【设计模式6】桥接模式
【设计模式1】单例模式
【设计模式2】工厂模式
【设计模式3】原型模式
【设计模式4】建造者模式
【设计模式5】适配器模式
【设计模式6】桥接模式
基本介绍
- 桥接模式(Bridge模式)是指:将实现与抽象放在两个不同的类层次中,使两个层次可以独立改变。
- 是一种结构型设计模式。
- Bridge模式基于类的最小设计原则,通过使用封装、聚合及继承等行为让不同的类承担不同的职责。它的主要特点是把抽象(Abstraction)与行为实现(Implementation)分离开来,从而可以保持各部分的独立性以及应对他们的功能扩展。
意图:将抽象部分与实现部分分离,使它们都可以独立的变化。
主要解决:在有多种可能会变化的情况下,用继承会造成类爆炸问题,扩展起来不灵活。
何时使用:实现系统可能有多个角度分类,每一种角度都可能变化。
如何解决:把这种多角度分类分离出来,让它们独立变化,减少它们之间耦合。
关键代码:抽象类依赖实现类。
模式的结构
桥接(Bridge)模式包含以下主要角色。
抽象化(Abstraction)角色:定义抽象类,并包含一个对实现化对象的引用。
扩展抽象化(Refined Abstraction)角色:是抽象化角色的子类,实现父类中的业务方法,并通过组合关系调用实现化角色中的业务方法。
实现化(Implementor)角色:定义实现化角色的接口,供扩展抽象化角色调用。
具体实现化(Concrete Implementor)角色:给出实现化角色接口的具体实现。
客户端:调用者

桥接模式实现代码
//调用者
public class BridgeClient {
    public static void main(String[] args) {
        Implementor imple = new ConcreteImplementorA();
        Abstraction abs = new RefinedAbstraction(imple);
        abs.Operation();
    }
}
//实现化角色
interface Implementor {
    public void OperationImpl();
}
//具体实现化角色
class ConcreteImplementorA implements Implementor {
    public void OperationImpl() {
        System.out.println("具体实现化(Concrete Implementor)角色被访问");
    }
}
//抽象化角色
abstract class Abstraction {
    protected Implementor imple;
    protected Abstraction(Implementor imple) {
        this.imple = imple;
    }
    public abstract void Operation();
}
//扩展抽象化角色
class RefinedAbstraction extends Abstraction {
    protected RefinedAbstraction(Implementor imple) {
        super(imple);
    }
    public void Operation() {
        System.out.println("扩展抽象化(Refined Abstraction)角色被访问");
        imple.OperationImpl();
    }
}
桥接模式的注意事项和细节
优点
- 实现了抽象和实现部分的分离,从而极大的提供了系统的灵活性,让抽象部分和实现部分独立开来,这有助于系统进行分层设计,从而产生更好的结构化系统。
- 对于系统的高层部分,只需要知道抽象部分和实现部分的接口就可以了,其它的部分由具体业务来完成。
- 桥接模式替代多层继承方案,可以减少子类的个数,降低系统的管理和维护成本。
缺点
- 桥接模式的引入增加了系统的理解和设计难度,由于聚合关联关系建立在抽象层,要求开发者针对抽象进行设计和编程
- 桥接模式要求正确识别出系统中两个独立变化的维度,因此其使用范围有一定的局限性,即需要有这样的应用场景。
使用场景
-
1,如果一个系统需要在构件的抽象化角色和具体化角色之间增加更多的灵活性,避免在两个层次之间建立静态的继承联系,通过桥接模式可以使它们在抽象层建立一个关联关系。
-
2,对于那些不希望使用继承或因为多层次继承导致系统类的个数急剧增加的系统,桥接模式尤为适用。
-
3,一个类存在两个独立变化的维度,且这两个维度都需要进行扩展。 对于两个独立变化的维度,使用桥接模式再适合不过了。
常见的应用场景:
-
-JDBC驱动程序
-
-银行转账系统
转账分类: 网上转账,柜台转账,AMT转账
转账用户类型:普通用户,银卡用户,金卡用户… -
-消息管理
消息类型:即时消息,延时消息
消息分类:手机短信,邮件消息,QQ消息…
java示例代码
桥接模式解决手机品牌和手机样式问题
UML类图

1,品牌:
//手机品牌
public interface PhoneBrand {

    //手机功能
    void open();

    void close();

    void call();
}
2,具体实现:
public class HuaWeiPhone implements PhoneBrand{
    @Override
    public void open() {
        System.out.println("hua wei phone open");
    }

    @Override
    public void close() {
        System.out.println("hua wei phone close");
    }

    @Override
    public void call() {
        System.out.println("hua wei phone calling");
    }
}

public class XiaoMiPhone implements PhoneBrand {
    @Override
    public void open() {
        System.out.println("xiao mi phone open");
    }

    @Override
    public void close() {
        System.out.println("xiao mi phone close");
    }

    @Override
    public void call() {
        System.out.println("xiao mi pone calling");
    }
}
3,抽象类:手机
//抽象类,手机
public abstract class Phone {
    //组合品牌
    private PhoneBrand brand;

    //构造器
    public Phone(PhoneBrand brand) {
        super();
        this.brand = brand;
    }

    //手机功能
    protected void open() {
        this.brand.open();
    }

    protected void close() {
        brand.close();
    }

    protected void call() {
        brand.call();
    }

}
4,抽象实现
//直立手机
public class FoldPhone extends Phone {

    public FoldPhone(PhoneBrand brand) {
        super(brand);
    }

    public void open() {
        super.open();
    }

    public void close() {
        super.close();
    }

    public void call() {
        super.call();
    }

}

//全面屏手机
public class FullScreenPhone extends Phone{

    public FullScreenPhone(PhoneBrand brand) {
        super(brand);
    }

    public void open(){
        super.open();
    }

    public void close(){
        super.close();
    }

    public void call(){
        super.call();
    }

}
5,调用:
public class Client {

    public static void main(String[] args) {

        //获取折叠式手机 (样式 + 品牌 )

        Phone phone1 = new FoldPhone(new XiaoMiPhone());

        phone1.open();
        phone1.call();
        phone1.close();

        System.out.println("=======================");

        Phone phone2 = new FoldPhone(new HuaWeiPhone());

        phone2.open();
        phone2.call();
        phone2.close();

        System.out.println("==============");

        Phone phone3 = new FullScreenPhone(new XiaoMiPhone());

        phone3.open();
        phone3.call();
        phone3.close();

        System.out.println("==============");

        Phone phone4 = new FullScreenPhone(new HuaWeiPhone());

        phone4.open();
        phone4.call();
        phone4.close();
    }
}
桥接模式在JDBC源码中的应用
我们对Driver接口一定不陌生。如果从桥接模式来看,Driver就是一个接口,下面可以有MySQL的Driver,Oracle的Driver,这些就可以当做实现接口类。那么我们现在来看看MySQL中的Driver类。
public class Driver extends NonRegisteringDriver implements java.sql.Driver {
    public Driver() throws SQLException {
    }

    static {
        try {
            DriverManager.registerDriver(new Driver());
        } catch (SQLException var1) {
            throw new RuntimeException("Can't register driver!");
        }
    }
}
特别简短的代码,其实只调用了DriverManager中的registerDriver方法来注册驱动。当驱动注册完成后,我们就会开始调用DriverManager中的getConnection方法了.
public class DriverManager {
    public static Connection getConnection(String url,
        String user, String password) throws SQLException {
        java.util.Properties info = new java.util.Properties();

        if (user != null) {
            info.put("user", user);
        }
        if (password != null) {
            info.put("password", password);
        }

        return (getConnection(url, info, Reflection.getCallerClass()));
    }

    private static Connection getConnection(
        String url, java.util.Properties info, Class<?> caller) throws SQLException {
        /*
         * When callerCl is null, we should check the application's
         * (which is invoking this class indirectly)
         * classloader, so that the JDBC driver class outside rt.jar
         * can be loaded from here.
         */
        ClassLoader callerCL = caller != null ? caller.getClassLoader() : null;
        synchronized(DriverManager.class) {
            // synchronize loading of the correct classloader.
            if (callerCL == null) {
                callerCL = Thread.currentThread().getContextClassLoader();
            }
        }

        if(url == null) {
            throw new SQLException("The url cannot be null", "08001");
        }

        println("DriverManager.getConnection(\"" + url + "\")");

        // Walk through the loaded registeredDrivers attempting to make a connection.
        // Remember the first exception that gets raised so we can reraise it.
        SQLException reason = null;

        for(DriverInfo aDriver : registeredDrivers) {
            // If the caller does not have permission to load the driver then
            // skip it.
            if(isDriverAllowed(aDriver.driver, callerCL)) {
                try {
                    println("    trying " + aDriver.driver.getClass().getName());
                    Connection con = aDriver.driver.connect(url, info);
                    if (con != null) {
                        // Success!
                        println("getConnection returning " + aDriver.driver.getClass().getName());
                        return (con);
                    }
                } catch (SQLException ex) {
                    if (reason == null) {
                        reason = ex;
                    }
                }

            } else {
                println("    skipping: " + aDriver.getClass().getName());
            }

        }

        // if we got here nobody could connect.
        if (reason != null)    {
            println("getConnection failed: " + reason);
            throw reason;
        }

        println("getConnection: no suitable driver found for "+ url);
        throw new SQLException("No suitable driver found for "+ url, "08001");
    }
 }
}
上面是简化的代码,可以看到需要返回的是Connection对象。在Java中通过Connection提供给各个数据库一样的操作接口,这里的Connection可以看作抽象类。可以说我们用来操作不同数据库的方法都是相同的,不过MySQL有自己的ConnectionImpl类,同样Oracle也有对应的实现类。这里Driver和Connection之间是通过DriverManager类进行桥接的,不是像我们上面说的那样用组合关系来进行桥接。
如下面UML类图

桥接模式与适配器模式
适配器模式与桥接模式的区别和联系
适配器模式和桥接模式都是间接引用对象,因此可以使系统更灵活,在实现上都涉及从自身以外的一个接口向被引用的对象发出请求。
两种模式的区别在于使用场合的不同,适配器模式主要解决两个已经有接口间的匹配问题,这种情况下被适配的接口的实现往往是一个黑匣子。我们不想,也不能修改这个接口及其实现。同时也不可能控制其演化,只要相关的对象能与系统定义的接口协同工作即可。适配器模式经常被用在与第三方产品的功能集成上,采用该模式适应新类型的增加的方式是开发针对这个类型的适配器,如下图所示:

桥接模式则不同,参与桥接的接口是稳定的,用户可以扩展和修改桥接中的类,但是不能改变接口。桥接模式通过接口继承实现或者类继承实现功能扩展。如下图所示:

按照GOF的说法,桥接模式和适配器模式用于设计的不同阶段,桥接模式用于设计的前期,即在设计类时将类规划为逻辑和实现两个大类,是他们可以分别精心演化;而适配器模式用于设计完成之后,当发现设计完成的类无法协同工作时,可以采用适配器模式。然而很多情况下在设计初期就要考虑适配器模式的使用,如涉及到大量第三方应用接口的情况。
适配器模式与桥接模式的联合
在实际应用中,桥接模式经常和适配器模式同时出现,如下图所示:

这种情况经常出现在需要其他系统提供实现方法时,一个典型的例子是工业控制中的数据采集。不同工控厂家提供的底层数据采集接口通常不同,因此在做上层软件设计无法预知可能遇到何种接口。为此需要定义一个通用的采集接口,然后针对具体的数据采集系统开发相应的适配器。数据存储需要调用数据采集接口获得的数据,而数据可以保存到关系数据库、实时数据库或者文件中,。数据存储接口和数据采集结构成了桥接,如下图所示:

同样的结构也经常出现在报表相关的应用中,报表本身结构和报表输出方式完全可以分开,如下图所示:
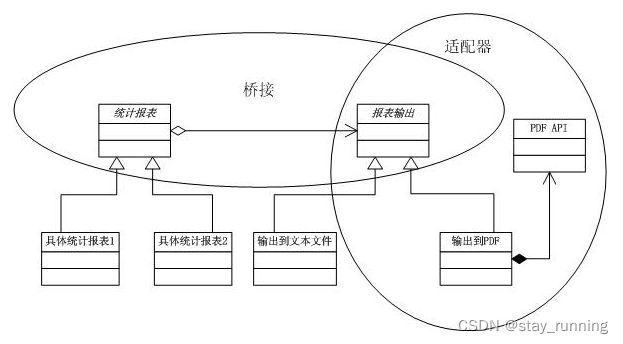
如上图所示,报表输出可以单独抽象出来与报表的具体形式分开。但报表输出又依赖于具体的输出方式,如果需要输出为PDF格式,则需要调用与PDF相关的API,而这是设计所无法控制的,因此这里需要适配器模式。