Linux0.11内核源码解析-bootsect.s
学习资料:
Linux内核完全注释
操作系统真像还原
极客时间-Linux内核源码趣读
Linux0.11内核源码
->上电
->80x86架构CPU会自动进入实模式
->从地址0xffff0自动执行程序代码
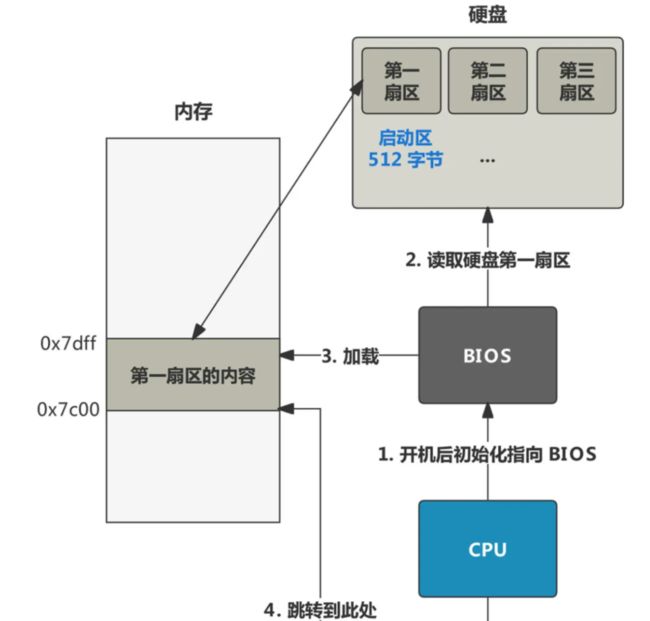
->bios执行系统检测,从物理地址0初始化中断向量,将第一个引导扇区512字节读入内存绝对地址0x7c00(BIOS把512字节的二进制数据从硬盘搬到内存中,作为操作系统的开发人员,我们只需要把代码放到0盘0磁道1扇区即可,对应的代码是bootsect.s)
->跳转到0x7c00(31KB)
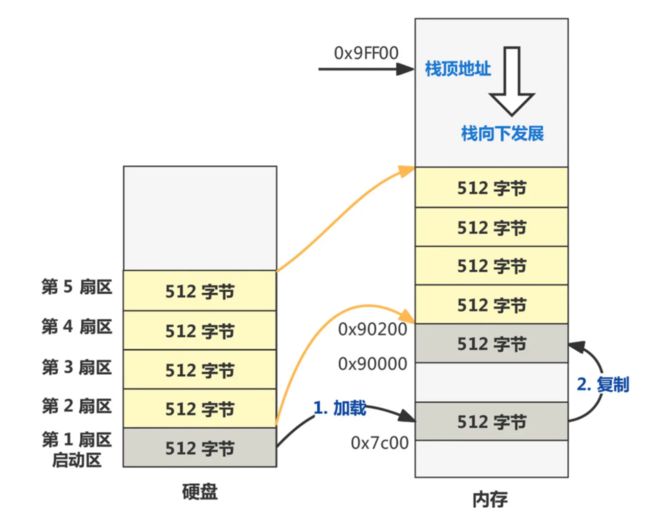
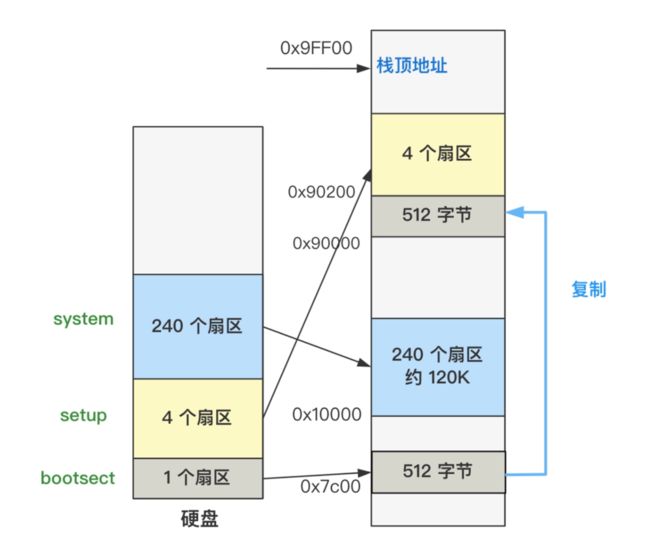
->0x7c00当被执行的时候会把自己搬到0x90000(576KB)处,并把启动设备中后2KB代码(setup.s)读到0x90200处
# ROOT_DEV:    0x000 - same type of floppy as boot. 根文件系统设备使用与引导同样的软驱设备
#        0x301 - first partition on first drive etc 根文件系统设备在第一个硬盘的第一个分区上
#        0x300  /dev/hd0
#        0x301 /dev/hd1
#        ...
#        0x304 /dev/hd4
#        0x305 /dev/hd5 第二个硬盘
#        0x306 /dev/hd6 第二个硬盘第一个分区
    .equ ROOT_DEV, 0x301
    ljmp    $BOOTSEG, $_start

_start:
 # ds = 0x07c0
    mov    $BOOTSEG, %ax
    mov    %ax, %ds

    # es = 0x9000
    mov    $INITSEG, %ax
    mov    %ax, %es

    # move 256 word from 0x7c00(DS:SI) to 0x9000(ES:DI)
  #ds:si=0x07c0:0x0000
  #es:di=0x9000:0x0000
    mov    $256, %cx
    sub    %si, %si
    sub    %di, %di
    rep
    movsw
    #间接跳转0x9000
    ljmp    $INITSEG, $go

# 代码段移动后,重新设置堆栈段
go:    mov    %cs, %ax
    mov    %ax, %ds
    mov    %ax, %es
# put stack at 0x9ff00.
    # cs=0x9000 ss=0x9000 sp=0xff00
    mov    %ax, %ss
    mov    $0xFF00, %sp        # arbitrary value >>512
int 0x13
功能02H
功能描述:读扇区
入口参数:AH=02H
AL=扇区数
CH=柱面
CL=扇区
DH=磁头
DL=驱动器,00H~7FH:软盘;80H~0FFH:硬盘
ES:BX=缓冲区的地址
功能00H
功能描述:磁盘系统复位
入口参数:AH=00H
DL=驱动器,00H~7FH:软盘;80H~0FFH:硬盘
出口参数:CF=0——操作成功,AH=00H,否则,AH=状态代码,参见功能号01H中的说明
load_setup:
    mov    $0x0000, %dx        # drive 0, head 0
    mov    $0x0002, %cx        # from sector 2, track 0
    mov    $0x0200, %bx        # address = 512, in INITSEG
    .equ    AX, 0x0200+4        # read 4 sector
    mov     $AX, %ax        # service 2, nr of sectors
    int    $0x13            # read it
    jnc    ok_load_setup        # ok - continue
    mov    $0x0000, %dx
    mov    $0x0000, %ax        # reset the diskette
    int    $0x13
    jmp    load_setup
功能08H
功能描述:读取驱动器参数
入口参数:AH=08H
DL=驱动器,00H~7FH:软盘;80H~0FFH:硬盘
出口参数:CF=1——操作失败,AH=状态代码,参见功能号01H中的说明,否则, BL=01H — 360K
=02H — 1.2M
=03H — 720K
=04H — 1.44M
CH=柱面数的低8位
CL的位7-6=柱面数的该2位
CL的位5-0=扇区数
DH=磁头数
DL=驱动器数
ES:DI=磁盘驱动器参数表地址
ok_load_setup:

# Get disk drive parameters, specifically nr of sectors/track

    mov    $0x00, %dl
    mov    $0x0800, %ax        # AH=8 is get drive parameters
    int    $0x13
    mov    $0x00, %ch
    #seg cs
    mov    %cx, %cs:sectors+0    # %cs means sectors is in %cs   保存磁道扇区数
    mov    $INITSEG, %ax
    mov    %ax, %es #磁盘参数中断改掉了es的值,恢复es寄存器
# 后续装载系统模块需要装载240个扇区,是之前装载扇区数量的60倍,在此处显示一条信息提示用户等待
# Print some inane message

    mov    $0x03, %ah        # read cursor pos
    xor    %bh, %bh
    int    $0x10

    mov    $24, %cx
    mov    $0x0007, %bx        # page 0, attribute 7 (normal)
    #lea    msg1, %bp
    mov     $msg1, %bp
    mov    $0x1301, %ax        # write string, move cursor
    int    $0x10
把system 240个扇区拷贝到0x10000,关闭软驱电机
# ok, we've written the message, now
# we want to load the system (at 0x10000)

    mov    $SYSSEG, %ax
    mov    %ax, %es        # segment of 0x010000
    call    read_it
    call    kill_motor
检查要使用哪个根文件系统设备,如果指定了设备!=0,就直接使用指定设备,否则根据BIOS报告的磁道扇区数来确定是用那个设备
跳转setup.s 0x90200
# After that we check which root-device to use. If the device is
# defined (#= 0), nothing is done and the given device is used.
# Otherwise, either /dev/PS0 (2,28) or /dev/at0 (2,8), depending
# on the number of sectors that the BIOS reports currently.

    #seg cs
    mov    %cs:root_dev+0, %ax  # Root Device根文件系统设备
    cmp    $0, %ax  # 判断根设备号是否为0
    jne    root_defined # ZF = 0时跳转,即ax不为0时,即根设备已设置
    #seg cs
# 根设备未设置
    mov    %cs:sectors+0, %bx
    mov    $0x0208, %ax        # /dev/ps0 - 1.2Mb
    cmp    $15, %bx  # 取上面获取到每磁道扇区数,如果sectors=15则说明是1.2Mb的驱动器
    je    root_defined
    mov    $0x021c, %ax        # /dev/PS0 - 1.44Mb
    cmp    $18, %bx # 取上面获取到每磁道扇区数,如果sectors=18则说明是1.44Mb的软驱
    je    root_defined
undef_root:  # down机
    jmp undef_root
root_defined:
    #seg cs
    mov    %ax, %cs:root_dev+0

# after that (everyting loaded), we jump to
# the setup-routine loaded directly after
# the bootblock:

    ljmp    $SETUPSEG, $0
如果ES在64k,0x1000边界上,就立刻停止
# This routine loads the system at address 0x10000, making sure
# no 64kB boundaries are crossed. We try to load it as fast as
# possible, loading whole tracks whenever we can.
#
# in:    es - starting address segment (normally 0x1000)
#
sread:    .word 1+ SETUPLEN    # sectors read of current track
head:    .word 0            # current head
track:    .word 0            # current track

read_it:
    mov    %es, %ax
    test    $0x0fff, %ax #  TEST指令按位进行逻辑与运算,与AND指令的区别是两个操作数不会被改变
die:    jne     die            # es must be at 64kB boundary
    xor     %bx, %bx        # bx is starting address within segment

rp_read:
    mov     %es, %ax
    cmp     $ENDSEG, %ax        # have we loaded all yet?
    jb    ok1_read
    ret

# 计算和验证当前磁道需要读取的扇区数,放在ax寄存器中,根据当前磁道未读取的扇区数以及段内数据字节开始偏移位置,
# 计算如果全部读取这些未读扇区,所读总字节数是否超过64KB段长度的限制,若会超过,则根据此次最多读入的字节数(64KB-段内偏移位置),反算出此次需要读取的扇区数
ok1_read:
    #seg cs
    mov    %cs:sectors+0, %ax # 获取磁道扇区数
    sub    sread, %ax # 减去当前磁道已读扇区数
    mov    %ax, %cx # cx = ax = 当前磁道未读扇区数
    shl    $9, %cx  # cx = cx * 512
    add    %bx, %cx # cx = cx + bx段内当前偏移值
    jnc     ok2_read # 没有超过64KB字节,则跳转ok2_read
    je     ok2_read
    xor     %ax, %ax #  加上此次将读磁道上所有未读扇区时会超过64KB
    sub     %bx, %ax # 此时最多能读入字节数(64KB-段内读偏移位置),再转换
    shr     $9, %ax # 读取扇区数

ok2_read:
    call     read_track
    mov     %ax, %cx # 该次操作已读扇区数
    add     sread, %ax # 当前磁道上已经读取的扇区数
    #seg cs
    cmp     %cs:sectors+0, %ax # 如果当前磁道上的还有扇区未读,则跳转到ok3_read
    jne     ok3_read # 读该磁道的下一磁头面上的数据,如果已经完成,则去读下一磁道
    mov     $1, %ax
    sub     head, %ax # 判断当前磁头号
    jne     ok4_read # 如果是0磁头号,则再去读1磁头面上的扇区数据
    incw    track # 否则去读下一磁道

ok4_read:
    mov    %ax, head # 保存当前磁头号
    xor    %ax, %ax # 清当前磁道已读扇区数

ok3_read:
    mov    %ax, sread # 保存当前磁道已读扇区
    shl    $9, %cx # 上次已读扇区数*512字节
    add    %cx, %bx # 调整当前段数据开始位置
    jnc    rp_read # 小于64KB边界值,则跳转到rp_read,继续读数据
    mov    %es, %ax  # 否则调整当前段,为读下一段数据作准备
    add    $0x1000, %ax # 将段基址指向为下一个64KB内存开始处
    mov    %ax, %es
    xor    %bx, %bx # 清段内数据开始偏移值
    jmp    rp_read

# 读当前磁道上指定开始扇区和需读扇区数的数据到es:bx,参见第67行下对BIOS磁盘读中断
# int 0x13, ah=2
# al 需读扇区数;es:bx 缓冲区开始位置
read_track:
    push    %ax
    push    %bx
    push    %cx
    push    %dx
    mov    track, %dx # 取当前磁道
    mov    sread, %cx # 取当前磁道上已读扇区数
    inc    %cx # cl开始读扇区
    mov    %dl, %ch # ch当前磁道号
    mov    head, %dx # 取当前磁头号
    mov    %dl, %dh # dh 磁头号
    mov    $0, %dl # dl 磁动器号,0表示当前A驱动器
    and    $0x0100, %dx # 磁头号大于1
    mov    $2, %ah # ah = 2,读磁盘扇区功能号
    int    $0x13
    jc    bad_rt # 出错则跳转bad_rt
    pop    %dx
    pop    %cx
    pop    %bx
    pop    %ax
    ret

# 执行驱动器复位操作,再跳转到read_track重试
bad_rt:    mov    $0, %ax
    mov    $0, %dx
    int    $0x13
    pop    %dx
    pop    %cx
    pop    %bx
    pop    %ax
    jmp    read_track

#/*
# * This procedure turns off the floppy drive motor, so
# * that we enter the kernel in a known state, and
# * don't have to worry about it later.
# */
kill_motor:
    push    %dx
    mov    $0x3f2, %dx
    mov    $0, %al
    outsb
    pop    %dx
    ret

sectors:
    .word 0

msg1:
    .byte 13,10
    .ascii "Loading system ..."
    .byte 13,10,13,10

    .org 508
root_dev:
    .word ROOT_DEV
boot_flag:
    .word 0xAA55
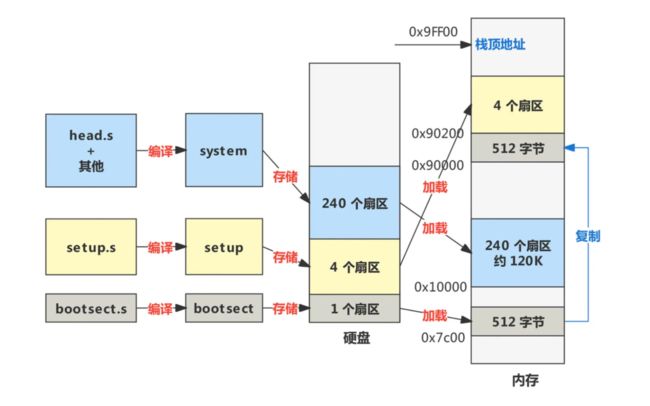
1. 把 bootsect.s 编译成 bootsect 放在硬盘的 1 扇区;2. 把 setup.s 编译成 setup 放在硬盘的 2~5 扇区;3. 把剩下的全部代码(head.s 作为开头,与各种 .c 和其他 .s 等文件一起)编译并链接成 system,放在硬盘的随后 240 个扇区
为什么不把系统模块直接加载到物理地址0x0000处运行,而要在setup中进行移动,这是因为setup程序代码开始部分需要利用BIOS的中断获取机器的一些参数,BIOS初始化的时候会在物理内存开始处放置大小为0x400字节(1kb)的中断向量表,因此需要在BIOS中断调用后才能将这个区域覆盖掉。


