k8s网络方案-calico
一、k8s网络通信模型
k8s的网络中主要存在四种类型的通信:
- 同一pod内的容器间通信
- pod与pod之间的通信
- pod与service间的通信
- Internet同service之间的通信
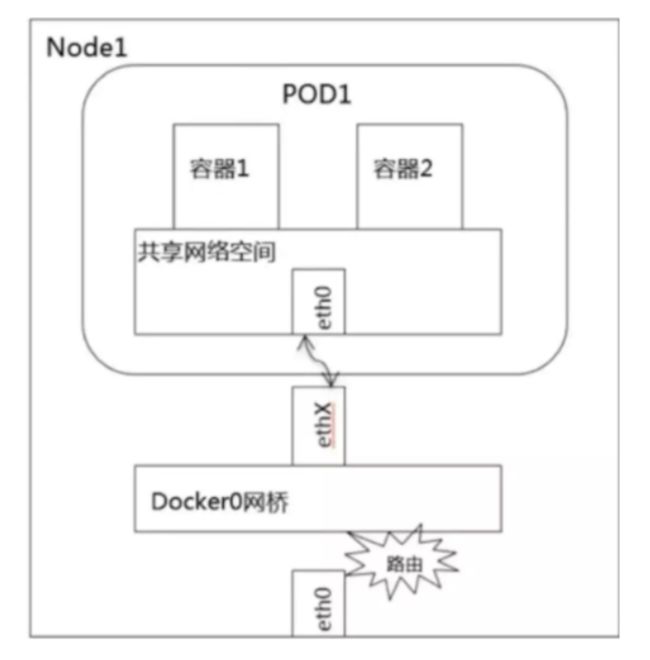
1, 同一pod内的容器间通信
同一pod内的容器共享同一个网络命名空间,所以可以直接通过lo直接通信
2, pod与pod之间的通信
又分为:
- 同node上pod之间通信
- 不同node上的pod之间通信
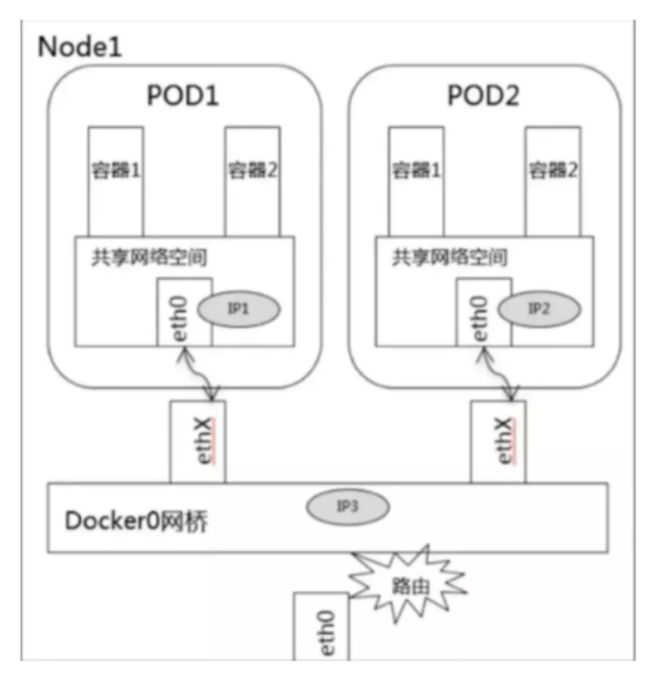
同node上pod之间通信
- 不同pod都有独立的IP,可以直接通信
- 它们在同一个网段上,通过Docker0网桥实现通信
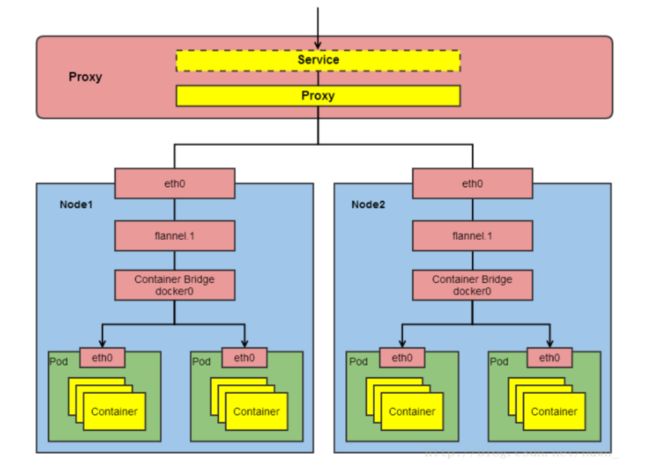
不同node上pod之间的通信
- 可以使用Overlay Network(叠加网络,二层报文或三层隧道报文)进行通信

3, pod与service间的通信
-
Service都会生成一个虚拟IP,称为Service-IP,
-
Kube-porxy组件负责实现Service-IP路由和转发,在overlay network之上又实现了虚拟转发网络
Kube-porxy实现了以下功能:
- 转发访问Service的Service-IP的请求到Endpoints(即Pod-IP)。
- 监控Service和Endpoints的变化,实时刷新转发规则。
- 负载均衡能力。
iptables实现

IPVS实现

4, Internet同service之间的通信
分为以下两种情况:
-
从k8s的service访问Internet
-
从Internet访问k8s的service
从k8s的service访问Internet
步骤:
- 将pod-IP进行SNAT转换为node-IP
- node-IP通过网关指向路由器将包给路由器
- 路由器SNAT成路由器公网IP出去访问Internet
- 包回来给路由器公网IP
- 由路由器自动DNAT给node-IP
- 由node自动DNAT给pod-IP
说明: 和以前学习的虚拟机NAT上外网,云主机NAT上外网过程一致。
从Internet访问k8s的service
让Internet流量进入k8s集群,可分为:
- NodePort
- LoadBalancer
- Ingress控制器
- pod的
hostnetwork: True或hostPort

二、k8s网络分层
通过以上章节内容可将k8s网络分层为:
1, Internet : 外部网络 ( 严格来说,internet不属于k8s集群网络 )
2, node网络: 各主机(master、node、etcd等)自身所属的网络,物理网卡配置的网络
3, service网络: 虚拟网络
4, pod网络: 虚拟网络
三、k8s网络解决方案
CNI
CNI(container network interface)是容器网络接口
- 是K8s中提供的一种通用网络标准规范,因为k8s本身不提供网络解决方案
- 以插件方式使用, 为用户在pod创建或者销毁时动态配置网络
CNI插件的三种使用模式
- overlay 通过隧道通信
- 路由 通过路由通信
- underlay 直接使用底层网络的IP,与宿主机在同一个网络里进行通讯
| Overlay | L3 Routing | Underlay | |
|---|---|---|---|
| 描述 | 把二层报文封装在IP报文之上进行传输 | 通过三层路由的方式向IP报文传输到目的宿主机 | 直接使用底层网络的IP,与宿主机在同一个网络里进行通讯 |
| 网络要求 | 低:IP可达 | 二层可达或BGP可达 | 二层可达/交换机支持 |
| 性能 | 中:封包、拆包 | 高:路由转发 | 高:几乎没有损耗 |
| IP类型 | 虚拟IP | 虚拟IP | 物理IP |
| 集群外访问 | Ingress/NodePort | Ingress/NodePort | Ingress/NodePort |
| 访问控制 | Network Policy | Network Policy | Iptables/外部网络 |
| 静态IP | 不支持 | 不支持 | 支持 |
| 场景 | 对性要求不高的;网络环境不灵活的 | 大多数场景 | 对性能要求高的,需要和现有业务直接通信,需要静态IP |
| 开源产品 | flannel-vxlan,openshift-sdn | calico,flannel-hostgw | Macvlan/IPvlan |
选择网络方案需要考虑的维度
- 网络配置:给Pod、Service提供IP地址
- 网络策略:通过提供网络策略添加网络规则,实现网络隔离(多租户场景下非常有必要)
常见网络方案对比
- flannel 仅支持网络配置
- calico 支持网络配置及网络策略,三层BGP网络
- canel 使用calico提供网络策略,使用flannel提供网络配置
[root@master1 ~]# ls /etc/cni/net.d/
10-calico.conflist  calico-kubeconfig  calico-tls
[root@master1 ~]# which calico
/opt/kube/bin/calico
四、calico网络
官方网站: https://www.projectcalico.org/
calico设计优势
1, 更优的资源利用
- 二层网络通讯需要依赖广播消息机制,广播消息的开销与 host 的数量呈指数级增长,Calico 使用的三层路由方法,则完全抑制了二层广播,减少了资源开销。
- 二层网络使用 VLAN 隔离技术,有 4096 个规格限制,即便可以使用 vxlan 解决,但 vxlan 又带来了隧道开销的新问题。而 Calico 不使用 vlan 或 vxlan 技术,使资源利用率更高。
2, 可扩展性
- Calico 使用与 Internet 类似的方案,Internet 的网络比任何数据中心都大,Calico 同样天然具有可扩展性。
3, 简单而更容易 debug
- 因为没有隧道,意味着 workloads 之间路径更短更简单,配置更少,在 host 上更容易进行 debug 调试。
4. 更少的依赖
- Calico 仅依赖三层路由可达。
5, 可适配性
- Calico 较少的依赖性使它能适配所有 VM、Container、白盒或者混合环境场景。
优势总结:
- 由于Calico是一种纯三层的实现,因此可以避免与二层方案相关的数据包封装的操作,中间没有任何的NAT,没有任何的overlay,所以它的转发效率非常高.
- 因为它的包直接走原生TCP/IP的协议栈,它的隔离也因为这个栈而变得好做。因为TCP/IP的协议栈提供了一整套的防火墙的规则,所以它可以通过IPTABLES的规则达到比较复杂的隔离逻辑。
Calico架构图

Calico主要工作组件
1,Felix: 运行在每一台Host的agent进程,主要负责网络接口管理和监听、路由、ARP 管理、ACL 管理和同步、状态上报等。
[root@master1 ~]# ps -ef |grep felix |grep -v grep
root      8712  7527  0 12:06 ?        00:00:00 runsv felix
root      8723  8712  5 12:06 ?        00:30:24 calico-node -felix
其它节点上都可查到相关进程
2,etcd: 分布式键值存储,主要负责网络元数据一致性,确保Calico网络状态的准确性,可以与kubernetes共用;
3,BGP Client(BIRD):Calico 为每一台 Host 部署一个BGP Client,使用BIRD实现,BIRD 是一个单独的持续发展的项目,实现了众多动态路由协议比如 BGP、OSPF、RIP 等。在 Calico 的角色是监听 Host 上由 Felix 注入的路由信息,然后通过 BGP 协议广播告诉剩余 Host 节点,从而实现网络互通。
4,BGP Route Reflector:在大型网络规模中,如果仅仅使用 BGP client 形成 mesh 全网互联的方案就会导致规模限制,因为所有节点之间俩俩互联,需要 N^2 个连接,为了解决这个规模问题,可以采用 BGP 的 Router Reflector 的方法,使所有 BGP Client 仅与特定 RR 节点互联并做路由同步,从而大大减少连接数。
calico通迅协议
calico主要通过两种协议来实现通信
- ipip协议 通过ipip隧道作为通信基础
- bgp协议 纯三层的路由交换
bgp协议主要由两种方式:
- BGP Speaker 全互联模式(node-to-node mesh)
- 网络成网状,两两互联,适合小规模集群
- BGP Speaker 路由反射模式(Route Reflector)
- BGP Speaker连接到一个或多个中心BGP Speaker,网络成星状。适合大规模节点集群
五、calicoctl工具
安装calicoctl工具
[root@master1 ~]# wget https://github.com/projectcalico/calicoctl/releases/download/v3.16.5/calicoctl-linux-amd64

[root@master1 ~]# mv calicoctl-linux-amd64 /bin/calicoctl
[root@master1 ~]# chmod a+x /bin/calicoctl
如果是kubeasz安装时选择了calico方案,默认就已经有calicoctl命令了
[root@master1 ~]# which calicoctl
/opt/kube/bin/calicoctl
查看calico节点信息
[root@master1 ~]# calicoctl get node
NAME
master1
master2
node1
node2
查看calico节点详细信息
[root@master1 ~]# calicoctl get node -o yaml
......
......
查看当前ip池
[root@master1 ~]# calicoctl get ippool
NAME                  CIDR          SELECTOR
default-ipv4-ippool   10.3.0.0/16   all()
查看当前网络模式
[root@master1 ~]# calicoctl node status
Calico process is running.

IPv4 BGP status
+----------------+-------------------+-------+----------+-------------+
|  PEER ADDRESS  |     PEER TYPE     | STATE |  SINCE   |    INFO     |
+----------------+-------------------+-------+----------+-------------+
| 192.168.122.12 | node-to-node mesh | up    | 04:06:47 | Established |
| 192.168.122.13 | node-to-node mesh | up    | 04:07:56 | Established |
| 192.168.122.14 | node-to-node mesh | up    | 04:06:37 | Established |
+----------------+-------------------+-------+----------+-------------+

IPv6 BGP status
No IPv6 peers found.
可以看到使用的是BGP的node-to-node mesh模式
[root@master1 ~]# netstat -anp | grep ESTABLISH | grep bird
tcp        0      0 192.168.122.11:179      192.168.122.13:39842    ESTABLISHED 8955/bird
tcp        0      0 192.168.122.11:179      192.168.122.14:54717    ESTABLISHED 8955/bird
tcp        0      0 192.168.122.11:179      192.168.122.12:59785    ESTABLISHED 8955/bird
我的k8s集群是4个节点,所以每个节点上能看到3个连接。(证明了节点之间是两两连接)
六、calico网络策略
网络策略介绍
参考: https://kubernetes.io/zh/docs/concepts/services-networking/network-policies/
网络策略就是对网络进行隔离和限制。
CNI插件可以实现不同Node节点的Pod互通问题,这整个就是一个扁平化的网络。但是如果遇到以下场景呢?
- 多租户网络环境隔离
- 不同环境之间的隔离,如: 开发环境namespace与测试环境namespace之间的隔离
- 应用程序间的访问控制。例如微服务A允许访问微服务B,却不能访问微服务C等
- 当Pod暴露到外部时,需要做Pod黑白名单
这时候网络策略就派上用场了。
网络策略就相当于把iptables防火墙规则做成了YAML资源,只要iptables会玩,网络策略就不难。
以官方一个YAML例子做讲解:
apiVersion: networking.k8s.io/v1
kind: NetworkPolicy
metadata:
  name: test-network-policy
  namespace: default					# 代表此策略对default这个namespace生效(还要看下面的podSelector)
spec:
  podSelector:
    matchLabels:
      role: db							# 代表此策略对default这个namespace里的带有role=db标签的pod才生效
  policyTypes:
  - Ingress							    # 相当于iptables -P INPUT DROP,做成进入流量全拒绝
  - Egress								# 相当于iptables -P OUTPUT DROP,做成出去流量全拒绝
  ingress:								# 在双链接拒绝的情况下配置的进入白名单
  - from:
    - ipBlock:							# 以ip段的方式配置的白名单
        cidr: 172.17.0.0/16				# 允许的IP段
        except:
        - 172.17.1.0/24					# 允许的IP段基础上再拒绝的IP段或IP
    - namespaceSelector:				# 以namespace的标签配置的白名单
        matchLabels:
          project: myproject			# 允许带有project=myproject标签的namespace里的所有pod
    - podSelector:
        matchLabels:
          role: frontend				# 允许相同namespace里的带有role=frontend标签的pod
    ports:
    - protocol: TCP
      port: 6379						# 相当于一个端口的过滤条件。上面三种白名单都只能访问目标tcp:6379端口
  egress:								# 在双链接拒绝的情况下配置的出去白名单
  - to:
    - ipBlock:
        cidr: 10.0.0.0/24
    ports:
    - protocol: TCP
      port: 5978
namespace拒绝进入流量
1,创建两个命名空间
[root@master1 ~]# kubectl create ns dev
namespace/dev created

[root@master1 ~]# kubectl create ns test
namespace/test created
2,分别运行一个pod
[root@master1 ~]# kubectl run nginx1 --image=nginx:1.15-alpine -n dev
pod/nginx1 created
[root@master1 ~]# kubectl run nginx2 --image=nginx:1.15-alpine -n test
pod/nginx2 created
3, 查看两个pod的IP
[root@master1 ~]# kubectl get pods -o wide -n dev
NAME     READY   STATUS    RESTARTS   AGE     IP           NODE             NOMINATED NODE   READINESS GATES
nginx1   1/1     Running   0          8m33s   10.3.104.4   192.168.122.14

[root@master1 ~]# kubectl get pods -o wide -n test
NAME     READY   STATUS    RESTARTS   AGE     IP             NODE             NOMINATED NODE   READINESS GATES
nginx2   1/1     Running   0          8m26s   10.3.166.139   192.168.122.13
4, 验证不同命名空间两个pod可以互通
[root@master1 ~]# kubectl exec -it nginx1 -n dev -- ping -c 2 10.3.166.139
PING 10.3.166.139 (10.3.166.139): 56 data bytes
64 bytes from 10.3.166.139: seq=0 ttl=62 time=1.454 ms
64 bytes from 10.3.166.139: seq=1 ttl=62 time=0.891 ms
[root@master1 ~]# kubectl exec -it nginx2 -n test -- ping -c 2 10.3.104.4
PING 10.3.104.4 (10.3.104.4): 56 data bytes
64 bytes from 10.3.104.4: seq=0 ttl=62 time=1.094 ms
64 bytes from 10.3.104.4: seq=1 ttl=62 time=4.969 ms
5,对dev命名空间创建网络策略(拒绝所有进入流量,允许所有出去流量)
[root@master1 ~]# vim dev-netpolicy.yaml
apiVersion: networking.k8s.io/v1
kind: NetworkPolicy
metadata:
  name: dev-netpolicy
spec:
  podSelector: {}			#  任意pod
  policyTypes:
  - Ingress					#  ingress代表进入

[root@master1 ~]# kubectl apply -f ingress-deny.yaml -n dev
networkpolicy.networking.k8s.io/dev-netpolicy created


[root@master1 ~]# kubectl get netpol -n dev
NAME               POD-SELECTOR   AGE
dev-netpolicy               9s
6, 验证dev的pod可以ping通test的pod(对于dev来说,可以出去)
[root@master1 ~]# kubectl exec -it nginx1 -n dev -- ping -c 2 10.3.166.139
PING 10.3.166.139 (10.3.166.139): 56 data bytes
64 bytes from 10.3.166.139: seq=0 ttl=62 time=0.345 ms
64 bytes from 10.3.166.139: seq=1 ttl=62 time=0.690 ms
7, 验证test的pod不能ping通dev的pod(对于dev来说,拒绝进入)
[root@master1 ~]# kubectl exec -it nginx2 -n test -- ping -c 2 10.3.104.4
PING 10.3.104.4 (10.3.104.4): 56 data bytes
namespace拒绝进出所有流量
1,修改yaml并应用
[root@master1 ~]# vim dev-netpolicy.yaml
apiVersion: networking.k8s.io/v1
kind: NetworkPolicy
metadata:
  name: dev-netpolicy
spec:
  podSelector: {}
  policyTypes:
  - Ingress
  - Egress		 		# 加1个Egress代表出, 其它不变
[root@master1 ~]# kubectl apply -f ingress-deny.yaml -n dev
networkpolicy.networking.k8s.io/dev-netpolicy configured	   # apply后在原基础上修改了配置
2,验证( 对于dev命名空间来说,进入与出去都拒绝)
出去ping不通
[root@master1 ~]# kubectl exec -it nginx1 -n dev -- ping -c 2 10.3.166.139
PING 10.3.166.139 (10.3.166.139): 56 data bytes
进入ping不通
[root@master1 ~]# kubectl exec -it nginx2 -n test -- ping -c 2 10.3.104.4
PING 10.3.104.4 (10.3.104.4): 56 data bytes
通过IP段与label定义策略
1, dev命名空间再创建一个名为nginx3的pod,test命名空间再创建一个名为nginx4的pod
[root@master1 ~]# kubectl run nginx3 --image=nginx:1.15-alpine -n dev
pod/nginx3 created

[root@master1 ~]# kubectl run nginx4 --image=nginx:1.15-alpine -n test
pod/nginx4 created
2, 为dev命名空间名为nginx1的pod打一个标记
[root@master1 haha]# kubectl label pod nginx1 app=nginx1 -n dev
pod/nginx1 labeled
3, 修改策略并应用
[root@master1 ~]# vim dev-netpolicy.yaml
apiVersion: networking.k8s.io/v1
kind: NetworkPolicy
metadata:
  name: dev-netpolicy
spec:
  podSelector:
    matchLabels:
      app: nginx1				# 匹配pod的标签
  policyTypes:
  - Ingress
  - Egress						# 双链拒绝
  ingress:
  - from:
    - ipBlock:				    # IP地址块
        cidr: 10.3.0.0/16		# 允许的IP段
        except:
          - 10.3.166.139/32		# 在允许的IP段中拒绝的IP(必须加掩码32位),这个IP是test命名空间的nginx2的pod-ip
[root@master1 ~]# kubectl apply -f dev-netpolicy.yaml -n dev
networkpolicy.networking.k8s.io/dev-netpolicy configured

[root@master1 ~]# kubectl get netpol -n dev
NAME               POD-SELECTOR   AGE
dev-netpolicy       app=nginx1    85m
说明: 总的意思就是dev命名空间中带有app=nginx1标签的pod,允许10.3.0.0/16网段进来,但拒绝10.3.166.139进来
4, 确认nginx1与nginx3的pod-IP
[root@master1 ~]# kubectl get pods -o wide -n dev
NAME     READY   STATUS    RESTARTS   AGE    IP           NODE          NOMINATED NODE   READINESS GATES
nginx1   1/1     Running   0          134m   10.3.104.4   192.168.122.14
nginx3   1/1     Running   0          20m    10.3.104.5   192.168.122.14
5, 验证
- test命名空间的nginx4可以ping通dev命名空间的nginx1
[root@master1 ~]# kubectl exec -it nginx4 -n test -- ping -c 2 10.3.104.4
PING 10.3.104.4 (10.3.104.4): 56 data bytes
64 bytes from 10.3.104.4: seq=0 ttl=63 time=0.146 ms
64 bytes from 10.3.104.4: seq=1 ttl=63 time=0.150 ms
- 但test命名空间的nginx2可以ping不通dev命名空间的nginx1(因为策略拒绝了)
[root@master2 ~]# kubectl exec -it nginx2 -n test -- ping -c 2 10.3.104.4
PING 10.3.104.4 (10.3.104.4): 56 data bytes
- 但test命名空间的nginx2又可以ping通dev命名空间的nginx3(因为只有nginx1才带有app=nginx1标签, nginx3不带此标签)
[root@master2 ~]# kubectl exec -it nginx2 -n test -- ping -c 2 10.3.104.5
PING 10.3.104.5 (10.3.104.5): 56 data bytes
64 bytes from 10.3.104.5: seq=0 ttl=62 time=0.507 ms
64 bytes from 10.3.104.5: seq=1 ttl=62 time=0.749 ms
同namespace通过label访问
1,修改策略并应用
[root@master1 ~]# vim dev-netpolicy.yaml
apiVersion: networking.k8s.io/v1
kind: NetworkPolicy
metadata:
  name: dev-netpolicy
spec:
  podSelector:
    matchLabels:
      app: nginx1					# 只能访问app=nginx1标签的pod
  policyTypes:
  - Ingress
  - Egress
  ingress:
  - from:
    - podSelector:
        matchLabels:
          access_nginx1: "true"		# 表示只有带有access_nginx1=true标签的pod才能访问(同namespace下)
[root@master1 ~]# kubectl apply -f dev-netpolicy.yaml -n dev
networkpolicy.networking.k8s.io/dev-netpolicy configured
2, 验证: 同namespace下的nginx3 ping不通nginx1
[root@master2 ~]# kubectl exec -it nginx3 -n dev -- ping -c 2 10.3.104.4
PING 10.3.104.4 (10.3.104.4): 56 data bytes
3, 验证: 为nginx3打上access_nginx1=true标签就可以访问nginx1了
[root@master2 ~]# kubectl label pod nginx3 access_nginx1=true -n dev
pod/nginx3 labeled
[root@master2 ~]# kubectl exec -it nginx3 -n dev -- ping -c 2 10.3.104.4
PING 10.3.104.4 (10.3.104.4): 56 data bytes
64 bytes from 10.3.104.4: seq=0 ttl=63 time=0.260 ms
64 bytes from 10.3.104.4: seq=1 ttl=63 time=0.164 ms
写在最后: 以上几个小例子只是抛砖引玉,更多复杂策略请按照业务需求对照语法来实现。
七、修改为Route Reflector模式
关闭node-to-node模式
[root@master1 ~]# vim bgpconfig.yml
apiVersion: projectcalico.org/v3
kind: BGPConfiguration
metadata:
  name: default
spec:
  logSeverityScreen: Info
  nodeToNodeMeshEnabled: false			# 关闭node-to-node模式
  asNumber: 61234						# 自定义AS号
[root@master1 ~]# calicoctl apply -f bgpconfig.yml
Successfully applied 1 'BGPConfiguration' resource(s)
验证
[root@master1 ~]# calicoctl get bgpconfig
NAME      LOGSEVERITY   MESHENABLED   ASNUMBER
default   Info          false         61234
[root@master1 ~]# kubectl get pods -o wide
NAME                            READY   STATUS    RESTARTS   AGE   IP             NODE             NOMINATED NODE   READINESS GATES
deploy-nginx-59bd7848d6-4fsph   1/1     Running   1          22h   10.3.104.35    192.168.122.14
deploy-nginx-59bd7848d6-c5c49   1/1     Running   1          22h   10.3.166.160   192.168.122.13


[root@master1 ~]# ping 10.3.104.35
ping不通k8s集群中的pod了
[root@master1 ~]# calicoctl get nodes --output=wide
NAME      ASN       IPV4                IPV6
master1   (61234)   192.168.122.11/24
master2   (61234)   192.168.122.12/24
node1     (61234)   192.168.122.13/24
node2     (61234)   192.168.122.14/24
创建bgppeer
[root@master1 ~]# vim bgppeer.yml
apiVersion: projectcalico.org/v3
kind: BGPPeer
metadata:
  name: bgppeer-global
spec:
  peerIP: 192.168.122.11			# 指定路由反射器节点(BGPPeer)
  asNumber: 61234
验证
[root@master1 ~]# calicoctl apply -f bgppeer.yml
Successfully applied 1 'BGPPeer' resource(s)

[root@master1 ~]# calicoctl get bgppeer
NAME             PEERIP           NODE       ASN
bgppeer-global   192.168.122.11   (global)   61234
验证
[root@master1 ~]# calicoctl node status
Calico process is running.

IPv4 BGP status
+----------------+---------------+-------+----------+-------------+
|  PEER ADDRESS  |   PEER TYPE   | STATE |  SINCE   |    INFO     |
+----------------+---------------+-------+----------+-------------+
| 192.168.122.12 | node specific | up    | 15:10:22 | Established |
| 192.168.122.13 | node specific | up    | 15:10:22 | Established |		 现在为node specific
| 192.168.122.14 | node specific | up    | 15:10:22 | Established |
+----------------+---------------+-------+----------+-------------+

IPv6 BGP status
No IPv6 peers found.

[root@master1 ~]# ping -c 2 10.3.104.35
PING 10.3.104.35 (10.3.104.35) 56(84) bytes of data.
64 bytes from 10.3.104.35: icmp_seq=1 ttl=63 time=0.359 ms
64 bytes from 10.3.104.35: icmp_seq=2 ttl=63 time=0.759 ms				k8s集群上的pod也可以ping得通了
验证集群各节点的连接
除了bgppeer节点有N-1个连接外,其它节点只有1个连接
[root@master1 ~]# netstat -anp | grep ESTABLISH | grep bird
tcp        0      0 192.168.122.11:55617    192.168.122.14:179      ESTABLISHED 8955/bird
tcp        0      0 192.168.122.11:179      192.168.122.12:43342    ESTABLISHED 8955/bird
tcp        0      0 192.168.122.11:33696    192.168.122.13:179      ESTABLISHED 8955/bird
[root@master2 ~]#  netstat -anp | grep ESTABLISH | grep bird
tcp        0      0 192.168.122.12:43342    192.168.122.11:179      ESTABLISHED 8216/bird
[root@node1 ~]# netstat -anp | grep ESTABLISH | grep bird
tcp        0      0 192.168.122.13:179      192.168.122.11:33696    ESTABLISHED 13541/bird
[root@node2 ~]#  netstat -anp | grep ESTABLISH | grep bird
tcp        0      0 192.168.122.14:179      192.168.122.11:55617    ESTABLISHED 12223/bird
改回mesh模式的方法
[root@master1 ~]# calicoctl delete -f bgppeer.yml
Successfully deleted 1 'BGPPeer' resource(s)
[root@master1 ~]# vim bgpconfig.yml
apiVersion: projectcalico.org/v3
kind: BGPConfiguration
metadata:
  name: default
spec:
  logSeverityScreen: Info
  nodeToNodeMeshEnabled: true              # 再改为True
  asNumber: 61234
[root@master1 ~]# calicoctl apply -f bgpconfig.yml
Successfully applied 1 'BGPConfiguration' resource(s)
[root@master1 ~]# calicoctl node status
Calico process is running.

IPv4 BGP status
+----------------+-------------------+-------+----------+-------------+
|  PEER ADDRESS  |     PEER TYPE     | STATE |  SINCE   |    INFO     |
+----------------+-------------------+-------+----------+-------------+
| 192.168.122.12 | node-to-node mesh | up    | 08:17:11 | Established |
| 192.168.122.13 | node-to-node mesh | up    | 08:17:11 | Established |
| 192.168.122.14 | node-to-node mesh | up    | 08:17:11 | Established |
+----------------+-------------------+-------+----------+-------------+

IPv6 BGP status
No IPv6 peers found.
下一篇:k8s-HPA