Airflow 安装
文章目录
- 1、官网
-
- 1.1、文档
- 2、安装
-
- 2.1、本地安装(Running Airflow locally)
-
- 2.1.1、说明
- 2.1.2、安装环境
- 2.1.3、安装
-
- 2.1.3.1、安装过程中遇到的问题说明
- 2.1.3.2、升级 sqlite3
- 2.1.3.3、安装 Python3 及虚拟环境 virtualenv
- 2.1.3.4、安装 Airflow
- 2.1.3.5、启动服务
- 3、总结
1、官网
官网地址
1.1、文档
两种安装方式,本文采用的安装方式。
2、安装
2.1、本地安装(Running Airflow locally)
2.1.1、说明
官方支持的安装方式 : pip 安装。(官方文档中有说明)
2.1.2、安装环境
操作系统 : CentOS Linux release 7.6.1810 (Core)
安装包 : Minimal
Python : 3.6.8
Airflow : 2.1.2
virtualenv : 20.7.0
gcc : 4.8.5
g++ : 4.8.5
sqlite3 : 3.36.0
2.1.3、安装
2.1.3.1、安装过程中遇到的问题说明
说明 : 要求的 sqlite3 版本 >= 3.15.0,否则在数据库初始化的时候会出错,提示信息如下:
airflow.exceptions.AirflowConfigException: error: sqlite C library version too old (< 3.15.0). See https://airflow.apache.org/docs/apache-airflow/2.1.2/howto/set-up-database.rst#setting-up-a-sqlite-database
说明 : 不安装 virtualenv ,安装过程中会提示 :
WARNING: Running pip as the 'root' user can result in broken permissions and conflicting behaviour with the system package manager. It is recommended to use a virtual environment instead: https://pip.pypa.io/warnings/venv
2.1.3.2、升级 sqlite3
查看当前 sqlite3 的版本,如果 >= 3.15.0 则不用升级。
sqlite3 -version
升级 sqlite3,需要有编译环境,因此需要安装 gcc 和 g++。
判断是否已经安装 gcc 和 g++,可使用以下命令 :
gcc -v
g++ -v
安装过程可以参考,gcc 安装文件下载地址 和 g++ 安装文件下载地址。下载完安装文件,上传到服务器,进入目录,运行以下命令进行安装(注意 : 一定要先安装 gcc , 再安装 g++ ,与依赖关系):
# 进入文件夹后运行
rpm -Uvh *.rpm --nodeps --force
下载 sqlite
# 没有安装 wget 服务,可以使用下面的命令安装
# yum -y install wget
wget https://www.sqlite.org/2021/sqlite-autoconf-3360000.tar.gz
解压
tar -zxvf sqlite-autoconf-3360000.tar.gz
进入目录
cd sqlite-autoconf-3360000
配置 sqlite
./configure --prefix=/usr/local
编译
make && make install
检查版本,确认是否升级成功
sqlite3 -version
添加到库路径,否则仍然会报错(官方说明 : Post install add /usr/local/lib to library path)
export LD_LIBRARY_PATH=/usr/local/lib:$LD_LIBRARY_PATH
2.1.3.3、安装 Python3 及虚拟环境 virtualenv
安装 Python 3 (默认包含 pip)
yum install python3 -y
安装完成后,验证安装情况
python3 -V
pip3 -V
安装 virtualenv
pip3 install virtualenv -i https://pypi.douban.com/simple/
建立软连接
ln -s /usr/local/python3/bin/virtualenv /usr/bin/virtualenv
安装完成后,验证安装情况
virtualenv --version
安装成功在根目录下建立文件夹,主要用于存放虚拟环境。(个人习惯,其它人可根据自己的实际情况处理)
mkdir -p /data/env
切换到/data/env/下,创建指定版本的虚拟环境:
cd /data/env/
virtualenv --python=/usr/bin/python3 airflow
进入虚拟环境目录:
cd /data/env/airflow/bin
启动虚拟环境:
source activate
退出虚拟环境
# cd /data/env/pyweb/bin
deactivate
说明 : 命令行最前边 “[” 之前出现(airflow),则表示进入了虚拟环境。
2.1.3.4、安装 Airflow
推荐 : 虚拟环境下安装,否则会有警告信息提示。
进入虚拟环境,运行以下命令:
# airflow needs a home, ~/airflow is the default,
# but you can lay foundation somewhere else if you prefer
# (optional)
export AIRFLOW_HOME=~/airflow

AIRFLOW_VERSION=2.1.2
PYTHON_VERSION="$(python --version | cut -d " " -f 2 | cut -d "." -f 1-2)"
# For example: 3.6
CONSTRAINT_URL="https://raw.githubusercontent.com/apache/airflow/constraints-${AIRFLOW_VERSION}/constraints-${PYTHON_VERSION}.txt"
# For example: https://raw.githubusercontent.com/apache/airflow/constraints-2.1.2/constraints-3.6.txt
pip install "apache-airflow==${AIRFLOW_VERSION}" --constraint "${CONSTRAINT_URL}" -i https://pypi.douban.com/simple/
PS : 如果网络不好的情况,pip install 过程中可能会出现 Retry 的字样。
PPS : 安装完成后会提示升级 pip 到 21.2.3,没有影响,是否升级都可。
初始化数据库,并创建用户
# initialize the database
airflow db init
# 创建用户(此处使用的是官网示例。相关信息可根据实际情况进行更改)
(airflow) [root@test bin]# airflow users create --username admin --firstname Peter --lastname Parker --role Admin --email [email protected]
[2021-08-08 15:57:19,547] {manager.py:784} WARNING - No user yet created, use flask fab command to do it.
# 提示输入密码
Password:
Repeat for confirmation:
Admin user admin created
2.1.3.5、启动服务
# start the web server, default port is 8080
# 前台启动,会一直输出日志
airflow webserver --port 8080
# 后台启动
airflow webserver --port 8080 -D
# start the scheduler
airflow scheduler -D
防火墙开通 8080 端口
# 开通 8080 端口
firewall-cmd --zone=public --add-port=8080/tcp --permanent
# 重启防火墙
systemctl restart firewalld.service
# 查看开放的端口列表
firewall-cmd --zone=public --list-ports
访问地址 http://IP:8080 ,登录页面如下:
账户名 : admin
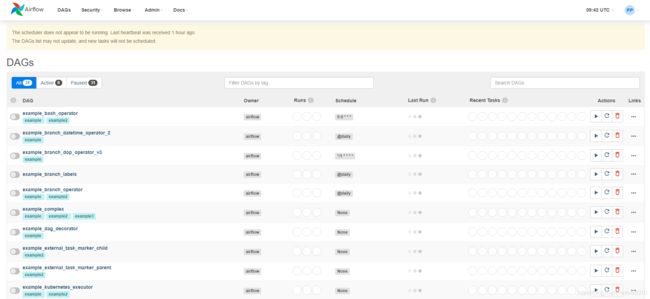
密码即为刚设置的。登录之后显示的页面如下
安装完成!
3、总结
官方文档提供的异常情况说明不是很全面,所以安装过程中遇到的问题都要自己去查。安装过程中的提示也很恶心,例如提示去访问 : https://airflow.apache.org/docs/apache-airflow/2.1.2/howto/set-up-database.rst#setting-up-a-sqlite-database , 访问的结果是 404 ,哭死 ~~ 之后查到访问地址变更为 : http://airflow.apache.org/docs/apache-airflow/stable/howto/set-up-database.html#database-uri 。不过,整体上安装过程还算顺利啦 ~~~

