手把手教你搭建Kubernetes集群
环境条件准备
三台Linux服务器,配置至少2c4g,操作系统为CentOS Linux release 7.9.2009 (Core)
相关基本概念
- kubectl- 主要的 CLI 工具,用于运行命令和管理 Kubernetes 集群。
- JSONPath- 通过 kubectl 使用JSONPath 表达式的语法指南。
- kubeadm- 此 CLI 工具可轻松配置安全的 Kubernetes 集群。
- kubelet- 在每个节点上运行的主_节点代理_。kubelet 采用一组 PodSpecs 并确保所描述的容器健康地运行。
- kube-apiserver- REST API,用于验证和配置 API 对象(如 Pod、服务或副本控制器等)的数据。
- kube-controller-manager- 一个守护进程,它嵌入到了 Kubernetes 的附带的核心控制循环。
- kube-proxy- 可进行简单的 TCP/UDP 流转发或针对一组后端执行轮流 TCP/UDP 转发。
- kube-scheduler- 一个调度程序,用于管理可用性、性能和容量。
安装k8s软件
1.安装Docker
# 安装docker所需的工具
yum install -y yum-utils device-mapper-persistent-data lvm2
# 配置阿里云的docker源
yum-config-manager --add-repo http://mirrors.aliyun.com/docker-ce/linux/centos/docker-ce.repo
# 指定安装这个版本的docker-ce
yum install -y docker-ce-18.09.9-3.el7
# 配置docker
vim /etc/docker/daemon.json 增加 "exec-opts":["native.cgroupdriver=systemd"]
# 启动docker
systemctl enable docker && systemctl start docker
2.设置服务器环境
# 关闭防火墙
systemctl disable firewalld
systemctl stop firewalld
# 关闭selinux
# 临时禁用selinux
setenforce 0
# 永久关闭 修改/etc/sysconfig/selinux文件设置
sed -i 's/SELINUX=permissive/SELINUX=disabled/' /etc/sysconfig/selinux
sed -i "s/SELINUX=enforcing/SELINUX=disabled/g" /etc/selinux/config
# 禁用交换分区
swapoff -a
# 永久禁用,打开/etc/fstab注释掉swap那一行。
sed -i 's/.*swap.*/#&/' /etc/fstab
# 修改内核参数
cat <<EOF >  /etc/sysctl.d/k8s.conf
net.bridge.bridge-nf-call-ip6tables = 1
net.bridge.bridge-nf-call-iptables = 1
EOF
sysctl --system
3.设置软件源并安装kubelet kubeadm kubectl
# 执行配置k8s阿里云源
cat <<EOF > /etc/yum.repos.d/kubernetes.repo
[kubernetes]
name=Kubernetes
baseurl=https://mirrors.aliyun.com/kubernetes/yum/repos/kubernetes-el7-x86_64/
enabled=1
gpgcheck=1
repo_gpgcheck=1
gpgkey=https://mirrors.aliyun.com/kubernetes/yum/doc/yum-key.gpg https://mirrors.aliyun.com/kubernetes/yum/doc/rpm-package-key.gpg
EOF
# 安装kubeadm、kubectl、kubelet
yum install -y kubectl-1.16.0-0 kubeadm-1.16.0-0 kubelet-1.16.0-0
# 启动kubelet服务
systemctl enable kubelet && systemctl start kubelet
4.拉取镜像(无法直接拉取谷歌镜像)
#查看所需镜像
kubeadm config images list
#将上面的镜像版本复制下来
images=(
    kube-apiserver:v1.21.1
    kube-controller-manager:v1.21.1
    kube-scheduler:v1.21.1
    kube-proxy:v1.21.1
    pause:3.4.1
    etcd:3.4.13-0
    coredns/coredns:v1.8.0
)
#迭代下载
for imageName in ${images[@]} ; do
    docker pull registry.cn-hangzhou.aliyuncs.com/google_containers/$imageName
    docker tag registry.cn-hangzhou.aliyuncs.com/google_containers/$imageName k8s.gcr.io/$imageName
    docker rmi registry.cn-hangzhou.aliyuncs.com/google_containers/$imageName
done
创建k8s集群
1.创建集群
kubeadm init
2.输出日志
[init] Using Kubernetes version: v1.21.1
[preflight] Running pre-flight checks
[preflight] Pulling images required for setting up a Kubernetes cluster
[preflight] This might take a minute or two, depending on the speed of your internet connection
[preflight] You can also perform this action in beforehand using 'kubeadm config images pull'
[certs] Using certificateDir folder "/etc/kubernetes/pki"
[certs] Generating "ca" certificate and key
[certs] Generating "apiserver" certificate and key
[certs] apiserver serving cert is signed for DNS names [kubernetes kubernetes.default kubernetes.default.svc kubernetes.default.svc.cluster.local mikey] and IPs [10.96.0.1 192.168.0.108]
[certs] Generating "apiserver-kubelet-client" certificate and key
[certs] Generating "front-proxy-ca" certificate and key
[certs] Generating "front-proxy-client" certificate and key
[certs] Generating "etcd/ca" certificate and key
[certs] Generating "etcd/server" certificate and key
[certs] etcd/server serving cert is signed for DNS names [localhost mikey] and IPs [192.168.0.108 127.0.0.1 ::1]
[certs] Generating "etcd/peer" certificate and key
[certs] etcd/peer serving cert is signed for DNS names [localhost mikey] and IPs [192.168.0.108 127.0.0.1 ::1]
[certs] Generating "etcd/healthcheck-client" certificate and key
[certs] Generating "apiserver-etcd-client" certificate and key
[certs] Generating "sa" key and public key
[kubeconfig] Using kubeconfig folder "/etc/kubernetes"
[kubeconfig] Writing "admin.conf" kubeconfig file
[kubeconfig] Writing "kubelet.conf" kubeconfig file
[kubeconfig] Writing "controller-manager.conf" kubeconfig file
[kubeconfig] Writing "scheduler.conf" kubeconfig file
[kubelet-start] Writing kubelet environment file with flags to file "/var/lib/kubelet/kubeadm-flags.env"
[kubelet-start] Writing kubelet configuration to file "/var/lib/kubelet/config.yaml"
[kubelet-start] Starting the kubelet
[control-plane] Using manifest folder "/etc/kubernetes/manifests"
[control-plane] Creating static Pod manifest for "kube-apiserver"
[control-plane] Creating static Pod manifest for "kube-controller-manager"
[control-plane] Creating static Pod manifest for "kube-scheduler"
[etcd] Creating static Pod manifest for local etcd in "/etc/kubernetes/manifests"
[wait-control-plane] Waiting for the kubelet to boot up the control plane as static Pods from directory "/etc/kubernetes/manifests". This can take up to 4m0s
[apiclient] All control plane components are healthy after 14.004108 seconds
[upload-config] Storing the configuration used in ConfigMap "kubeadm-config" in the "kube-system" Namespace
[kubelet] Creating a ConfigMap "kubelet-config-1.21" in namespace kube-system with the configuration for the kubelets in the cluster
[upload-certs] Skipping phase. Please see --upload-certs
[mark-control-plane] Marking the node mikey as control-plane by adding the labels: [node-role.kubernetes.io/master(deprecated) node-role.kubernetes.io/control-plane node.kubernetes.io/exclude-from-external-load-balancers]
[mark-control-plane] Marking the node mikey as control-plane by adding the taints [node-role.kubernetes.io/master:NoSchedule]
[bootstrap-token] Using token: r88hug.49e7ngr2wnoj1mxt
[bootstrap-token] Configuring bootstrap tokens, cluster-info ConfigMap, RBAC Roles
[bootstrap-token] configured RBAC rules to allow Node Bootstrap tokens to get nodes
[bootstrap-token] configured RBAC rules to allow Node Bootstrap tokens to post CSRs in order for nodes to get long term certificate credentials
[bootstrap-token] configured RBAC rules to allow the csrapprover controller automatically approve CSRs from a Node Bootstrap Token
[bootstrap-token] configured RBAC rules to allow certificate rotation for all node client certificates in the cluster
[bootstrap-token] Creating the "cluster-info" ConfigMap in the "kube-public" namespace
[kubelet-finalize] Updating "/etc/kubernetes/kubelet.conf" to point to a rotatable kubelet client certificate and key
[addons] Applied essential addon: CoreDNS
[addons] Applied essential addon: kube-proxy

Your Kubernetes control-plane has initialized successfully!

To start using your cluster, you need to run the following as a regular user:

  mkdir -p $HOME/.kube
  sudo cp -i /etc/kubernetes/admin.conf $HOME/.kube/config
  sudo chown $(id -u):$(id -g) $HOME/.kube/config

Alternatively, if you are the root user, you can run:

  export KUBECONFIG=/etc/kubernetes/admin.conf

You should now deploy a pod network to the cluster.
Run "kubectl apply -f [podnetwork].yaml" with one of the options listed at:
  https://kubernetes.io/docs/concepts/cluster-administration/addons/

Then you can join any number of worker nodes by running the following on each as root:

kubeadm join 192.168.0.108:6443 --token r88hug.49e7ngr2wnoj1mxt \
	--discovery-token-ca-cert-hash sha256:4a6d874c2ec5eb1b57006446643cc186f9157bcd244aa87d69b070c948c27115
设置配置文件路径
export KUBECONFIG=/etc/kubernetes/admin.conf
检查状态
#查看所有命名空间下的pod
kubectl get pods --all-namespaces
#发现coredns一直处于creating状态
NAMESPACE     NAME                                            READY   STATUS              RESTARTS   AGE
kube-system   coredns-558bd4d5db-4d2wm                        0/1     ContainerCreating   0          51s
kube-system   coredns-558bd4d5db-pgzrx                        0/1     ContainerCreating   0          51s
#查看详情
kubectl describe pod coredns-558bd4d5db-4d2wm --namespace kube-system
#启动flannel来解决(自行通过获取kube-flannel.yml)
kubectl apply -f kube-flannel.yml
#设置访问权限
sudo chown $(id -u):$(id -g) /run/flannel/subnet.env
#再进行查看
kubectl get pods --all-namespaces
#发现其已经全部处于runing状态
work结点加入
#master结点init后输出的
kubeadm join 192.168.0.108:6443 --token r88hug.49e7ngr2wnoj1mxt \
	--discovery-token-ca-cert-hash sha256:4a6d874c2ec5eb1b57006446643cc186f9157bcd244aa87d69b070c948c27115
同步配置文件到work结点
#复制传输
scp /etc/kubernetes/admin.conf [email protected]:/etc/kubernetes/
#环境变量
export KUBECONFIG=/etc/kubernetes/admin.conf
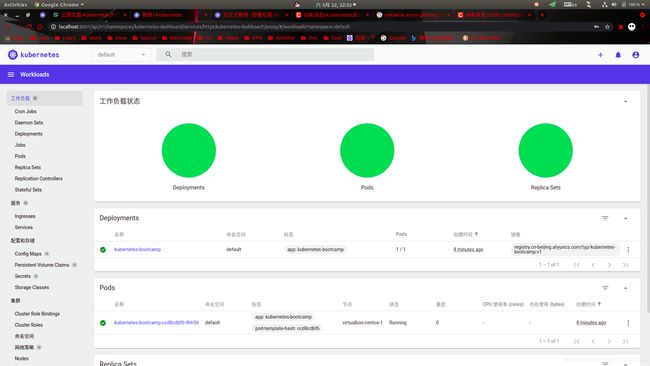
安装dashboard
安装可视化dashboard(无法访问需自行)
kubectl apply -f https://raw.githubusercontent.com/kubernetes/dashboard/v2.2.0/aio/deploy/recommended.yaml
开启代理
kubectl proxy --address='0.0.0.0' --accept-hosts='^*$'
浏览器访问
http://localhost:8001/api/v1/namespaces/kubernetes-dashboard/services/https:kubernetes-dashboard:/proxy/
查看秘钥(这些secrets中的大部分都可以用来访问dashboard的,只有不同的账户权限不同,很多账户被限制不能进行操作)
kubectl get secret -n=kube-system
获取秘钥输入即可
kubectl describe secret -n=kube-system default-token-kgwfv
因为是虚拟机部署而dashboard只能通过内网访问(localhost)我需要在外部进行访问需要进行转发
#本地主机输入
ssh -L localhost:8001:localhost:8001 -NT [email protected]
输入root密码即可
输入秘钥即可登入

发现所有的数据为空并且右上角有报错解决方法
创建一个群集管理服务帐户,在此步骤中,我们将为仪表板创建服务帐户并获取其凭据。
运行以下命令:此命令将在默认名称空间中为仪表板创建服务帐户
kubectl create serviceaccount dashboard -n default
将集群绑定规则添加到您的仪表板帐户
kubectl create clusterrolebinding dashboard-admin -n default --clusterrole=cluster-admin --serviceaccount=default:dashboard
使用以下命令复制仪表板登录所需的令牌:
kubectl get secret $(kubectl get serviceaccount dashboard -o jsonpath="{.secrets[0].name}") -o jsonpath="{.data.token}" | base64 --decode
复制令牌,然后通过选择令牌选项将其粘贴到仪表板登录页面中
解决错误
secrets is forbidden: User "system:serviceaccount:kube-system:clusterrole-aggregation-controller" cannot list resource "secrets" in API group "" in the namespace "default"
如果想使用默认账户请运行
kubectl create clusterrolebinding dashboard -n default --clusterrole=cluster-admin --serviceaccount=default:default
基本操作命令
- kubectl- 主要的 CLI 工具,用于运行命令和管理 Kubernetes 集群。
- JSONPath- 通过 kubectl 使用JSONPath 表达式的语法指南。
- kubeadm- 此 CLI 工具可轻松配置安全的 Kubernetes 集群。
kubeadm init 用于搭建控制平面节点
kubeadm join 用于搭建工作节点并将其加入到集群中
kubeadm upgrade 用于升级 Kubernetes 集群到新版本
kubeadm config 如果你使用了 v1.7.x 或更低版本的 kubeadm 版本初始化你的集群,则使用 kubeadm upgrade 来配置你的集群
kubeadm token 用于管理 kubeadm join 使用的令牌
kubeadm reset 用于恢复通过 kubeadm init 或者 kubeadm join 命令对节点进行的任何变更
kubeadm certs 用于管理 Kubernetes 证书
kubeadm kubeconfig 用于管理 kubeconfig 文件
kubeadm version 用于打印 kubeadm 的版本信息
kubeadm alpha 用于预览一组可用于收集社区反馈的特性
部署一个应用
我们需要了解另外的一些基本概念Deployment
创建一个deployment
kubectl create deployment kubernetes-bootcamp --image=registry.cn-beijing.aliyuncs.com/typ/kubernetes-bootcamp:v1
查看创建的deployment
kubectl get deployments
开启proxy
kubectl proxy
访问应用
curl http://localhost:8001/version
返回以下信息即表示成功
{
  "major": "1",
  "minor": "21",
  "gitVersion": "v1.21.1",
  "gitCommit": "5e58841cce77d4bc13713ad2b91fa0d961e69192",
  "gitTreeState": "clean",
  "buildDate": "2021-05-12T14:12:29Z",
  "goVersion": "go1.16.4",
  "compiler": "gc",
  "platform": "linux/amd64"
}
暴露服务到外网
kubectl expose deployment/kubernetes-bootcamp --type="NodePort" --port 8080
查看service
kubectl get services
NAME TYPE CLUSTER-IP EXTERNAL-IP PORT(S) AGE
kubernetes ClusterIP 10.96.0.1 443/TCP 24m
kubernetes-bootcamp NodePort 10.101.237.179 8080:31478/TCP 20s
查看暴露结点的详细信息
kubectl describe services/kubernetes-bootcamp
Name:                     kubernetes-bootcamp
Namespace:                default
Labels:                   app=kubernetes-bootcamp
Annotations:              <none>
Selector:                 app=kubernetes-bootcamp
Type:                     NodePort
IP Family Policy:         SingleStack
IP Families:              IPv4
IP:                       10.101.237.179
IPs:                      10.101.237.179
Port:                     <unset>  8080/TCP
TargetPort:               8080/TCP
NodePort:                 <unset>  31478/TCP
Endpoints:                10.244.1.3:8080
Session Affinity:         None
External Traffic Policy:  Cluster
Events:                   <none>
通过访问任意一台主机的ip:端口(上面暴露出的端口:31478)即可看到效果

好了一个简单的应用就部署完成了
常见问题记录
1.corednsr一直处于pending状态,查看描述如下所示

创建flannel来修复,执行下面的命令(需),让子弹飞一会
kubectl apply -f https://raw.githubusercontent.com/coreos/flannel/master/Documentation/kube-flannel.yml
2.部署出现认证问题
network: error getting ClusterInformation: Get "https://10.96.0.1:443/apis/crd.projectcalico.org/v1/clusterinformations/default": x509: certificate signed by unknown authority (possibly because of "crypto/rsa: verification error" while trying to verify candidate authority certificate "kubernetes")]
每次使用kubeadm reset时需要手动进行删除/etc/cni/net.d
# 清理文件
rm -rf /etc/cni/net.d
# 重建集群
kubeadm init
相关参考资料
kubernetes教程
对 kubeadm 进行故障排查
访问K8s Dashboard的几种方式
Dashboard官网
