nginx
nginx
文章目录
- nginx
-
- 1. nginx简介
- 2. nginx的特性与优点
-
- 2.1 nginx的特性
- 2.2 nginx的优点
- 3. nginx的功能及应用类别
-
- 3.1 nginx的基本功能
- 3.2 nginx的扩展功能
- 3.3 nginx的应用类别
- 4. nginx的模块与工作原理
-
- 4.1 nginx的模块分类
- 4.2 nginx的工作原理
- 5. lnmp的安装与配置
-
- 5.1 nginx的安装
- 5.2 mysql的安装
- 5.3 php的安装
- 6. nginx版本升级
- 7. zabbix监控nginx status
- 8. 基于nginx实现负载均衡
1. nginx简介
nginx是一款轻量级的Web服务器/反向代理服务器及电子邮件(IMAP/POP3)代理服务器,并在一个BSD-like协议下发行。
nginx由俄罗斯的程序设计师Igor Sysoev所开发,最初供俄国大型的入口网站及搜寻引擎Rambler使用。
第一个公开版本0.1.0发布于2004年10月4日。其将源代码以类BSD许可证的形式发布,因它的稳定性、丰富的功能集、示例配置文件和低系统资源的消耗而闻名。2011年6月1日,nginx 1.0.4发布。
nginx的特点是占有内存少,并发能力强,事实上nginx的并发能力确实在同类型的网页服务器中表现较好,中国大陆使用nginx网站用户有:百度、京东、新浪、网易、腾讯、淘宝等。
2. nginx的特性与优点
2.1 nginx的特性
nginx是一个很牛的高性能Web和反向代理服务器,它具有很多非常优越的特性:
- 在高连接并发的情况下,nginx是Apache服务器不错的替代品,能够支持高达50000个并发连接数的响应
- 使用epoll and kqueue作为开发模型
- nginx作为负载均衡服务器:nginx既可在内部直接支持和PHP程序对外进行服务,也可支持作为HTTP代理服务器对外进行服务
- nginx采用C进行编写,不论系统资源开销还是CPU使用效率都比Perlbal要好很多
2.2 nginx的优点
- 高并发连接:官方测试能够支撑5万并发连接,在实际生产环境中跑到2-3万并发连接数
- 内存消耗少:在3万并发连接下,开启的10个nginx进程才消耗150M内存(15M*10=150M)
- 配置文件非常简单:风格跟程序一样通俗易懂
- 成本低廉:nginx为开源软件,可以免费使用。而购买F5 BIG-IP、NetScaler等硬件负载均衡交换机则需要十多万至几十万人民币
- 支持Rewrite重写规则:能够根据域名、URL的不同,将HTTP请求分到不同的后端服务器群组
- 内置的健康检查功能:如果Nginx Proxy后端的某台Web服务器宕机了,不会影响前端访问
- 节省带宽:支持GZIP压缩,可以添加浏览器本地缓存的Header头
- 稳定性高:用于反向代理,宕机的概率微乎其微
- 模块化设计:模块可以动态编译
- 外围支持好:文档全,二次开发和模块较多
- 支持热部署:可以不停机重载配置文件
- 支持事件驱动、AIO(AsyncIO,异步IO)、mmap(Memory Map,内存映射)等性能优化
3. nginx的功能及应用类别
3.1 nginx的基本功能
- 静态资源的web服务器,能缓存打开的文件描述符
- http、smtp、pop3协议的反向代理服务器
- 缓存加速、负载均衡
- 支持FastCGI(fpm,LNMP),uWSGI(Python)等
- 模块化(非DSO机制),过滤器zip、SSI及图像的大小调整
- 支持SSL
3.2 nginx的扩展功能
- 基于名称和IP的虚拟主机
- 支持keepalive
- 支持平滑升级
- 定制访问日志、支持使用日志缓冲区提高日志存储性能
- 支持URL重写
- 支持路径别名
- 支持基于IP及用户的访问控制
- 支持速率限制,支持并发数限制
3.3 nginx的应用类别
- 使用nginx结合FastCGI运行PHP、JSP、Perl等程序
- 使用nginx作反向代理、负载均衡、规则过滤
- 使用nginx运行静态HTML网页、图片
- nginx与其他新技术的结合应用
4. nginx的模块与工作原理
nginx由内核和模块组成。其中,内核的设计非常微小和简洁,完成的工作也非常简单,仅仅通过查找配置文件将客户端请求映射到一个location block(location是nginx配置中的一个指令,用于URL匹配),而在这个location中所配置的每个指令将会启动不同的模块去完成相应的工作。
4.1 nginx的模块分类
nginx的模块从结构上分为核心模块、基础模块和第三方模块
- HTTP模块、EVENT模块和MAIL模块等属于核心模块
- HTTP Access模块、HTTP FastCGI模块、HTTP Proxy模块和HTTP Rewrite模块属于基本模块
- HTTP Upstream模块、Request Hash模块、Notice模块和HTTP Access Key模块属于第三方模块
用户根据自己的需要开发的模块都属于第三方模块。正是有了如此多模块的支撑,nginx的功能才会如此强大
nginx模块从功能上分为三类,分别是:
- Handlers(处理器模块)。此类模块直接处理请求,并进行输出内容和修改headers信息等操作。handlers处理器模块一般只能有一个
- Filters(过滤器模块)。此类模块主要对其他处理器模块输出的内容进行修改操作,最后由nginx输出
- Proxies(代理器模块)。就是nginx的HTTP Upstream之类的模块,这些模块主要与后端一些服务比如fastcgi等操作交互,实现服务代理和负载均衡等功能
nginx模块分为:核心模块、事件模块、标准Http模块、可选Http模块、邮件模块、第三方模块和补丁等
- nginx基本模块:所谓基本模块,指的是nginx默认的功能模块,它们提供的指令,允许你使用定义nginx基本功能的变量,在编译时不能被禁用,包括:
- 核心模块:基本功能和指令,如进程管理和安全。常见的核心模块指令,大部分是放置在配置文件的顶部
- 事件模块:在Nginx内配置网络使用的能力。常见的events(事件)模块指令,大部分是放置在配置文件的顶部
- 配置模块:提供包含机制
具体的指令,请参考nginx的官方文档
4.2 nginx的工作原理
nginx的模块直接被编译进nginx,因此属于静态编译方式。
启动nginx后,nginx的模块被自动加载,与Apache不一样,首先将模块编译为一个so文件,然后在配置文件中指定是否进行加载。
在解析配置文件时,nginx的每个模块都有可能去处理某个请求,但是同一个处理请求只能由一个模块来完成。
nginx的进程架构:
启动nginx时,会启动一个Master进程,这个进程不处理任何客户端的请求,主要用来产生worker线程,一个worker线程用来处理n个request。
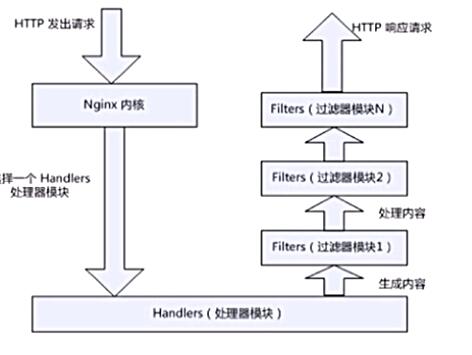
下图展示了nginx模块一次常规的HTTP请求和响应的过程
下图展示了基本的WEB服务请求步骤
5. lnmp的安装与配置
5.1 nginx的安装
//创建nginx系统用户
[root@localhost ~]# useradd -r -M -s /sbin/nologin nginx

//安装依赖包
[root@localhost ~]# dnf -y install pcre-devel openssl openssl-devel gd-devel gcc gcc-c++ make
[root@localhost ~]# cd /usr/src/

//下载nginx包并解压
[root@localhost src]# wget http://nginx.org/download/nginx-1.22.0.tar.gz
[root@localhost src]# tar xf nginx-1.22.0.tar.gz

//编译安装nginx
[root@localhost src]# cd nginx-1.22.0
[root@localhost nginx-1.12.0]# ./configure \
--prefix=/usr/local/nginx \
--user=nginx \
--group=nginx \
--with-debug \
--with-http_ssl_module \
--with-http_realip_module \
--with-http_image_filter_module \
--with-http_gunzip_module \
--with-http_gzip_static_module \
--with-http_stub_status_module \
--http-log-path=/var/log/nginx/access.log \
--error-log-path=/var/log/nginx/error.log

[root@localhost nginx-1.22.0]# make && make install

//配置环境变量
[root@localhost nginx-1.22.0]# echo 'export PATH=/usr/local/nginx/sbin:$PATH' > /etc/profile.d/nginx.sh
[root@localhost nginx-1.22.0]# source /etc/profile.d/nginx.sh

//开启nginx服务
[root@localhost nginx-1.22.0]# nginx

//查看nginx版本和端口号
[root@localhost nginx-1.22.0]# nginx -v
nginx version: nginx/1.22.0
[root@localhost nginx-1.22.0]# ss -antl
State     Recv-Q    Send-Q       Local Address:Port        Peer Address:Port    Process
LISTEN    0         128                0.0.0.0:80               0.0.0.0:*
LISTEN    0         128                0.0.0.0:22               0.0.0.0:*
LISTEN    0         128                   [::]:22                  [::]:*
5.2 mysql的安装
//下载mysql包并解压
[root@localhost nginx-1.22.0]# cd ..
[root@localhost src]# wget https://cdn.mysql.com/archives/mysql-8.0/mysql-8.0.25-linux-glibc2.12-x86_64.tar.xz
[root@localhost src]# tar xf mysql-8.0.25-linux-glibc2.12-x86_64.tar.xz -C /usr/local/

//创建mysql系统用户
[root@localhost src]# useradd -r -M -s /sbin/nologin mysql
[root@localhost src]# cd /usr/local/
[root@localhost local]# mv mysql-8.0.25-linux-glibc2.12-x86_64 mysql
[root@localhost local]# ls
bin  etc  games  include  lib  lib64  libexec  mysql  nginx  sbin  share  src
[root@localhost local]# chown -R mysql.mysql mysql/

//配置环境
[root@localhost local]# echo 'export PATH=/usr/local/mysql/bin:$PATH' > /etc/profile.d/mysql.sh
[root@localhost local]# source /etc/profile.d/mysql.sh
[root@localhost local]# ln -s /usr/local/mysql/include /usr/include/mysql
[root@localhost local]# vim /etc/ld.so.conf.d/mysql.conf
/usr/local/mysql/lib
[root@localhost local]# ldconfig
[root@localhost local]# mkdir -p /opt/data
[root@localhost local]# chown -R mysql.mysql /opt/data/

//初始化数据库
[root@localhost local]# mysqld --initialize --user mysql --datadir /opt/data
2022-09-03T09:49:55.663710Z 0 [System] [MY-013169] [Server] /usr/local/mysql/bin/mysqld (mysqld 8.0.25) initializing of server in progress as process 36149
2022-09-03T09:49:55.680087Z 1 [System] [MY-013576] [InnoDB] InnoDB initialization has started.
2022-09-03T09:49:56.415400Z 1 [System] [MY-013577] [InnoDB] InnoDB initialization has ended.
2022-09-03T09:49:57.438903Z 6 [Note] [MY-010454] [Server] A temporary password is generated for root@localhost: BBHl3Qpjio#t

[root@localhost local]# echo 'BBHl3Qpjio#t' > /root/mysql_pass

//数据库配置文件
[root@localhost local]# vim /etc/my.cnf
[mysqld]
basedir = /usr/local/mysql
datadir = /opt/data
socket = /tmp/mysql.sock
port = 3306
pid-file = /opt/data/mysql.pid
user = mysql
skip-name-resolve
[root@localhost local]# /usr/local/mysql/support-files/mysql.server start
[root@localhost local]# ss -antl
State     Recv-Q    Send-Q       Local Address:Port        Peer Address:Port    Process
LISTEN    0         128                0.0.0.0:80               0.0.0.0:*
LISTEN    0         128                0.0.0.0:22               0.0.0.0:*
LISTEN    0         70                       *:33060                  *:*
LISTEN    0         128                      *:3306                   *:*
LISTEN    0         128                   [::]:22                  [::]:*
5.3 php的安装
//下载php包并解压
[root@localhost local]# cd /usr/src/
[root@localhost src]# wget https://www.php.net/distributions/php-8.0.23.tar.gz
[root@localhost src]# tar xf php-8.0.23.tar.gz

//安装依赖包
[root@localhost src]# dnf -y install http://mirror.centos.org/centos/8-stream/PowerTools/x86_64/os/Packages/oniguruma-devel-6.8.2-2.el8.x86_64.rpm
[root@localhost src]# dnf -y install libxml2 libxml2-devel \
openssl openssl-devel bzip2 bzip2-devel \
libcurl libcurl-devel libicu-devel libjpeg \
libjpeg-devel libpng libpng-devel openldap-devel  \
pcre-devel freetype freetype-devel gmp gmp-devel \
libmcrypt libmcrypt-devel readline readline-devel \
libxslt libxslt-devel mhash mhash-devel php-mysqlnd \
sqlite-devel libzip-devel

//编译安装php
[root@localhost src]# cd php-8.0.23
[root@localhost php-8.0.23]# ./configure --prefix=/usr/local/php7  \
--with-config-file-path=/etc \
--enable-fpm \
--disable-debug \
--disable-rpath \
--enable-shared \
--enable-soap \
--with-openssl \
--enable-bcmath \
--with-iconv \
--with-bz2 \
--enable-calendar \
--with-curl \
--enable-exif  \
--enable-ftp \
--enable-gd \
--with-jpeg \
--with-zlib-dir \
--with-freetype \
--with-gettext \
--enable-mbstring \
--enable-pdo \
--with-mysqli=mysqlnd \
--with-pdo-mysql=mysqlnd \
--with-readline \
--enable-shmop \
--enable-simplexml \
--enable-sockets \
--with-zip \
--enable-mysqlnd-compression-support \
--with-pear \
--enable-pcntl \
--enable-posix

[root@localhost php-8.0.23]# make && make install

//配置环境
[root@localhost php-8.0.23]# echo 'export PATH=/usr/local/php7/bin:$PATH' > /etc/profile.d/php7.sh
[root@localhost php-8.0.23]# source /etc/profile.d/php7.sh
[root@localhost php-8.0.23]# \cp php.ini-production /etc/php.ini
[root@localhost php-8.0.23]# cp sapi/fpm/init.d.php-fpm /etc/init.d/php-fpm
[root@localhost php-8.0.23]# chmod +x /etc/rc.d/init.d/php-fpm
[root@localhost php-8.0.23]# cp /usr/local/php7/etc/php-fpm.conf.default /usr/local/php7/etc/php-fpm.conf
[root@localhost php-8.0.23]# cp /usr/local/php7/etc/php-fpm.d/www.conf.default /usr/local/php7/etc/php-fpm.d/www.conf
[root@localhost php-8.0.23]# vim /usr/local/nginx/html/index.html
<?php
    phpinfo();
?>

//开启php服务
[root@localhost php-8.0.23]# service php-fpm start
[root@localhost php-8.0.23]# ss -antl
State     Recv-Q    Send-Q       Local Address:Port        Peer Address:Port    Process
LISTEN    0         128              127.0.0.1:9000             0.0.0.0:*
LISTEN    0         128                0.0.0.0:80               0.0.0.0:*
LISTEN    0         128                0.0.0.0:22               0.0.0.0:*
LISTEN    0         70                       *:33060                  *:*
LISTEN    0         128                      *:3306                   *:*
LISTEN    0         128                   [::]:22                  [::]:*
修改nginx配置文件,让网页能够访问php页面
[root@localhost php-8.0.23]# cd /usr/local/nginx/conf/
[root@localhost conf]# vim nginx.conf
......(省略)
        location / {
            root   html;
            index  index.php index.html index.htm;		//添加php网页文件格式
        }
......(省略)
//取消注释,传递脚本并开启监听
        location ~ \.php$ {
            root           html;
            fastcgi_pass   127.0.0.1:9000;
            fastcgi_index  index.php;
            fastcgi_param  SCRIPT_FILENAME  /usr/local/nginx/html$fastcgi_script_name;
            //修改为web路径
            include        fastcgi_params;
        }

//重新加载nginx
[root@localhost conf]# nginx -s reload
6. nginx版本升级
//下载所需的模块
[root@nginx ~]# dnf -y install git
[root@nginx ~]# git clone https://github.com/openresty/echo-nginx-module.git

//下载并解压新的nginx包
[root@nginx ~]# cd /usr/src/
[root@nginx src]# tar xf nginx-1.22.0.tar.gz

//查看当前版本号和编译参数
[root@nginx src]# nginx -V
nginx version: nginx/1.20.2
built by gcc 8.5.0 20210514 (Red Hat 8.5.0-3) (GCC)
built with OpenSSL 1.1.1k  FIPS 25 Mar 2021
TLS SNI support enabled
configure arguments: --prefix=/usr/local/nginx --user=nginx --group=nginx --with-debug --with-http_ssl_module --with-http_realip_module --with-http_image_filter_module --with-http_gunzip_module --with-http_gzip_static_module --with-http_stub_status_module --http-log-path=/var/log/nginx/access.log --error-log-path=/var/log/nginx/error.log

//重新编译加入新的模块,编译完成后不要执行make install
[root@nginx src]# cd nginx-1.22.0
[root@nginx nginx-1.22.0]# ./configure --prefix=/usr/local/nginx --user=nginx --group=nginx --with-debug --with-http_ssl_module --with-http_realip_module --with-http_image_filter_module --with-http_gunzip_module --with-http_gzip_static_module --with-http_stub_status_module --http-log-path=/var/log/nginx/access.log --error-log-path=/var/log/nginx/error.log --add-module=/root/echo-nginx-module
[root@nginx nginx-1.22.0]# make

//停用原来的nginx,启动新的nginx
[root@nginx nginx-1.22.0]# nginx -s stop;~/nginx-1.22.0/objs/nginx -c /usr/local/nginx/conf/nginx.conf

//备份原来的nginx二进制文件,将新的复制过来
[root@nginx nginx-1.22.0]# cd /usr/local/nginx/sbin/
[root@nginx sbin]# mv nginx /opt/
[root@nginx sbin]# cp ~/nginx-1.22.0/objs/nginx .
[root@nginx src]# nginx -V
nginx version: nginx/1.22.0
built by gcc 8.5.0 20210514 (Red Hat 8.5.0-3) (GCC)
built with OpenSSL 1.1.1k  FIPS 25 Mar 2021
TLS SNI support enabled
configure arguments: --prefix=/usr/local/nginx --user=nginx --group=nginx --with-debug --with-http_ssl_module --with-http_realip_module --with-http_image_filter_module --with-http_gunzip_module --with-http_gzip_static_module --with-http_stub_status_module --http-log-path=/var/log/nginx/access.log --error-log-path=/var/log/nginx/error.log --add-module=/root/echo-nginx-module
7. zabbix监控nginx status
| 主机名 | 已配置 | IP地址 |
|---|---|---|
| zabbix_server | lamp,zabbix_server | 192.168.10.101 |
| nginx | nginx,zabbix_agentd | 192.168.10.102 |
在nginx端执行:
[root@nginx ~]# vim /usr/local/nginx/conf/nginx.conf
        location /status {			//在server字段下加location
            stub_status;
        }
[root@nginx ~]# nginx -s reload
[root@nginx ~]# mkdir /script
[root@nginx ~]# cd /script/
[root@nginx script]# vim status.sh
#!/bin/bash

host='127.0.0.1'
port='80'
statusurl='/status'

active() {
        curl -s http://${host}:${port}${statusurl}|awk '/^Active/{print $3}'
}
accepts() {
        curl -s http://${host}:${port}${statusurl}|awk 'NR==3{print $1}'
}
handled() {
        curl -s http://${host}:${port}${statusurl}|awk 'NR==3{print $2}'
}
requests() {
        curl -s http://${host}:${port}${statusurl}|awk 'NR==3{print $3}'
}
reading() {
        curl -s http://${host}:${port}${statusurl}|awk 'NR==4{print $2}'
}
writing() {
        curl -s http://${host}:${port}${statusurl}|awk 'NR==4{print $4}'
}
waiting() {
        curl -s http://${host}:${port}${statusurl}|awk 'NR==4{print $6}'
}

$1

//给脚本执行权限并测试
[root@nginx script]# chmod +x status.sh
[root@nginx script]# ./status.sh waiting
0
[root@nginx script]# ./status.sh requests
6
[root@nginx script]# ./status.sh reading
0
[root@nginx script]# ./status.sh active
3

//修改配置文件
[root@nginx script]# vim /usr/local/etc/zabbix_agentd.conf
### Option: UserParameter
#       User-defined parameter to monitor. There can be several user-defined parameters.
#       Format: UserParameter=,
#       See 'zabbix_agentd' directory for examples.
#
# Mandatory: no
# Default:
# UserParameter=
UserParameter=nginx.status[*],/script/status.sh $1

//重启zabbix客户端
[root@nginx script]# pkill zabbix
[root@nginx script]# zabbix_agentd
[root@nginx script]# ss -antl
State     Recv-Q    Send-Q       Local Address:Port        Peer Address:Port    Process
LISTEN    0         128                0.0.0.0:22               0.0.0.0:*
LISTEN    0         128                0.0.0.0:10050            0.0.0.0:*
LISTEN    0         128                0.0.0.0:80               0.0.0.0:*
LISTEN    0         128                   [::]:22                  [::]:*
在zabbix服务端测试
[root@zabbix_server ~]# zabbix_get -s 192.168.10.102 -p 10050 -k "nginx.status[waiting]"
0
[root@zabbix_server ~]# zabbix_get -s 192.168.10.102 -p 10050 -k "nginx.status[requests]"
14
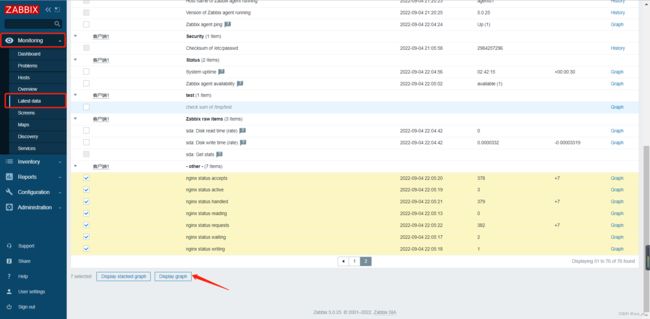
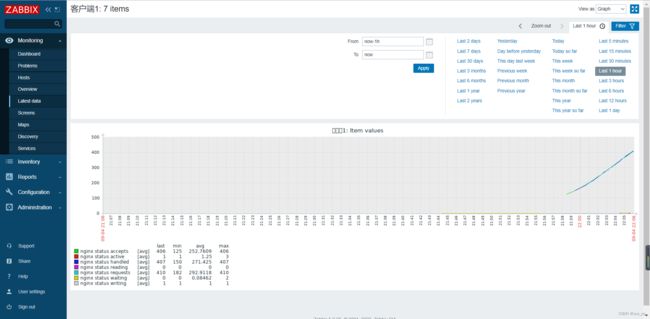
添加监控项
8. 基于nginx实现负载均衡
| 主机名 | 已配置 | IP地址 |
|---|---|---|
| zabbix_server | lamp | 192.168.10.101 |
| nginx | nginx | 192.168.10.102 |
| web | httpd | 192.168.10.103 |
web端用yum安装httpd并配置好web界面
[root@web html]# cat index.html
nginx.example.com
zabbix服务端:
//关闭zabbix服务,删除httpd虚拟主机
[root@zabbix_server ~]# pkill zabbix
[root@zabbix_server ~]# cd /usr/local/apache/conf
[root@zabbix_server conf]# vim httpd.conf

//创建测试文件
[root@zabbix_server conf]# cd ..
[root@zabbix_server apache]# cd htdocs/
[root@zabbix_server htdocs]# echo "lamp.example.com" > index.html
nginx端:
//开启负载均衡
[root@nginx ~]# vim /usr/local/nginx/conf/nginx.conf
	upstream test {
        server 192.168.10.101;
        server 192.168.10.103;
    }
    server {
        listen       80;
        server_name  localhost;
        location / {
            proxy_pass http://test;
        }
[root@nginx ~]# nginx -s reload


![[外链图片转存失败,源站可能有防盗链机制,建议将图片保存下来直接上传(img-Y0oz6o3H-1662352070203)(E:\App\Typora\Typora\picture\image-20220904220125161.png)]](http://img.e-com-net.com/image/info8/b9a3a96fd6b443e081af91300f6b4e0f.jpg)


