微服务架构网关组件Spring Cloud Gateway 用法详解和实战案例
文章目录
-
- 一、Spring boot整合Spring Cloud Gateway
-
-
- 1. JavaBean 方式
- 2. yml配置
-
- 二、GateWay用法详解和案例实战
-
-
- 1. Predicates(断言)和Filters(过滤器)用法
-
-
- 1) Predicates
- 2)Filters
- 3) 实战
-
- 2. 集成Spring Cloud Hystrix在微服务架构中实现服务降级
- 3. 整合redis实现限流功能
- 4. 整合eureka实现动态路由
-
一、Spring boot整合Spring Cloud Gateway
Spring Cloud 官网对gateway的用法和说明如下:
| 原文 | 翻译 |
|---|---|
| Spring Cloud Gateway features | Spring Cloud GateWay 特性 |
| Built on Spring Framework 5, Project Reactor and Spring Boot 2.0 | 基于Spring 5,Reactor项目和Spring Boot 2.0版本构建 |
| Able to match routes on any request attribute. | 能够匹配任何请求 |
| Predicates and filters are specific to routes. | 可以对路由指定断言和过滤器 |
| Circuit Breaker integration. | 能够集成断路器Hystrix |
| Spring Cloud DiscoveryClient integration | 能够集成服务发现客户端 |
| Easy to write Predicates and Filters | 容易写断言和过滤器 |
| Request Rate Limiting | 请求限流 |
| Path Rewriting | 路径重写 |
可以发现Spring Cloud Gateway 具有请求转发、拦截请求、服务降级、限流等功能,接下来用Spring boot整合Spring Cloud Gateway,需要注意的是版本要对应上,否则在启动的时候会出现报错,如找不到类等情况。
Spring Boot 版本:
<parent>
        <groupId>org.springframework.bootgroupId>
        <artifactId>spring-boot-starter-parentartifactId>
        <version>2.1.7.RELEASEversion>
        <relativePath/>
parent>
Spring Cloud 版本:
 <dependencyManagement>
        <dependencies>
            <dependency>
                <groupId>org.springframework.cloudgroupId>
                <artifactId>spring-cloud-dependenciesartifactId>
                <version>Greenwich.SR2version>
                <type>pomtype>
                <scope>importscope>
            dependency>
        dependencies>
dependencyManagement>
Spring Cloud Gateway 依赖:
 <dependency>
            <groupId>org.springframework.cloudgroupId>
            <artifactId>spring-cloud-starter-gatewayartifactId>
dependency>
注:
1. gateway配置不能与spring-boot-starter-web 依赖放一起,否则会报错,出现冲突!
2. 上面组件版本会沿用到下面的案例 。
有两种方式可以开启 gateway配置
1. JavaBean 方式
重新定义 RouteLocator ,指定routes和predicates。
package com.example.gateway.config;

import org.springframework.cloud.gateway.route.RouteLocator;
import org.springframework.cloud.gateway.route.builder.RouteLocatorBuilder;
import org.springframework.context.annotation.Bean;
import org.springframework.context.annotation.Configuration;

/**
 * @author bingbing
 * @date 2021/4/20 0020 9:58
 */
@Configuration
public class RouteConfig {

    @Bean
    public RouteLocator customRouteLocator(RouteLocatorBuilder locatorBuilder) {
        return locatorBuilder.routes()
                .route("shop-route1", r -> r.path("/product/all")
                        .uri("http://localhost:8001/product/all")
                )
                .build();
    }
}
2. yml配置
spring:
  application:
    name: gateway
  cloud:
    gateway:
      routes:
        - id: shop-route #路由的ID
          uri: ${service-url.my-shop}/product/all #匹配后路由地址
          predicates: # 匹配地址栏上的uri
            - Path=/shop/product/all
指定路由id, uri 为断言匹配后的路由。predicates 为匹配地址栏上uri的规则。
二、GateWay用法详解和案例实战
1. Predicates(断言)和Filters(过滤器)用法
1) Predicates
predicates可以按照一定规则来匹配地址栏上的uri, predicates常见的属性如下表
| 属性 | 栗子 | 说明 |
|---|---|---|
| - After | 2021-04-20T 08:30:00+08:00[Asia/Shanghai] | 在这个时间点之后匹配路由 |
| - Before | 2021-04-20T 08:30:00+08:00[Asia/Shanghai] | 在这个时间点之前匹配路由 |
| - Between | 2021-04-20T 08:30:00+08:00[Asia/Shanghai] ,2021-04-20T 09:30:00+08:00[Asia/Shanghai] | 在这个时间段内才匹配路由 |
| - Cookie | username,bingbing | cookie里带有username =bingbing的匹配 |
| - Header | token , \d+ | 匹配请求头,请求头里还有token=123456 的匹配 |
| - Host | **.bingbing.com | 匹配域名为后缀为bingbing.com的host |
| - Method | GET | 匹配请求方式为GET的请求 |
| - Path | /user/info | uri为/user/info的请求才匹配 |
| - Query | username | 携带参数为usernam的请求才匹配 |
| - Weight | - Weight=group1, 8 | 需要结合两个路由一起使用,并且给要相同的group, 8为权重,指的是匹配到后80的请求会路由到指定的 uri |
2)Filters
路由过滤器能在匹配到路由的同时可以对原有地址添加额外的规则和属性, 他们都由GatewayFilter工厂类来生成。
| 属性 | 栗子 | 说明 |
|---|---|---|
| - AddRequestParameter | username,bingbing | 添加请求参数的过滤器 , 参数和值有 逗号 ‘,’ 隔开 |
| - StripPrefix | 1 | 去除掉原有Uri的第一个’/’ 和第二个 ‘/’ 里的内容去除,例如 /base/user–> /user |
| - PrefixPath | /user | 用法与 - StripPrefix 相反,在原有的地址前添加 /user |
| - Hystrix | args: \n name: \n goods-hystrix args: \n fallbackUri: \n forward:/fallback | 需要在 指定两个参数,name 为断路器名称, fallbackUri 为回调的地址,前缀用 forward: |
| - Retry | args:\n retries:\n 1 args:\n statues:\n BAD_GATEWAY | 包含2个参数,retires为失败重试次数, statues为HTTP状态码 |
| - RequestRateLimiter | redis-rate-limiter.replenishRate: 1 #每秒允许处理的请求数量 redis-rate-limiter.burstCapacity: 2 #每秒最大处理的请求数量 key-resolver: “#{@ipKeyResolver}” | 配置每秒最大请求数量。通过对ip进行限流。 |
 |
||
 |
3) 实战
以下案例用到的模块
springcloud-gateway
├── nginx – 转发请求到网关,配置域名
├── base-service – 相当于base服务
├── shop-service— 相当于shop 服务
└──gateway – gateway作为网关的测试服务
场景一:
通过网关路由到不同的服务上。
假设有2个服务,一个base服务,一个shop服务。
访问base服务用地址:http://www.bingbing.com/api/base,。
访问shop服务用http://www.bingbing.com/api/shop。
实际在服务中的地址不包含服务名前缀 base和shop。
1) nginx配置域名和反向代理,将请求转发到gateway服务上,gateway的端口为9000
    server {
        listen       80;
        server_name  www.bingbing.com;

        #charset koi8-r;

        #access_log  logs/host.access.log  main;

        location / {
				proxy_pass   http://116.62.146.90:8080;
        }


       location ^~/api/ {
          client_body_timeout  7200;
          proxy_read_timeout 7200;
          proxy_send_timeout 7200;
          proxy_pass   http://127.0.0.1:9000/;
          proxy_set_header Host $host;

       }
  }
启动nginx。
注: windows环境下,nginx启动一次会生成一个进程,因此再次启动后,需要先结束上一次启动的nginx进程! 否则会出现更改配置不生效的问题。
可以在cmd里执行如下命令结束nginx进程。
taskkill /IM nginx.exe /F
2) 使用filters 过滤请求,用 StripPrefix 去掉服务前缀 shop 和base。
注: yml文件的配置复制过去可能会报错,因为复制到csdn的代码框里文本的格式会发生改变,这点需要注意,我们应该多注意配置的级别,每个冒号后面要空格!
server:
  port: 9000
service-url:
  my-shop: http://localhost:8001
  user: http://localhost:8002
spring:
  application:
    name: gateway
  cloud:
    gateway:
      routes:
        - id: shop-route #路由的ID
          uri: ${service-url.my-shop}/product/all #匹配后路由地址
          predicates: # 匹配地址栏上的uri
            - Path=/shop/product/all
          filters:
            - StripPrefix=1 # 去掉前缀 /shop
        - id: base-service-route
          uri: ${service-url.user}/user/info
          predicates:
            - Path=/base/user/info
            - Method=GET
          filters:
            - StripPrefix=1
分别访问 http://www.bingbing.com/api/base/user/info 和 http://www.bingbing.com/api/shop/product/all

![]()
2. 集成Spring Cloud Hystrix在微服务架构中实现服务降级
gateway可以整合Hystrix实现服务降级,如果某个服务突然出现宕机或者网络异常等问题,应该及时的将该服务断开,然后报警,找出问题后,解决即可。
        <dependency>
            <groupId>org.springframework.cloudgroupId>
            <artifactId>spring-cloud-starter-netflix-hystrixartifactId>
        dependency>
添加Hystrix配置:
server:
port: 9000
service-url:
my-shop: http://localhost:8001
user: http://localhost:8002
spring:
application:
name: gateway
cloud:
gateway:
routes:
- id: shop-route #路由的ID
uri: ${service-url.my-shop}/product/all #匹配后路由地址
predicates: # 匹配地址栏上的uri
- Path=/shop/product/all
filters:
- StripPrefix=1 # 去掉前缀 /shop
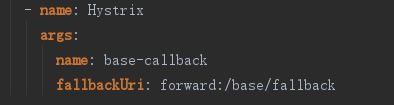
- name: Hystrix
args:
name: shop-hystix
fallBackUri: forward:/fail/shop-service/call/back
- id: base-service-route
uri: ${service-url.user}/user/info
predicates:
- Path=/base/user/info
- Method=GET
filters:
- name: Retry
args:
retries: 1 # 调用失败需要进行重试的次数,比如因为网络原因出现502等
statuses: BAD_GATEWAY
- StripPrefix=1
- name: Hystrix
args:
name: base-hystrix
fallBackUri: forward:/fail/base-service/call/back
添加回调方法,与fallBackUri相呼应:
package com.example.gateway.controller;

import org.springframework.web.bind.annotation.GetMapping;
import org.springframework.web.bind.annotation.PathVariable;
import org.springframework.web.bind.annotation.RequestMapping;
import org.springframework.web.bind.annotation.RestController;

import java.util.HashMap;
import java.util.Map;

/**
 * @author bingbing
 * @date 2021/4/23 0023 9:56
 */
@RestController
@RequestMapping("/fail")
public class FallBackController {


    @GetMapping("/{user-service}/call/back")
    public Object FallBack(@PathVariable("user-service") String userService) {
        Map<String, Object> result = new HashMap<>();
        result.put("data", null);
        result.put("message", "请稍后重试!");
        result.put("code", 500);
        // 报警,提示哪个服务出错
        System.out.println(userService + "错误!");
        // sendEmail(admin,userService,"服务出错")
        return result;
    }
}
断掉base服务后,再访问base服务:

断掉shop服务后,再次访问shop服务:

查看控制台的Log:

3. 整合redis实现限流功能
RequestRateLimiter过滤器能够配合网关实现限流,添加限流相关依赖:
 <dependency>
            <groupId>org.springframework.bootgroupId>
            <artifactId>spring-boot-starter-data-redis-reactiveartifactId>
dependency>
添加yml配置, 指定key-resolver,key-resolver为限流的对象。
server:
  port: 9000
service-url:
  my-shop: http://localhost:8001
spring:
  redis:
    host: localhost
    password: 123456
    port: 6379
  application:
    name: gateway
  cloud:
    gateway:
      routes:
        - id: shop-route #路由的ID
          uri: ${service-url.my-shop}/product/all #匹配后路由地址
          predicates: # 匹配地址栏上的uri
            - Path=/shop/product/all
          filters:
            - StripPrefix=1 # 去掉前缀 /shop
            - name: RequestRateLimiter
              args:
                redis-rate-limiter.replenishRate: 1
                redis-rate-limiter.burstCapacity: 2
                key-resolver: "#{@ipKeyResolver}"
指定限流策略,需要我们自己去实现KeyResolver接口, 如果我们需要对ip进行限流。
package com.example.gateway.config;

import org.springframework.cloud.gateway.filter.ratelimit.KeyResolver;
import org.springframework.context.annotation.Bean;
import org.springframework.context.annotation.Configuration;
import reactor.core.publisher.Mono;

/**
 * @author bingbing
 * @date 2021/4/22 0022 11:47
 */
@Configuration
public class RedisRateLimiterConfig {


    @Bean
    public KeyResolver ipKeyResolver() {
        return exchange -> Mono.just(exchange.getRequest().getRemoteAddress().getHostName());
    }
}
也可以对参数进行限流, 只需要修改获取到的参数即可。
  @Bean
    public KeyResolver userKeyResolver() {
        return exchange -> Mono.just(exchange.getRequest().getQueryParams().getFirst("username"));
    }
然后我可以快速地发起请求, 1s点两次http://www.bingbing.com/api/shop/product/all,观察页面响应。
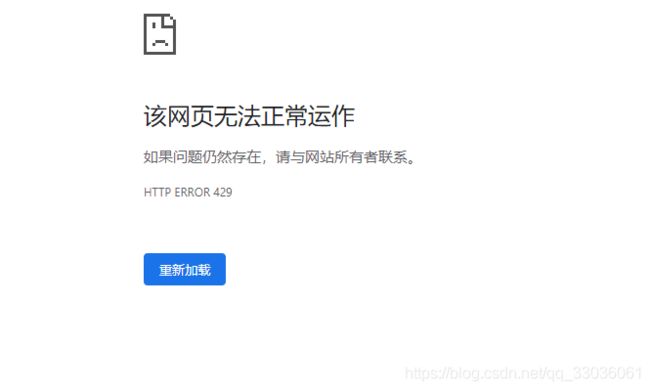
请求被gateway拦截下来了。
限流相关源码解析
gateway借助redis是如何实现限流的呢?
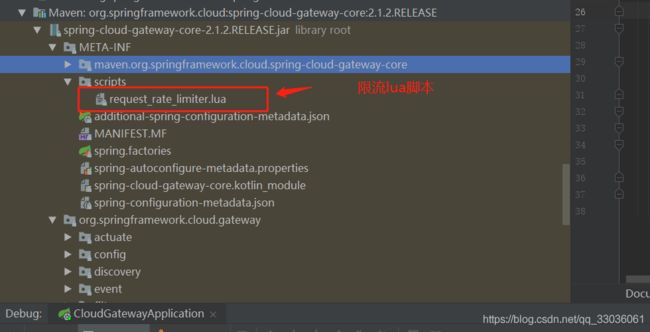
答: 是借助lua脚本,能够在分布式环境下保证限流的解决方案,我们在jar包里查看lua的源码
local tokens_key = KEYS[1]
local timestamp_key = KEYS[2]
--redis.log(redis.LOG_WARNING, "tokens_key " .. tokens_key)

local rate = tonumber(ARGV[1])
local capacity = tonumber(ARGV[2])
local now = tonumber(ARGV[3])
local requested = tonumber(ARGV[4])

local fill_time = capacity/rate
local ttl = math.floor(fill_time*2)

--redis.log(redis.LOG_WARNING, "rate " .. ARGV[1])
--redis.log(redis.LOG_WARNING, "capacity " .. ARGV[2])
--redis.log(redis.LOG_WARNING, "now " .. ARGV[3])
--redis.log(redis.LOG_WARNING, "requested " .. ARGV[4])
--redis.log(redis.LOG_WARNING, "filltime " .. fill_time)
--redis.log(redis.LOG_WARNING, "ttl " .. ttl)

local last_tokens = tonumber(redis.call("get", tokens_key))
if last_tokens == nil then
  last_tokens = capacity
end
--redis.log(redis.LOG_WARNING, "last_tokens " .. last_tokens)

local last_refreshed = tonumber(redis.call("get", timestamp_key))
if last_refreshed == nil then
  last_refreshed = 0
end
--redis.log(redis.LOG_WARNING, "last_refreshed " .. last_refreshed)

local delta = math.max(0, now-last_refreshed)
local filled_tokens = math.min(capacity, last_tokens+(delta*rate))
local allowed = filled_tokens >= requested
local new_tokens = filled_tokens
local allowed_num = 0
if allowed then
  new_tokens = filled_tokens - requested
  allowed_num = 1
end

--redis.log(redis.LOG_WARNING, "delta " .. delta)
--redis.log(redis.LOG_WARNING, "filled_tokens " .. filled_tokens)
--redis.log(redis.LOG_WARNING, "allowed_num " .. allowed_num)
--redis.log(redis.LOG_WARNING, "new_tokens " .. new_tokens)

redis.call("setex", tokens_key, ttl, new_tokens)
redis.call("setex", timestamp_key, ttl, now)

return { allowed_num, new_tokens }
跟着源码去寻找限流方法,首先找到jar包文件
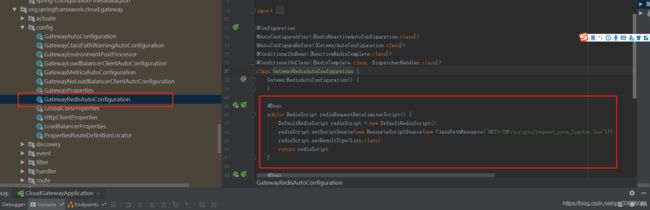
由springboot加载机制可知道,我们可以先找到 gateway源码的GatewayRedisAutoConfiguration。从redisRequestRateLimiterScript 方法可以发现加载lua脚本的过程和方法。
找到源码后接下来可以去发现RequestRateLimiter里更多的秘密和机制。
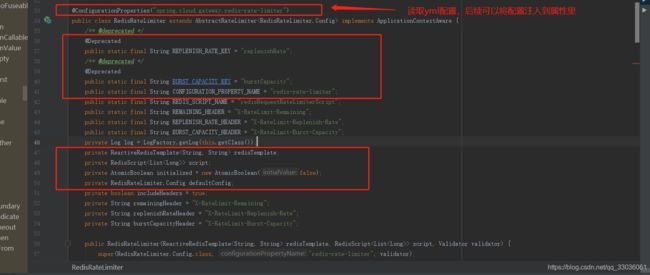
RedisRateLimiter源码解析分析限流的执行流程
首先RequestRateLimiter类里包含2个重要的属性replenishRate和burstCapcity。
- replenishRate: 每秒允许出来的请求数量。
- burstCapacity: 每秒最大的请求数量,超过该数量会报错 TOO MANY REQUEST, 前端页面会展示429的提示。
这两个变量会作为lua脚本需要的args,还会有一些其他的变量参数在发挥作用。
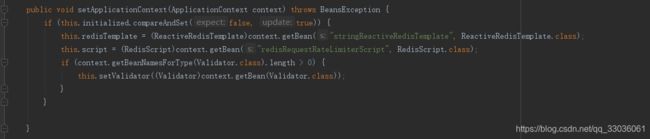
-
lua脚本初始化完毕后,找到RedisRateLimiter类,可以发现在setApplicationContext方法里将lua脚本赋值给了RedisRateLimiter的
RedisScript对象
-
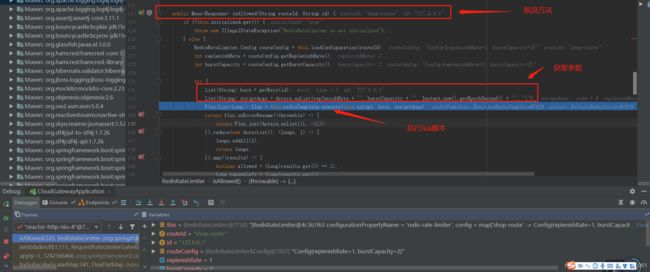
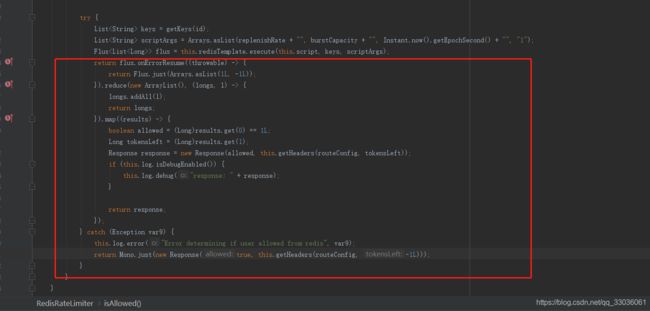
跟着debug,发现isAllowed()方法是实现限流的主要方法。
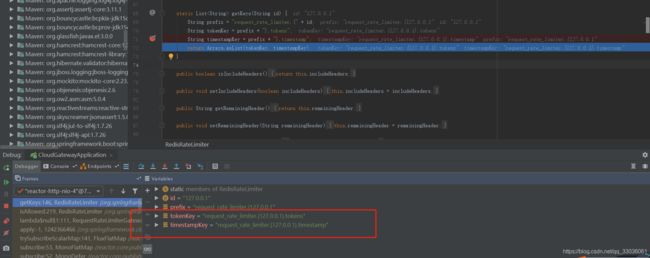
getKeys()方法能够返回Lua脚本需要的tokens_key 和timestamp_key -
接着获取到lua脚本需要的参数scriptsargs,
ListscriptArgs = Arrays.asList(replenishRate + "", burstCapacity + "", Instant.now().getEpochSecond() + "", "1"); -
在redis里 执行lua脚本。
Flux
-
根据执行结果响应前端。用了flux框架,不是很明白这个东西,后续会继续学习。
4. 整合eureka实现动态路由
springcloud-gateway
├── eureka – 实现服务发现功能。
├── nginx – 转发请求到网关,配置域名
├── base-service – 相当于base服务
├── shop-service— 相当于shop 服务
└── gateway – gateway作为网关的测试服务
添加eureka客户端依赖:
        <dependency>
            <groupId>org.springframework.cloudgroupId>
            <artifactId>spring-cloud-starter-netflix-eureka-clientartifactId>
        dependency>
注: 注册到eureka的服务名默认为大写!

配置eureka, 将uri参数修改为 lb协议的加服务名。通过 - StripPrefix=1 去掉服务名前缀,在服务的请求前添加前缀,这样url可以区分是请求的哪个服务。
server:
  port: 9000
spring:
  application:
    name: gateway
  cloud:
    gateway:
      routes:
        - id: shop-route #路由的ID
          uri: lb://SHOP
          predicates:
            - Method=GET
            - Path=/shop/**
          filters:
            - StripPrefix=1
            - name: Retry
              args:
                retires: 1
                statues: BAD_GATEWAY
            - name: Hystrix
              args:
                name: shop-hystrix
                fallBackUri: forward:/fail/shop-service/call/back

        - id: base-service-route
          uri:  lb://BASE-SERVICE
          predicates:
            - Method=GET
            - Path=/base/**
          filters:
            - name: Retry
              args:
                retries: 1 # 调用失败需要进行重试的次数,比如因为网络原因出现502等
                statuses: BAD_GATEWAY
            - StripPrefix=1
            - name: Hystrix # 整合断路器实现服务降级
              args:
                name: base-hystrix
                fallBackUri: forward:/fail/base-service/call/back


eureka:
  instance:
    hostname: ${spring.cloud.client.ip-address}
    prefer-ip-address: true
    instance-id:  ${eureka.instance.hostname}:${server.port}
  client:
    service-url:
      defaultZone: http://116.62.146.90:8008/eureka

logging:
  level:
    org.springframework.cloud.gateway: debug
查看控制台:
可以发现gateway从eureka那里拉取到服务名,然后通过exchange将请求转发到指定服务。
![]()
访问http://www.bingbing.com/api/base/user/info:

学习路漫漫,唯有坚持无懈可击!~
代码地址: https://gitee.com/bingbing-123456/springcloud-gateway.git