Mysql集群之mysql双主双活+keepalived实现高可用_mysql+keepalived搭建教程
该教程再linux系统下
从部署单台mysql -->到部署两台双主mysql-->再到安装keepalived-->整体测试
从而实现mysql双主双活高可用的目标。
改文档由本人亲自部署搭建一步一步编写而来,实属不易,如对您有所帮助,请收藏点个赞,如有不合理地方,请留言,及时进行更正。
目录
一、介绍
二、准备工作
三、安装mysql
四、mysql数据库双主双从配置
五、双主双从测试
六、keepalived安装
七、mysql双主双活+keepalived高可用整体测试
一、介绍
MySQL双主双活是指两台mysql服务器mysql-1、mysql-2都为master主节点服务器,同时又是对方的slave从节点,每个数据库都可作为主数据库使用,并将对数据库操作的数据同步至另外一台mysql服务中。
当应用服务开发过程中使用了mysql-1连接信息,在打包发布后,数据库连接信息已经固定,当数据库mysql-1出现异常时,需要人工干预先将应用服务停止-->将应用服务的mysql连接信息改为mysql-2 -->在启动应用服务器,比较繁琐,当应用服务器较多时,一个一个关闭,修改,再重启,将耽误更多时间,应用服务器修复故障时间延长,严重时会造成灾难性的后果。
故而引入了keepalived,keepalived通过VIP虚拟IP的漂移实现高可用,在相同集群内发送组播包,master主通过VRRP协议发送组播包,告诉从主的状态。
当我们通过keepalived虚拟出一个ip服务 mysql-3,应用服务只需要将mysql配置信息更改为mysql-3的配置信息,mysql-3实际代理的实体服务器为mysql-1或mysql-2。
例如:当mysql-3实际代理mysql-1时,mysql-1服务出现故障后,keepalived通过自身机制,自动将mysql-2作为实际代理主服务器,不需要人工干预去修改mysql配置信息,从而实现了高可用。
二、准备工作
1.两台centos7 linux服务器
mysql-1:192.168.222.128
mysql-2:192.168.222.129
2.mysql安装包
版本:mysql-5.7.36-el7-x86_64.tar.gz
下载地址:https://cdn.mysql.com/archives/mysql-5.7/mysql-test-5.7.36-el7-x86_64.tar.gz
3.keepalived安装包
版本:keepalived-2.2.7.tar.gz
下载地址:https://www.keepalived.org/software/keepalived-2.2.7.tar.gz
三、安装mysql
1.在128、129两台服务器根据《linux安装mysql服务-两种安装方式教程》安装好mysql应用。
2.修改128服务器/etc/my.cnf配置文件,没有的话可自行创建,配置如下:
[client]
#客户端连接端口
port=3306
#客户端连接sock
socket=/opt/mysql5.7/log/mysql.socka
#客户端编码
default-character-set=utf8

[mysqld]
#mysql服务端口
port=3306
#安装目录
basedir=/opt/mysql5.7
#数据存放目录
datadir=/opt/mysql5.7/data
#sock文件地址
socket=/opt/mysql5.7/log/mysql.sock
#错误日志存放地址
log-error=/opt/mysql5.7/log/mysql.log
#pid文件地址
pid-file=/opt/mysql5.7/log/mysql.pid

#下面内容为mysq主备时配置,单mysql部署护理下面配置
#server-id 多台服务器时,此表示需要唯一
server-id=1
#主从同步bin-log日志文件名
log-bin=mysql-bin
#主从同步时,需要同步的数据库,多个数据库写多行binlog_do_db配置
binlog_do_db=test_db
#主从同步时,不需要同步的数据库,多个数据库写多行binlog_ignore_db配置
#binlog_ignore_db=mysql
#binlog_ignore_db=information_schema
#binlog_ignore_db=sys
#binlog_ignore_db=performance_schema
#主从同步方式
binlog_format=row
#服务端编码
character-set-server=utf8

!includedir /etc/my.cnf.d
3.修改129服务器/etc/my.cnf配置文件,只有server-id不同,为2配置如下
[client]
#客户端连接端口
port=3306
#客户端连接sock
socket=/opt/mysql5.7/log/mysql.socka
#客户端编码
default-character-set=utf8

[mysqld]
#mysql服务端口
port=3306
#安装目录
basedir=/opt/mysql5.7
#数据存放目录
datadir=/opt/mysql5.7/data
#sock文件地址
socket=/opt/mysql5.7/log/mysql.sock
#错误日志存放地址
log-error=/opt/mysql5.7/log/mysql.log
#pid文件地址
pid-file=/opt/mysql5.7/log/mysql.pid

#下面内容为mysq主备时配置,单mysql部署护理下面配置
#server-id 多台服务器时,此表示需要唯一
server-id=2
#主从同步bin-log日志文件名
log-bin=mysql-bin
#主从同步时,需要同步的数据库,多个数据库写多行binlog_do_db配置
binlog_do_db=test_db
#主从同步时,不需要同步的数据库,多个数据库写多行binlog_ignore_db配置
#binlog_ignore_db=mysql
#binlog_ignore_db=information_schema
#binlog_ignore_db=sys
#binlog_ignore_db=performance_schema
#主从同步方式
binlog_format=row
#服务端编码
character-set-server=utf8

!includedir /etc/my.cnf.d
5.重启mysql服务
[root@128 mysql5.7]# systemctl stop mysqld
[root@128 mysql5.7]# systemctl start mysqld
四、mysql数据库双主双从配置
1.连接128服务器mysql,并创建主从同步账户slavebak,并查看master状态,记录下file、psition值,配置129mysql从库时使用
[root@128 ~]# /opt/mysql5.7/bin/mysql -uroot -proot
mysql: [Warning] Using a password on the command line interface can be insecure.
......
Type 'help;' or '\h' for help. Type '\c' to clear the current input statement.

mysql> grant replication slave on *.* to slavebak@'%' identified by 'slavebak';
mysql> flush privileges;
mysql> show master status;
+------------------+----------+--------------+------------------+-------------------+
| File             | Position | Binlog_Do_DB | Binlog_Ignore_DB | Executed_Gtid_Set |
+------------------+----------+--------------+------------------+-------------------+
| mysql-bin.000002 |     1287 | test_db      |                  |                   |
+------------------+----------+--------------+------------------+-------------------+
1 row in set (0.01 sec)
mysql>
2.连接129服务器,使用slavebak用户远程登录128mysql,测试连接是否正常。
[root@129 ~]# /opt/mysql5.7/bin/mysql -h192.168.222.128 -uslavebak -pslavebak
mysql: [Warning] Using a password on the command line interface can be insecure.
......
Type 'help;' or '\h' for help. Type '\c' to clear the current input statement.

mysql> exit;
[root@129 ~]#
3.在129服务器用root连接本服务器mysql,并配置128的主库信息
[root@129 ~]# /opt/mysql5.7/bin/mysql -uroot -proot
mysql: [Warning] Using a password on the command line interface can be insecure.
......
Type 'help;' or '\h' for help. Type '\c' to clear the current input statement.

mysql> change master to
    -> master_host='192.168.222.128',            #128服务器mysql ip
    -> master_port=3306,                         #128服务器mysql端口
    -> master_user='slavebak',                   #128服务器mysql从库同步用户
    -> master_password='slavebak',               #128服务器mysql从库同步用户密码
    -> master_log_file='mysql-bin.000002',       #前面记录的128服务mysql file值
    -> master_log_pos=1287;                      #前面记录的128服务mysql psition值
Query OK, 0 rows affected, 2 warnings (0.02 sec)

mysql> start slave;            #启动从库配置
4.查看129从库配置是否成功Slave_IO_Running、Slave_SQL_Running都为yes则成功
mysql> show slave status;
mysql> show slave status \G;
*************************** 1. row ***************************
            ......
            Slave_IO_Running:  Yes                    #此值为yes配置成功
            Slave_SQL_Running: Yes                    #此值为yes配置i成功
            ......
1 row in set (0.01 sec)
5.在129服务器mysql创建主从同步账户slavebak,查看master状态,记录下file、psition值
mysql> grant replication slave on *.* to slavebak@'%' identified by 'slavebak';
mysql> flush privileges;
mysql> show master status;
+------------------+----------+--------------+------------------+-------------------+
| File             | Position | Binlog_Do_DB | Binlog_Ignore_DB | Executed_Gtid_Set |
+------------------+----------+--------------+------------------+-------------------+
| mysql-bin.000002 |     848  | test_db      |                  |                   |
+------------------+----------+--------------+------------------+-------------------+
1 row in set (0.01 sec)
6.连接128服务器并使用root用户连接本服务器mysql,配置129的主库信息
[root@128 ~]# /opt/mysql5.7/bin/mysql -uroot -proot
mysql: [Warning] Using a password on the command line interface can be insecure.
......
Type 'help;' or '\h' for help. Type '\c' to clear the current input statement.

mysql> change master to
    -> master_host='192.168.222.129',            #129服务器mysql ip
    -> master_port=3306,                         #129服务器mysql端口
    -> master_user='slavebak',                   #129服务器mysql从库同步用户
    -> master_password='slavebak',               #129服务器mysql从库同步用户密码
    -> master_log_file='mysql-bin.000002',       #前面记录的129服务mysql file值
    -> master_log_pos=848;                       #前面记录的129服务mysql psition值
Query OK, 0 rows affected, 2 warnings (0.02 sec)

mysql> start slave;            #启动从库配置
7.查看128从库配置是否成功Slave_IO_Running、Slave_SQL_Running都为yes则成功
mysql> show slave status;
mysql> show slave status \G;
*************************** 1. row ***************************
            ......
            Slave_IO_Running:  Yes                    #此值为yes配置成功
            Slave_SQL_Running: Yes                    #此值为yes配置i成功
            ......
1 row in set (0.01 sec)
至此,128服务器,129服务器双主双从配置完成
五、MySQL双主双从测试
1.连接128服务器,使用root用户连接本机mysql,并创建test_db数据库,t_test表,并插入一条数据id=1,name='zhangsan'
[root@128 ~]# /opt/mysql5.7/bin/mysql -uroot -proot
mysql: [Warning] Using a password on the command line interface can be insecure.
......
Type 'help;' or '\h' for help. Type '\c' to clear the current input statement.

mysql> create database test_db;
Query OK, 1 row affected (0.00 sec)

mysql> use test_db;
mysql> create table t_test(id int primary key, name varchar(30));
Query OK, 0 row affected (0.01 sec)
mysql> insert into t_test values (1, 'zhangsan');
Query OK, 1 row affected (0.01 sec)
mysql> select * from t_test;
+----+----------+
| id | name     |
+----+----------+
|  1 | zhangsan |
+----+----------+
1 rows in set (0.00 sec)
2.连接129服务器,使用root用户连接mysql,查看test_db数据库、t_test表以及数据是否同步,并插入id=2,name=‘lisi’
[root@129 ~]# /opt/mysql5.7/bin/mysql -uroot -proot
mysql: [Warning] Using a password on the command line interface can be insecure.
......
Type 'help;' or '\h' for help. Type '\c' to clear the current input statement.

mysql> show databases;
+--------------------+
| Database           |
+--------------------+
| information_schema |
| mysql              |
| performance_schema |
| sys                |
| test_db            |        #test_db数据库已同步过来
+--------------------+
5 rows in set (0.01 sec)

mysql> use test_db;
mysql> show tables;
+-------------------+
| Tables_in_test_db |
+-------------------+
| t_test            |        #t_test表已同步过来
+-------------------+
1 row in set (0.01 sec)

mysql> select * from t_test;
+----+----------+
| id | name     |
+----+----------+
|  1 | zhangsan |            #数据已同步过来
+----+----------+
1 rows in set (0.00 sec)

mysql> insert into t_test values (2, 'lisi');
Query OK, 1 row affected (0.01 sec)
3.在128服务器查看id=2,name="lisi" 是否同步
[root@128 ~]# /opt/mysql5.7/bin/mysql -uroot -proot
mysql: [Warning] Using a password on the command line interface can be insecure.
......
Type 'help;' or '\h' for help. Type '\c' to clear the current input statement.

mysql> select * from t_test;
+----+----------+
| id | name     |
+----+----------+
|  1 | zhangsan |
|  2 | lisi     |            #lisi数据已同步
+----+----------+
1 rows in set (0.00 sec)
至此,数据库双主双从测试完成。
六、keepalived安装
128、129两台服务器安装步骤相同,配置文件不同,下面有介绍。
1.安装相关依赖包,并下载keepalived安装包,解压,配置,编译
[root@128 ~]# cd /opt
[root@128 opt]# yum -y install gcc openssl-devel popt-devel psmisc
[root@128 opt]# wget https://www.keepalived.org/software/keepalived-2.2.7.tar.gz
[root@128 opt]# tar -zxvf keepalived-2.2.7.tar.gz
[root@128 opt]# cd keepalived-2.2.7
[root@128 keepalived-2.2.7]# ./configure --prefix=/opt/keepalived2.2.7
[root@128 keepalived-2.2.7]# make && make install
2.将文件复制到对应目录下
[root@128 keepalived-2.2.7]# mkdir /etc/keepalived
[root@128 keepalived-2.2.7]# cp keepalived/etc/keepalived/keepalived.conf.sample /etc/keepalived/keepalived.conf
[root@128 keepalived-2.2.7]# cp keepalived/etc/init.d/keepalived /etc/init.d/
[root@128 keepalived-2.2.7]# cp keepalived/etc/sysconfig/keepalived /etc/sysconfig/
[root@128 keepalived-2.2.7]# cp bin/keepalived /usr/sbin/
3.新建/etc/keepalived/shutdown.sh文件,内容为:
#!/bin/bash
#该脚本是在mysql服务出现异常时,将keepalived应用停止,从而使虚拟vip主机自动连接到另一台mysql上
killall keepalived
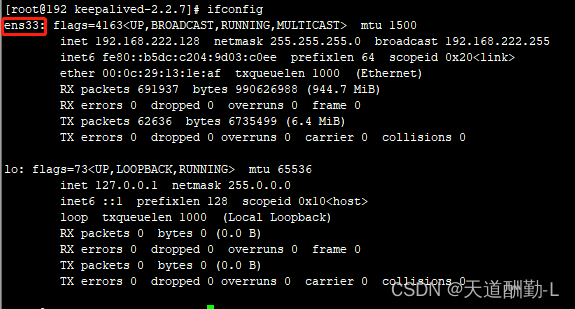
4.使用ifconfig命令查看下网卡名称,本机网卡名称为ens33
5.修改128服务器/etc/keepalived/keepalived.conf配置文件,内容如下:
! Configuration File for keepalived

global_defs {
   notification_email {
     [email protected]
     [email protected]
     [email protected]
   }
   notification_email_from [email protected]
   smtp_server 192.168.200.1
   smtp_connect_timeout 30
   router_id LVS_MASTER
   vrrp_skip_check_adv_addr
   vrrp_strict
   vrrp_garp_interval 0
   vrrp_gna_interval 0
}

vrrp_instance VI_1 {
    state MASTER
    #interface为刚才查到的本机网卡名称
    interface ens33
    #同一网段中同一组virtual_router_id值相同。不同组virtual_router_id值唯一。
    #如server-1、server-2为一组,virtual_router_id=51
    #server-3、server-4为一组,则virtual_router_id不能为51
    virtual_router_id 51
    priority 100
    advert_int 1
    authentication {
        auth_type PASS
        auth_pass 1111
    }
    virtual_ipaddress {
       #该ip为虚拟出来的vip地址
       192.168.222.130
    }
}

#配置virtual_server  ip为上面配置的虚拟vip地址  端口为mysql的端口
virtual_server 192.168.222.130 3306 {
    delay_loop 6
    lb_algo rr
    lb_kind NAT
    persistence_timeout 50
    protocol TCP
    #real_server 该配置为实际物理机ip地址 以及实际物理机mysql端口
    real_server 192.168.222.128 3306 {
        #当该ip 端口连接异常时,执行该脚本
        notify_down /etc/keepalived/shutdow.sh
        TCP_CHECK {
            #实际物理机ip地址
            connect_ip 192.168.222.128
            connect_timeuot 3
            nb_get_retry 3
            delay_before_retry 3
        }
    }
}
6.修改129服务器/etc/keepalived/keepalived.conf配置文件,与128的配置不同地方为real_server、connect_ip 两个配置,需要配置对应的实际主机ip,详细内容如下:
! Configuration File for keepalived

global_defs {
   notification_email {
     [email protected]
     [email protected]
     [email protected]
   }
   notification_email_from [email protected]
   smtp_server 192.168.200.1
   smtp_connect_timeout 30
   router_id LVS_MASTER
   vrrp_skip_check_adv_addr
   vrrp_strict
   vrrp_garp_interval 0
   vrrp_gna_interval 0
}

vrrp_instance VI_1 {
    state MASTER
    #interface为刚才查到的本机网卡名称
    interface ens33
    #同一网段中同一组virtual_router_id值相同。不同组virtual_router_id值唯一。
    #如server-1、server-2为一组,virtual_router_id=51
    #server-3、server-4为一组,则virtual_router_id不能为51
    virtual_router_id 51
    priority 100
    advert_int 1
    authentication {
        auth_type PASS
        auth_pass 1111
    }
    virtual_ipaddress {
       #该ip为虚拟出来的vip地址
       192.168.222.130
    }
}

#配置virtual_server  ip为上面配置的虚拟vip地址  端口为mysql的端口
virtual_server 192.168.222.130 3306 {
    delay_loop 6
    lb_algo rr
    lb_kind NAT
    persistence_timeout 50
    protocol TCP
    #real_server 该配置为实际物理机ip地址 以及实际物理机mysql端口
    real_server 192.168.222.129 3306 {
        #当该ip 端口连接异常时,执行该脚本
        notify_down /etc/keepalived/shutdow.sh
        TCP_CHECK {
            #实际物理机ip地址
            connect_ip 192.168.222.129
            connect_timeuot 3
            nb_get_retry 3
            delay_before_retry 3
        }
    }
}
详细配置参考《Keepalived 安装和配置详解》
7.将128、129服务器keepalived加入开机自启,并启动服务
[root@128 keepalived-2.2.7]# systemctl enable keepalived
[root@128 keepalived-2.2.7]# systemctl start keepalived
8.启动后keepalived状态为:active(running)则正常
9.启动后相当于虚拟出一个vip 192.168.222.130,可使用远程连接工具,连接该服务器,连接进去后使用ifconfig查看该虚拟vip实际上使用的实体服务器是129服务器。
10.将129服务器的keepalived应用停止,再次查看130服务ifconfig,可以看到,130服务器自动将实体机ip漂移到了128服务器上
至此,keepalived部署完成。
七、mysql双主双活+keepalived高可用整体测试
1.首先将128、129两台服务器mysql、keepalived应用全部启动,然后用mysql连接工具连接keepalived虚拟出来的192.168.222.130服务器
2.再130数据库test_db库t_test表插入id=3,name='wangwu'
3.此时可以查看128、129数据库,数据已同步
4.查看130服务器ifconfig实际使用的物理机为128,所以128服务器mysql为主数据库。
5.此时手动将128服务器mysql停止,keepalived检测到128服务3306端口连接失败,会执行/etc/keepalived/shutdown.sh脚本,将128服务器keepalived应用结束。
6.此时再连接130服务下,ifconfig查看,发现已经实际将物理机由128转移到129服务器上
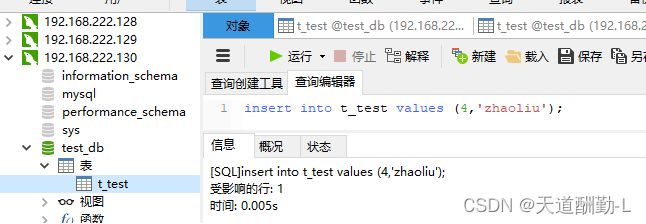
7.再使用mysql连接工具连接130的mysql,插入一条数据id=4,name='zhaoliu',测试是否将数据存入129服务器mysql中
8.查看129服务器mysql数据,数据已同步,说明keepalived搭建高可用成功,当128服务器mysql出现问题后keepalived自动漂移IP到实体机129服务器上,从而使129服务器mysql作为主数据库。
9.此时再启动128服务器mysql、keepalived应用
10.查看128数据库t_test表数据,数据已同步成功。
11.如果漂移失败,可能是virtual_router_id在同网段内重复导致。可执行命令查看是否有其他ip使用
[root@128 keepalived-2.2.7]# tcpdump -i 网卡名 vrrp -n |grep virtual_router_id值
#例如:
[root@128 keepalived-2.2.7]# tcpdump -i eno16777736 vrrp -n |grep 51
至此,mysql双主双活+keepalived高可用部署并测试完成。
编写不易,请收藏点赞,有问题可随时联系我,及时改正。


