VUE3.0,DAY63,Vue路由传参、路由命名、params参数、props配置
VUE3.0,DAY63
- 案例准备
- 传递参数
- 路由命名
- params参数
- props配置
案例准备
接上一篇案例,我们准备了两个类似按钮的东西,About和Home,点击Home又弹出News和Message。现在我们需要在点击Message下的信息,在弹出详情信息。
追加新建一个Detail.vue,里边代码如下:
<template>
  <ul>
    <li>消息编号:li>
    <li>消息标题:li>
  ul>
template>

<script>
export default {
  name: "Detail",
};
script>
路由的配置文件index.js中代码
// 该文件专门用于创建整个应用的路由器
import VueRouter from 'vue-router'
//引入组件
import About from '../components/About'
import Home from '../components/Home'
import News from '../components/News'
import Message from '../components/Message'
import Detail from '../components/Detail'
//创建并暴露一个路由器
export default new VueRouter({
    routes: [
        //前两个是一级路由,嵌套的话,是在一级路由里边在写新路由
        {
            path: '/about',
            component: About
        },
        {
            path: '/home',
            component: Home,
            // 下边是嵌套的二级路由,path中不用加/符号
            children: [
                {
                    path: 'news',
                    component: News,
                },
                {
                    path: 'message',
                    component: Message,
                    //我们需要点击message后,在继续显示东西
                    children: [
                        {
                            path: 'detail',
                            component: Detail,
                        }
                    ]
                }
            ]
        }
    ]
})
Message.vue代码
<template>
  <div>

    <ul v-for="m in messageList" :key="m.id">
      <li>
        <router-link to="/home/message/detail">{{ m.title }}router-link>

      li>
    ul>
    <hr />

    <router-view>router-view>
  div>
template>

<script>
export default {
  name: "Message",
  data() {
    return {
      messageList: [
        { id: "001", title: "消息001" },
        { id: "002", title: "消息002" },
        { id: "003", title: "消息003" },
      ],
    };
  },
};
script>
传递参数
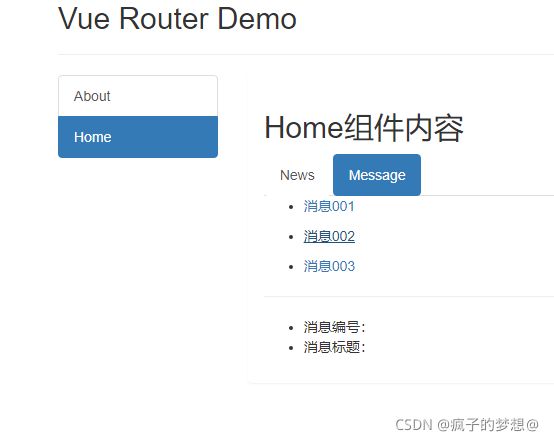
我们看到在消息编号和消息标题后是空着的,现在我们追加需求,要求点击消息002后,下边的编号和标题进行显示。
在message.vue中,router-link标签后的to表示当前的文件地址,在加个问号,就使用了jQuery进行传参数。
<template>
  <div>

    <ul v-for="m in messageList" :key="m.id">
      <li>


        <router-link :to="`/home/message/detail?id=${m.id}&title=${m.title}`">{{ m.title }}router-link>

      li>
    ul>
    <hr />

    <router-view>router-view>
  div>
template>

<script>
export default {
  name: "Message",
  data() {
    return {
      messageList: [
        { id: "001", title: "消息001" },
        { id: "002", title: "消息002" },
        { id: "003", title: "消息003" },
      ],
    };
  },
};
script>
在Detail.vue中要拿到传过来 的参数并进行渲染。
<template>
  <ul>

    <li>消息编号:{{ $route.query.id }}li>
    <li>消息标题:{{ $route.query.title }}li>
  ul>
template>

<script>
export default {
  name: "Detail",
};
script>
跳转路由并携带query参数除了上述字符串写法,还有第二种写法。在message.vue中代码修改如下:
<template>
  <div>

    <ul v-for="m in messageList" :key="m.id">
      <li>


        <router-link
          :to="{
            path: '/home/message/detail',
            query: {
              id: m.id,
              title: m.title,
            },
          }"
          >{{ m.title }}router-link
        >

      li>
    ul>
    <hr />

    <router-view>router-view>
  div>
template>

<script>
export default {
  name: "Message",
  data() {
    return {
      messageList: [
        { id: "001", title: "消息001" },
        { id: "002", title: "消息002" },
        { id: "003", title: "消息003" },
      ],
    };
  },
};
script>
路由命名
我们在路由配置文件index.js中直接给路由添加name属性,就是给路由命名了。代码如下:
// 该文件专门用于创建整个应用的路由器
import VueRouter from 'vue-router'
//引入组件
import About from '../components/About'
import Home from '../components/Home'
import News from '../components/News'
import Message from '../components/Message'
import Detail from '../components/Detail'
//创建并暴露一个路由器
export default new VueRouter({
    routes: [
        //前两个是一级路由,嵌套的话,是在一级路由里边在写新路由
        {//给路由起名字叫guanyu
            name: 'guanyu',
            path: '/about',
            component: About
        },
        {
            path: '/home',
            component: Home,
            // 下边是嵌套的二级路由,path中不用加/符号
            children: [
                {
                    path: 'news',
                    component: News,
                },
                {
                    path: 'message',
                    component: Message,
                    //我们需要点击message后,在继续显示东西
                    children: [
                        {
                            // 给路由起名字叫xiangqing
                            name: 'xiangqing',
                            path: 'detail',
                            component: Detail,
                        }
                    ]
                }
            ]
        }
    ]
})
路由的命名可以简化一些代码的书写,比如在message.vue中,我们的字符to后边要跟路由跳转地址,这里可以简化直接写要跳转的路由名字。注意这样用的方法是to必须写成对象的形式。
<template>
  <div>

    <ul v-for="m in messageList" :key="m.id">
      <li>


        <router-link
          :to="{
            name: 'xiangqing',
            query: {
              id: m.id,
              title: m.title,
            },
          }"
          >{{ m.title }}router-link
        >

      li>
    ul>
    <hr />

    <router-view>router-view>
  div>
template>

<script>
export default {
  name: "Message",
  data() {
    return {
      messageList: [
        { id: "001", title: "消息001" },
        { id: "002", title: "消息002" },
        { id: "003", title: "消息003" },
      ],
    };
  },
};
script>
params参数
ajax里的params参数,进行路由传参。
message.vue代码如下:
<template>
  <div>

    <ul v-for="m in messageList" :key="m.id">
      <li>


        <router-link :to="`/home/message/detail/${m.id}/${m.title}`">{{
          m.title
        }}router-link>


      li>
    ul>
    <hr />

    <router-view>router-view>
  div>
template>

<script>
export default {
  name: "Message",
  data() {
    return {
      messageList: [
        { id: "001", title: "消息001" },
        { id: "002", title: "消息002" },
        { id: "003", title: "消息003" },
      ],
    };
  },
};
script>
那么还要告诉路由,我们to后边的内容detail是路由地址,再往后就是参数了,在index.js中进行配置。
// 该文件专门用于创建整个应用的路由器
import VueRouter from 'vue-router'
//引入组件
import About from '../components/About'
import Home from '../components/Home'
import News from '../components/News'
import Message from '../components/Message'
import Detail from '../components/Detail'
//创建并暴露一个路由器
export default new VueRouter({
    routes: [
        //前两个是一级路由,嵌套的话,是在一级路由里边在写新路由
        {//给路由起名字叫guanyu
            name: 'guanyu',
            path: '/about',
            component: About
        },
        {
            path: '/home',
            component: Home,
            // 下边是嵌套的二级路由,path中不用加/符号
            children: [
                {
                    path: 'news',
                    component: News,
                },
                {
                    path: 'message',
                    component: Message,
                    //我们需要点击message后,在继续显示东西
                    children: [
                        {
                            // 给路由起名字叫xiangqing
                            name: 'xiangqing',
                            //告诉路由,路径detail后边的第一个是参数id,第二个是参数title
                            path: 'detail/:id/:title',
                            component: Detail,
                        }
                    ]
                }
            ]
        }
    ]
})
最后在Detail.vue中进行渲染
<template>
  <ul>

    <li>消息编号:{{ $route.params.id }}li>
    <li>消息标题:{{ $route.params.title }}li>
  ul>
template>

<script>
export default {
  name: "Detail",
  mounted() {
    console.log(this.$route);
  },
};
script>
第二种对象式的写法,如下。但有一个注意点是to后边必须使用命名路由,不允许使用path
<template>
  <div>

    <ul v-for="m in messageList" :key="m.id">
      <li>


        <router-link
          :to="{
            name: 'xiangqing',
            params: {
              id: m.id,
              title: m.title,
            },
          }"
          >{{ m.title }}router-link
        >

      li>
    ul>
    <hr />

    <router-view>router-view>
  div>
template>

<script>
export default {
  name: "Message",
  data() {
    return {
      messageList: [
        { id: "001", title: "消息001" },
        { id: "002", title: "消息002" },
        { id: "003", title: "消息003" },
      ],
    };
  },
};
script>
props配置
分析一下路由是怎么拿到别人传过来的参数的。我们看到在Detail.vue中我们要接收两个参数,就使用了如下写法,如果参数很多呢,我们需要简化代码。
<template>
  <ul>

    <li>消息编号:{{ $route.params.id }}li>
    <li>消息标题:{{ $route.params.title }}li>
  ul>
template>

<script>
export default {
  name: "Detail",
  mounted() {
    console.log(this.$route);
  },
};
script>
这就借用了路由route的一个props配置。所以哪个路由接收东西,我们就在哪个路由内设定配置,路由配置文件index.js内找到要接收东西的路由Detail。
index.js内代码
// 该文件专门用于创建整个应用的路由器
import VueRouter from 'vue-router'
//引入组件
import About from '../components/About'
import Home from '../components/Home'
import News from '../components/News'
import Message from '../components/Message'
import Detail from '../components/Detail'
//创建并暴露一个路由器
export default new VueRouter({
    routes: [
        //前两个是一级路由,嵌套的话,是在一级路由里边在写新路由
        {//给路由起名字叫guanyu
            name: 'guanyu',
            path: '/about',
            component: About
        },
        {
            path: '/home',
            component: Home,
            // 下边是嵌套的二级路由,path中不用加/符号
            children: [
                {
                    path: 'news',
                    component: News,
                },
                {
                    path: 'message',
                    component: Message,
                    //我们需要点击message后,在继续显示东西
                    children: [
                        {
                            // 给路由起名字叫xiangqing
                            name: 'xiangqing',
                            //告诉路由,路径detail后边的第一个是参数id,第二个是参数title
                            path: 'detail/:id/:title',
                            component: Detail,
                            //props的第一种写法,值为对象,该对象中的所有key,value都以props的形式传给Detail组件
                             props: { a: 1, b: 'hello' }
                            //props的第二种写法,值为布尔值,若布尔值为真,就会把该路由组件收到的所有params参数,以props的形式传给Detail

                        }
                    ]
                }
            ]
        }
    ]
})
Detail.vue内代码。
<template>
  <ul>

    <li>消息编号:{{ $route.params.id }}li>
    <li>消息标题:{{ $route.params.title }}li>

    <h2>展示props传递的参数h2>

    <li>a:{{ a }}li>
    <li>b:{{ b }}li>
  ul>
template>

<script>
export default {
  name: "Detail",
  //接收传递的参数
  props: ["a", "b"],
  mounted() {
    console.log(this.$route);
  },
};
script>
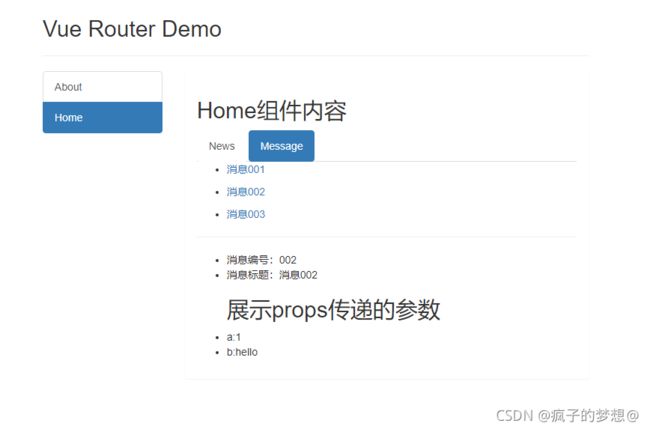
输出如下:这样写传递的参数是死参数,即在代码中固定写好了的静态参数。

第二种写法:
在配置文集index.js代码如下:
// 该文件专门用于创建整个应用的路由器
import VueRouter from 'vue-router'
//引入组件
import About from '../components/About'
import Home from '../components/Home'
import News from '../components/News'
import Message from '../components/Message'
import Detail from '../components/Detail'
//创建并暴露一个路由器
export default new VueRouter({
    routes: [
        //前两个是一级路由,嵌套的话,是在一级路由里边在写新路由
        {//给路由起名字叫guanyu
            name: 'guanyu',
            path: '/about',
            component: About
        },
        {
            path: '/home',
            component: Home,
            // 下边是嵌套的二级路由,path中不用加/符号
            children: [
                {
                    path: 'news',
                    component: News,
                },
                {
                    path: 'message',
                    component: Message,
                    //我们需要点击message后,在继续显示东西
                    children: [
                        {
                            // 给路由起名字叫xiangqing
                            name: 'xiangqing',
                            //告诉路由,路径detail后边的第一个是参数id,第二个是参数title
                            path: 'detail/:id/:title',
                            component: Detail,
                            //props的第一种写法,值为对象,该对象中的所有key,value都以props的形式传给Detail组件
                            // props: { a: 1, b: 'hello' }
                            //props的第二种写法,值为布尔值,若布尔值为真,就会把该路由组件收到的所有params参数,以props的形式传递给Detail组件
                            props: true
                        }
                    ]
                }
            ]
        }
    ]
})
在Detail.vue中代码
<template>
  <ul>

    <li>消息编号:{{ id }}li>
    <li>消息标题:{{ title }}li>
  ul>
template>

<script>
export default {
  name: "Detail",
  //接收传递的参数
  props: ["id", "title"],
  mounted() {
    console.log(this.$route);
  },
};
script>
注意:这样写法仅适用于params参数传递。
第三种写法修改index.js内代码
// 该文件专门用于创建整个应用的路由器
import VueRouter from 'vue-router'
//引入组件
import About from '../components/About'
import Home from '../components/Home'
import News from '../components/News'
import Message from '../components/Message'
import Detail from '../components/Detail'
//创建并暴露一个路由器
export default new VueRouter({
    routes: [
        //前两个是一级路由,嵌套的话,是在一级路由里边在写新路由
        {//给路由起名字叫guanyu
            name: 'guanyu',
            path: '/about',
            component: About
        },
        {
            path: '/home',
            component: Home,
            // 下边是嵌套的二级路由,path中不用加/符号
            children: [
                {
                    path: 'news',
                    component: News,
                },
                {
                    path: 'message',
                    component: Message,
                    //我们需要点击message后,在继续显示东西
                    children: [
                        {
                            // 给路由起名字叫xiangqing
                            name: 'xiangqing',
                            //告诉路由,路径detail后边的第一个是参数id,第二个是参数title
                            path: 'detail/:id/:title',
                            component: Detail,
                            //props的第一种写法,值为对象,该对象中的所有key,value都以props的形式传给Detail组件
                            // props: { a: 1, b: 'hello' }
                            //props的第二种写法,值为布尔值,若布尔值为真,就会把该路由组件收到的所有params参数,以props的形式传递给Detail组件
                            // props: true
                            //props的第三种写法,值为函数,return内所有key,value都以props的形式传给Detail组件
                            props($route) {
                                return { id: $route.params.id, title: $route.params.title }
                            }
                        }
                    ]
                }
            ]
        }
    ]
})


