一文学会在Vue中使用Axios进行前后端通信
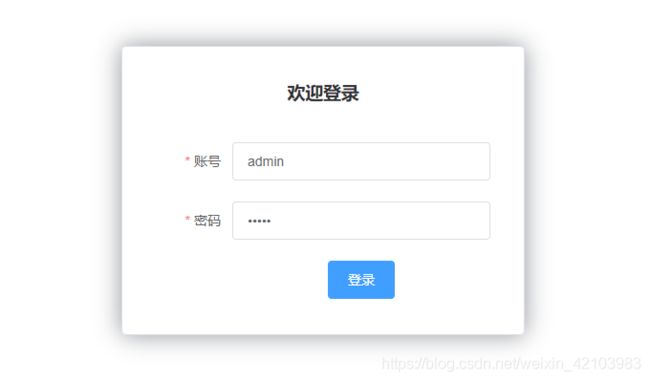
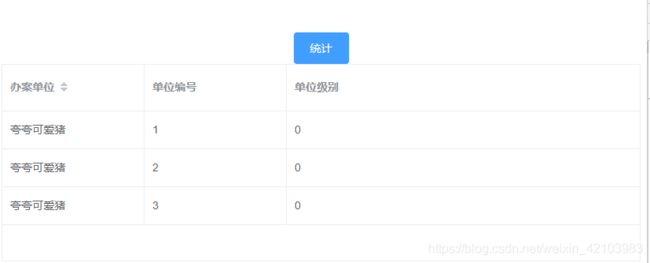
这篇文章从昨天开始准备,到现在逐渐成型,主要是针对于在前后端分离项目,在Vue前端使用Axios进行通信,相当于Ajax一样,下面就写了一个登录的例子,来进行演示,同时在登陆到主页后会有一个列表数据请求,并将请求的数据展示在table页面中。
一、准备工作
如何新建一个Vue项目请看我的另一篇文章:Vue学习之Vue结合 ElementUI 组件库搭建Web工程项目
新建好之后,我们要在项目的build中加入本地的数据json文件,用来模拟请求返回的数据,这里推荐一篇文章,讲的比较详细的vue配置请求本地json数据的方法.
不要走开!底部有完整的项目GitHub地址提供给大家学习!!
首先修改build里面的webpack.dev.conf.js,在里面加入如下代码:
const express = require('express')
const app = express()
const appData = require('../data.json') // 加载本地json文件
const login = appData.login // 获取对应本地数据
const caseList = appData.caseList
//const ratings = appData.ratings
const apiRoutes = express.Router()
app.use('/api',apiRoutes)


   //然后找到devSeerver,在里面添加
    before (app) {
      app.get('/api/login',(reg,res) => {
        res.json({
          errno: 0,
          data: login
        }) // 接口返回json数据,上面配置的数据seller就复制给data请求后调用
      }),
        app.get('/api/caseList',(reg,res) => {
          res.json({
            errno: 0,
            data: caseList
          }) // 接口返回json数据,上面配置的数据goods就复制给data请求后调用
        })/*,
        app.get('/api/ratings',(reg,res) => {
          res.json({
            errno: 0,
            data: ratings
          }) // 接口返回json数据,上面配置的数据ratings就复制给data请求后调用
        })*/
    }
我的json文件内容如下:将该文件放在我们项目的根目录便于获取。
{
  "login": {
    "code": 200,
    "msg": null,
    "data": {
      "id": null,
      "userId": 1,
      "token": "77ae89be36504adfb5c09ef71409ea0e",
      "expireTime": "2018-09-01T16:24:50.473+0000",
      "createBy": null,
      "createTime": null,
      "lastUpdateBy": null,
      "lastUpdateTime": "2018-09-01T04:24:50.473+0000"
    }
  },
  "caseList": {
    "code": 200,
    "msg": null,
    "data": [
      {
        "startDate": null,
        "endDate": null,
        "startTime": null,
        "endTime": null,
        "orgId": "1",
        "orgName": "夸夸可爱猪",
        "orgLevel": 0
      },
      {
        "startDate": null,
        "endDate": null,
        "startTime": null,
        "endTime": null,
        "orgId": "2",
        "orgName": "夸夸可爱猪",
        "orgLevel": 0
      },
      {
        "startDate": null,
        "endDate": null,
        "startTime": null,
        "endTime": null,
        "orgId": "3",
        "orgName": "夸夸可爱猪",
        "orgLevel": 0
      }
    ]
  }
}
加上之后我们就可以获取它,在此之前需要我们进行安装以下组件:
首先是安装了elementUI
>
>
>命令为:npm i element-ui -S
>
>
>然后是sass-loder node-sass
>
>
>命令为:npm install sass-loader node-sass --save-dev
>
>
>然后是axios
>
>
>命令为:npm install axios -s
>
>
>然后是cookie
>
>
> npm install cookie -s
欧克,一切就绪,接下来就开始写登录功能!
二、登录实现
在这里我只放上js代码,后面我会将我的代码提交到github,大家可以下载
login.vue
<template>
  <div>
    <el-form ref="loginForm" :model="loginForm" :rules="rules" label-width="80px" class="login-box">
      <h3 class="login-title">欢迎登录</h3>
      <el-form-item label="账号" prop="username">
        <el-input type="text" placeholder="请输入账号" v-model="loginForm.username"/>
      </el-form-item>
      <el-form-item label="密码" prop="password">
        <el-input type="password" placeholder="请输入密码" v-model="loginForm.password"/>
      </el-form-item>
      <el-form-item>
        <el-button type="primary" v-on:click="onSubmit('loginForm')">登录</el-button>
      </el-form-item>
    </el-form>

    <el-dialog
      title="温馨提示"
      :visible.sync="dialogVisible"
      width="30%"
      :before-close="handleClose">
      <span>请输入账号和密码</span>
      <span slot="footer" class="dialog-footer">
        <el-button type="primary" @click="dialogVisible = false">确 定</el-button>
      </span>
    </el-dialog>
  </div>
</template>
<script>
  import Cookies from 'js-cookie';
  import router from '@/router';

  export default {
    name: "login",
    props: {},
    data() {
      return {
        loginForm: {
          username: 'admin',
          password: 'admin',
          src: ''
        },
        //表单验证,需要在 el-form-item 元素中增加 prop 属性
        rules:{
          username:[
            {required:true,message:'账号不可为空',trigger:'blur'}
          ],
          password:[
            {required:true,message: '密码不可为空',trigger: 'blur'}
          ]
        },
        //对话框显示和隐藏
        dialogVisible:false
      }
    },
    created() {
    },
    mounted() {
    },
    methods: {
      onSubmit(formName){
        //为表单绑定验证功能
      /*  this.$refs[formName].validate((valid) => {   //这是表单验证的方法 valid 是validate方法的回调参数 代表是否通过验证 如果为true就是通过    ref属性可以用来获取dom的引用,它的值可以随便定义, 但是注意这个名字不要和页面中其他的ref属性名相同,获取定义的ref可以通过this.$refs.ref的名字
          if(valid){
            //使用 vue-router 路由到指定页面,该方式称之为编程式导航
            this.axios({
              method: 'get',
              url: 'http://localhost:8080/api/login'
            }).then(function (repos) {
              console.log(repos);
            }).catch(function (error) {
              console.log(error);
            });
            this.$router.push("/home")
          }else{
            this.dialogVisible = true;
            return false;
          }

        });*/
        var that =this
        this.$api.login.login(formName).then(function (res) {//调用登录接口
          if(res.msg != null){
            that.$message({message: res.msg, type: 'error'})
          }else{
            Cookies.set('token',res.data.token)//放置token到Cookie
            sessionStorage.setItem('user',that.loginForm.username)//保存用户到本地会话this.form.username  因为是有:model作为动态绑定,所以可以直接取值
            /*this.$router.push({path: '/my/profile', query: queryData});*/
            router.push("/home")//登录成功,跳转到主页
          }
         /* this.dialogVisible = true;*/
        }).catch( function(res){
          that.$message({message: res.msg, type: 'error'})
        });


      },
     /* beforeRouteEnter: (to, from, next) => {
        console.log("准备进入个人信息页");
        next();
      },
      beforeRouteLeave: (to, from, next) => {
        console.log("准备离开个人信息页");
        next();
      }*/
    }
  }
</script>
<style scoped>
  .login-box {
    border: 1px solid #DCDFE6;
    width: 350px;
    margin: 180px auto;
    padding: 35px 35px 15px 35px;
    border-radius: 5px;
    -webkit-border-radius: 5px;
    -moz-border-radius: 5px;
    box-shadow: 0 0 25px #909399;
  }

  .login-title {
    text-align: center;
    margin: 0 auto 40px auto;
    color: #303133;
  }
</style>
这里会请求http文件中的api.js文件,代码如下:
import * as login from './modules/login'
import * as caseList from './modules/caseList'

// 默认全部导出
export default {
  login,
  caseList
}
这里分别引用了两个模块,一个是登录一个是信息获取模块。
我们看一下登录,是在http的modules文件夹下,为了便于修改和统计:
login.js
//这里用来存放用于登录使用的login方法与logout方法
//首先导入axios
import axios from "../axios"

//登录
export const login = data => {
  return axios({
    url: 'login',
    method: 'get',
    data
  })
}

//登出
export const logout = () => {
  return axios({
    url: 'logout',
    method: 'get'
  })
}
接下来是Axios通信封装组件,网上看了一个比较全的 大家可以借鉴一下:vue+axios 实现登录拦截权限验证.这里是我的:
//Axios拦截器  在这里进行请求拦截和响应拦截  主要是用来判断请求是否含有token  并进行拦截验证
import axios from 'axios'
import config from './config'
import Cookies from 'js-cookie'
import router from '@/router'

export default function $axios(options){
  return new Promise((resolve,reject) => {
    const instance = axios.create({
      baseURL: config.baseUrl,
      headers: config.headers,
      timeout: config.timeout,
      withCredentials:config.withCredentials
    })
    //请求拦截器
    instance.interceptors.request.use(
      config => {
        let token  = Cookies.get("token")
        if (token){//发送请求时携带的token
          config.headers.token = token
        }else{//重定向到登录页
          router.push("/login")
        }
        return config
      },
      error => {
        return Promise.reject(error)
      }
    )
    //response响应拦截器
    instance.interceptors.response.use(
      response => {
        return response.data
      },
      error => {
        return Promise.reject(err)
      }
    )
    //请求处理
    instance(options).then(res => {
      resolve(res)
      return false
    }).catch(error =>{
      reject(error)
    } )
  })
}
三、实现主页点击获取信息并展示
<template>
<div>
  <el-button type="primary" v-on:click="getCaseList()">统计</el-button>
  <el-table
    :data="tableData"
    height="250"
    lazy
    :load="load"
    border
    style="width: 100%">

    <el-table-column prop="orgName"
                     label="办案单位"
                     width="180" sortable>
      <template slot-scope="scope" >
        {{ scope.row.orgName }}
      </template>
    </el-table-column>
    <el-table-column
      prop="orgId"
      label="单位编号"
      width="180">
      <template slot-scope="scope" >
        {{ scope.row.orgId }}
      </template>

    </el-table-column>
    <el-table-column
      prop="orgLevel"
      label="单位级别">
      <template slot-scope="scope" >
        {{ scope.row.orgLevel }}
      </template>
    </el-table-column>
  </el-table>
</div>
</template>

<script>

  export default {
    name: "home",
    data() {
      return {
        keyword: '',  //搜索关键字
        tableData: [],
        titles:[]
      }
    },
    methods:{

      getCaseList() {
        var that=this;
        //const url = "http://localhost:8080/api/caseList";
        //const params = "?schoolId=1&keywords=" + keyword;
        // 记录搜索历史
       // this.$store.dispatch('saveSearchShopHis', keyword);
        /*vm.axios.get(url + params).then((response) => {*/
        this.$api.caseList.caseList().then(function (res) {
          console.log(res)
          if(res.msg != null){
            that.tableData = [];
            // 将关键字置空
            this.keyword = "";
            this.$message({message: '没有获取到数据', type: 'error'})
          } else {
            that.tableData = res.data.data;
          }
        }, (response) => {
          this.$message({message: '数据获取失败', type: 'error'})
        });
      }

    }
  }
</script>

<style scoped>

</style>
项目Github地址:Github地址
https://github.com/Pxcdzi0977t4kSPV564r7nzllf/Vue-Axios.git
这里是一个真诚的***青年技术交流QQ群:761374713***,不管你是大学生、社畜、想学习变成的其他人员,欢迎大家加入我们,一起成长,一起进步,真诚的欢迎你,不管是技术,还是人生,还是学习方法。有道无术,术亦可求,有术无道,止于术。


