Spring Security OAuth2密码模式(四)
写在前面:各位看到此博客的小伙伴,如有不对的地方请及时通过私信我或者评论此博客的方式指出,以免误人子弟。多谢!如果我的博客对你有帮助,欢迎进行评论✏️✏️、点赞、收藏⭐️⭐️,满足一下我的虚荣心 。
之前已经使用客户端模式进行认证授权的演示记录,但到目前为止还没有使用到用户相关的信息,之前项目都是在用户登录的时候判断用户名和密码是否正确,都校验通过后查询用户拥有的角色及菜单,并将用户权限信息放入session,那使用oauth2后怎么结合用户的角色权限保护资源呢?本篇记录一下密码模式的使用姿势。
目录
使用流程
WebSecurityConfigurerAdapter中配置AuthenticationManager
AuthorizationServerEndpointsConfigurer中配置AuthenticationManager
WebSecurityConfigurerAdapter中配置AuthenticationManagerBuilder
测试
测试类
密码模式获取token
访问资源
使用流程
大致需要修改的如下:
一、WebSecurityConfigurerAdapter中配置AuthenticationManager。
二、AuthorizationServerEndpointsConfigurer中配置AuthenticationManager。
三、WebSecurityConfigurerAdapter中配置AuthenticationManagerBuilder。
WebSecurityConfigurerAdapter中配置AuthenticationManager
在WebSecurityConfig类中增加配置AuthenticationManager这个Bean,代码如下:
@Override
@Bean
public AuthenticationManager authenticationManagerBean() throws Exception {
    return super.authenticationManagerBean();
}
AuthorizationServerEndpointsConfigurer中配置AuthenticationManager
想要使用密码验证模式,需要在授权服务器中的AuthorizationServerEndpointsConfigurer中配置authenticationManager,因为默认情况下开启了除了密码类型外的所有验证类型,密码验证只有配置了authenticationManager的配置才会开启。
授权服务器中注入authenticationManager,endpoints中配置authenticationManager后,完整代码如下:
@EnableAuthorizationServer
@Configuration
public class AuthorizationServer extends AuthorizationServerConfigurerAdapter {

    @Autowired
    private DataSource dataSource;
    @Autowired
    private AuthenticationManager authenticationManager;

    @Override
    public void configure(AuthorizationServerSecurityConfigurer security) throws Exception {
        security.allowFormAuthenticationForClients();
        security.checkTokenAccess("permitAll()");
    }

    @Override
    public void configure(ClientDetailsServiceConfigurer clients) throws Exception {
        clients.withClientDetails(clientDetails());
    }

    @Override
    public void configure(AuthorizationServerEndpointsConfigurer endpoints) throws Exception {
        endpoints.allowedTokenEndpointRequestMethods(HttpMethod.GET,HttpMethod.POST);
        endpoints.tokenStore(tokenStore());
        endpoints.authenticationManager(authenticationManager);
    }

    @Bean
    public ClientDetailsService clientDetails() {
        return new JdbcClientDetailsService(dataSource);
    }

    @Bean
    public TokenStore tokenStore() {
        return new JdbcTokenStore(dataSource);
    }

}
WebSecurityConfigurerAdapter中配置AuthenticationManagerBuilder
经过以上两步配置已经开启了密码验证模式,那怎么知道获取token时填写的用户名和密码是否正确呢?那就需要在WebSecurityConfigurerAdapter中配置AuthenticationManagerBuilder(暂且称它为:认证管理器),AuthenticationManagerBuilder并不真正验证用户信息,真正执行认证需要设置userDetailsService(一个实现UserDetailsService接口的类),另外还需要设置密码加密方式,追加代码如下:
@Override
public void configure(AuthenticationManagerBuilder auth) throws Exception {
    auth.userDetailsService(userDetailsService).passwordEncoder(passwordEncoder());
}
完整代码如下:
@Configuration
@EnableWebSecurity
@EnableGlobalMethodSecurity(prePostEnabled = true)
public class WebSecurityConfig extends WebSecurityConfigurerAdapter {

    @Autowired
    private CustomUserDetailsService userDetailsService;

    @Bean
    public PasswordEncoder passwordEncoder() {
        return new BCryptPasswordEncoder();
    }

    @Override
    @Bean
    public AuthenticationManager authenticationManagerBean() throws Exception {
        return super.authenticationManagerBean();
    }

    @Override
    public void configure(AuthenticationManagerBuilder auth) throws Exception {
        auth.userDetailsService(userDetailsService).passwordEncoder(passwordEncoder());
    }

}
新建CustomUserDetailsService类实现UserDetailsService接口,真正的用户信息验证及验证用户名密码成功后给用户赋权都在这里,代码如下:
@Component
public class CustomUserDetailsService implements UserDetailsService {
    @Override
    public UserDetails loadUserByUsername(String username) throws UsernameNotFoundException {
        SimpleGrantedAuthority simpleGrantedAuthority = new SimpleGrantedAuthority("ROLE_admin");
        List authorities = new ArrayList<>();
        authorities.add(simpleGrantedAuthority);
        return new User(username, "$2a$10$bowh1hF9Zwda/O5dUciQde3W6Rk88EP25xC9K9kveFnqFTRFg1n1O", authorities);
    }

    public static void main(String[] args) {
        BCryptPasswordEncoder bCryptPasswordEncoder = new BCryptPasswordEncoder();
        String password = bCryptPasswordEncoder.encode("123456");
        System.out.println(password);
    }
}
以上代码仅仅是测试用的,测试数据:用户名随意,密码123456,使用BCryptPasswordEncoder方式加密后为: $2a$10$bowh1hF9Zwda/O5dUciQde3W6Rk88EP25xC9K9kveFnqFTRFg1n1O, 用户的权限设置为ROLE_admin,真正使用的时候用户名密码还有权限信息这些应该是从数据库中查询或者调用远程服务获取的用户相关信息。
注意oauth2在验证权限的时候会在权限字符串前自动加上 “ROLE_”,所以我们构建authorities时需要自己把ROLE_追加上。
测试
测试类
新增测试类,代码如下:
@RestController
@RequestMapping("/pwd")
public class TestPwdController {

    @RequestMapping("/test1")
    @PreAuthorize("hasRole('admin')")
    public String test1() {
        return "admin";
    }

    @RequestMapping("/test2")
    @PreAuthorize("hasRole('common')")
    public String test2() {
        return "common";
    }

}
密码模式获取token
使用get、post方式获取,如下:
localhost:9004/oauth/token?client_id=pwd-client&client_secret=123456&grant_type=password&scopes=all&username=zhangsan&password=123456
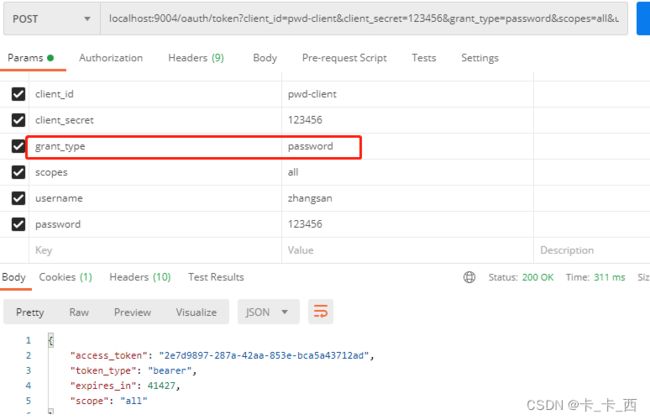
注意修改下grant_type为password。
访问资源
用户权限为admin,分别访问资源/test1、/test2,/test1需要admin权限才能访问,/test2需要common权限才能访问,测试如下:
携带token访问 localhost:9004/pwd/test1 可以访问。
携带token访问 localhost:9004/pwd/test2 不可访问,状态返回403,错误信息如下:
{
"error": "access_denied",
"error_description": "不允许访问"
}