Springboot源码(一)入口方法分析
springboot 入口方法分析
前言:熟悉了Spring容器的源码之后,打算看看Springboot如何做到自动配置的。其实不用看大概也能猜到使用@import注解注入了对应的自动配置类,然后进行自动配置流程。
**我们先分析入口函数,再分析@springbootApplication 这个核心注解。**做过 Spring Boot 项目的都知道,上面是 Spring Boot 最简单通用的入口类。入口类的要求是最顶层包下面第一个含有 main 方法的类,使用注解 @SpringBootApplication 来启用 Spring Boot 特性,使用 SpringApplication.run 方法来启动 Spring Boot 项目。
让我们看看一个简单的入口函数:
@SpringBootApplication
public class TestApplication {
	public static void main(String[] args) {
	SpringApplication.run(TestApplication.class, args);
	}
}
run方法是SpringApplication类的静态方法,看看源码的调用关系
public static ConfigurableApplicationContext run(Class<?> primarySource, String... args) {
	// 调用了下面的重载方法
    return run(new Class<?>[]{primarySource}, args);
}

public static ConfigurableApplicationContext run(Class<?>[] primarySources, String[] args) {
		// 主要方法 构造 SpringApplication 然后启动 返回 applicationContext
		return new SpringApplication(primarySources).run(args);
}
第一个参数 primarySource:加载的主要资源类
第二个参数 args:传递给应用的应用参数
可以看到我们核心的两步:

第一步 new SpringApplication(primarySources)
org.springframework.boot.SpringApplication#SpringApplication(org.springframework.core.io.ResourceLoader, java.lang.Class…)
public SpringApplication(ResourceLoader resourceLoader, Class<?>... primarySources) {
		// 1、资源初始化资源加载器 一般为 null
		this.resourceLoader = resourceLoader;
		Assert.notNull(primarySources, "PrimarySources must not be null");
		// 2、初始化主要加载资源类集合并去重
		this.primarySources = new LinkedHashSet<>(Arrays.asList(primarySources));
		// 3、推断当前 WEB 应用类型 一般为 SERVLET
		this.webApplicationType = WebApplicationType.deduceFromClasspath();
		// 4.设置应用上线文初始化器 重点方法
		setInitializers((Collection) getSpringFactoriesInstances(ApplicationContextInitializer.class));
		// 5.设置监听器
		setListeners((Collection) getSpringFactoriesInstances(ApplicationListener.class));
		// 6.通过方法栈 推断 main方法 入口的类
		this.mainApplicationClass = deduceMainApplicationClass();
}
我们看一些重要的步骤:
3、推断当前 WEB 应用类型 一般为 SERVLET
this.webApplicationType = WebApplicationType.deduceFromClasspath();
看下 deduceFromClasspath() 方法
static WebApplicationType deduceFromClasspath() {
		if (ClassUtils.isPresent(WEBFLUX_INDICATOR_CLASS, null) && !ClassUtils.isPresent(WEBMVC_INDICATOR_CLASS, null)
				&& !ClassUtils.isPresent(JERSEY_INDICATOR_CLASS, null)) {
			return WebApplicationType.REACTIVE;
		}
		for (String className : SERVLET_INDICATOR_CLASSES) {
			if (!ClassUtils.isPresent(className, null)) {
				return WebApplicationType.NONE;
			}
		}
    	// 一般都是返回这个
		return WebApplicationType.SERVLET;
	}

    WebApplicationType 类的变量参考
	/**
	 *非 WEB 项目
	 */
	NONE,

	/**
     * SERVLET WEB 项目
     */
	SERVLET,
	/**
     * 响应式 WEB 项目
     */
	REACTIVE;

	private static final String[] SERVLET_INDICATOR_CLASSES = { "javax.servlet.Servlet",
			"org.springframework.web.context.ConfigurableWebApplicationContext" };

	private static final String WEBMVC_INDICATOR_CLASS = "org.springframework." + "web.servlet.DispatcherServlet";

	private static final String WEBFLUX_INDICATOR_CLASS = "org." + "springframework.web.reactive.DispatcherHandler";

	private static final String JERSEY_INDICATOR_CLASS = "org.glassfish.jersey.servlet.ServletContainer";

	private static final String SERVLET_APPLICATION_CONTEXT_CLASS = "org.springframework.web.context.WebApplicationContext";
4.设置应用上线文初始化器
setInitializers((Collection) getSpringFactoriesInstances(ApplicationContextInitializer.class));
getSpringFactoriesInstances() 方法,是重点方法,后面我们自动配置类也是这样扫描出来的。
private <T> Collection<T> getSpringFactoriesInstances(Class<T> type, Class<?>[] parameterTypes, Object... args) {
		ClassLoader classLoader = getClassLoader();
		// 使用名称并确保唯一,以防止重复
		// 获取 来自 的初始化类 spring-boot-project/spring-boot-autoconfigure/src/main/resources/META-INF/spring.factories
		// ConditionEvaluationReportLoggingListener
		// SharedMetadataReaderFactoryContextInitializer
		Set<String> names = new LinkedHashSet<>(SpringFactoriesLoader.loadFactoryNames(type, classLoader));
		List<T> instances = createSpringFactoriesInstances(type, parameterTypes, classLoader, args, names);
		AnnotationAwareOrderComparator.sort(instances);
		return instances;
	}
可以看到 主要是 调用 SpringFactoriesLoader.loadFactoryNames(type, classLoader) 方法 去扫描了 ** ****spring-boot-autoconfigure/src/main/resources/META-INF/spring.factories **文件里的 ApplicationContextInitializer.class 类对应的配置,然后返回了 集合。
看下文件内容:
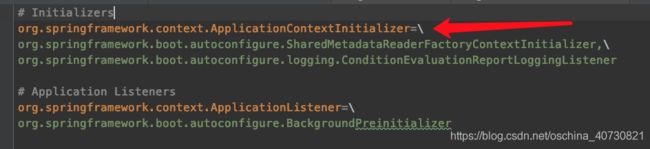
**SpringFactoriesLoader.loadFactoryNames(type, classLoader)**方法是Spring core 中的一个类方法。**spring.factories**中配置的读取都是使用了这个方法
public static List<String> loadFactoryNames(Class<?> factoryClass, @Nullable ClassLoader classLoader) {
		String factoryClassName = factoryClass.getName();
		return loadSpringFactories(classLoader).getOrDefault(factoryClassName, Collections.emptyList());
}
public static final String FACTORIES_RESOURCE_LOCATION = "META-INF/spring.factories";

private static Map<String, List<String>> loadSpringFactories(@Nullable ClassLoader classLoader) {
		MultiValueMap<String, String> result = cache.get(classLoader);
		if (result != null) {
			return result;
		}

		try {
			Enumeration<URL> urls = (classLoader != null ?
					classLoader.getResources(FACTORIES_RESOURCE_LOCATION) :
					ClassLoader.getSystemResources(FACTORIES_RESOURCE_LOCATION));
			result = new LinkedMultiValueMap<>();
			while (urls.hasMoreElements()) {
				URL url = urls.nextElement();
				UrlResource resource = new UrlResource(url);
				Properties properties = PropertiesLoaderUtils.loadProperties(resource);
				for (Map.Entry<?, ?> entry : properties.entrySet()) {
					String factoryClassName = ((String) entry.getKey()).trim();
					for (String factoryName : StringUtils.commaDelimitedListToStringArray((String) entry.getValue())) {
						result.add(factoryClassName, factoryName.trim());
					}
				}
			}
			cache.put(classLoader, result);
			return result;
		}
		catch (IOException ex) {
			throw new IllegalArgumentException("Unable to load factories from location [" +
					FACTORIES_RESOURCE_LOCATION + "]", ex);
		}
	}
6.通过方法栈 推断 main方法 入口的类
this.mainApplicationClass = deduceMainApplicationClass();
通过方法栈信息,推断出入口类
private Class<?> deduceMainApplicationClass() {
			StackTraceElement[] stackTrace = new RuntimeException().getStackTrace();
			for (StackTraceElement stackTraceElement : stackTrace) {
				if ("main".equals(stackTraceElement.getMethodName())) {
					return Class.forName(stackTraceElement.getClassName());
				}
			}
		return null;
	}
第二部 SpringApplication 实例 run 方法运行过程
org.springframework.boot.SpringApplication#run(java.lang.String…)
	public ConfigurableApplicationContext run(String... args) {
		// 1、创建并启动计时监控类
		StopWatch stopWatch = new StopWatch();
		stopWatch.start();
		// 2、初始化应用上下文和异常报告集合
		ConfigurableApplicationContext context = null;
		Collection<SpringBootExceptionReporter> exceptionReporters = new ArrayList<>();
		// 3、设置系统属性 `java.awt.headless` 的值,默认值为:true
		configureHeadlessProperty();
		// 4、创建所有 Spring 运行监听器并发布应用启动事件
		SpringApplicationRunListeners listeners = getRunListeners(args);
		listeners.starting();
		try {
			// 5、初始化默认应用参数类
			ApplicationArguments applicationArguments = new DefaultApplicationArguments(args);
			// 6、根据运行监听器和应用参数来准备 Spring 环境 env
			ConfigurableEnvironment environment = prepareEnvironment(listeners, applicationArguments);
			// 忽略bean信息 spring.beaninfo.ignore 设置为 true
			configureIgnoreBeanInfo(environment);
			// 7、创建 Banner 打印类 输出banner并返回对象
			Banner printedBanner = printBanner(environment);
			// 8、创建应用上下文 spring 中的application 无参构造的第一步
			context = createApplicationContext();
			// 9、准备异常报告器
			exceptionReporters = getSpringFactoriesInstances(SpringBootExceptionReporter.class,
					new Class[]{ConfigurableApplicationContext.class}, context);
			// 10、准备应用上下文
			prepareContext(context, environment, listeners, applicationArguments, printedBanner);
			// 11、刷新应用上下文 对应 spring源码中的 refresh()
			refreshContext(context);
			// 12、应用上下文刷新后置处理
			afterRefresh(context, applicationArguments);
			// 13、停止计时监控类
			stopWatch.stop();
			// 14、输出日志记录执行主类名、时间信息
			if (this.logStartupInfo) {
				new StartupInfoLogger(this.mainApplicationClass).logStarted(getApplicationLog(), stopWatch);
			}
			// 15、发布应用上下文启动完成事件
			listeners.started(context);
			// 16、执行所有 Runner 运行器
			callRunners(context, applicationArguments);
		} catch (Throwable ex) {
			handleRunFailure(context, ex, exceptionReporters, listeners);
			throw new IllegalStateException(ex);
		}

		try {
			// 17、发布应用上下文就绪事件
			listeners.running(context);
		} catch (Throwable ex) {
			handleRunFailure(context, ex, exceptionReporters, null);
			throw new IllegalStateException(ex);
		}
		// 18、返回应用上下文
		return context;
	}
可以看到启动思路和spring源码的context 启动思路 大体相同。
1、创建并启动计时监控类
StopWatch stopWatch = new StopWatch();
stopWatch.start();
来看下这个计时监控类 StopWatch 的相关源码:
public void start() throws IllegalStateException {
    start("");
}
public void start(String taskName) throws IllegalStateException {
    if (this.currentTaskName != null) {
        throw new IllegalStateException("Can't start StopWatch: it's already running");
    }
    this.currentTaskName = taskName;
    this.startTimeMillis = System.currentTimeMillis();
}
首先记录了当前任务的名称,默认为空字符串,然后记录当前 Spring Boot 应用启动的开始时间。
2、初始化应用上下文和异常报告集合
ConfigurableApplicationContext context = null;
Collection<SpringBootExceptionReporter> exceptionReporters = new ArrayList<>();
3、设置系统属性 java.awt.headless 的值
configureHeadlessProperty();
设置该默认值为:true,Java.awt.headless = true 有什么作用?
对于一个 Java 服务器来说经常要处理一些图形元素,例如地图的创建或者图形和图表等。这些API基本上总是需要运行一个X-server以便能使用AWT(Abstract Window Toolkit,抽象窗口工具集)。然而运行一个不必要的 X-server 并不是一种好的管理方式。有时你甚至不能运行 X-server,因此最好的方案是运行 headless 服务器,来进行简单的图像处理。
参考:www.cnblogs.com/princessd8251/p/4000016.html
4、创建所有 Spring 运行监听器并发布应用启动事件
SpringApplicationRunListeners listeners = getRunListeners(args);
listeners.starting();
来看下创建 Spring 运行监听器相关的源码:
private SpringApplicationRunListeners getRunListeners(String[] args) {
    Class<?>[] types = new Class<?>[] { SpringApplication.class, String[].class };
    return new SpringApplicationRunListeners(logger, getSpringFactoriesInstances(
            SpringApplicationRunListener.class, types, this, args));
}
SpringApplicationRunListeners(Log log,
        Collection<? extends SpringApplicationRunListener> listeners) {
    this.log = log;
    this.listeners = new ArrayList<>(listeners);
}
创建逻辑和之前实例化初始化器和监听器的一样,一样调用的是 getSpringFactoriesInstances 方法来获取配置的监听器名称并实例化所有的类。
SpringApplicationRunListener 所有监听器配置在 spring-boot-2.0.3.RELEASE.jar!/META-INF/spring.factories 这个配置文件里面。
# Run Listeners
org.springframework.boot.SpringApplicationRunListener=\
org.springframework.boot.context.event.EventPublishingRunListener
5、初始化默认应用参数类
ApplicationArguments applicationArguments = new DefaultApplicationArguments(
        args);
6、根据运行监听器和应用参数来准备 Spring 环境
ConfigurableEnvironment environment = prepareEnvironment(listeners,
        applicationArguments);
configureIgnoreBeanInfo(environment);
下面我们主要来看下准备环境的 prepareEnvironment 源码:
private ConfigurableEnvironment prepareEnvironment(
        SpringApplicationRunListeners listeners,
        ApplicationArguments applicationArguments) {
    // 6.1) 获取(或者创建)应用环境
    ConfigurableEnvironment environment = getOrCreateEnvironment();
    // 6.2) 配置应用环境
    configureEnvironment(environment, applicationArguments.getSourceArgs());
    listeners.environmentPrepared(environment);
    bindToSpringApplication(environment);
    if (this.webApplicationType == WebApplicationType.NONE) {
        environment = new EnvironmentConverter(getClassLoader())
                .convertToStandardEnvironmentIfNecessary(environment);
    }
    ConfigurationPropertySources.attach(environment);
    return environment;
}
6.1) 获取(或者创建)应用环境
private ConfigurableEnvironment getOrCreateEnvironment() {
    if (this.environment != null) {
        return this.environment;
    }
    if (this.webApplicationType == WebApplicationType.SERVLET) {
        return new StandardServletEnvironment();
    }
    return new StandardEnvironment();
}
这里分为标准 Servlet 环境和标准环境。
6.2) 配置应用环境
protected void configureEnvironment(ConfigurableEnvironment environment,
        String[] args) {
    configurePropertySources(environment, args);
    configureProfiles(environment, args);
}
这里分为以下两步来配置应用环境。
- 配置 property sources
- 配置 Profiles
这里主要处理所有 property sources 配置和 profiles 配置。
7、创建 Banner 打印类
Banner printedBanner = printBanner(environment);
这是用来打印 Banner 的处理类,这个没什么好说的。
8、创建应用上下文
context = createApplicationContext();
来看下 createApplicationContext() 方法的源码:
protected ConfigurableApplicationContext createApplicationContext() {
    Class<?> contextClass = this.applicationContextClass;
    if (contextClass == null) {
        try {
            switch (this.webApplicationType) {
            case SERVLET:
                contextClass = Class.forName(DEFAULT_WEB_CONTEXT_CLASS);
                break;
            case REACTIVE:
                contextClass = Class.forName(DEFAULT_REACTIVE_WEB_CONTEXT_CLASS);
                break;
            default:
                contextClass = Class.forName(DEFAULT_CONTEXT_CLASS);
            }
        }
        catch (ClassNotFoundException ex) {
            throw new IllegalStateException(
                    "Unable create a default ApplicationContext, "
                            + "please specify an ApplicationContextClass",
                    ex);
        }
    }
    return (ConfigurableApplicationContext) BeanUtils.instantiateClass(contextClass);
}
其实就是根据不同的应用类型初始化不同的上下文应用类。
9、准备异常报告器
exceptionReporters = getSpringFactoriesInstances(
        SpringBootExceptionReporter.class,
        new Class[] { ConfigurableApplicationContext.class }, context);
逻辑和之前实例化初始化器和监听器的一样,一样调用的是 getSpringFactoriesInstances 方法来获取配置的异常类名称并实例化所有的异常处理类。
该异常报告处理类配置在 spring-boot-2.0.3.RELEASE.jar!/META-INF/spring.factories 这个配置文件里面。
# Error Reporters
org.springframework.boot.SpringBootExceptionReporter=\
org.springframework.boot.diagnostics.FailureAnalyzers
10、准备应用上下文
prepareContext(context, environment, listeners, applicationArguments,
        printedBanner);
来看下 prepareContext() 方法的源码:
private void prepareContext(ConfigurableApplicationContext context,
        ConfigurableEnvironment environment, SpringApplicationRunListeners listeners,
        ApplicationArguments applicationArguments, Banner printedBanner) {
    // 10.1)绑定环境到上下文
    context.setEnvironment(environment);
    // 10.2)配置上下文的 bean 生成器及资源加载器
    postProcessApplicationContext(context);
    // 10.3)为上下文应用所有初始化器
    applyInitializers(context);
    // 10.4)触发所有 SpringApplicationRunListener 监听器的 contextPrepared 事件方法
    listeners.contextPrepared(context);
    // 10.5)记录启动日志
    if (this.logStartupInfo) {
        logStartupInfo(context.getParent() == null);
        logStartupProfileInfo(context);
    }
    // 10.6)注册两个特殊的单例bean
    context.getBeanFactory().registerSingleton("springApplicationArguments",
            applicationArguments);
    if (printedBanner != null) {
        context.getBeanFactory().registerSingleton("springBootBanner", printedBanner);
    }
    // 10.7)加载所有资源
    Set<Object> sources = getAllSources();
    Assert.notEmpty(sources, "Sources must not be empty");
    load(context, sources.toArray(new Object[0]));
    // 10.8)触发所有 SpringApplicationRunListener 监听器的 contextLoaded 事件方法
    listeners.contextLoaded(context);
}
11、刷新应用上下文
refreshContext(context);
这个主要是刷新 Spring 的应用上下文,源码如下,不详细说明。
private void refreshContext(ConfigurableApplicationContext context) {
    refresh(context);
    if (this.registerShutdownHook) {
        try {
            context.registerShutdownHook();
        }
        catch (AccessControlException ex) {
            // Not allowed in some environments.
        }
    }
}
12、应用上下文刷新后置处理
afterRefresh(context, applicationArguments);
看了下这个方法的源码是空的,目前可以做一些自定义的后置处理操作。
/**
 * Called after the context has been refreshed.
 * @param context the application context
 * @param args the application arguments
 */
protected void afterRefresh(ConfigurableApplicationContext context,
        ApplicationArguments args) {
}
13、停止计时监控类
stopWatch.stop();
public void stop() throws IllegalStateException {
    if (this.currentTaskName == null) {
        throw new IllegalStateException("Can't stop StopWatch: it's not running");
    }
    long lastTime = System.currentTimeMillis() - this.startTimeMillis;
    this.totalTimeMillis += lastTime;
    this.lastTaskInfo = new TaskInfo(this.currentTaskName, lastTime);
    if (this.keepTaskList) {
        this.taskList.add(this.lastTaskInfo);
    }
    ++this.taskCount;
    this.currentTaskName = null;
}
计时监听器停止,并统计一些任务执行信息。
14、输出日志记录执行主类名、时间信息
if (this.logStartupInfo) {
    new StartupInfoLogger(this.mainApplicationClass)
            .logStarted(getApplicationLog(), stopWatch);
}
15、发布应用上下文启动完成事件
listeners.started(context);
触发所有 SpringApplicationRunListener 监听器的 started 事件方法。
16、执行所有 Runner 运行器
callRunners(context, applicationArguments);
private void callRunners(ApplicationContext context, ApplicationArguments args) {
    List<Object> runners = new ArrayList<>();
    runners.addAll(context.getBeansOfType(ApplicationRunner.class).values());
    runners.addAll(context.getBeansOfType(CommandLineRunner.class).values());
    AnnotationAwareOrderComparator.sort(runners);
    for (Object runner : new LinkedHashSet<>(runners)) {
        if (runner instanceof ApplicationRunner) {
            callRunner((ApplicationRunner) runner, args);
        }
        if (runner instanceof CommandLineRunner) {
            callRunner((CommandLineRunner) runner, args);
        }
    }
}
执行所有 ApplicationRunner 和 CommandLineRunner 这两种运行器,不详细展开了。
17、发布应用上下文就绪事件
listeners.running(context);
触发所有 SpringApplicationRunListener 监听器的 running 事件方法。
18、返回应用上下文
return context;
简单分析了一下 SpringBoot 入口函数的执行过程,其实读过Spring源码,再来看这个很快就能了解Springboot 的自动配置原理。