Android Context解析以及getContext()、getApplication()、getApplicationContext()和getBaseContext()区别
文章目录
- Context 介绍
- Context数量
- getContext()、getApplication()、getApplicationContext()和getBaseContext()区别
-
- getContext
- getApplication()、getApplicationContext()
- getBaseContext()
Context 介绍
Android程序不像Java程序一样,随便创建一个类,写个main()方法就能跑了,而是要有一个完整的Android工程环境,在这个环境下,我们有像Activity、Service、BroadcastReceiver等系统组件,而这些组件并不是像一个普通的Java对象new一下就能创建实例的了,而是要有它们各自的上下文环境,也就是我们这里讨论的Context。可以这样讲,Context是维持Android程序中各组件能够正常工作的一个核心功能类。
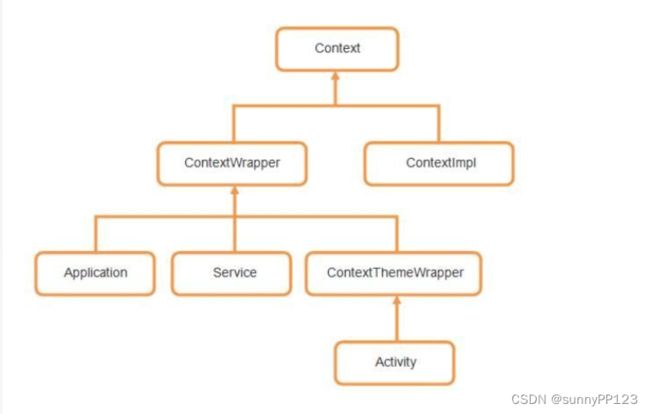
直系子类有两个,一个是ContextWrapper,一个是ContextImpl。那么从名字上就可以看出,ContextWrapper是上下文功能的封装类,而ContextImpl则是上下文功能的实现类。而ContextWrapper又有三个直接的子类,ContextThemeWrapper、Service和Application。其中,ContextThemeWrapper是一个带主题的封装类,而它有一个直接子类就是Activity。
Context一共有三种类型,分别是Application、Activity和Service。这三个类虽然分别各种承担着不同的作用,但它们都属于Context的一种,而它们具体Context的功能则是由ContextImpl类去实现的。
Context数量
那么一个应用程序中到底有多少个Context呢?其实根据上面的Context类型我们就已经可以得出答案了。Context一共有Application、Activity和Service三种类型,因此一个应用程序中Context数量的计算公式就可以这样写
Context数量 = Activity数量 + Service数量 + 1
上面的1代表着Application的数量,因为一个应用程序中可以有多个Activity和多个Service,但是只能有一个Application。
getContext()、getApplication()、getApplicationContext()和getBaseContext()区别
getContext
就是代表当前上下文环境,这个是给View了提供的方法。返回的是当前View运行在哪个Activity Context中。
public class MainActivity extends AppCompatActivity {
   private static final String TAG = "MainActivity";

   @Override
   protected void onCreate(Bundle savedInstanceState) {
       super.onCreate(savedInstanceState);
       setContentView(R.layout.activity_main);

       Button btn = findViewById(R.id.handler_btn);
       Context context = btn.getContext();

   	// 如果说btn是在当前Activity调用的,那么这两个打印的结果是相同的,都是指的是MainActivity对象,它是一个Context。
       Log.d(TAG, "onCreate: "+context);
       Log.d(TAG, "onCreate: "+this);

   }

}
getApplication()、getApplicationContext()
都是获取当前应用的上下文环境。即当前应用所使用的的Application,这在AndroidManifest中唯一指定。意味着,在当前app的任意位置使用这个函数得到的是同一个Context。
		Context applicationContext = getApplicationContext();
        Application application = getApplication();
        Log.d(TAG, "onCreate: "+applicationContext);
        Log.d(TAG, "onCreate: "+application);
/**
	打印结果:
		2022-10-18 23:27:52.368 20708-20708/com.example.androidlearn D/MainActivity: onCreate: android.app.Application@bad9c8a
		2022-10-18 23:27:52.368 20708-20708/com.example.androidlearn D/MainActivity: onCreate: android.app.Application@bad9c8a
*/
既然这两个方法得到的结果都是相同的,那么Android为什么要提供两个功能重复的方法呢?实际上这两个方法在作用域上有比较大的区别。getApplication()方法的语义性非常强,一看就知道是用来获取Application实例的,但是这个方法只有在Activity和Service中才能调用的到。那么也许在绝大多数情况下我们都是在Activity或者Service中使用Application的,但是如果在一些其它的场景,比如BroadcastReceiver中也想获得Application的实例,这时就可以借助getApplicationContext()方法了
public class MyReceiver extends BroadcastReceiver {

	@Override
	public void onReceive(Context context, Intent intent) {
		Application mApp = (Application) context.getApplicationContext();
		Log.d("TAG", "App is " + mApp);
	}

}
也就是说,getApplicationContext()方法的作用域会更广一些,任何一个Context的实例,只要调用getApplicationContext()方法都可以拿到我们的Application对象。
getBaseContext()
getBaseContext()方法得到的是一个ContextImpl对象。这个ContextImpl是不是感觉有点似曾相识?回去看一下Context的继承结构图吧,ContextImpl正是上下文功能的实现类。也就是说像Application、Activity这样的类其实并不会去具体实现Context的功能,而仅仅是做了一层接口封装而已,Context的具体功能都是由ContextImpl类去完成的。那么这样的设计到底是怎么实现的呢?我们还是来看一下源码吧。因为Application、Activity、Service都是直接或间接继承自ContextWrapper的,我们就直接看ContextWrapper的源码,如下所示:
/**
 * Proxying implementation of Context that simply delegates all of its calls to
 * another Context.  Can be subclassed to modify behavior without changing
 * the original Context.
 */
public class ContextWrapper extends Context {
    Context mBase;

    /**
     * Set the base context for this ContextWrapper.  All calls will then be
     * delegated to the base context.  Throws
     * IllegalStateException if a base context has already been set.
     *
     * @param base The new base context for this wrapper.
     */
    protected void attachBaseContext(Context base) {
        if (mBase != null) {
            throw new IllegalStateException("Base context already set");
        }
        mBase = base;
    }

    /**
     * @return the base context as set by the constructor or setBaseContext
     */
    public Context getBaseContext() {
        return mBase;
    }

    @Override
    public AssetManager getAssets() {
        return mBase.getAssets();
    }

    @Override
    public Resources getResources() {
        return mBase.getResources();
    }

    @Override
    public ContentResolver getContentResolver() {
        return mBase.getContentResolver();
    }

    @Override
    public Looper getMainLooper() {
        return mBase.getMainLooper();
    }

    @Override
    public Context getApplicationContext() {
        return mBase.getApplicationContext();
    }

    @Override
    public String getPackageName() {
        return mBase.getPackageName();
    }

    @Override
    public void startActivity(Intent intent) {
        mBase.startActivity(intent);
    }

    @Override
    public void sendBroadcast(Intent intent) {
        mBase.sendBroadcast(intent);
    }

    @Override
    public Intent registerReceiver(
        BroadcastReceiver receiver, IntentFilter filter) {
        return mBase.registerReceiver(receiver, filter);
    }

    @Override
    public void unregisterReceiver(BroadcastReceiver receiver) {
        mBase.unregisterReceiver(receiver);
    }

    @Override
    public ComponentName startService(Intent service) {
        return mBase.startService(service);
    }

    @Override
    public boolean stopService(Intent name) {
        return mBase.stopService(name);
    }

    @Override
    public boolean bindService(Intent service, ServiceConnection conn,
            int flags) {
        return mBase.bindService(service, conn, flags);
    }

    @Override
    public void unbindService(ServiceConnection conn) {
        mBase.unbindService(conn);
    }

    @Override
    public Object getSystemService(String name) {
        return mBase.getSystemService(name);
    }

    ......
}
由于ContextWrapper中的方法还是非常多的,我就进行了一些筛选,只贴出来了部分方法。那么上面的这些方法相信大家都是非常熟悉的,getResources()、getPackageName()、getSystemService()等等都是我们经常要用到的方法。那么所有这些方法的实现又是什么样的呢?其实所有ContextWrapper中方法的实现都非常统一,就是调用了mBase对象中对应当前方法名的方法。
那么这个mBase对象又是什么呢?我们来看第16行的attachBaseContext()方法,这个方法中传入了一个base参数,并把这个参数赋值给了mBase对象。而attachBaseContext()方法其实是由系统来调用的,它会把ContextImpl对象作为参数传递到attachBaseContext()方法当中,从而赋值给mBase对象,之后ContextWrapper中的所有方法其实都是通过这种委托的机制交由ContextImpl去具体实现的,所以说ContextImpl是上下文功能的实现类是非常准确的。
那么另外再看一下我们刚刚打印的getBaseContext()方法,在第26行。这个方法只有一行代码,就是返回了mBase对象而已,而mBase对象其实就是ContextImpl对象,因此刚才的打印结果也得到了印证。
参考链接:Android Context完全解析
