nginx配置自签名https
nginx配置https是需要CA颁发证书的,为了测试方便,我们可以使用自签名证书。
安装openssl
安装包和出现问题处理参考:Windows 下OpenSSL安装过程及错误解决办法_发呆的程序猿-CSDN博客_openssl安装
本次提供windows 64bit 轻量版安装包:Win64OpenSSL_Light-3_0_0.rar-网络安全文档类资源-CSDN下载
按照正常软件安装流程安装即可。
说明:一般Linux系统都有openssl,可以直接到Linu系统上直接操作。
如何生成自签名证书
我们需要为服务端和客户端准备私钥和公钥
说明:执行后续步骤前请创建ca文件夹,路径为:E:\ca
//生成服务器端私钥
openssl genrsa -out E:/ca/server.key 2048
//生成服务器端公钥
openssl rsa -in E:/ca/server.key -pubout -out E:/ca/server.pem
生成CA证书
// 生成 CA 私钥
openssl genrsa -out E:/ca/ca.key 2048

openssl req -new -key E:/ca/ca.key -out E:/ca/ca.csr
注意:执行上面第二个命令会出现以下需要填写的项目,可以直接回车跳过,但是Common Name那一项建议填写你的域名,如果是本地的话,可以写localhost,此处我是随便填写一些数据。
You are about to be asked to enter information that will be incorporated
into your certificate request.
What you are about to enter is what is called a Distinguished Name or a DN.
There are quite a few fields but you can leave some blank
For some fields there will be a default value,
If you enter '.', the field will be left blank.
-----
Country Name (2 letter code) [AU]:CN
State or Province Name (full name) [Some-State]:guangxi
Locality Name (eg, city) []:nanning
Organization Name (eg, company) [Internet Widgits Pty Ltd]:test
Organizational Unit Name (eg, section) []:test
Common Name (e.g. server FQDN or YOUR name) []:test
Email Address []:[email protected]

Please enter the following 'extra' attributes
to be sent with your certificate request
A challenge password []:
An optional company name []:
//生成CA证书
openssl x509 -req -in E:/ca/ca.csr -signkey E:/ca/ca.key -out E:/ca/ca.crt -days 3650生成服务器证书
//服务器端需要向 CA 机构申请签名证书,在申请签名证书之前依然是创建自己的 CSR 文件
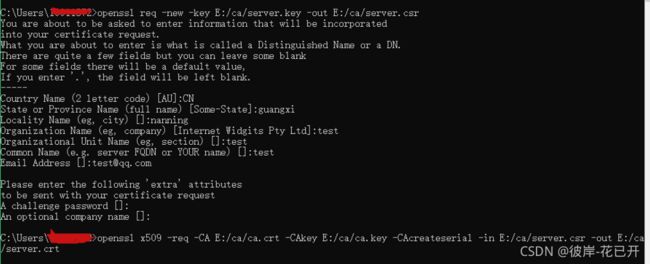
openssl req -new -key E:/ca/server.key -out E:/ca/server.csr
//向自己的 CA 机构申请证书,签名过程需要 CA 的证书和私钥参与,最终颁发一个带有 CA 签名的证书
openssl x509 -req -CA E:/ca/ca.crt -CAkey E:/ca/ca.key -CAcreateserial -in E:/ca/server.csr -out E:/ca/server.crt -days 3650
注意:执行上面第一个命令会出现以下需要填写的项目,可以直接回车跳过,但是Common Name那一项建议填写你的域名,如果是本地的话,可以写localhost,此处我是随便填写一些数据。
You are about to be asked to enter information that will be incorporated
into your certificate request.
What you are about to enter is what is called a Distinguished Name or a DN.
There are quite a few fields but you can leave some blank
For some fields there will be a default value,
If you enter '.', the field will be left blank.
-----
Country Name (2 letter code) [AU]:CN
State or Province Name (full name) [Some-State]:guangxi
Locality Name (eg, city) []:nanning
Organization Name (eg, company) [Internet Widgits Pty Ltd]:test
Organizational Unit Name (eg, section) []:test
Common Name (e.g. server FQDN or YOUR name) []:test
Email Address []:[email protected]

Please enter the following 'extra' attributes
to be sent with your certificate request
A challenge password []:
An optional company name []:
生成cer文件
//使用openssl 进行转换
openssl x509 -in E:/ca/server.crt -out E:/ca/server.cer -outform der -days 3650
配置nginx
我们拿到CA签发的这个证书后,需要将证书配置在nginx中。 首先,我们将server.crt和server.key拷贝到nginx的配置文件所在的目录 其次,在nginx的配置中添加如下配置:
        listen 9527 ssl;
        server_name localhost;
		#为虚拟主机指定pem格式的证书文件
		ssl_certificate      E:\ca\server.crt;
		#为虚拟主机指定私钥文件
		ssl_certificate_key  E:\ca\server.key;
		#客户端能够重复使用存储在缓存中的会话参数时间
		ssl_session_timeout  5m;
		#指定使用的ssl协议
		ssl_protocols  SSLv3 TLSv1;
		#指定许可的密码描述
		ssl_ciphers  ALL:!ADH:!EXPORT56:RC4+RSA:+HIGH:+MEDIUM:+LOW:+SSLv2:+EXP;
		#SSLv3和TLSv1协议的服务器密码需求优先级高于客户端密码
		ssl_prefer_server_ciphers   on;
圈起来部分为新增的部分。
此时即可使用https访问。
http请求自动跳转到https
新增一个server,定义server监听其他端口号,将所有该端口号的请求转发到对应server
server {
        charset utf-8;
        listen 80;
        server_name localhost;
        rewrite ^(.*) https://$host$1 permanent;
}
参考:nginx配置自签名https - 剩余价值 - 博客园
自签数字证书_hdyes的专栏-CSDN博客


