uni-app项目构建与实践的思考(持续更新)
一、easycom
uni-app:easycom官网描述
1、配置
//pages.json文件
"easycom":{
		"autoscan":true,
		"xc-(.*)":"@/components/global/xc-$1/xc-$1.vue"
	},
<xc-button name="搜索蓝牙" @click="searchBlueTooth"></xc-button>
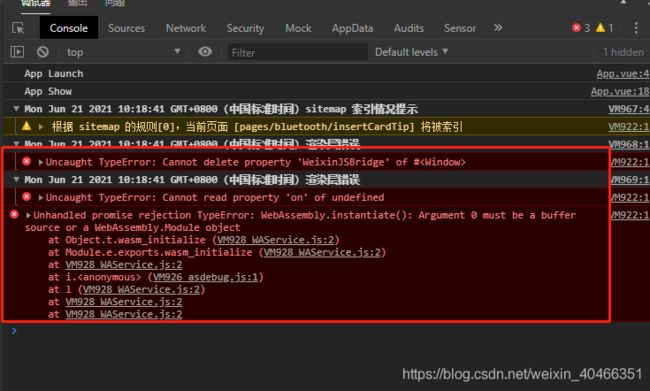
二、uni-app 编译成小程序,小程序报错,但程序能正常执行
三、uni-app全局变量和方法
uni-app 实现全局变量或方法的 4 种方式
1、公用模块
2、挂载Vue.peototype和exports.install+Vue.prototype
2.1 使用Vue.prototype
//main.js
Vue.prototype.getToken = function (){}
2.2 使用exports.install+Vue.prototype
//fun.js
exports.install = function (Vue, options) {
    Vue.prototype.getToken = function (){
       ...
    };
};
//main.js
import fun from './fun'
Vue.use(fun);
3、Vuex
4、globalData
uniapp 自定全局变量,全局函数方法一个小结
//App.vue
//防止按钮多次点击
methods:{
	throttle(fn,gapTime){
		if (gapTime == null || gapTime == undefined) {
			gapTime = 1500
		}
		let _lastTime = null
		// 返回新的函数
		return function() {
			let _nowTime = +new Date()
			if (_nowTime - _lastTime > gapTime || !_lastTime) {
				fn.apply(this, arguments) //将this和参数传给原函数
				_lastTime = _nowTime
			}
		}
	}
}
//页面使用
searchBlueTooth:getApp().throttle(function(){
 this.$navigateTo("/pages/bluetooth/connectDevice");
}),
5、本地存储
四、uni-app 过滤器的三种方式
uni-app中使用过滤器filter的两种方法
1、 全局可用的过滤器 【main.js】
//main.js
Vue.filter("formatDate",(data)=>{
	const nDate=new Date(data);
	const year = nDate.getFullYear();
	const month = nDate.getMonth()+1;
	const day = nDate.getDay();
	return year +'-'+ month +'-'+ day
})
2、全局可用的过滤器(filters.js+main.js)
//filters.js
let filters = {
	formateDate:(data)=>{
		const nDate=new Date(data);
		const year = nDate.getFullYear();
		const month = nDate.getMonth()+1;
		const day = nDate.getDay();
		return year +'-'+ month +'-'+ day
	}
}
export default filters;
//main.js
import filters from './static/utils/filters.js';

Object.keys(filters).map(v => {
    Vue.filter(v, filters[v])
})
3、单独页面中使用的过滤器
filters:{
	formateDate:(data)=>{
		const nDate=new Date(data);
		const year = nDate.getFullYear();
		const month = nDate.getMonth()+1;
		const day = nDate.getDay();
		return year +'-'+ month +'-'+ day
	}
}
使用
<text> {{yourTime | formatDate}}</text>
五、uni-app中使用vuex
如何在uni-app使用vuex
1、创建store/index.js文件
import Vue from 'vue'
import Vuex from 'vuex'
Vue.use(Vuex)
const store = new Vuex.Store({
    state: {
		count: 0
	},
    mutations: {
		increment (state) {
		      state.count++
		    }
	},
    actions: {
		 increment ({ commit }) {
		    commit('increment')
		  }
	}
})
export default store
2、在main.js中挂载vuex
//引入vuex
import store from './static/store/index.js'
//把vuex定义成全局组件
Vue.prototype.$store = store

const app = new Vue({
    ...App,
	store
})
3、在页面中使用
console.log("store",this.$store.state.count) //0
this.$store.commit('increment');
console.log("store",this.$store.state.count)//1
this.$store.dispatch('increment')
console.log("store",this.$store.state.count)//2
4、vuex中mutation和action的详细区别
1、流程顺序
“相应视图—>修改State”拆分成两部分,视图触发Action,Action再触发Mutation。
2、角色定位
基于流程顺序,二者扮演不同的角色。
Mutation:专注于修改State,理论上是修改State的唯一途径。
Action:业务代码、异步请求。
3、限制
角色不同,二者有不同的限制。
Mutation:必须同步执行。
Action:可以异步,但不能直接操作State。
5、分模块使用vuex
后续追加
6、vuex:弄懂mapState、mapGetters、mapMutations、mapActions
vuex:弄懂mapState、mapGetters、mapMutations、mapActions
7、mutation传多次参数的问题
六、小程序提示getLocation需要在app.json 中声明permission字段
八、小程序蓝牙模块
1、Ios与Android的兼容性
- ios上连接后必须先获取服务和特征值,否则notify失败,安卓上无此问题
九、HBuilderX集成git
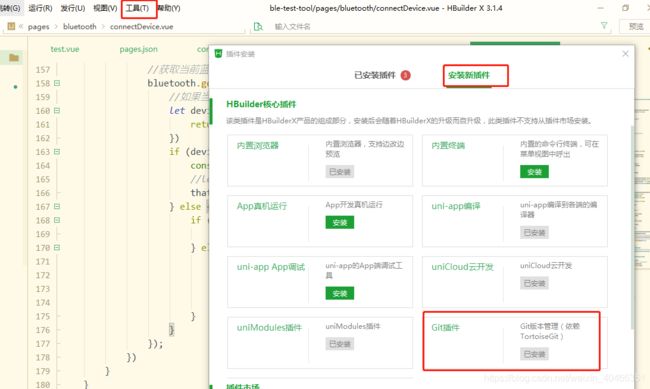
1、安装TortoiseGit依赖
自行百度
2、HBuilder安装git插件
3、使用(QQ截图快捷键 Alt+A)
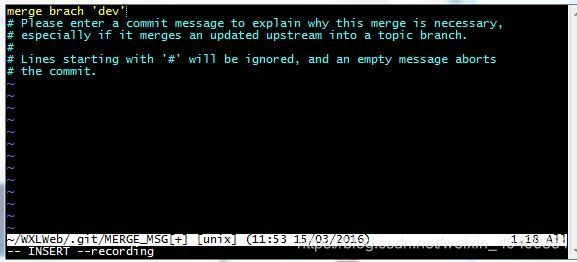
4、冲突提示框处理
请输入提交消息来解释为什么这种合并是必要的
1.按键盘字母 i 进入insert模式
2.修改最上面那行黄色合并信息,可以不修改
3.按键盘左上角"Esc"
4.输入":wq",注意是冒号+wq,按回车键即可
十、类九宫格布局如何实现最后一行靠左?
老大难问题:类九宫格布局如何实现最后一行靠左添加链接描述
1、利用伪元素(最后一行只差一个)
<div class="parent">
    <!--为演示方便,用了Vue语法-->
   <div class="child" v-for="index in 7" :key="index"></div>
</div>
.parent {
  width: 410px;
  height: 410px;
  margin: 40px auto;
  border: 1px solid #fff;
  display: flex;
  align-items: center;
  justify-content: space-around;
  flex-wrap: wrap;
}

.parent::after {
  content:'',
  width:120px
}

.child {
  width: 120px;
  height: 120px;
  background-color: #d72323;
}
2、动态追加占位元素
<div class="parent">
   <div class="child" v-for="index in 7" :key="index"></div>
   <!-- 此处7代表子元素总长度,3代表每行个数 -->
   <div class="child" v-for="index in 3- 7 % 3" :key="index"></div>
</div>
.child {
  width: 120px;
  height: 120px;
  background-color: #d72323;
}
.child.no-height {
  height: 0;
}
十一、Browserslist: caniuse-lite is outdated. Please run next command npm update
Browserslist: caniuse-lite is outdated. Please run next command `npm update
1、升级 HBuilderX 或 cli
2、在老版 HBuilderX 下手动升级 caniuse-lite 的 npm 库
十二、修改复选框样式
微信小程序checkbox样式修改
/*checkbox 整体大小  */
checkbox {
  width: 40rpx;
  height: 40rpx;
}
/*checkbox 选项框大小  */
checkbox .wx-checkbox-input {
  width: 40rpx;
  height:40rpx;
}
/*checkbox选中后样式  */
checkbox .wx-checkbox-input.wx-checkbox-input-checked {
  background: $uni-color-primary;
}
/*checkbox选中后图标样式  */
checkbox .wx-checkbox-input.wx-checkbox-input-checked::before {
  width: 28upx;
  height: 28upx;
  line-height: 28upx;
  text-align: center;
  font-size: 22upx;
  color: #fff;
  background: transparent;
  transform: translate(-50%, -50%) scale(1);
  -webkit-transform: translate(-50%, -50%) scale(1);
}
十三、cli创建uni-app+ts项目
1、执行安装命令
vue create -p dcloudio/uni-preset-vue smart-home
解决办法:
码云下载uni-preset-vue
下载地址:https://gitee.com/testz/uni-preset-vue?_from=gitee_search
执行:
vue create -p E:\workspace\DEMO\uni-preset-vue smart-home
2、选择模板
3、运行
npm run serve
4、装饰器的使用
uni-app 创建typescript 项目 并且引入 vant
vue-property-decorator的简单介绍,一看就会
<script lang="ts">
import { Component,Vue ,Watch} from "vue-property-decorator";
  @Component({})
  export default class Index extends Vue{
      private title:String  = 'myTeeitle'; //响应式属性
      private num:Number = 123;           //对标之前的data函数返回的对象
      get age():Number{                   //计算属性
          return this.num;
      }
      onLoad(){
          this.printTitle();
          let a:string = '123';
      }
      @Watch('title')                    //watch,此处是监听title的变化
      titleChange(newVal:Number,oldVal:Number){
          console.log(newVal,oldVal);
      }
      printTitle():void{                //methods
          console.log('hahahhhaha')
      }
  }

</script>
十四、uni-app下使用vant组件
uni-app下使用vant组件
uni-app中使用vant注意事项
1、下载vant组件
vant-weapp 码云下载地址
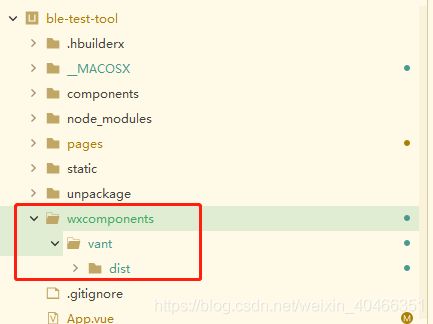
2、创建目录
3、引用vant组件
app.vue文件
<style>
	@import "/wxcomponents/vant/dist/common/index.wxss";
</style>
pages.json文件
	"globalStyle": {
		"navigationBarTextStyle": "black",
		"navigationBarTitleText": "uni-app",
		"navigationBarBackgroundColor": "#ebedec",
		"backgroundColor": "#f8f8f8",
		"usingComponents":{
			"van-button":"/wxcomponents/vant/dist/button/index"
		}
	},
4、使用
<van-button type="info">信息按钮</van-button>
5、采坑记录
vant的css错误(Unclosed bracket)
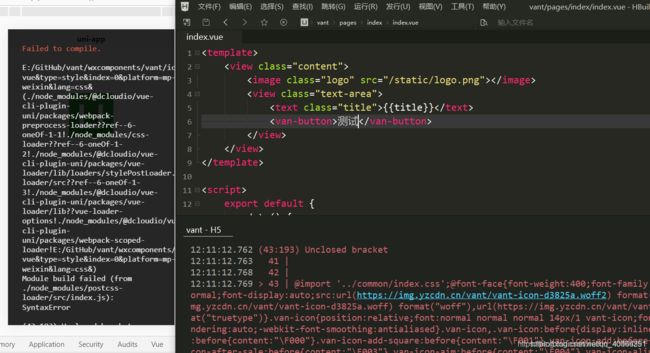
解决方案:全局搜索 ,url(,添加空格

十五、html5加载省略号动画
#test:after{ content:" "; animation: test 2s infinite;}

@keyframes test{

    0%,100%{content: "";}

        20%{content: ".";}

        40%{content: "..";}

        60%{content: "...";}

       80%{content: "....";}

}
十六、H5不让显示顶部导航栏
/* #ifdef H5 */
	uni-page-head
	{
		display: none;
	}
	/* #endif */
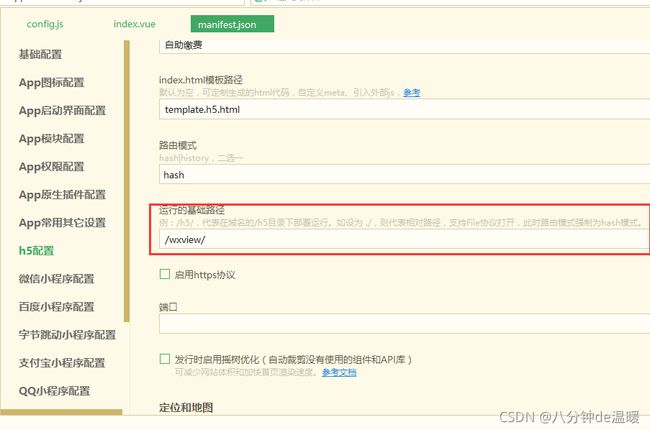
十七、uni-app 打包H5时,打包成相对路径
可以支持 在mainfest.json中设置h5节点的publicPath为:'./'打包后即为相对路径 但是你会发现一个问题就是有tabbar的情况下你的图标找不到 这是你需要手动改打包后的index.xxxxx.js文件 把这个e.uniConfig.router={mode:“hash”,base:“/”}改成e.uniConfig.router={mode:“hash”,base:“./”}即可
十八、uni-app 打包H5时,打包成带文件名的绝对路径
十九、uni-app webview 加载前端网页页面,前端网页中的请求需要携带token,并点击列表按钮跳转到应用中的list页面
参考链接:
uni-app应用web-view加载三方web应用、网页应用、uni-app开发的H5应用调用uni的API及网页和vue页面通讯解决方案
https://uniapp.dcloud.io/component/web-view
引入js
//一定要引入jweixin-1.4.0.js,否则小程序端不能正常运行
<script src="<%= BASE_URL %>cdn/webview/jweixin-1.4.0.js"></script>
<script src="<%= BASE_URL %>cdn/webview/uni.webview.1.5.2.js"></script>
<container
      :props="props"
      ref="container"
      :option="option"
      :visual-data="visualData"
      :realTimeDataArr="realTimeDataArr"
      v-if="visible"
    ></container>

    //返回列表页面按钮
    <div class="visual_list" id="visual_list" v-if="visible && isWeixin">
      <i class="el-icon-s-grid"></i>
    </div>
2、判断是小程序端显示还是PC端显示,如果是小程序端显示,则获取token,把token储存到storage。切记不要存到cookie,否则取不到cookie中的值,定时判断token是否过期,过期前执行刷新token的操作,并给按钮添加点击事件
 mounted() {
    let href = window.location.href;
    let oauthId = href.indexOf("oauthId") != -1 ? href.split("=")[1] : "";
    //如果是小程序端访问,则获取token并刷新token
    if (!this.validatenull(oauthId)) {
      this.isWeixin = true;
      getToken(oauthId).then((res) => {
        let data = res.data;
        let tokenObj = {
          expires_in: data.expires_in,
          tenant_id: data.tenant_id,
          refresh_token: data.refresh_token,
          access_token: data.access_token,
          datetime: new Date().getTime(),
        };
        //定时刷新token
        window.localStorage.setItem("wx_token", JSON.stringify(tokenObj));
        this.refreshToken();
        setTimeout(() => {
          this.visible = true;
          this.$nextTick(() => {
            this.gotoVisualList();
          });
        });
      });
    } else {
      this.visible = true;
    }
  },
  methods: {
    gotoVisualList() {
      document.getElementById("visual_list").onclick = function () {
        h5uni.navigateTo({
          url: "/pagesVisual/list",
        });
      };
    },
    calcDate(date1, date2) {
      let date3 = date2 - date1;

      let days = Math.floor(date3 / (24 * 3600 * 1000));

      let leave1 = date3 % (24 * 3600 * 1000); //计算天数后剩余的毫秒数
      let hours = Math.floor(leave1 / (3600 * 1000));

      let leave2 = leave1 % (3600 * 1000); //计算小时数后剩余的毫秒数
      let minutes = Math.floor(leave2 / (60 * 1000));

      let leave3 = leave2 % (60 * 1000); //计算分钟数后剩余的毫秒数
      let seconds = Math.round(date3 / 1000);
      return {
        leave1,
        leave2,
        leave3,
        days: days,
        hours: hours,
        minutes: minutes,
        seconds: seconds,
      };
    },
    // 定时检测token
    refreshToken() {
      this.refreshTime = setInterval(() => {
        let tokenObj = null;
        let wx_token = window.localStorage.getItem("wx_token");
        if (!this.validatenull(wx_token)) {
          tokenObj = JSON.parse(wx_token);
          const date = this.calcDate(tokenObj.datetime, new Date().getTime());
          let tokenTime = parseInt(tokenObj.expires_in) - 600;
          if (this.validatenull(date)) return;
          if (date.seconds >= tokenTime) {
            refreshToken(tokenObj.refresh_token, tokenObj.tenant_id).then(
              (res) => {
                //重新存储token
                let data = res.data;
                tokenObj.datetime = new Date().getTime();
                tokenObj.access_token = data.access_token;
                tokenObj.refresh_token = data.refresh_token;
                window.localStorage.setItem(
                  "wx_token",
                  JSON.stringify(tokenObj)
                );
              }
            );
          }
        }
      }, 10000);
    },
  },
3、uni-app页面
	<web-view  v-if="id!='' && visible" :src="'http://172.16.100.59:1889/#/meter/customScreen/view/'+id+'?oauthId='+oauthId">
		</web-view>
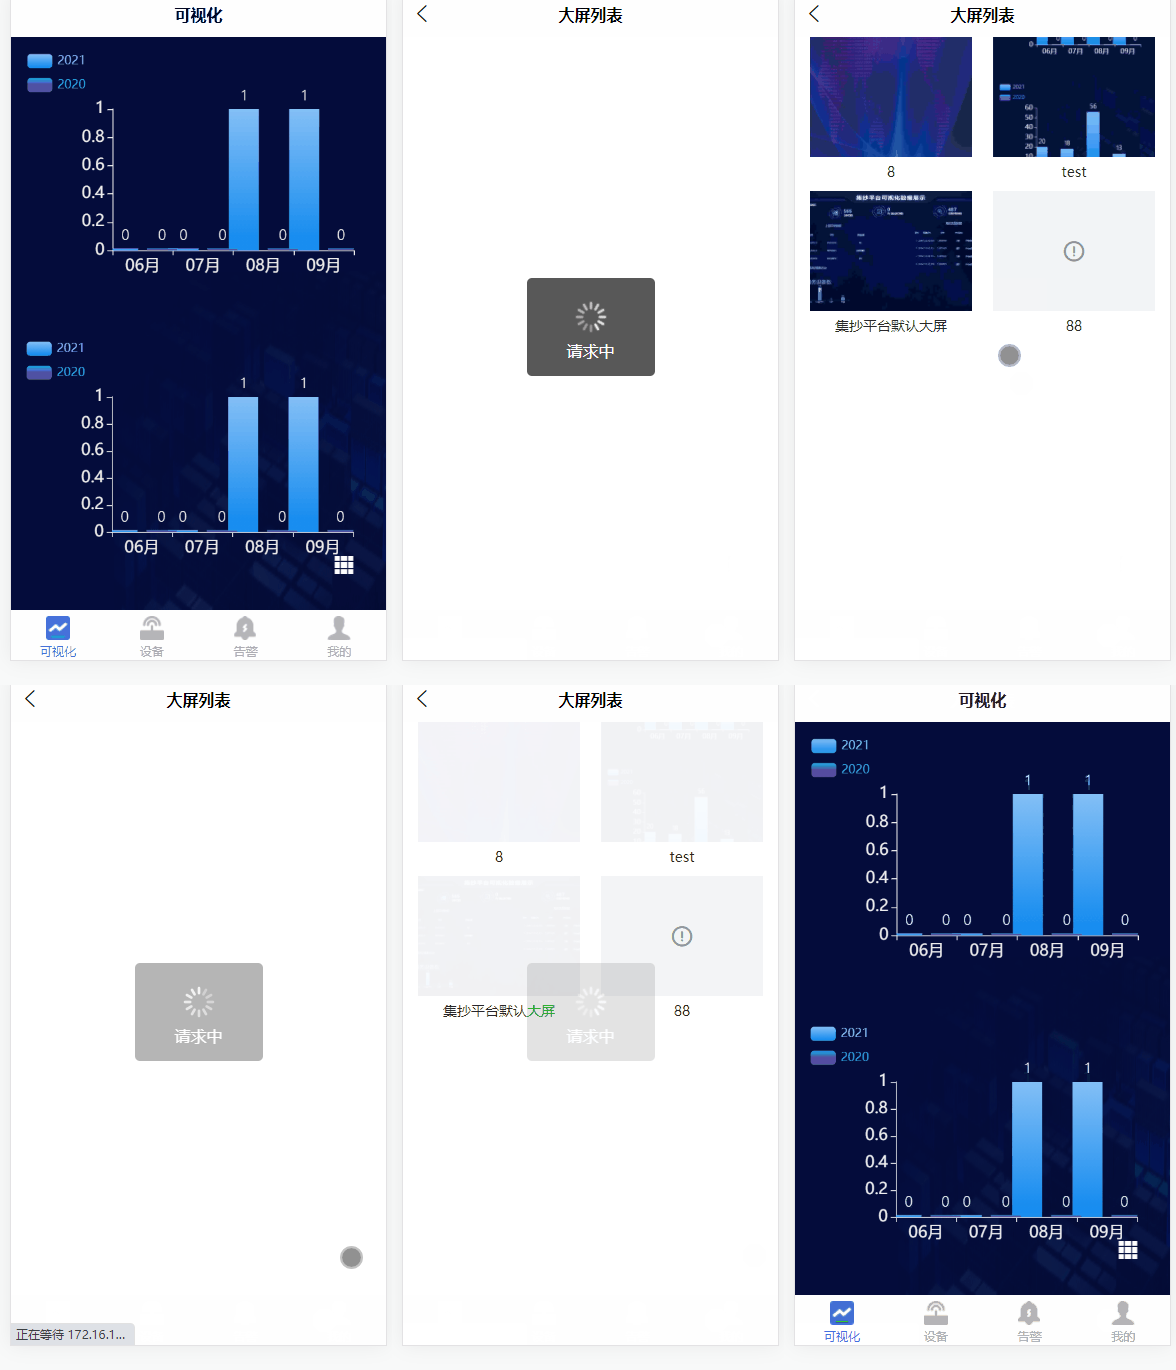
4、实现效果
二十、微信小程序体验版,发送http请求进行测试
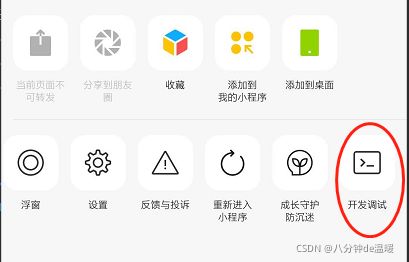
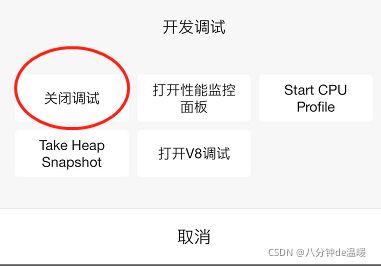
手机上,体验版页面右上角三个点那里,点开,然后选择“打开调试”,重新进小程序,就可以不校验 https 了
二十一:清除订阅消息授权
开发者工具——清缓存——清除授权数据
二十二:组件循环内使用插槽
<view class="content pb40">
	<slot :content="item">
		{{item[prop.content]}}
	</slot>

</view>
报错:
slot “” duplication is found under a single shadow root. The first one was accepted
问题未能解决
二十三、循环中,微信小程序无法获取 item,H5 正常
原因:v-for 循环中,没有添加:key属性,原因未知
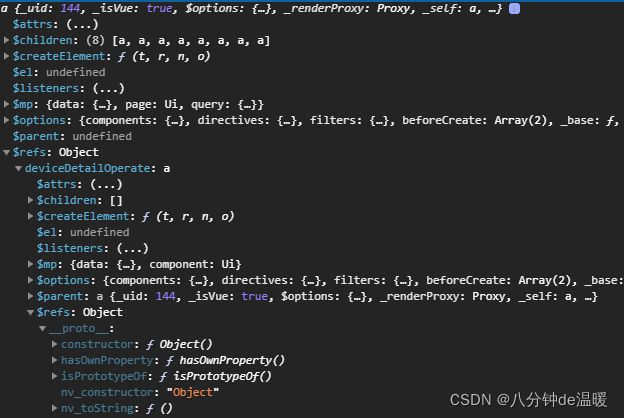
二十四、微信小程序无法获取嵌套的refs 组件实例,H5 正常
例如:
this.valveControlVm = this.$refs.deviceDetailOperate.$refs.valveControl;
//原来代码
this.valveControlVm = this.$refs.deviceDetailOperate.$refs.valveControl;
//修改后的代码
//valveControlVm  不放在data(){} 里面
let valveControlVm = null;
valveControlVm = this.$refs.deviceDetailOperate.$refs.valveControl;
从最里面成的组件 $emit 出来
mounted() {
			this.$nextTick(() => {
				this.$emit("valveControlMounted")
			})
		},
二十五、强制刷新当前页面
let page = getCurrentPages();
if (page.length != 0) {
   page[page.length - 1].onLoad();
   page[page.length - 1].onShow();
}
二十六、微信开发者工具显示正常,但是真机空白
解决方案1、结束服务重新来
2、打开真机调试面板
二十七、canvas的层级以及显示问题
1、canvas 是原生组件,原生组件的层级高于原生组件,所有设置任何的z-index无效
解决方案:可以通过api,将canvas转化成图片进行展示
uni.canvasToTempFilePath({
					x: 0,
					y: 0,
					width: 400,
					height: 400,
					canvasId: 'cpbg',
					success: function(res) {
						that.canvasInImage = res.tempFilePath;
					}
				});
2、生成的base64 无法在image 组件中显示
解决方案,因为我的canvas是在自定义组件内,所以需要添加this参数

uni.canvasToTempFilePath({
					x: 0,
					y: 0,
					width: 400,
					height: 400,
					canvasId: 'cpbg',
					success: function(res) {
						that.canvasInImage = res.tempFilePath;
					}
				},this);
二十八、uni-app 打包成app 真机无法显示的问题
注意打包APP时会提示:App平台 v3 模式暂不支持在 js 文件中引用"./static/font/iconfont.css" 请改在 style 内引用
二十九、图片铺满整个屏幕,用于启动页
<template>
	<view class="imagesize">
		<image style="width: 100%;height: 100%;" src="/static/images/index/start.gif" ></image>
	</view>
</template>

<style scoped>
page{
   height:100%
}
.imagesize{
 height: 100%;
 width: 100%;

}

</style>
三十、展示md文本
<template>
  <view class="p30 content">
    <u-parse :content="pageStr"></u-parse>
  </view>
</template>

<script>
import uParse from "@/uview-ui/components/u-parse/u-parse"
import { marked } from "marked"
import {userAgreement,privacy,userManual,maintain } from "./agreementConfig.js"


export default {
  name: "agreement",
  components: {
    uParse
  },
  data() {
    return {
      content: userAgreement,
    }
  },
  computed: {
    pageStr() {
      return marked(this.content)
    }
  },
}
</script>
md 语法:
文本居中:
隐私条款
显示图片 base64:
图片转base64的在线网址:
https://c.runoob.com/front-end/59/

三十一、插槽里面再用其他的变量会报错

