java 并发编程【一】线程安全与通讯
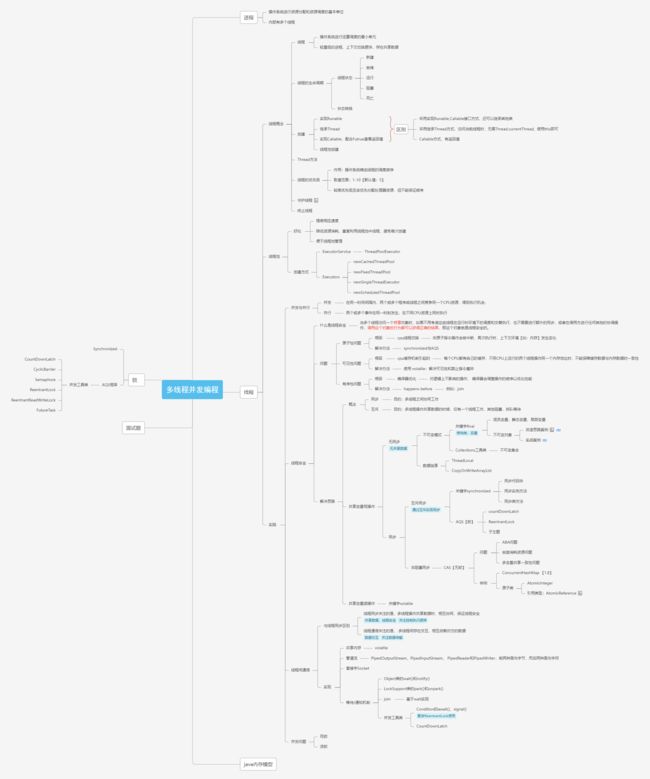
线程是 java 知识体系中非常重要的一部分,下面是详细的介绍 java 线程中需要掌握的知识。
一、基本概念
1.1、线程与进程
进程:
进程是一个程序在一个数据集上的一次动态执行过程,是操作系统进行资源分配和调度的一个独立单位。
线程:
线程是操作系统进行运算调度的最小单位,是进程中的实际运作单位。
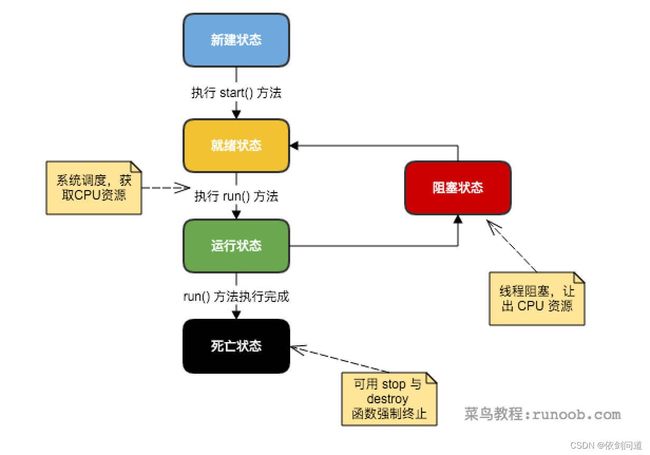
1.2、线程的生命周期
1.3、状态转换
1.4、线程的创建
Java线程创建的方式:
- 实现Runnable接口;
- 继承Thread类;
- 实现Callable接口,通过Futrue获取返回值;
- 线程池;
1.4.1、实现Runnable接口
package hello;

public class Hello {
    public static void main(String[] args) {
        Thread thread = new Thread(new MyThread1());
		thread.setName("thread1");
        Thread thread1 = new Thread(new MyThread2());
        thread.setName("thread2");
        thread.start();
        thread1.start();

    }
}


class MyThread1 implements Runnable{
    @Override
    public void run() {
        for(int i=0;i<10;i++) {
            if (i % 2 == 1) {
                System.out.println(Thread.currentThread().getName() + ":" + i);
                try {
                    Thread.sleep(10);
                } catch (InterruptedException e) {
                    e.printStackTrace();
                }
            }
        }
    }
}

class MyThread2 implements Runnable{
    @Override
    public void run() {
        for(int i=0;i<5;i++) {
            if (i % 2 == 0) {
                System.out.println(Thread.currentThread().getName() + ":" + i);

            }
        }
    }
}
1.4.2、继承Thread类
package hello;

public class Hello {
    public static void main(String[] args) {
        Thread1 thread1 = new Thread1();
        thread1.setName("thread1");
        Thread thread = new Thread() {
            @Override
            public void run() {
                for (int i = 0; i < 10; i++) {
                    if (i % 2 == 1) {
                    //打印线程名,线程名是从0开始的
                        System.out.println(Thread.currentThread().getName() + ":" + i);
                    }
                }
            }
        };
		thread.setName("thread");
        thread1.start();
        thread.start();
    }
}

class Thread1 extends Thread{
    @Override
    public void run() {
        super.run();
        for(int i=0;i<3;i++){
            if (i%2==0){
                System.out.println(Thread.currentThread().getName()+":"+i);
            }
        }
    }
}
1.4.3、实现Callable接口
package hello;

import java.util.concurrent.Callable;
import java.util.concurrent.FutureTask;

public class Hello {
    public static void main(String[] args) throws Exception {

        MyThread1 myThread1 = new MyThread1();
        FutureTask<Integer> futureTask = new FutureTask<>(new MyThread1());
        new Thread(futureTask).start();//开启线程
        System.out.println(futureTask.get());//获取返回值

    }
}


class  MyThread1 implements Callable<Integer> {

    @Override
    public Integer call() throws Exception {
        int count = 0;
        for (int i = 1;i<10;i++){
            if (i%3==0){
                count++;
            }
        }
        return count;
    }
}
1.4.4、线程池
(1)ExecutorService方式:
package hello;


import java.util.concurrent.*;

public class Hello {
    public static void main(String[] args) throws Exception {

        //创建线程池
        ThreadPoolExecutor threadPoolExecutor = new ThreadPoolExecutor(2, 4, 5, TimeUnit.MILLISECONDS,
                new ArrayBlockingQueue<>(2),
                new ThreadFactory() {
                    @Override
                    public Thread newThread(Runnable r) {
                        Thread thread = new Thread(r);
                        thread.setName("myThread");
                        return thread;
                    }
                },
                new ThreadPoolExecutor.AbortPolicy());

        //threadPoolExecutor.submit();
        threadPoolExecutor.execute(new MyThread());//提交任务
        threadPoolExecutor.shutdown();//关闭线程池


    }
}

class MyThread implements Runnable{

    @Override
    public void run() {
        for (int i=0;i<10;i++){
            System.out.println(i);
        }
    }
}
(2)Executors方式:
import java.util.concurrent.ExecutorService;
import java.util.concurrent.Executors;
import java.util.concurrent.ThreadPoolExecutor;

/**
 * 创建多线程的方式四:使用线程池
 */

class NumberThread implements Runnable{
    @Override
    public void run() {
        for(int i = 0;i <= 100;i++){
            if(i % 2 == 0){
                System.out.println(Thread.currentThread().getName() + ":" + i);
            }
        }
    }
}

class NumberThread1 implements Runnable{
    @Override
    public void run() {
        for(int i = 0;i <= 100;i++){
            if(i % 2 != 0){
                System.out.println(Thread.currentThread().getName() + ":" + i);
            }
        }
    }
}

public class ThreadPool {
    public static void main(String[] args) {

        //1. 提供指定线程数量的线程池
        ExecutorService service = Executors.newFixedThreadPool(10);
        ThreadPoolExecutor service1 = (ThreadPoolExecutor) service;
        //设置线程池的属性
//        System.out.println(service.getClass());
//        service1.setCorePoolSize(15);
//        service1.setKeepAliveTime();

        //2.执行指定的线程的操作。需要提供实现Runnable接口或Callable接口实现类的对象
        service.execute(new NumberThread());  //适用于Runable
        service.execute(new NumberThread1());  //适用于Runable

//        service.submit(Callable callable);   //适用于Callable

        //3.关闭连接池
        service.shutdown();
    }
}
1.5、方法
1.5.1、线程方法
实例方法:
| 方法 | 描述 |
|---|---|
| start | 启动当前线程,执行线程的run方法 |
| run | 需要重写Thread类中的此方法,将创建线程需要执行的操作声明在此方法中 |
| getName | 获取线程名称 |
| setName | 更改线程名称 |
| setPriority(int) | 更改线程的优先级 |
| setDaemon(boolean) | 将线程标记为守护线程或用户线程 |
| join | 在线程a中调用线程b的join(),此时线程a就进入阻塞状态,直到线程b完全执行完之后,线程a在结束阻塞状态 |
| interrupt | 中断 |
| isAlive | 线程是否活着 |
静态方法:
| 方法 | 描述 |
|---|---|
| yield | 暂停 |
| sleep(long ms) | 在指定毫秒内,当前线程休眠 |
| currentThread | 返回当前线程的引用 |
1.5.2、线程池方法
ExecutorService:真正的线程池接口。常见子类ThreadPoolExecutor
| 方法 | 描述 |
|---|---|
| void execute(Runnable command) | 执行无返回值的任务,一般用来执行Runnable |
| Future submit(Callable task) | 执行有返回值的任务,一般来执行Callable |
| void shutdown() | 关闭连接池 |
Executors:工具类、线程池的工厂类,用于创建并返回不同类型的线程池
| 方法 | 描述 |
|---|---|
| Executors.newCachedThreadPool() | 创建一个可根据需要创建新线程的线程池 |
| Executors.newFixedThreadPool(n) | 创建一个可重用固定线程数的线程池 |
| Executors.newSingleThreadExecutor() | 创建一个只有一个线程的线程池 |
| Executors.newScheduledThreadPool(n) | 创建一个线程池,它可安排在给定延迟后运行命令或者定期地执行 |
1.6 终止线程
1.6.1 使用标志位终止线程
public class ServerThread extends Thread {
    //volatile修饰符用来保证其它线程读取的总是该变量的最新的值
    public volatile boolean exit = false;

    @Override
    public void run() {
        ServerSocket serverSocket = new ServerSocket(8080);
        while(!exit){
            serverSocket.accept(); //阻塞等待客户端消息
            ...
        }
    }

    public static void main(String[] args) {
        ServerThread t = new ServerThread();
        t.start();
        ...
        t.exit = true; //修改标志位,退出线程
    }
}
1.6.2 Thread.stop()已弃用
为什么弃用stop:
- 调用 stop() 方法会立刻停止 run() 方法中剩余的全部工作,包括在 catch 或 finally
语句中的,并抛出ThreadDeath异常(通常情况下此异常不需要显示的捕获),因此可能会导致一些清理性的工作的得不到完成,如文件,数据库等的关闭。 - 调用 stop() 方法会立即释放该线程所持有的所有的锁,导致数据得不到同步,出现
数据不一致的问题。
1.6.3 interrupt() 中断线程
当线程因Object.wait()、Object.wait(long)、Object.wait(long,int)、Thread.join、Thread.join(long,int)、Thread.sleep(long,int)等方法影响,处于等待状态时, 调用interrupt方法,线程会抛出InterruptedException异常,此时线程并非被终止,而是进入异常,可使用try catch让线程做对应的处理后结束执行,既保障了数据,线程也会正常终止.
public boolean Thread.isInterrupted() //判断是否被中断
public static boolean Thread.interrupted() //判断是否被中断,并清除当前中断状态
public class InterruptThread1 extends Thread{

    public static void main(String[] args) {
        try {
            InterruptThread1 t = new InterruptThread1();
            t.start();
            Thread.sleep(200);
            t.interrupt();
        } catch (InterruptedException e) {
            e.printStackTrace();
        }
    }

	@Override
	public void run() {
	    super.run();
	    for(int i = 0; i <= 200000; i++) {
	        //判断是否被中断
	        if(Thread.currentThread().isInterrupted()){
	            //处理中断逻辑
	            break;
	        }
	        System.out.println("i=" + i);
	    }
	}

}
二、线程安全
2.1、什么是线程安全
当多个线程访问一个共享对象时,如果不用考虑这些线程在运行时环境下的调度和交替执行,也不需要进行额外的同步,或者在调用方进行任何其他的协调操作,调用这个对象的行为都可以获得正确的结果,那这个对象就是线程安全的。
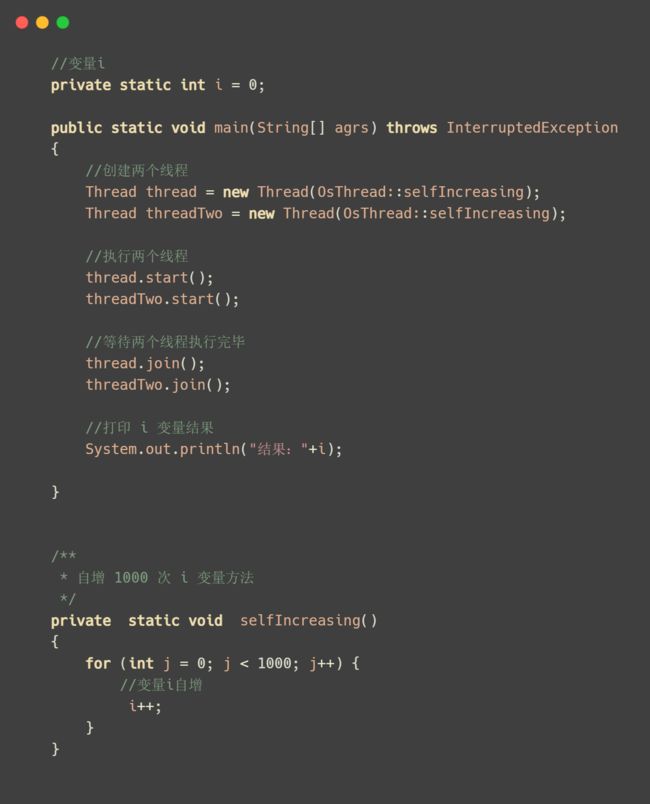
2.2、模拟
正常来说,i 变量最后的值是 2000 ,可是并非如此,我们执行下代码看看结果
结果:2000
结果:1855
2.3、解决思路
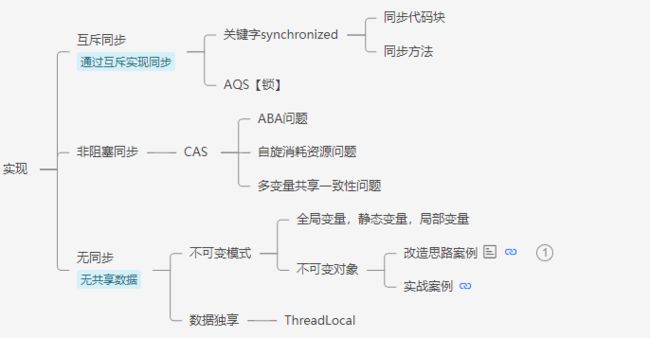
2.3.1 互斥同步
为了解决因竞争条件出现的线程安全,操作系统是通过互斥与同步来解决此类问题。
ps:
竞争条件是指在并发环境中,多个线程同时访问共享资源时,在执行过程中发生线程上下文切换,由于执行顺序的不确定,从而导致程序输出结果的不确定
互斥
多线程操作共享变量的这段代码可能会导致竞争状态,因此我们将此段代码称为临界区(critical section),它是执行共享资源的代码片段,一定不能给多线程同时执行。
所以我们希望这段代码是互斥(mutualexclusion)的,也就说执行临界区(critical section)代码段的只能有一个线程,其他线程阻塞等待,达到排队效果。
互斥并不只是针对多线程的竞争条件,同时还可用于多进程,避免共享资源混乱。
同步
互斥解决了「多进程/线程」对临界区使用的问题,但是它没有解决「多进程/线程」协同工作的问题.
所谓同步,就是「多进程/线程间」在一些关键点上可能需要互相等待与互通消息,这种相互制约的等待与互通信息称为「进程/线程」同步。通过同步,我们可以控制多线程执行顺序。
| 方式 | 区别 |
|---|---|
| 同步 | 线程之间有些信息需要交互,多线程需要协同工作 |
| 互斥 | 操作共享数据的代码,仅有一个线程可以操作,其他线程处于阻塞状态 |
2.3.2 非阻塞同步
使用synchronized的时候,只能有一个线程可以获取对象的锁,其他线程就会进入阻塞状态,阻塞状态就会引起线程的挂起和唤醒,会带来很大的性能问题,所以就出现了非阻塞同步的实现方法。
阻塞同步和非阻塞同步都是实现线程安全的两个保障手段,非阻塞同步对于阻塞同步而言主要解决了阻塞同步中线程阻塞和唤醒带来的性能问题,那什么叫做非阻塞同步呢?在并发环境下,某个线程对共享变量先进行操作,如果没有其他线程争用共享数据那操作就成功;如果存在数据的争用冲突,那就才去补偿措施,比如不断的重试机制,直到成功为止,因为这种乐观的并发策略不需要把线程挂起,也就把这种同步操作称为非阻塞同步(操作和冲突检测具备原子性)。例如:CAS指令(Compare-And-Swap比较并交换)。
CAS是实现非阻塞同步的计算机指令,它有三个操作数:内存位置,旧的预期值,新值,在执行CAS操作时,当且仅当内存地址的值符合旧的预期值的时候,才会用新值来更新内存地址的值,否则就不执行更新。
CAS的缺点有如ABA问题,自旋锁消耗问题、多变量共享一致性问题.
1.ABA:
问题描述:线程t1将它的值从A变为B,再从B变为A。同时有线程t2要将值从A变为C。但CAS检查的时候会发现没有改变,但是实质上它已经发生了改变 。可能会造成数据的缺失。
解决方法:CAS还是类似于乐观锁,同数据乐观锁的方式给它加一个版本号或者时间戳,如AtomicStampedReference
2.自旋消耗资源:
问题描述:多个线程争夺同一个资源时,如果自旋一直不成功,将会一直占用CPU。
解决方法:破坏掉for死循环,当超过一定时间或者一定次数时,return退出。JDK8新增的LongAddr,和ConcurrentHashMap类似的方法。当多个线程竞争时,将粒度变小,将一个变量拆分为多个变量,达到多个线程访问多个资源的效果,最后再调用sum把它合起来。
虽然base和cells都是volatile修饰的,但感觉这个sum操作没有加锁,可能sum的结果不是那么精确。
3.多变量共享一致性问题:
解决方法: CAS操作是针对一个变量的,如果对多个变量操作,
1)可以加锁来解决。
2)封装成对象类解决。
2.3.3 无需同步
线程本地存储:将共享数据的可见范围限制在一个线程中。这样无需同步也能保证线程之间不出现数据争用问题。
经常使用的就是ThreadLocal类
ThreadLocal类 最常见的ThreadLocal使用场景为 用来解决数据库连接、Session管理等。
  public T get() { }
  public void set(T value) { }
  public void remove() { }
  protected T initialValue() { }

get()方法是用来获取ThreadLocal在当前线程中保存的变量副本,set()用来设置当前线程中变量的副本,remove()用来移除当前线程中变量的副本,initialValue()是一个protected方法,一般是用来在使用时进行重写的,它是一个延迟加载方法
三、互斥同步
3.1、 关键字- synchronized
使用继承thread方式创建线程时,同步代码块不能用this,只能修饰静态方法。
3.1.1 同步代码块
(1)实现Runable
/**
 *  例子:创建三个窗口卖票,总票数为100张.使用实现Runnable接口的方式
 *  1.卖票过程中出现重票、错票 ---》出现了线程的安全问题
 *  2.问题出现的原因:当某个线程操作车票的过程中,尚未操作完成时,其他线程参与进来,也操作车票
 *  3.如何解决:当一个线程在操作ticket的时候,其他线程不能参与进来。直到线程a操作完ticket时,其他
 *            线程才可以操作ticket。这种情况即使线程a出现了阻塞,也不能被改变。
 *  4.在java中,我们通过同步机制,来解决线程的安全问题。
 *
 *  5.同步的方式,解决了线程的安全问题。---好处
 *    操作同步代码时,只能有一个线程参与,其他线程等待。相当于是一个单线程的过程,效率低。---局限性
 */

class Windows1 implements Runnable{

    private int ticket = 100;
//    Object obj = new Object();
//    Dog dog = new Dog();

    @Override
    public void run() {
        while(true){
            synchronized (this) {//此时的this:唯一的windows1的对象 //方式二:synchronized (dog) {
                if (ticket > 0) {

                    try{
                        Thread.sleep(100);
                    }catch (InterruptedException e){
                        e.printStackTrace();
                    }

                    System.out.println(Thread.currentThread().getName() + ":卖票,票号为: " + ticket);
                    ticket--;
                } else {
                    break;
                }
            }
        }
    }
}

public class WindowsTest1 {
    public static void main(String[] args) {
        Windows1 w = new Windows1();

        Thread t1 = new Thread(w);
        Thread t2 = new Thread(w);
        Thread t3 = new Thread(w);

        t1.setName("窗口1");
        t2.setName("窗口2");
        t3.setName("窗口3");

        t1.start();
        t2.start();
        t3.start();
    }
}
class Dog{

}
(2)继承Thread
/**
 * 使用同步代码块解决继承Thread类的方式的线程安全问题
 *
 * 例子:创建三个c窗口卖票,总票数为100张
 */
class Windows extends Thread{

    private static int ticket = 100;
    private static Object obj = new Object();

    @Override
    public void run() {
        while(true){
            //正确的
            //synchronized (obj) {
            synchronized (Windows.class){   //Class clazz = Windows.class
            //错误的,因为此时this表示的是t1,t2,t3三个对象
            //synchronized (this) {
                if (ticket > 0) {

                    try {
                        Thread.sleep(100);
                    } catch (InterruptedException e) {
                        e.printStackTrace();
                    }

                    System.out.println(getName() + ":卖票,票号为: " + ticket);
                    ticket--;
                } else {
                    break;
                }
            }
        }
    }
}

public class WindowsTest2 {
    public static void main(String[] args) {
        Windows t1 = new Windows();
        Windows t2 = new Windows();
        Windows t3 = new Windows();

        t1.setName("窗口1");
        t2.setName("窗口2");
        t3.setName("窗口3");

        t1.start();
        t2.start();
        t3.start();
    }
}
注意:
synchronized同步代码块,继承Thread方式 不能用this, 此时this代表实例
3.1.2 同步实例方法
(1)实现Runable
/**
 * 使用同步方法解决实现Runnable接口的线程安全问题
 *
 * 关于同步方法的总结:
 *  1. 同步方法仍然涉及到同步监视器,只是不需要我们显式的声明。
 *  2. 非静态的同步方法,同步监视器是:this
 *     静态的同步方法,同步监视器是:当前类本身
 */

class Windows3 implements Runnable {

    private int ticket = 100;

    @Override
    public void run() {
        while (true) {
            show();
        }
    }

    public synchronized void show() { //同步监视器:this
//        synchronized (this){
            if (ticket > 0) {
                try {
                    Thread.sleep(100);
                } catch (InterruptedException e) {
                    e.printStackTrace();
                }
                System.out.println(Thread.currentThread().getName() + ":卖票,票号为: " + ticket);
                ticket--;
            }
//        }
    }
}

public class WindowsTest3 {
    public static void main(String[] args) {
        Windows3 w3 = new Windows3();

        Thread t1 = new Thread(w3);
        Thread t2 = new Thread(w3);
        Thread t3 = new Thread(w3);

        t1.setName("窗口1");
        t2.setName("窗口2");
        t3.setName("窗口3");

        t1.start();
        t2.start();
        t3.start();
    }
}
3.1.3 同步类方法
(1)继承Thread
/**
 * 使用同步方法处理继承Thread类的方式中的线程安全问题
 */
class Windows4 extends Thread {

    private static int ticket = 100;

    @Override
    public void run() {

        while (true) {

            show();
        }

    }
    private static synchronized void show(){//同步监视器:Window4.class
        //private synchronized void show(){ //同步监视器:t1,t2,t3。此种解决方式是错误的
        if (ticket > 0) {

            try {
                Thread.sleep(100);
            } catch (InterruptedException e) {
                e.printStackTrace();
            }

            System.out.println(Thread.currentThread().getName() + ":卖票,票号为:" + ticket);
            ticket--;
        }
    }
}


public class WindowsTest4 {
    public static void main(String[] args) {
        Windows4 t1 = new Windows4();
        Windows4 t2 = new Windows4();
        Windows4 t3 = new Windows4();


        t1.setName("窗口1");
        t2.setName("窗口2");
        t3.setName("窗口3");

        t1.start();
        t2.start();
        t3.start();

    }
}
注意:
·继承Thread方式,不能使用非静态方法
(2)实现Runable
/**
 * 使用同步方法解决实现Runnable接口的线程安全问题
 *
 * 关于同步方法的总结:
 *  1. 同步方法仍然涉及到同步监视器,只是不需要我们显式的声明。
 *  2. 非静态的同步方法,同步监视器是:this
 *     静态的同步方法,同步监视器是:当前类本身
 */

class Windows3 implements Runnable {

    private int ticket = 100;

    @Override
    public void run() {
        while (true) {
            show();
        }
    }

    public static synchronized void show() { //同步监视器:当前类本身
        if (ticket > 0) {
            try {
                Thread.sleep(100);
            } catch (InterruptedException e) {
                e.printStackTrace();
            }
            System.out.println(Thread.currentThread().getName() + ":卖票,票号为: " + ticket);
            ticket--;
        }
    }
}

public class WindowsTest3 {
    public static void main(String[] args) {
        Windows3 w3 = new Windows3();

        Thread t1 = new Thread(w3);
        Thread t2 = new Thread(w3);
        Thread t3 = new Thread(w3);

        t1.setName("窗口1");
        t2.setName("窗口2");
        t3.setName("窗口3");

        t1.start();
        t2.start();
        t3.start();
    }
}
3.5、并发包工具类 - 锁
(1) ReentrantLock
import java.util.concurrent.locks.ReentrantLock;


class Windows implements Runnable{

    private int ticket = 100;
    //1.实例化ReentrantLock
    private ReentrantLock lock = new ReentrantLock();


    @Override
    public void run() {
        while(true){
            try{

                //调用锁定方法:lock()
                lock.lock();

                if(ticket > 0){

                    try {
                        Thread.sleep(100);
                    } catch (InterruptedException e) {
                        e.printStackTrace();
                    }

                    System.out.println(Thread.currentThread().getName() + ":售票,票号为: " + ticket);
                    ticket --;
                }else{
                    break;
                }
            }finally {
                //3.调用解锁方法:unlock()
                lock.unlock();
            }
        }
    }
}

public class LockTest {
    public static void main(String[] args) {
        Windows w = new Windows();

        Thread t1 = new Thread(w);
        Thread t2 = new Thread(w);
        Thread t3 = new Thread(w);

        t1.setName("窗口1");
        t2.setName("窗口2");
        t3.setName("窗口3");

        t1.start();
        t2.start();
        t3.start();
    }
}
(2) CountDownLatch
注意事项:
- 使用CountDownLatch必须确保计数器数量与子线程数量一致,且countDown必须要执行,否则出现计数器不为0,导致主线程一致等待的情况
- 在执行任务的线程中,使用了try…finally结构,该结构可以保证创建的线程发生异常时CountDownLatch.countDown()方法也会执行,也就保证了主线程不会一直处于等待状态。
    public static void main(String[] args) {
        CountDownLatchUtils.initialize("da1", 5);
        List<String> list=new CopyOnWriteArrayList<>();

        ExecutorUtils.create(()->{
            System.out.println("张三正在马鞍山,准备赶到南京坐飞机,需要1小时的车程到机场");
            SleepTools.second(4);
            list.add("张三");
            CountDownLatchUtils.countDown("da1");
        });
        ExecutorUtils.create(()->{
            System.out.println("李四正在徐州,准备赶到南京坐飞机,需要5小时的车程到机场");
            SleepTools.second(15);
            list.add("李四");
            CountDownLatchUtils.countDown("da1");
        });

        ExecutorUtils.create(()->{
            System.out.println("王五正在芜湖,准备赶到南京坐飞机,需要2小时的车程到机场");
            SleepTools.second(9);
            list.add("王五");
            CountDownLatchUtils.countDown("da1");
        });

        ExecutorUtils.create(()->{
            //飞机起飞
            CountDownLatchUtils.await("da1",10);  //这里先模拟10秒 360秒=1小时
            System.out.println("南京禄口机场_机长启动飞机起飞");
            //当前航班已到乘客
            System.out.println("当前航班已到乘客"+list);
        });
    }
四、 非阻塞同步
4.1、CAS- 原子类AtomicInteger
public class ThreadDemo implements Runnable {

	private AtomicInteger count = new AtomicInteger(0);

	@Override
	public void run() {
		for (int i = 0; i < 100; i++) {
			// 递增
			count.getAndIncrement();
		}
	}


	public int getCount() {
		return count.get();
	}
}
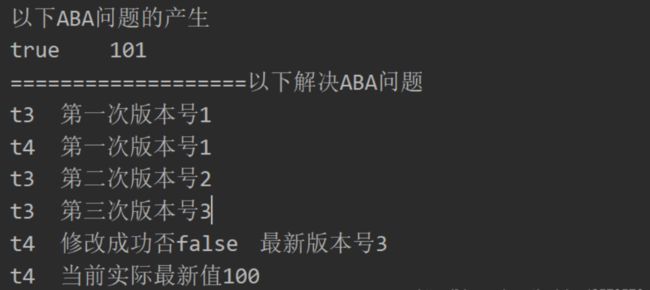
4.2、CAS-原子类 AtomicStampedReference
public class ABADemo {
    static AtomicReference<Integer> atomicReference = new AtomicReference<>(100);
    static AtomicStampedReference<Integer> atomicStampedReference = new AtomicStampedReference<>(100,1);
    public static void main(String[] args) {
        System.out.println("以下ABA问题的产生");
        new Thread(()->{
            atomicReference.compareAndSet(100,101);
            atomicReference.compareAndSet(101,100);
        },"t1").start();

        new Thread(()->{
            try {
                TimeUnit.SECONDS.sleep(1);
            } catch (InterruptedException e) {
                e.printStackTrace();
            }
            //true 101
            System.out.println(atomicReference.compareAndSet(100, 101)+"\t"+atomicReference.get());
        },"t2").start();
        try {
            TimeUnit.SECONDS.sleep(2);
        } catch (InterruptedException e) {
            e.printStackTrace();
        }


        System.out.println("===================以下解决ABA问题");
        new Thread(()->{
            //拿到初始版本号
            int stamp = atomicStampedReference.getStamp();
            System.out.println(Thread.currentThread().getName()+"\t第一次版本号"+stamp);
            try {
                TimeUnit.SECONDS.sleep(1);
            } catch (InterruptedException e) {
                e.printStackTrace();
            }
            atomicStampedReference.compareAndSet(100,101,atomicStampedReference.getStamp(),atomicStampedReference.getStamp()+1);
            System.out.println(Thread.currentThread().getName()+"\t第二次版本号"+atomicStampedReference.getStamp());
            atomicStampedReference.compareAndSet(101,100,atomicStampedReference.getStamp(),atomicStampedReference.getStamp()+1);
            System.out.println(Thread.currentThread().getName()+"\t第三次版本号"+atomicStampedReference.getStamp());
        },"t3").start();

        new Thread(()->{
            //拿到初始版本号
            int stamp = atomicStampedReference.getStamp();
            System.out.println(Thread.currentThread().getName()+"\t第一次版本号"+stamp);
            try {
                //确保完成了一次ABA操作
                TimeUnit.SECONDS.sleep(3);
            } catch (InterruptedException e) {
                e.printStackTrace();
            }
            boolean result = atomicStampedReference.compareAndSet(100, 2019, stamp, stamp + 1);
            //最新版本号
            int newStamp = atomicStampedReference.getStamp();
            System.out.println(Thread.currentThread().getName()+"\t修改成功否"+result+"\t最新版本号"+newStamp);
            System.out.println(Thread.currentThread().getName()+"\t当前实际最新值"+atomicStampedReference.getReference());
        },"t4").start();

    }
}
日志如下:
五、 无需同步
取消共享变量,则多线程运行时互不影响,因此无需同步。比如使用局部变量,常量,或者仅使用线程内变量如threadLocal.
5.1、ThreadLocal
public class ThreadLocalExe {
    public static void main(String[] args) {

        ThreadLocal threadLocal = new ThreadLocal();
//        ThreadLocal threadLocal = new ThreadLocal(){
//            @Override
//            protected String initialValue() { //开始值设置为空
//                return "";
//            }
//        };

        //在主线程中调用ThreadLocal的set()方法保存一个变量
        threadLocal.set("主线程");

        new Thread(){
            public void run() {
                System.out.println("ThreadLocal保存的第一个子线程的变量值:"+threadLocal.get());
                //在第一个子线程中调用ThreadLocal的set()方法保存一个变量
                threadLocal.set("线程A");
                System.out.println("ThreadLocal保存的第一个子线程的变量值:"+threadLocal.get());
            };
        }.start();
        new Thread(){
            public void run() {
                System.out.println("ThreadLocal保存的第一个子线程的变量值:"+threadLocal.get());
                //在第二个子线程中调用ThreadLocal的set()方法保存一个变量
                threadLocal.set("线程B");
                System.out.println("ThreadLocal保存的第二个子线程的变量值:"+threadLocal.get());
            };
        }.start();


        try {
            Thread.sleep(3000);
            //验证在第一个和第二个子线程对于ThreadLocal存储的变量值的改动没有影响到ThreadLocal存的主线程变量
            System.out.println("ThreadLocal保存的主线的变量值:"+threadLocal.get());
        } catch (Exception e) {
        }
    }
}
5.2、不可变模式-final
public class LocationHolder {

  private static volatile LocationHolder INSTANCE = new LocationHolder();
  // 不可变,但对象引用可变,需要去掉set方法,且get方法如下
  private final Map<Long, Location> locations;

  public LocationHolder() {
    this.locations = this.loadFromDb();
  }

  public LocationHolder getInstance() {
    return INSTANCE;
  }

  public Location getLocation(long id) {
    return locations.get(id);
  }
  // 防止被篡改
  public Map<Long, Location> getLocations() {
    return Collections.unmodifiableMap(deepCopy(locations));
  }
  public Map<Long, Location> deepCopy(Map<Long, Location> srcMap) {
  	Map<Long, Location> result = new HashMap<>(srcMap.size());
  	for(Map.Entry<Long, Location> entry : srcMap.entrySet()){
  		result.put(entry.getKey(), new Location(entry.getValue.getId(), entry.getValue.getName()));
  	}
    return result;
  }

 // 初始化
  public Map<Long, Location> loadFromDb() {
    Map<Long, Location> newMap = new HashMap<>();
    newMap.put(1L, new Location(1, "location1") );
    newMap.put(2L, new Location(2, "location2") );
    return newMap;
  }
}

// 类不可被继承
public final class Location {
    // 属性不可变
   private final long id;
   private final String name;

   public Location(long id, String name) {
    this.id= id;
    this.name= name;
  }

}
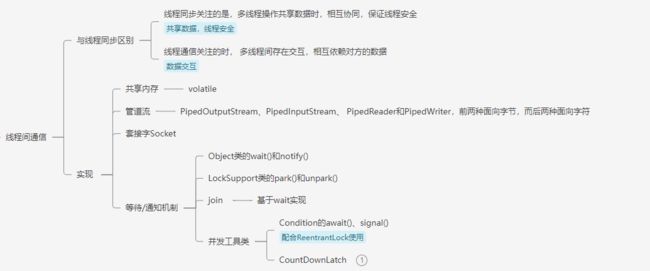
六、线程间的通信
多个线程协同工作来完成某个任务,这时就涉及到了线程间通信了。分为进程内线程通讯,进程间线程通讯.
6.1、 共享内存
6.1.1、关键字 volatile
案例:线程b一直监听notice, 线程a修改notice,线程b能够感知到线程a操作notice
public class TestSync {
    // 定义一个共享变量来实现通信,它需要是volatile修饰,否则线程不能及时感知
    static volatile boolean notice = false;

    public static void main(String[] args) {
        List<String>  list = new ArrayList<>();
        // 实现线程A
        Thread threadA = new Thread(() -> {
            for (int i = 1; i <= 10; i++) {
                list.add("abc");
                System.out.println("线程A向list中添加一个元素,此时list中的元素个数为:" + list.size());
                try {
                    Thread.sleep(500);
                } catch (InterruptedException e) {
                    e.printStackTrace();
                }
                if (list.size() == 5)
                    notice = true;
            }
        });
        // 实现线程B
        Thread threadB = new Thread(() -> {
            while (true) {
                if (notice) {
                    System.out.println("线程B收到通知,开始执行自己的业务...");
                    break;
                }
            }
        });
        // 需要先启动线程B
        threadB.start();
        try {
            Thread.sleep(1000);
        } catch (InterruptedException e) {
            e.printStackTrace();
        }
        // 再启动线程A
        threadA.start();
    }
}
6.2、等待、通知机制
6.2.1、Object类的wait()和notify()
wait()/notify()/notifyAll() 必须配合 synchronized 使用,wait 方法释放锁,notify 方法不释放锁。
notify并不释放锁,只是告诉调用过wait()的线程可以去参与获得锁的竞争了,但不是马上得到锁,因为锁还在别人手里,别人还没释放,
public class TestSync {
    public static void main(String[] args) {
        // 定义一个锁对象
        Object lock = new Object();
        List<String>  list = new ArrayList<>();
        // 实现线程A
        Thread threadA = new Thread(() -> {
            synchronized (lock) {                   // 抢锁
                for (int i = 1; i <= 10; i++) {
                    list.add("abc");
                    System.out.println("线程A向list中添加一个元素,此时list中的元素个数为:" + list.size());
                    try {
                        Thread.sleep(500);
                    } catch (InterruptedException e) {
                        e.printStackTrace();
                    }
                    if (list.size() == 5)
                        lock.notify();// 唤醒B线程
                }
            }
        });
        // 实现线程B
        Thread threadB = new Thread(() -> {
            while (true) {
                synchronized (lock) {               // 抢锁
                    if (list.size() != 5) {
                        try {
                            lock.wait();            // 释放锁
                        } catch (InterruptedException e) {
                            e.printStackTrace();
                        }
                    }
                    System.out.println("线程B收到通知,开始执行自己的业务...");
                }
            }
        });
        // 需要先启动线程B
        threadB.start();
        try {
            Thread.sleep(1000);
        } catch (InterruptedException e) {
            e.printStackTrace();
        }
        // 再启动线程A
        threadA.start();
    }
}
6.2.2、LockSupport
public class TestSync {
    public static void main(String[] args) {
        List<String> list = new ArrayList<>();
        // 实现线程B
        final Thread threadB = new Thread(() -> {
            if (list.size() != 5) {
                LockSupport.park();
            }
            System.out.println("线程B收到通知,开始执行自己的业务...");
        });
        // 实现线程A
        Thread threadA = new Thread(() -> {
            for (int i = 1; i <= 10; i++) {
                list.add("abc");
                System.out.println("线程A向list中添加一个元素,此时list中的元素个数为:" + list.size());
                try {
                    Thread.sleep(500);
                } catch (InterruptedException e) {
                    e.printStackTrace();
                }
                if (list.size() == 5)
                    LockSupport.unpark(threadB);
            }
        });
        threadA.start();
        threadB.start();
    }
}
6.2.3、Thread.join()
/**
 * @author wcc
 * @date 2021/8/21 20:46
 * 现在有T1、T2 两个线程,你怎样保证T2在T1执行完后执行
 */
public class JoinDemo {

    public static void main(String[] args) {

        Thread t1=new Thread(new Runnable() {
            @Override
            public void run() {
                System.out.println("t1 is running...");
            }
        });

        //初始化线程二
        Thread t2=new Thread(new Runnable() {
            @Override
            public void run() {
                try {
                    t1.join();
                } catch (InterruptedException e) {
                    e.printStackTrace();
                }finally {
                    System.out.println("t2 is running...");
                }
            }
        });

        t1.start();
        t2.start();

    }

}
6.2.3、并发包工具类
(1)CountDownLatch
public class TestSync {
    public static void main(String[] args) {
        CountDownLatch countDownLatch = new CountDownLatch(1);
        List<String>  list = new ArrayList<>();
        // 实现线程A
        Thread threadA = new Thread(() -> {
            for (int i = 1; i <= 10; i++) {
                list.add("abc");
                System.out.println("线程A向list中添加一个元素,此时list中的元素个数为:" + list.size());
                try {
                    Thread.sleep(500);
                } catch (InterruptedException e) {
                    e.printStackTrace();
                }
                if (list.size() == 5)
                    countDownLatch.countDown();
            }
        });
        // 实现线程B
        Thread threadB = new Thread(() -> {
            while (true) {
                if (list.size() != 5) {
                    try {
                        countDownLatch.await();
                    } catch (InterruptedException e) {
                        e.printStackTrace();
                    }
                }
                System.out.println("线程B收到通知,开始执行自己的业务...");
                break;
            }
        });
        // 需要先启动线程B
        threadB.start();
        try {
            Thread.sleep(1000);
        } catch (InterruptedException e) {
            e.printStackTrace();
        }
        // 再启动线程A
        threadA.start();
    }
}
(2)Condition 结合 ReentrantLock
public class TestSync {
    public static void main(String[] args) {
        ReentrantLock lock = new ReentrantLock();
        Condition condition = lock.newCondition();

        List<String> list = new ArrayList<>();
        // 实现线程A
        Thread threadA = new Thread(() -> {
            lock.lock();
            for (int i = 1; i <= 10; i++) {
                list.add("abc");
                System.out.println("线程A向list中添加一个元素,此时list中的元素个数为:" + list.size());
                try {
                    Thread.sleep(500);
                } catch (InterruptedException e) {
                    e.printStackTrace();
                }
                if (list.size() == 5)
                    condition.signal();

            }
            lock.unlock();
        });
        // 实现线程B
        Thread threadB = new Thread(() -> {
            lock.lock();
            if (list.size() != 5) {
                try {
                    condition.await();
                } catch (InterruptedException e) {
                    e.printStackTrace();
                }
            }
            System.out.println("线程B收到通知,开始执行自己的业务...");
            lock.unlock();
        });
        threadB.start();
        try {
            Thread.sleep(1000);
        } catch (InterruptedException e) {
            e.printStackTrace();
        }
        threadA.start();
    }
}
6.4、管道输入输出流
管道输入/输出流和普通的文件输入/输出流或者网络输入/输出流不同之处在于,它主要 用于线程之间的数据传输,而传输的媒介为内存。
管道输入/输出流主要包括了如下4种具体实现:PipedOutputStream、PipedInputStream、 PipedReader和PipedWriter,前两种面向字节,而后两种面向字符。
public class PipedWriteDemo {
  public static void main(String[] args) throws IOException {
    Sender sender = new Sender();
    Receiver receiver = new Receiver();
    PipedWriter pipedWriter= sender.getPipedWriter();
    PipedReader pipedReader = receiver.getPipedReader();
    pipedReader.connect(pipedWriter);
    sender.start();
    receiver.start();
  }
}
/**
* 生产者
*/
public class Sender extends Thread {

  private PipedWriter pipedWriter = new PipedWriter();

  public PipedWriter getPipedWriter() {
    return pipedWriter;
  }

  public void run() {
    try {
      pipedWriter.write("this is a demo about PipedWriter and PipedReader".toCharArray());
      pipedWriter.append("0123");
      pipedWriter.close();
    } catch (IOException e) {
      e.printStackTrace();
    }
  }
}
/**
* 消费者
*/
public class Receiver extends Thread{

  private PipedReader pipedReader = new PipedReader();

  public PipedReader getPipedReader() {
    return pipedReader;
  }

  public void run() {
    try {
     char[] buf = new char[1024];
     pipedReader.read(buf);
     System.out.println(new String(buf));
     pipedReader.close();
    } catch (IOException e) {
      e.printStackTrace();
    }
  }
}
参考资料:
1.Java多线程【三种实现方法】
2.Java线程
3.线程间通信的几种实现方式
4.Java IO流之PipedWriter和PipedReader分析
5.线程三:线程安全
6.什么是线程安全?一文带你深入理解
7.什么是线程安全?如何保证线程安全?
8.CAS的缺点及解决
9.JAVA线程安全之CAS机制
10.Java多线程-CountDownLatch
11.终止线程
