【正点原子MP157连载】第三十四章 platform设备驱动实验-摘自【正点原子】STM32MP1嵌入式Linux驱动开发指南V1.7
1)实验平台:正点原子STM32MP157开发板
2)购买链接:https://item.taobao.com/item.htm?&id=629270721801
3)全套实验源码+手册+视频下载地址:http://www.openedv.com/thread-318813-1-1.html
4)正点原子官方B站:https://space.bilibili.com/394620890
5)正点原子STM32MP157技术交流群:691905614

第三十四章 platform设备驱动实验
我们在前面几章编写的设备驱动都非常的简单,都是对GPIO进行最简单的读写操作。像I2C、SPI、LCD等这些复杂外设的驱动就不能这么去写了,Linux系统要考虑到驱动的可重用性,因此提出了驱动的分离与分层这样的软件思路,在这个思路下诞生了我们将来最常打交道的platform设备驱动,也叫做平台设备驱动。本章我们就来学习一下Linux下的驱动分离与分层,以及platform框架下的设备驱动该如何编写。
34.1 Linux驱动的分离与分层
34.1.1 驱动的分隔与分离
对于Linux这样一个成熟、庞大、复杂的操作系统,代码的重用性非常重要,否则的话就会在Linux内核中存在大量无意义的重复代码。尤其是驱动程序,因为驱动程序占用了Linux内核代码量的大头,如果不对驱动程序加以管理,任由重复的代码肆意增加,那么用不了多久Linux内核的文件数量就庞大到无法接受的地步。
假如现在有三个平台A、B和C,这三个平台(这里的平台说的是SOC)上都有MPU6050这个I2C接口的六轴传感器,按照我们写裸机I2C驱动的时候的思路,每个平台都有一个MPU6050的驱动,因此编写出来的最简单的驱动框架如图34.1.1.1所示:

图34.1.1.1 传统的I2C设备驱动
从图34.1.1.1可以看出,每种平台下都有一个主机驱动和设备驱动,主机驱动肯定是必须要的,毕竟不同的平台其I2C控制器不同。但是右侧的设备驱动就没必要每个平台都写一个,因为不管对于那个SOC来说,MPU6050都是一样,通过I2C接口读写数据就行了,只需要一个MPU6050的驱动程序即可。如果再来几个I2C设备,比如AT24C02、FT5206(电容触摸屏)等,如果按照图34.1.1.1中的写法,那么设备端的驱动将会重复的编写好几次。显然在Linux驱动程序中这种写法是不推荐的,最好的做法就是每个平台的I2C控制器都提供一个统一的接口(也叫做主机驱动),每个设备的话也只提供一个驱动程序(设备驱动),每个设备通过统一的I2C接口驱动来访问,这样就可以大大简化驱动文件,比如34.1.1.1中三种平台下的MPU6050驱动框架就可以简化为图34.1.1.2所示:

图34.1.1.2 改进后的设备驱动
实际的I2C驱动设备肯定有很多种,不止MPU6050这一个,那么实际的驱动架构如图34.1.1.3所示:
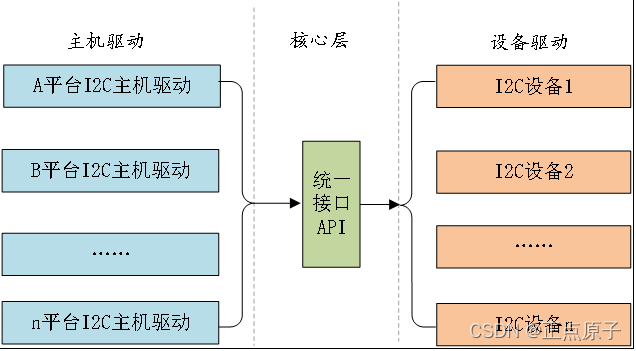
图34.1.1.3 分隔后的驱动框架
这个就是驱动的分隔,也就是将主机驱动和设备驱动分隔开来,比如I2C、SPI等等都会采用驱动分隔的方式来简化驱动的开发。在实际的驱动开发中,一般I2C主机控制器驱动已经由半导体厂家编写好了,而设备驱动一般也由设备器件的厂家编写好了,我们只需要提供设备信息即可,比如I2C设备的话提供设备连接到了哪个I2C接口上,I2C的速度是多少等等。相当于将设备信息从设备驱动中剥离开来,驱动使用标准方法去获取到设备信息(比如从设备树中获取到设备信息),然后根据获取到的设备信息来初始化设备。 这样就相当于驱动只负责驱动,设备只负责设备,想办法将两者进行匹配即可。这个就是Linux中的总线(bus)、驱动(driver)和设备(device)模型,也就是常说的驱动分离。总线就是驱动和设备信息的月老,负责给两者牵线搭桥,如图34.1.1.4所示:

图34.1.1.4 Linux总线、驱动和设备模式
当我们向系统注册一个驱动的时候,总线就会在右侧的设备中查找,看看有没有与之匹配的设备,如果有的话就将两者联系起来。同样的,当向系统中注册一个设备的时候,总线就会在左侧的驱动中查找看有没有与之匹配的设备,有的话也联系起来。Linux内核中大量的驱动程序都采用总线、驱动和设备模式,我们一会要重点讲解的platform驱动就是这一思想下的产物。
34.1.2 驱动的分层
上一小节讲了驱动的分隔与分离,本节我们来简单看一下驱动的分层,大家应该听说过网络的7层模型,不同的层负责不同的内容。同样的,Linux下的驱动往往也是分层的,分层的目的也是为了在不同的层处理不同的内容。以其他书籍或者资料常常使用到的input(输入子系统,后面会有专门的章节详细的讲解)为例,简单介绍一下驱动的分层。input子系统负责管理所有跟输入有关的驱动,包括键盘、鼠标、触摸等,最底层的就是设备原始驱动,负责获取输入设备的原始值,获取到的输入事件上报给input核心层。input核心层会处理各种IO模型,并且提供file_operations操作集合。我们在编写输入设备驱动的时候只需要处理好输入事件的上报即可,至于如何处理这些上报的输入事件那是上层去考虑的,我们不用管。可以看出借助分层模型可以极大的简化我们的驱动编写,对于驱动编写来说非常的友好。
34.2 platform平台驱动模型简介
前面我们讲了设备驱动的分离,并且引出了总线(bus)、驱动(driver)和设备(device)模型,比如I2C、SPI、USB等总线。在SOC中有些外设是没有总线这个概念的,但是又要使用总线、驱动和设备模型该怎么办呢?为了解决此问题,Linux提出了platform这个虚拟总线,相应的就有platform_driver和platform_device。
34.2.1 platform总线
Linux系统内核使用bus_type结构体表示总线,此结构体定义在文件include/linux/device.h,bus_type结构体内容如下:
示例代码34.2.1.1 bus_type结构体代码段
1  struct bus_type {
2   const char      *name;
3   const char      *dev_name;
4   struct device       *dev_root;
5   const struct attribute_group **bus_groups;
6   const struct attribute_group **dev_groups;
7   const struct attribute_group **drv_groups;
8   int (*match)(struct device *dev, struct device_driver *drv);
9   int (*uevent)(struct device *dev, struct kobj_uevent_env *env);
10  int (*probe)(struct device *dev);
11  int (*remove)(struct device *dev);
12  void (*shutdown)(struct device *dev);
13  int (*online)(struct device *dev);
14  int (*offline)(struct device *dev);
15  int (*suspend)(struct device *dev, pm_message_t state);
16  int (*resume)(struct device *dev);
17  int (*num_vf)(struct device *dev);
18  int (*dma_configure)(struct device *dev);
19  const struct dev_pm_ops *pm;
20  const struct iommu_ops *iommu_ops;
21  struct subsys_private *p;
22  struct lock_class_key lock_key;
23  bool need_parent_lock;
24 };
第8行,match函数,此函数很重要,单词match的意思就是“匹配、相配”,因此此函数就是完成设备和驱动之间匹配的,总线就是使用match函数来根据注册的设备来查找对应的驱动,或者根据注册的驱动来查找相应的设备,因此每一条总线都必须实现此函数。match函数有两个参数:dev和drv,这两个参数分别为device和device_driver类型,也就是设备和驱动。
platform总线是bus_type的一个具体实例,定义在文件drivers/base/platform.c,platform总线定义如下:
示例代码34.2.1.2 platform总线实例
1   struct bus_type platform_bus_type = {
2       .name       	= "platform",
3       .dev_groups 	= platform_dev_groups,
4       .match      	= platform_match,
5       .uevent     	= platform_uevent,
6       .dma_configure  = platform_dma_configure,
7       .pm     		= &platform_dev_pm_ops,
8   };
platform_bus_type就是platform平台总线,其中platform_match就是匹配函数。我们来看一下驱动和设备是如何匹配的,platform_match函数定义在文件drivers/base/platform.c中,函数内容如下所示:
示例代码34.2.1.3 platform总线实例
1  static int platform_match(struct device *dev,
struct device_driver *drv)
2  {
3   	struct platform_device *pdev = to_platform_device(dev);
4   	struct platform_driver *pdrv = to_platform_driver(drv);
5
6   	/*When driver_override is set,only bind to the matching driver*/
7   	if (pdev->driver_override)
8       return !strcmp(pdev->driver_override, drv->name);
9
10  	/* Attempt an OF style match first */
11  	if (of_driver_match_device(dev, drv))
12      	return 1;
13
14  	/* Then try ACPI style match */
15  	if (acpi_driver_match_device(dev, drv))
16      	return 1;
17
18  	/* Then try to match against the id table */
19  	if (pdrv->id_table)
20      	return platform_match_id(pdrv->id_table, pdev) != NULL;
21
22  	/* fall-back to driver name match */
23  	return (strcmp(pdev->name, drv->name) == 0);
24 }
驱动和设备的匹配有四种方法,我们依次来看一下:
第11~12行,第一种匹配方式, OF类型的匹配,也就是设备树采用的匹配方式,of_driver_match_device函数定义在文件include/linux/of_device.h中。device_driver结构体(表示设备驱动)中有个名为of_match_table的成员变量,此成员变量保存着驱动的compatible匹配表,设备树中的每个设备节点的compatible属性会和of_match_table表中的所有成员比较,查看是否有相同的条目,如果有的话就表示设备和此驱动匹配,设备和驱动匹配成功以后probe函数就会执行。
第15~16行,第二种匹配方式,ACPI匹配方式。
第19~20行,第三种匹配方式,id_table匹配,每个platform_driver结构体有一个id_table成员变量,顾名思义,保存了很多id信息。这些id信息存放着这个platformd驱动所支持的驱动类型。
第23行,第四种匹配方式,如果第三种匹配方式的id_table不存在的话就直接比较驱动和设备的name字段,看看是不是相等,如果相等的话就匹配成功。
对于支持设备树的Linux版本号,一般设备驱动为了兼容性都支持设备树和无设备树两种匹配方式。也就是第一种匹配方式一般都会存在,第三种和第四种只要存在一种就可以,一般用的最多的还是第四种,也就是直接比较驱动和设备的name字段,毕竟这种方式最简单了。
34.2.2 platform驱动
platform_driver结构体表示platform驱动,此结构体定义在文件include/linux/platform_device.h中,内容如下:
示例代码34.2.2.1 platform_driver结构体
1  struct platform_driver {
2   	int (*probe)(struct platform_device *);
3   	int (*remove)(struct platform_device *);
4   	void (*shutdown)(struct platform_device *);
5   	int (*suspend)(struct platform_device *, pm_message_t state);
6  	 	int (*resume)(struct platform_device *);
7   	struct device_driver driver;
8   	const struct platform_device_id *id_table;
9   	bool prevent_deferred_probe;
10 };
第2行,probe函数,当驱动与设备匹配成功以后probe函数就会执行,非常重要的函数!!一般驱动的提供者会编写,如果自己要编写一个全新的驱动,那么probe就需要自行实现。
第7行,driver成员,为device_driver结构体变量,Linux内核里面大量使用到了面向对象的思维,device_driver相当于基类,提供了最基础的驱动框架。plaform_driver继承了这个基类,然后在此基础上又添加了一些特有的成员变量。
第8行,id_table表,也就是我们上一小节讲解platform总线匹配驱动和设备的时候采用的第三种方法,id_table是个表(也就是数组),每个元素的类型为platform_device_id,platform_device_id结构体内容如下:
示例代码34.2.2.2 platform_device_id结构体
1 struct platform_device_id {
2   	char name[PLATFORM_NAME_SIZE];
3   	kernel_ulong_t driver_data;
4 };
device_driver结构体定义在include/linux/device.h,device_driver结构体内容如下:
示例代码34.2.2.3 device_driver结构体
1  struct device_driver {
2   const char      	*name;
3   struct bus_type  	*bus;
4   struct module   	*owner;
5   const char      	*mod_name;  	/* used for built-in modules */
6   bool suppress_bind_attrs;   		/* disables bind/unbind via sysfs */
7   enum probe_type probe_type;
8   const struct of_device_id   *of_match_table;
9   const struct acpi_device_id *acpi_match_table;
10  int (*probe) (struct device *dev);
11  int (*remove) (struct device *dev);
12  void (*shutdown) (struct device *dev);
13  int (*suspend) (struct device *dev, pm_message_t state);
14  int (*resume) (struct device *dev);
15  const struct attribute_group **groups;
16  const struct attribute_group **dev_groups;
17  const struct dev_pm_ops *pm;
18  void (*coredump) (struct device *dev);
19  struct driver_private *p;
20 };
第8行,of_match_table就是采用设备树的时候驱动使用的匹配表,同样是数组,每个匹配项都为of_device_id结构体类型,此结构体定义在文件include/linux/mod_devicetable.h中,内容如下:
示例代码34.2.2.4 of_device_id结构体
1 struct of_device_id {
2   char    		name[32];
3   char    		type[32];
4   char    		compatible[128];
5   const void 	*data;
6 };
第4行的compatible非常重要,因为对于设备树而言,就是通过设备节点的compatible属性值和of_match_table中每个项目的compatible成员变量进行比较,如果有相等的就表示设备和此驱动匹配成功。
在编写platform驱动的时候,首先定义一个platform_driver结构体变量,然后实现结构体中的各个成员变量,重点是实现匹配方法以及probe函数。当驱动和设备匹配成功以后probe函数就会执行,具体的驱动程序在probe函数里面编写,比如字符设备驱动等等。
当我们定义并初始化好platform_driver结构体变量以后,需要在驱动入口函数里面调用platform_driver_register函数向Linux内核注册一个platform驱动,platform_driver_register函数原型如下所示:
int platform_driver_register (struct platform_driver *driver)
函数参数和返回值含义如下:
driver:要注册的platform驱动。
返回值:负数,失败;0,成功。
还需要在驱动卸载函数中通过platform_driver_unregister函数卸载platform驱动,platform_driver_unregister函数原型如下:
void platform_driver_unregister(struct platform_driver *drv)
函数参数和返回值含义如下:
drv:要卸载的platform驱动。
返回值:无。
platform驱动框架如下所示:
示例代码34.2.2.5 platform驱动框架
 	/* 设备结构体 */
1  	struct xxx_dev{
2   	struct cdev cdev;
3   	/* 设备结构体其他具体内容 */
4  	};
5
6  	struct xxx_dev xxxdev;   /* 定义个设备结构体变量 */
7
8  	static int xxx_open(struct inode *inode, struct file *filp)
9  	{
10  	/* 函数具体内容 */
11  	return 0;
12 	}
13
14 static ssize_t xxx_write(struct file *filp, const char __user *buf,
size_t cnt, loff_t *offt)
15 	{
16  	/* 函数具体内容 */
17  	return 0;
18 	}
19
20 /*
21  * 字符设备驱动操作集
22  */
23 	static struct file_operations xxx_fops = {
24  	.owner = THIS_MODULE,
25  	.open = xxx_open,
26  	.write = xxx_write,
27 	};
28
29 /*
30  * platform驱动的probe函数
31  * 驱动与设备匹配成功以后此函数就会执行
32  */
33 	static int xxx_probe(struct platform_device *dev)
34 	{
35  	......
36  	cdev_init(&xxxdev.cdev, &xxx_fops); /* 注册字符设备驱动 */
37  	/* 函数具体内容 */
38  	return 0;
39 	}
40
41 	static int xxx_remove(struct platform_device *dev)
42 	{
43  	......
44  	cdev_del(&xxxdev.cdev);/*  删除cdev */
45  	/* 函数具体内容 */
46  	return 0;
47 	}
48
49 /* 匹配列表 */
50 static const struct of_device_id xxx_of_match[] = {
51  	{ .compatible = "xxx-gpio" },
52 	 	{ /* Sentinel */ }
53 };
54
55 /*
56  * platform平台驱动结构体
57  */
58 	static struct platform_driver xxx_driver = {
59  	.driver = {
60      	.name       = "xxx",
61      	.of_match_table = xxx_of_match,
62  	},
63  	.probe      = xxx_probe,
64  	.remove     = xxx_remove,
65 	};
66
67 	/* 驱动模块加载 */
68 	static int __init xxxdriver_init(void)
69 	{
70  	return platform_driver_register(&xxx_driver);
71 }
72
73 	/* 驱动模块卸载 */
74 	static void __exit xxxdriver_exit(void)
75 	{
76      	platform_driver_unregister(&xxx_driver);
77 	}
78
79 	module_init(xxxdriver_init);
80 	module_exit(xxxdriver_exit);
81 	MODULE_LICENSE("GPL");
82 	MODULE_AUTHOR("zuozhongkai");
第1~27行,传统的字符设备驱动,所谓的platform驱动并不是独立于字符设备驱动、块设备驱动和网络设备驱动之外的其他种类的驱动。platform只是为了驱动的分离与分层而提出来的一种框架,其驱动的具体实现还是需要字符设备驱动、块设备驱动或网络设备驱动。
第33~39行,xxx_probe函数,当驱动和设备匹配成功以后此函数就会执行,以前在驱动入口init函数里面编写的字符设备驱动程序就全部放到此probe函数里面。比如注册字符设备驱动、添加cdev、创建类等等。
第41~47行,xxx_remove函数,platform_driver结构体中的remove成员变量,当关闭platfor备驱动的时候此函数就会执行,以前在驱动卸载exit函数里面要做的事情就放到此函数中来。比如,使用iounmap释放内存、删除cdev,注销设备号等等。
第50~53行,xxx_of_match匹配表,如果使用设备树的话将通过此匹配表进行驱动和设备的匹配。第51行设置了一个匹配项,此匹配项的compatible值为“xxx-gpio”,因此当设备树中设备节点的compatible属性值为“xxx-gpio”的时候此设备就会与此驱动匹配。第52行是一个标记,of_device_id表最后一个匹配项必须是空的。
第5865行,定义一个platform_driver结构体变量xxx_driver,表示platform驱动,第5962行设置paltform_driver中的device_driver成员变量的name和of_match_table这两个属性。其中name属性用于传统的驱动与设备匹配,也就是检查驱动和设备的name字段是不是相同。of_match_table属性就是用于设备树下的驱动与设备检查。对于一个完整的驱动程序,必须提供有设备树和无设备树两种匹配方法。最后63和64这两行设置probe和remove这两成员变量。
第68~71行,驱动入口函数,调用platform_driver_register函数向Linux内核注册一个platform驱动,也就是上面定义的xxx_driver结构体变量。
第74~77行,驱动出口函数,调用platform_driver_unregister函数卸载前面注册的platform驱动。
总体来说,platform驱动还是传统的字符设备驱动、块设备驱动或网络设备驱动,只是套上了一张“platform”的皮,目的是为了使用总线、驱动和设备这个驱动模型来实现驱动的分离与分层。
34.2.3 platform设备
platform驱动已经准备好了,我们还需要platform设备,否则的话单单一个驱动也做不了什么。platform_device这个结构体表示platform设备,这里我们要注意,如果内核支持设备树的话就不要再使用platform_device来描述设备了,因为改用设备树去描述了。当然了,你如果一定要用platform_device来描述设备信息的话也是可以的。platform_device结构体定义在文件include/linux/platform_device.h中,结构体内容如下:
示例代码34.2.3.1 platform_device结构体代码段
1  struct platform_device {
2   	const char  *name;
3   	int     id;
4   	bool        id_auto;
5   	struct device   dev;
6   	u64     platform_dma_mask;
7   	u32     num_resources;
8   	struct resource *resource;
9
10  	const struct platform_device_id *id_entry;
11  	char *driver_override; /* Driver name to force a match */
12
13  	/* MFD cell pointer */
14  	struct mfd_cell *mfd_cell;
15
16  	/* arch specific additions */
17  	struct pdev_archdata    archdata;
18 };
第2行,name表示设备名字,要和所使用的platform驱动的name字段相同,否则的话设备就无法匹配到对应的驱动。比如对应的platform驱动的name字段为“xxx-gpio”,那么此name字段也要设置为“xxx-gpio”。
第7行,num_resources表示资源数量,一般为第8行resource资源的大小。
第8行,resource表示资源,也就是设备信息,比如外设寄存器等。Linux内核使用resource结构体表示资源,resource结构体定义在include/linux/ioport.h文件里面,内容为:
示例代码54.2.3.2 resource结构体代码段
1 struct resource {
2  	resource_size_t start;
3  	resource_size_t end;
4  	const char *name;
5  	unsigned long flags;
6  	unsigned long desc;
7  	struct resource *parent, *sibling, *child;
8 };
start和end分别表示资源的起始和终止信息,对于内存类的资源,就表示内存起始和终止地址,name表示资源名字,flags表示资源类型,可选的资源类型都定义在了文件include/linux/ioport.h里面,如下所示:
示例代码34.2.3.3 资源类型
1   #define IORESOURCE_BITS        	0x000000ff  /* Bus-specific bits */
2
3   #define IORESOURCE_TYPE_BITS	0x00001f00  /* Resource type    */
4   #define IORESOURCE_IO           	0x00000100  /* 表示IO口的资源 */
5   #define IORESOURCE_MEM          	0x00000200  /* 表示内存地址 */
6   #define IORESOURCE_REG           	0x00000300  /* Register offsets */
7   #define IORESOURCE_IRQ          	0x00000400  /* 中断号 */
8   #define IORESOURCE_DMA          	0x00000800  /* DMA通道号 */
9   #define IORESOURCE_BUS          	0x00001000      /* 总线号 */
......
84 #define IORESOURCE_PCI_FIXED    (1<<4)  /* Do not move resource */
在以前不支持设备树的Linux版本中,用户需要编写platform_device变量来描述设备信息,然后使用platform_device_register函数将设备信息注册到Linux内核中,此函数原型如下所示:
int platform_device_register(struct platform_device *pdev)
函数参数和返回值含义如下:
pdev:要注册的platform设备。
返回值:负数,失败;0,成功。
如果不再使用platform的话可以通过platform_device_unregister函数注销掉相应的platform设备,platform_device_unregister函数原型如下:
void platform_device_unregister(struct platform_device *pdev)
函数参数和返回值含义如下:
pdev:要注销的platform设备。
返回值:无。
platform设备信息框架如下所示:
示例代码54.2.3.4 platform设备框架
1  /* 寄存器地址定义*/
2  #define PERIPH1_REGISTER_BASE  	(0X20000000) /* 外设1寄存器首地址 */
3  #define PERIPH2_REGISTER_BASE  	(0X020E0068) /* 外设2寄存器首地址 */
4  #define REGISTER_LENGTH          	4
5
6  /* 资源 */
7  static struct resource xxx_resources[] = {
8   	[0] = {
9       		.start  = PERIPH1_REGISTER_BASE,
10      	.end    = (PERIPH1_REGISTER_BASE + REGISTER_LENGTH - 1),
11      	.flags  = IORESOURCE_MEM,
12  	},
13  	[1] = {
14      	.start  = PERIPH2_REGISTER_BASE,
15      	.end    = (PERIPH2_REGISTER_BASE + REGISTER_LENGTH - 1),
16      	.flags  = IORESOURCE_MEM,
17  	},
18 };
19
20 /* platform设备结构体 */
21 static struct platform_device xxxdevice = {
22  	.name = "xxx-gpio",
23  	.id = -1,
24  	.num_resources = ARRAY_SIZE(xxx_resources),
25  	.resource = xxx_resources,
26 };
27
28 /* 设备模块加载 */
29 static int __init xxxdevice_init(void)
30 {
31  	return platform_device_register(&xxxdevice);
32 }
33
34 /* 设备模块注销 */
35 static void __exit xxx_resourcesdevice_exit(void)
36 {
37  	platform_device_unregister(&xxxdevice);
38 }
39
40 module_init(xxxdevice_init);
41 module_exit(xxxdevice_exit);
42 MODULE_LICENSE("GPL");
43 MODULE_AUTHOR("zuozhongkai");
第7~18行,数组xxx_resources表示设备资源,一共有两个资源,分别为设备外设1和外设2的寄存器信息。因此flags都为IORESOURCE_MEM,表示资源为内存类型的。
第21~26行,platform设备结构体变量,注意name字段要和所使用的驱动中的name字段一致,否则驱动和设备无法匹配成功。num_resources表示资源大小,其实就是数组xxx_resources的元素数量,这里用ARRAY_SIZE来测量一个数组的元素个数。
第29~32行,设备模块加载函数,在此函数中调用platform_device_register向Linux内核注册platform设备。
第35~38行,设备模块卸载函数,在此函数中调用platform_device_unregister从Linux内核中卸载platform设备。
示例代码34.2.3.4主要是在不支持设备树的Linux版本中使用的,当Linux内核支持了设备树以后就不需要用户手动去注册platform设备了。因为设备信息都放到了设备树中去描述,Linux内核启动的时候会从设备树中读取设备信息,然后将其组织成platform_device形式,至于设备树到platform_device的具体过程就不去详细的追究了,感兴趣的可以去看一下,网上也有很多博客详细的讲解了整个过程。
关于platform下的总线、驱动和设备就讲解到这里,我们接下来就使用platform驱动框架来编写一个LED灯驱动,本章我们不使用设备树来描述设备信息,我们采用自定义platform_device这种“古老”方式来编写LED的设备信息。下一章我们来编写设备树下的platform驱动,这样我们就掌握了无设备树和有设备树这两种platform驱动的开发方式。
34.3 硬件原理图分析
本章实验我们只使用到正点原子的STM32MP1开发板上的LED灯,因此实验硬件原理图参考21.2小节即可。
34.4 试验程序编写
本实验对应的例程路径为:开发板光盘1、程序源码2、Linux驱动例程17_platform。
本章实验我们需要编写一个驱动模块和一个设备模块,其中驱动模块是platform驱动程序,设备模块是platform的设备信息。当这两个模块都加载成功以后就会匹配成功,然后platform驱动模块中的probe函数就会执行,probe函数中就是传统的字符设备驱动那一套。
34.4.1 platform设备与驱动程序编写
新建名为“17_platform”的文件夹,然后在17_platform文件夹里面创建vscode工程,工作区命名为“platform”。新建名为leddevice.c和leddriver.c这两个文件,这两个文件分别为LED灯的platform设备文件和LED灯的platform的驱动文件。在leddevice.c中输入如下所示内容:
示例代码34.4.1.1 leddevice.c文件代码段
1   #include <linux/types.h>
2   #include <linux/kernel.h>
3   #include <linux/delay.h>
4   #include <linux/ide.h>
5   #include <linux/init.h>
6   #include <linux/module.h>
7   #include <linux/errno.h>
8   #include <linux/gpio.h>
9   #include <linux/cdev.h>
10  #include <linux/device.h>
11  #include <linux/of_gpio.h>
12  #include <linux/semaphore.h>
13  #include <linux/timer.h>
14  #include <linux/irq.h>
15  #include <linux/wait.h>
16  #include <linux/poll.h>
17  #include <linux/fs.h>
18  #include <linux/fcntl.h>
19  #include <linux/platform_device.h>
20  #include <asm/mach/map.h>
21  #include <asm/uaccess.h>
22  #include <asm/io.h>
23
24  /* 寄存器物理地址 */
25  #define PERIPH_BASE             	(0x40000000)
26  #define MPU_AHB4_PERIPH_BASE  	(PERIPH_BASE + 0x10000000)
27  #define RCC_BASE               	(MPU_AHB4_PERIPH_BASE + 0x0000)
28  #define RCC_MP_AHB4ENSETR     	(RCC_BASE + 0XA28)
29  #define GPIOI_BASE           		(MPU_AHB4_PERIPH_BASE + 0xA000)
30  #define GPIOI_MODER         		(GPIOI_BASE + 0x0000)
31  #define GPIOI_OTYPER           	(GPIOI_BASE + 0x0004)
32  #define GPIOI_OSPEEDR           	(GPIOI_BASE + 0x0008)
33  #define GPIOI_PUPDR           	(GPIOI_BASE + 0x000C)
34  #define GPIOI_BSRR            	(GPIOI_BASE + 0x0018)
35  #define REGISTER_LENGTH        	4
36
37  /* @description 	: 释放flatform设备模块的时候此函数会执行
38   * @param - dev  	: 要释放的设备
39   * @return        	: 无
40   */
41  static void led_release(struct device *dev)
42  {
43      printk("led device released!\r\n");
44  }
45
46  /*
47   * 设备资源信息,也就是LED0所使用的所有寄存器
48   */
49  static struct resource led_resources[] = {
50      [0] = {
51          .start	= RCC_MP_AHB4ENSETR,
52          .end  	= (RCC_MP_AHB4ENSETR + REGISTER_LENGTH - 1),
53          .flags	= IORESOURCE_MEM,
54      },
55      [1] = {
56          .start	= GPIOI_MODER,
57          .end   	= (GPIOI_MODER + REGISTER_LENGTH - 1),
58          .flags	= IORESOURCE_MEM,
59      },
60      [2] = {
61          .start	= GPIOI_OTYPER,
62          .end  	= (GPIOI_OTYPER + REGISTER_LENGTH - 1),
63          .flags	= IORESOURCE_MEM,
64      },
65      [3] = {
66          .start	= GPIOI_OSPEEDR,
67          .end  	= (GPIOI_OSPEEDR + REGISTER_LENGTH - 1),
68          .flags	= IORESOURCE_MEM,
69      },
70      [4] = {
71          .start	= GPIOI_PUPDR,
72          .end   	= (GPIOI_PUPDR + REGISTER_LENGTH - 1),
73          .flags	= IORESOURCE_MEM,
74      },
75      [5] = {
76          .start	= GPIOI_BSRR,
77          .end   	= (GPIOI_BSRR + REGISTER_LENGTH - 1),
78          .flags	= IORESOURCE_MEM,
79      },
80  };
81
82  /*
83   * platform设备结构体
84   */
85  static struct platform_device leddevice = {
86      .name 	= "stm32mp1-led",
87      .id 	= -1,
88      .dev 	= {
89          .release = &led_release,
90      },
91      .num_resources = ARRAY_SIZE(led_resources),
92      .resource = led_resources,
93  };
94
95  /*
96   * @description 	: 设备模块加载
97   * @param       	: 无
98   * @return      	: 无
99   */
100 static int __init leddevice_init(void)
101 {
102     return platform_device_register(&leddevice);
103 }
104
105 /*
106  * @description 	: 设备模块注销
107  * @param       	: 无
108  * @return      	: 无
109  */
110 static void __exit leddevice_exit(void)
111 {
112     platform_device_unregister(&leddevice);
113 }
114
115 module_init(leddevice_init);
116 module_exit(leddevice_exit);
117 MODULE_LICENSE("GPL");
118 MODULE_AUTHOR("ALIENTEK");
119 MODULE_INFO(intree, "Y");
leddevice.c文件内容就是按照示例代码34.2.3.4的platform设备模板编写的。
第49~80行,led_resources数组,也就是设备资源,描述了LED所要使用到的寄存器信息,也就是IORESOURCE_MEM资源。
第85~93,platform设备结构体变量leddevice,这里要注意name字段为“stm32mp1-led”,所以稍后编写platform驱动中的name字段也要为“stm32mp1-led”,否则设备和驱动匹配失败。
第100~103行,设备模块加载函数,在此函数里面通过platform_device_register向Linux内核注册leddevice这个platform设备。
第110~113行,设备模块卸载函数,在此函数里面通过platform_device_unregister从Linux内核中删除掉leddevice这个platform设备。
leddevice.c文件编写完成以后就编写leddriver.c这个platform驱动文件,在leddriver.c里面输入如下内容:
示例代码54.4.1.2 leddriver.c文件代码段
1   #include <linux/types.h>
2   #include <linux/kernel.h>
3   #include <linux/delay.h>
4   #include <linux/ide.h>
5   #include <linux/init.h>
6   #include <linux/module.h>
7   #include <linux/errno.h>
8   #include <linux/gpio.h>
9   #include <linux/cdev.h>
10  #include <linux/device.h>
11  #include <linux/of_gpio.h>
12  #include <linux/semaphore.h>
13  #include <linux/timer.h>
14  #include <linux/irq.h>
15  #include <linux/wait.h>
16  #include <linux/poll.h>
17  #include <linux/fs.h>
18  #include <linux/fcntl.h>
19  #include <linux/platform_device.h>
20  #include <asm/mach/map.h>
21  #include <asm/uaccess.h>
22  #include <asm/io.h>
23
24  #define LEDDEV_CNT   		1           		/* 设备号长度  	*/
25  #define LEDDEV_NAME    	"platled"   	/* 设备名字     */
26  #define LEDOFF          	0
27  #define LEDON           	1
28
29  /* 映射后的寄存器虚拟地址指针 */
30  static void __iomem *MPU_AHB4_PERIPH_RCC_PI;
31  static void __iomem *GPIOI_MODER_PI;
32  static void __iomem *GPIOI_OTYPER_PI;
33  static void __iomem *GPIOI_OSPEEDR_PI;
34  static void __iomem *GPIOI_PUPDR_PI;
35  static void __iomem *GPIOI_BSRR_PI;
36
37  /* leddev设备结构体 */
38  struct leddev_dev{
39      dev_t devid;            	/* 设备号    	*/
40      struct cdev cdev;       	/* cdev   		*/
41      struct class *class;   	/* 类      		*/
42      struct device *device;  	/* 设备       	*/
43  };
44
45  struct leddev_dev leddev;   	/* led设备 	*/
46
47  /*
48   * @description	: LED打开/关闭
49   * @param - sta 	: LEDON(0) 打开LED,LEDOFF(1) 关闭LED
50   * @return        	: 无
51   */
52  void led_switch(u8 sta)
53  {
54      u32 val = 0;
55      if(sta == LEDON) {
56          val = readl(GPIOI_BSRR_PI);
57          val |= (1 << 16);
58          writel(val, GPIOI_BSRR_PI);
59      }else if(sta == LEDOFF) {
60          val = readl(GPIOI_BSRR_PI);
61          val|= (1 << 0);
62          writel(val, GPIOI_BSRR_PI);
63      }
64  }
65
66  /*
67   * @description 	: 取消映射
68   * @return        	: 无
69   */
70  void led_unmap(void)
71  {
72    	/* 取消映射 */
73      iounmap(MPU_AHB4_PERIPH_RCC_PI);
74      iounmap(GPIOI_MODER_PI);
75      iounmap(GPIOI_OTYPER_PI);
76      iounmap(GPIOI_OSPEEDR_PI);
77      iounmap(GPIOI_PUPDR_PI);
78      iounmap(GPIOI_BSRR_PI);
79  }
80
81  /*
82   * @description 	: 打开设备
83   * @param – inode	: 传递给驱动的inode
84   * @param – filp	: 设备文件,file结构体有个叫做private_data的成员变量
85   *                    一般在open的时候将private_data指向设备结构体。
86   * @return       	: 0 成功;其他 失败
87   */
88  static int led_open(struct inode *inode, struct file *filp)
89  {
90      return 0;
91  }
92
93  /*
94   * @description 	: 向设备写数据
95   * @param – filp	: 设备文件,表示打开的文件描述符
96   * @param - buf 	: 要写给设备写入的数据
97   * @param - cnt  	: 要写入的数据长度
98   * @param – offt	: 相对于文件首地址的偏移
99   * @return       	: 写入的字节数,如果为负值,表示写入失败
100  */
101 static ssize_t led_write(struct file *filp, const char __user *buf,
size_t cnt, loff_t *offt)
102 {
103     int retvalue;
104     unsigned char databuf[1];
105     unsigned char ledstat;
106
107     retvalue = copy_from_user(databuf, buf, cnt);
108     if(retvalue < 0) {
109         printk("kernel write failed!\r\n");
110         return -EFAULT;
111     }
112
113     ledstat = databuf[0];       	/* 获取状态值 	*/
114     if(ledstat == LEDON) {
115         led_switch(LEDON);      	/* 打开LED灯 	*/
116     }else if(ledstat == LEDOFF) {
117         led_switch(LEDOFF); 		/* 关闭LED灯 	*/
118     }
119
120     return 0;
121 }
122
123 /* 设备操作函数 */
124 static struct file_operations led_fops = {
125     .owner = THIS_MODULE,
126     .open = led_open,
127     .write = led_write,
128 };
129
130 /*
131  * @description	: flatform驱动的probe函数
132  * @param - dev  	: platform设备
133  * @return        	: 0,成功;其他负值,失败
134  */
135 static int led_probe(struct platform_device *dev)
136 {
137     int i = 0, ret;
138     int ressize[6];
139     u32 val = 0;
140     struct resource *ledsource[6];
141
142     printk("led driver and device has matched!\r\n");
143     /* 1、获取资源 */
144     for (i = 0; i < 6; i++) {
145         ledsource[i] = platform_get_resource(dev, IORESOURCE_MEM, i);
146         if (!ledsource[i]) {
147             dev_err(&dev->dev, "No MEM resource for always on\n");
148             return -ENXIO;
149         }
150         ressize[i] = resource_size(ledsource[i]);
151     }
152
153     /* 2、初始化LED */
154     /* 寄存器地址映射 */
155     MPU_AHB4_PERIPH_RCC_PI = ioremap(ledsource[0]->start,
ressize[0]);
156     GPIOI_MODER_PI = ioremap(ledsource[1]->start, ressize[1]);
157     GPIOI_OTYPER_PI = ioremap(ledsource[2]->start, ressize[2]);
158     GPIOI_OSPEEDR_PI = ioremap(ledsource[3]->start, ressize[3]);
159     GPIOI_PUPDR_PI = ioremap(ledsource[4]->start, ressize[4]);
160     GPIOI_BSRR_PI = ioremap(ledsource[5]->start, ressize[5]);
161
162     /* 3、使能PI时钟 */
163     val = readl(MPU_AHB4_PERIPH_RCC_PI);
164     val &= ~(0X1 << 8); 	/* 清除以前的设置 	*/
165     val |= (0X1 << 8); 	/* 设置新值 			*/
166     writel(val, MPU_AHB4_PERIPH_RCC_PI);
167
168     /* 4、设置PI0通用的输出模式。*/
169     val = readl(GPIOI_MODER_PI);
170     val &= ~(0X3 << 0); 	/* bit0:1清零 		*/
171     val |= (0X1 << 0);  	/* bit0:1设置01 	*/
172     writel(val, GPIOI_MODER_PI);
173
174     /* 5、设置PI0为推挽模式。*/
175     val = readl(GPIOI_OTYPER_PI);
176     val &= ~(0X1 << 0); 	/* bit0清零,设置为上拉*/
177     writel(val, GPIOI_OTYPER_PI);
178
179     /* 6、设置PI0为高速。*/
180     val = readl(GPIOI_OSPEEDR_PI);
181     val &= ~(0X3 << 0); 	/* bit0:1 清零 		*/
182     val |= (0x2 << 0); 	/* bit0:1 设置为10		*/
183     writel(val, GPIOI_OSPEEDR_PI);
184
185     /* 7、设置PI0为上拉。*/
186     val = readl(GPIOI_PUPDR_PI);
187     val &= ~(0X3 << 0); 	/* bit0:1 清零			*/
188     val |= (0x1 << 0); 	/*bit0:1 设置为01		*/
189     writel(val,GPIOI_PUPDR_PI);
190
191     /* 8、默认关闭LED */
192     val = readl(GPIOI_BSRR_PI);
193     val |= (0x1 << 0);
194     writel(val, GPIOI_BSRR_PI);
195
196     /* 注册字符设备驱动 */
197     /* 1、申请设备号 */
198     ret = alloc_chrdev_region(&leddev.devid, 0, LEDDEV_CNT,
LEDDEV_NAME);
199     if(ret < 0)
200         goto fail_map;
201
202     /* 2、初始化cdev */
203     leddev.cdev.owner = THIS_MODULE;
204     cdev_init(&leddev.cdev, &led_fops);
205
206     /* 3、添加一个cdev */
207     ret = cdev_add(&leddev.cdev, leddev.devid, LEDDEV_CNT);
208     if(ret < 0)
209         goto del_unregister;
210
211     /* 4、创建类 */
212     leddev.class = class_create(THIS_MODULE, LEDDEV_NAME);
213     if (IS_ERR(leddev.class)) {
214         goto del_cdev;
215     }
216
217     /* 5、创建设备 */
218     leddev.device = device_create(leddev.class, NULL, leddev.devid,
NULL, LEDDEV_NAME);
219     if (IS_ERR(leddev.device)) {
220         goto destroy_class;
221     }
222     return 0;
223
224 destroy_class:
225     class_destroy(leddev.class);
226 del_cdev:
227     cdev_del(&leddev.cdev);
228 del_unregister:
229     unregister_chrdev_region(leddev.devid, LEDDEV_CNT);
230 fail_map:
231     led_unmap();
232     return -EIO;
233 }
234
235 /*
236  * @description	: platform驱动的remove函数
237  * @param - dev  	: platform设备
238  * @return        	: 0,成功;其他负值,失败
239  */
240 static int led_remove(struct platform_device *dev)
241 {
242     led_unmap();    			/* 取消映射 		*/
243     cdev_del(&leddev.cdev);	/* 删除cdev 	*/
244     unregister_chrdev_region(leddev.devid, LEDDEV_CNT); /* 注销设备号 */
245     device_destroy(leddev.class, leddev.devid); 	/* 注销设备 */
246     class_destroy(leddev.class);    				/* 注销类 */
247     return 0;
248 }
249
250 /* platform驱动结构体 */
251 static struct platform_driver led_driver = {
252     .driver     = {
253         .name   = "stm32mp1-led", 	/* 驱动名字,用于和设备匹配 */
254     },
255     .probe      = led_probe,
256     .remove     = led_remove,
257 };
258
259 /*
260  * @description 	: 驱动模块加载函数
261  * @param       	: 无
262  * @return      	: 无
263  */
264 static int __init leddriver_init(void)
265 {
266     return platform_driver_register(&led_driver);
267 }
268
269 /*
270  * @description 	: 驱动模块卸载函数
271  * @param       	: 无
272  * @return      	: 无
273  */
274 static void __exit leddriver_exit(void)
275 {
276     platform_driver_unregister(&led_driver);
277 }
278
279 module_init(leddriver_init);
280 module_exit(leddriver_exit);
281 MODULE_LICENSE("GPL");
282 MODULE_AUTHOR("ALIENTEK");
283 MODULE_INFO(intree, "Y");
leddriver.c文件内容就是按照示例代码34.2.2.5的platform驱动模板编写的。
第88~128行,传统的字符设备驱动。
第135~233行,probe函数,当设备和驱动匹配以后此函数就会执行,当匹配成功以后会在终端上输出“led driver and device has matched!”。在probe函数里面初始化LED、注册字符设备驱动。也就是将原来在驱动加载函数里面做的工作全部放到probe函数里面完成。
第240~248行,remobe函数,当卸载platform驱动的时候此函数就会执行。在此函数里面释放内存、注销字符设备等。也就是将原来驱动卸载函数里面的工作全部都放到remove函数中完成。
第251~257行,platform_driver驱动结构体,注意name字段为"stm32mp1-led",和我们在leddevice.c文件里面设置的设备name字段一致。
第264~267行,驱动模块加载函数,在此函数里面通过platform_driver_register向Linux内核注册led_driver驱动。
第274~277行,驱动模块卸载函数,在此函数里面通过platform_driver_unregister从Linux内核卸载led_driver驱动。
34.4.2 测试APP编写
测试APP的内容很简单,就是打开和关闭LED灯,新建ledApp.c这个文件,然后在里面输入如下内容:
示例代码34.4.2.1 ledApp.c文件代码段
1  #include "stdio.h"
2  #include "unistd.h"
3  #include "sys/types.h"
4  #include "sys/stat.h"
5  #include "fcntl.h"
6  #include "stdlib.h"
7  #include "string.h"
8  /***************************************************************
9  Copyright © ALIENTEK Co., Ltd. 1998-2029. All rights reserved.
10 文件名  		: ledApp.c
11 作者       	: 正点原子Linux团队
12 版本       	: V1.0
13 描述       	: platform驱动驱测试APP。
14 其他       	: 无
15 使用方法 	 	:./ledApp /dev/platled  0 关闭LED
16           	  ./ledApp /dev/platled  1 打开LED
17 论坛       	: www.openedv.com
18 日志       	: 初版V1.0 2019/8/16 正点原子Linux团队创建
19 ***************************************************************/
20 #define LEDOFF   0
21 #define LEDON    1
22
23 /*
24  * @description 	: main主程序
25  * @param - argc 	: argv数组元素个数
26  * @param - argv 	: 具体参数
27  * @return        	: 0 成功;其他 失败
28  */
29 int main(int argc, char *argv[])
30 {
31  	int fd, retvalue;
32  	char *filename;
33  	unsigned char databuf[1];
34
35  	if(argc != 3){
36     	 	printf("Error Usage!\r\n");
37      	return -1;
38  	}
39
40  	filename = argv[1];
41  	/* 打开led驱动 */
42  	fd = open(filename, O_RDWR);
43  	if(fd < 0){
44      	printf("file %s open failed!\r\n", argv[1]);
45      	return -1;
46  	}
47
48  	databuf[0] = atoi(argv[2]); /* 要执行的操作:打开或关闭 */
49  	retvalue = write(fd, databuf, sizeof(databuf));
50  	if(retvalue < 0){
51      	printf("LED Control Failed!\r\n");
52      	close(fd);
53      	return -1;
54  	}
55
56  	retvalue = close(fd); /* 关闭文件 */
57  	if(retvalue < 0){
58      	printf("file %s close failed!\r\n", argv[1]);
59     	 	return -1;
60  	}
61  	return 0;
62 }
ledApp.c文件内容很简单,就是控制LED灯的亮灭,和第四十一章的测试APP基本一致,这里就不重复讲解了。
34.5 运行测试
34.5.1 编译驱动程序和测试APP
1、编译驱动程序
编写Makefile文件,本章实验的Makefile文件和第四十章实验基本一样,只是将obj-m变量的值改为“leddevice.o leddriver.o”,Makefile内容如下所示:
示例代码34.5.1.1 Makefile文件
1  KERNELDIR := /home/zuozhongkai/linux/my_linux/linux-5.4.31
......
4  obj-m := leddevice.o
5  obj-m += leddriver.o
......
12 clean:
13  $(MAKE) -C $(KERNELDIR) M=$(CURRENT_PATH) clean
第4,5行,设置obj-m变量的值为“leddevice.o leddriver.o”。
输入如下命令编译出驱动模块文件:
make -j32
编译成功以后就会生成一个名为“leddevice.ko leddriver.ko”的驱动模块文件。
2、编译测试APP
输入如下命令编译测试ledApp.c这个测试程序:
arm-none-linux-gnueabihf-gcc ledApp.c -o ledApp
编译成功以后就会生成ledApp这个应用程序。
34.4.2 运行测试
将上一小节编译出来leddevice.ko、leddriver.ko和ledApp这两个文件拷贝到rootfs/lib/modules/5.4.31目录中,重启开发板,进入到目录lib/modules/5.4.31中,输入如下命令加载leddevice.ko设备模块和leddriver.ko这个驱动模块。
depmod //第一次加载驱动的时候需要运行此命令
modprobe leddevice.ko //加载设备模块
modprobe leddriver.ko //加载驱动模块
根文件系统中/sys/bus/platform/目录下保存着当前板子platform总线下的设备和驱动,其中devices子目录为platform设备,drivers子目录为plartofm驱动。进入/sys/bus/platform/devices/目录,查看我们的设备是否存在,我们在leddevice.c中设置设备的name字段为“stm32mp1-led”,因此肯定在/sys/bus/platform/devices/目录下存在一个名字“stm32mp1-led”的文件,否则说明我们的设备模块加载失败,结果如图34.4.2.1所示:

图34.4.2.1 stm32mp1-led设备
同理,查看/sys/bus/platform/drivers/目录,看一下驱动是否存在,我们在leddriver.c中设置name字段为“stm32mp1-led”,因此会在/sys/bus/platform/drivers/目录下存在名为“stm32mp1-led”这个文件,结果如图34.4.2.2所示:

图34.4.2.2 stm32mp1-led驱动
驱动模块和设备模块加载成功以后platform总线就会进行匹配,当驱动和设备匹配成功以后就会输出如图34.4.2.3所示一行语句:

图34.4.2.3 驱动和设备匹配成功
驱动和设备匹配成功以后就可以测试LED灯驱动了,输入如下命令打开LED灯:
./ledApp /dev/platled 1 //打开LED灯
在输入如下命令关闭LED灯:
./ledApp /dev/platled 0 //关闭LED灯
观察一下LED灯能否打开和关闭,如果可以的话就说明驱动工作正常,如果要卸载驱动的话输入如下命令即可:
rmmod leddevice.ko
rmmod leddriver.ko