SpringBoot整合Shiro学习(下)
SpringBoot整合Shiro(下)
基于【编程不良人】2020最新版Shiro教程,整合SpringBoot项目实战教程
哔哩哔哩链接:https://www.bilibili.com/video/BV1uz4y197Zm?p=1
在中篇中我们已经了解到shiro对jsp页面有很好的集成,但是与thymeleaf却没有,需要我们引入相关的依赖和配置才可以。接下来我们将学习shiro与thymeleaf的整合。
九、Shiro与thymeleaf整合
1.新建springboot项目
此处以ideal为例,我们新建一个springboot项目,
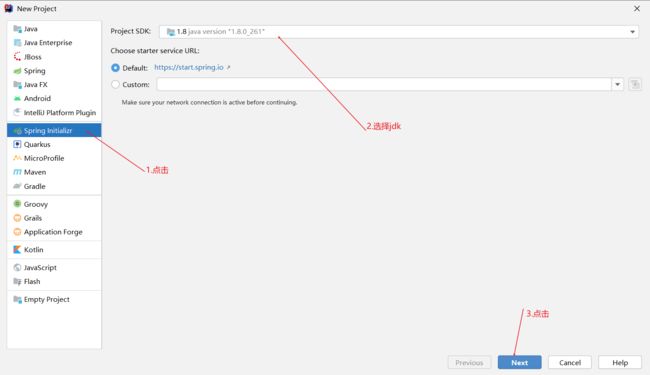
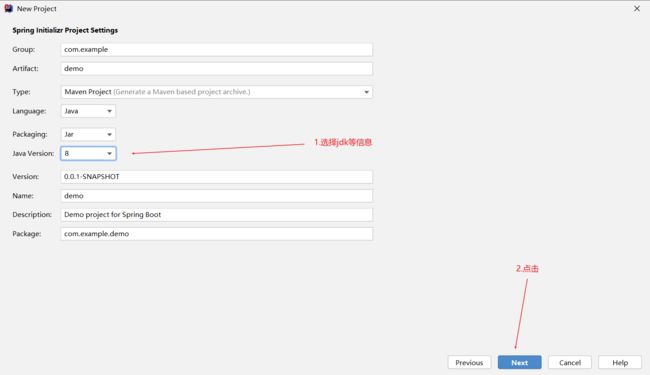
配置项目信息,
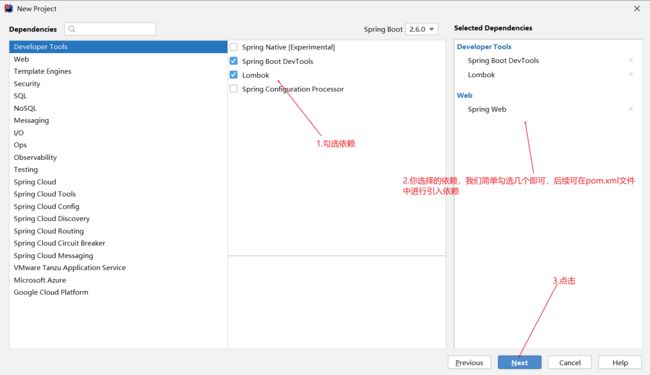
引入依赖,
对项目进行命名等配置,

2.引入依赖
创建好项目后,我们需要引入更多依赖,我们打开pom.xml文件,具体代码如下:
<project xmlns="http://maven.apache.org/POM/4.0.0" xmlns:xsi="http://www.w3.org/2001/XMLSchema-instance"
         xsi:schemaLocation="http://maven.apache.org/POM/4.0.0 https://maven.apache.org/xsd/maven-4.0.0.xsd">
    <modelVersion>4.0.0modelVersion>
    <parent>
        <groupId>org.springframework.bootgroupId>
        <artifactId>spring-boot-starter-parentartifactId>
        <version>2.3.2.RELEASEversion>
        <relativePath/>
    parent>
    <groupId>com.examplegroupId>
    <artifactId>demoartifactId>
    <version>0.0.1-SNAPSHOTversion>
    <name>demoname>
    <description>Demo project for Spring Bootdescription>
    <properties>
        <java.version>1.8java.version>
    properties>
    <dependencies>

        <dependency>
            <groupId>org.springframework.bootgroupId>
            <artifactId>spring-boot-starter-thymeleafartifactId>
        dependency>

        <dependency>
            <groupId>com.github.theborakompanionigroupId>
            <artifactId>thymeleaf-extras-shiroartifactId>
            <version>2.0.0version>
        dependency>

        <dependency>
            <groupId>org.apache.shirogroupId>
            <artifactId>shiro-spring-boot-starterartifactId>
            <version>1.5.3version>
        dependency>

        <dependency>
            <groupId>org.apache.shirogroupId>
            <artifactId>shiro-ehcacheartifactId>
            <version>1.5.3version>
        dependency>

        <dependency>
            <groupId>org.springframework.bootgroupId>
            <artifactId>spring-boot-starter-data-redisartifactId>
        dependency>

        <dependency>
            <groupId>com.alibabagroupId>
            <artifactId>fastjsonartifactId>
            <version>1.2.70version>
        dependency>

        <dependency>
            <groupId>org.springframework.bootgroupId>
            <artifactId>spring-boot-starter-webartifactId>
        dependency>

        <dependency>
            <groupId>org.mybatis.spring.bootgroupId>
            <artifactId>mybatis-spring-boot-starterartifactId>
            <version>2.1.2version>
        dependency>

        <dependency>
            <groupId>mysqlgroupId>
            <artifactId>mysql-connector-javaartifactId>
            <version>8.0.23version>
        dependency>

        <dependency>
            <groupId>com.alibabagroupId>
            <artifactId>druidartifactId>
            <version>1.1.19version>
        dependency>

        <dependency>
            <groupId>org.springframework.bootgroupId>
            <artifactId>spring-boot-devtoolsartifactId>
            <scope>runtimescope>
            <optional>trueoptional>
        dependency>
        <dependency>
            <groupId>org.projectlombokgroupId>
            <artifactId>lombokartifactId>
            <optional>trueoptional>
        dependency>
        <dependency>
            <groupId>org.springframework.bootgroupId>
            <artifactId>spring-boot-starter-testartifactId>
            <scope>testscope>
        dependency>
    dependencies>

    <build>
        <plugins>
            <plugin>
                <groupId>org.springframework.bootgroupId>
                <artifactId>spring-boot-maven-pluginartifactId>
                <configuration>
                    <excludes>
                        <exclude>
                            <groupId>org.projectlombokgroupId>
                            <artifactId>lombokartifactId>
                        exclude>
                    excludes>
                configuration>
            plugin>
        plugins>
    build>

project>
3.书写项目配置文件
我们很多配置都是和之前一样的,此处只需要将jsp的配置改为thymeleaf的配置即可,具体如下:
server.port=8080
server.servlet.context-path=/shiro
spring.application.name=shiro
# 关闭thymeleaf的缓存,方便测试,在项目上线时需要改为true
spring.thymeleaf.cache=false
# thymeleaf的很多配置都有默认值,基本上不用我们做很多配置
spring.thymeleaf.suffix=.html
spring.thymeleaf.prefix=classpath:/templates/

spring.datasource.type=com.alibaba.druid.pool.DruidDataSource
spring.datasource.driver-class-name=com.mysql.cj.jdbc.Driver
spring.datasource.url=jdbc:mysql://localhost:3306/shiro?useUnicode=true&characterEncoding=utf8&zeroDateTimeBehavior=convertToNull&useSSL=true&serverTimezone=GMT%2B8
spring.datasource.username=root
spring.datasource.password=123456

mybatis.type-aliases-package=com.example.demo.entity
mybatis.mapper-locations=classpath:mapper/*.xml


logging.level.com.example.demo.dao=debug
4.引入之前的包
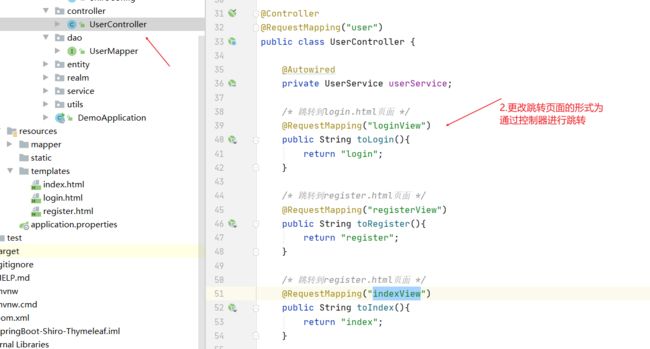
由于我们的业务都是一样的,我们将之前的项目中的代码目录复制过来更改一下即可,我们需要更改的位置如下:
1.打开UserController.java,由之前的直接跳转jsp页面更改为通过控制器进行跳转,因为thymeleaf不能直接访问视图,需要通过控制器进行访问,如果我们直接访问界面,是不能由thymeleaf进行解析的。
具体代码如下:
package com.example.demo.controller;

import com.example.demo.cache.FastJson2JsonRedisSerializer;
import com.example.demo.entity.User;
import com.example.demo.service.UserService;
import com.example.demo.utils.ApplicationContextUtils;
import com.example.demo.utils.VerifyCodeUtils;
import com.fasterxml.jackson.annotation.JsonAutoDetect;
import com.fasterxml.jackson.annotation.JsonTypeInfo;
import com.fasterxml.jackson.annotation.PropertyAccessor;
import com.fasterxml.jackson.databind.ObjectMapper;
import com.fasterxml.jackson.databind.jsontype.impl.LaissezFaireSubTypeValidator;
import org.apache.shiro.SecurityUtils;
import org.apache.shiro.authc.IncorrectCredentialsException;
import org.apache.shiro.authc.UnknownAccountException;
import org.apache.shiro.authc.UsernamePasswordToken;
import org.apache.shiro.authz.annotation.RequiresPermissions;
import org.apache.shiro.subject.Subject;
import org.springframework.beans.factory.annotation.Autowired;
import org.springframework.data.redis.core.RedisTemplate;
import org.springframework.data.redis.serializer.StringRedisSerializer;
import org.springframework.stereotype.Controller;
import org.springframework.web.bind.annotation.RequestMapping;
import org.springframework.web.bind.annotation.ResponseBody;

import javax.servlet.ServletOutputStream;
import javax.servlet.http.HttpServletResponse;
import javax.servlet.http.HttpSession;
import java.io.IOException;

@Controller
@RequestMapping("user")
public class UserController {

    @Autowired
    private UserService userService;

    /* 跳转到login.html页面 */
    @RequestMapping("loginView")
    public String toLogin(){
        return "login";
    }

    /* 跳转到register.html页面 */
    @RequestMapping("registerView")
    public String toRegister(){
        return "register";
    }

    /* 跳转到register.html页面 */
    @RequestMapping("indexView")
    public String toIndex(){
        return "index";
    }

    /**
     * 测试我们自定义的序列化方式
     */
    @RequestMapping("test")
    @ResponseBody
    public String test() {
        RedisTemplate redisTemplate = (RedisTemplate) ApplicationContextUtils.getBean("redisTemplate");
        System.out.println(redisTemplate);
        /* 序列化key的序列化方式为string类型的序列化方式 */
        redisTemplate.setKeySerializer(new StringRedisSerializer());
        // 使用Jackson2JsonRedisSerializer来序列化和反序列化redis的value值
        // Jackson2JsonRedisSerializer serializer = new Jackson2JsonRedisSerializer(Object.class);
        // 使用Fastjson2JsonRedisSerializer来序列化和反序列化redis的value值
        FastJson2JsonRedisSerializer serializer = new FastJson2JsonRedisSerializer(Object.class);

        // Jackson之ObjectMapper对象的使用: https://blog.csdn.net/qq_41834086/article/details/111152470
        ObjectMapper mapper = new ObjectMapper();
        // ALL:此伪类型表明所有访问器都受到影响。ANY:所有类型的访问修饰符都是可接受的,从私有到公有。
        mapper.setVisibility(PropertyAccessor.ALL, JsonAutoDetect.Visibility.ANY);
        mapper.activateDefaultTyping(LaissezFaireSubTypeValidator.instance, ObjectMapper.DefaultTyping.NON_FINAL, JsonTypeInfo.As.PROPERTY);
        serializer.setObjectMapper(mapper);
        // 使用Jackson2JsonRedisSerializerr来序列化和反序列化redis的value值
        redisTemplate.setValueSerializer(serializer);
        /* 查询tom的数据 */
        User tom = userService.findByUserName("tom");
        redisTemplate.opsForValue().set("123",tom);
        return "ok";
    }

    /**
     * 退出登录
     */
    @RequestMapping("logout")
    public String logout() {
        Subject subject = SecurityUtils.getSubject();
        subject.logout();//退出用户
        return "redirect:/user/loginView";
    }

    /**
     * 用来处理身份认证
     * @param username
     * @param password
     * @return
     */
    @RequestMapping("login")
    public String login(String username, String password, String code, HttpSession session) {
        //比较验证码
        String codes = (String) session.getAttribute("code");
        try {
            /* 在web环境中,只要我们在ShiroConfig配置中创建了安全管理器,shiro就会自动给SecurityUtils注入web的安全管理器,
             即注入DefaultWebSecurityManager*/
            // 获取主体对象
            if (codes.equalsIgnoreCase(code)) {
                Subject subject = SecurityUtils.getSubject();
                // 在认证过程中使用subject.login进行认证, UsernamePasswordToken将用户名密码封装为token
                subject.login(new UsernamePasswordToken(username, password));
                return "redirect:/user/indexView";
            }else {
                throw new RuntimeException("验证码错误!");
            }
        } catch (UnknownAccountException e) {
            e.printStackTrace();
            System.out.println("用户名错误!");
        } catch (IncorrectCredentialsException e) {
            e.printStackTrace();
            System.out.println("密码错误!");
        } catch (Exception e) {
            e.printStackTrace();
            System.out.println(e.getMessage());
        }
        return "redirect:/user/loginView";
    }

    /**
     * 用户注册
     */
    @RequestMapping("register")
    public String register(User user) {
        try {
            userService.register(user);
            return "redirect:/user/loginView";
        }catch (Exception e){
            e.printStackTrace();
            return "redirect:/user/registerView";
        }
    }

    /* 基于授权的代码方式测试 */
    @RequestMapping("save")
    public String save(){
        //基于角色
        //获取主体对象
        Subject subject = SecurityUtils.getSubject();
        //代码方式
        if (subject.hasRole("admin")) {
            System.out.println("有admin角色!");
        }else{
            System.out.println("无admin角色!");
        }
        //基于权限字符串
        /*
        * isPermitted() 方法判断这个登录的用户是否具有参数字符串所表示的权限,返回一个 boolean 类型的值。
        * checkPermission() 和 isPermitted() 方法的功能是类似的,区别在于如果这个登录的用户不具有参数字符串所表示的权限时,程序将抛出异常。
        * 类似地,hasRole() 和 checkRole() 方法也有类似的作用,在这里就不多做解释了。
        * */
        if (subject.isPermittedAll("user:*")){
            System.out.println("拥有user:*权限");
        }else {
            System.out.println("没有user:*权限");
        }
        return "redirect:/user/indexView";
    }

    /* 基于授权的注解方式测试 */
    @RequestMapping("save2")
    // @RequiresRoles(value={"admin","user"})//用来判断角色,这里表示同时具有 admin user 角色才能进行此方法
    // 用来判断权限字符串,这里表示user:update:01才能进入此方法(如果是user:*:*(可以简写为user:*)或者*:*:*(全部角色)也可进入此方法)
    @RequiresPermissions("user:update:01")
    public String save2(){
        System.out.println("进入了此方法");
        return "redirect:/user/indexView";
    }

    /* 生成验证码 */
    @RequestMapping("getImage")
    public void getImage(HttpSession session, HttpServletResponse response) throws IOException {
        // 生成4位验证码
        String code = VerifyCodeUtils.generateVerifyCode(4);
        // 验证码放入session
        session.setAttribute("code",code);
        // 以response响应流的形式将验证码存入图片
        ServletOutputStream os = response.getOutputStream(); // 拿到响应流
        // 给响应流设置响应类型
        response.setContentType("image/png");
        VerifyCodeUtils.outputImage(220, 60, os, code);
    }
}
2.修改shiro配置
我们打开ShiroConfig.java文件,放行UserController.java更改后的请求和界面
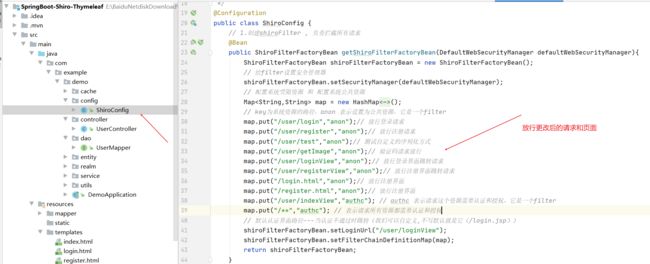
具体代码如下:
package com.example.demo.config;

import at.pollux.thymeleaf.shiro.dialect.ShiroDialect;
import com.example.demo.cache.RedisCacheManager;
import com.example.demo.realm.CustomerRealm;
import org.apache.shiro.authc.credential.HashedCredentialsMatcher;
import org.apache.shiro.realm.Realm;
import org.apache.shiro.spring.web.ShiroFilterFactoryBean;
import org.apache.shiro.web.mgt.DefaultWebSecurityManager;
import org.springframework.context.annotation.Bean;
import org.springframework.context.annotation.Configuration;

import java.util.HashMap;
import java.util.Map;

/**
 * 用来整合shiro框架相关的配置类
 */
@Configuration
public class ShiroConfig {
    // 1.创建shiroFilter , 负责拦截所有请求
    @Bean
    public ShiroFilterFactoryBean getShiroFilterFactoryBean(DefaultWebSecurityManager defaultWebSecurityManager){
        ShiroFilterFactoryBean shiroFilterFactoryBean = new ShiroFilterFactoryBean();
        // 给filter设置安全管理器
        shiroFilterFactoryBean.setSecurityManager(defaultWebSecurityManager);
        // 配置系统受限资源 和 配置系统公共资源
        Map<String,String> map = new HashMap<String,String>();
        // key为系统资源的路径,anon 表示设置为公共资源,它是一个filter
        map.put("/user/login","anon");// 放行登录请求
        map.put("/user/register","anon");// 放行注册请求
        map.put("/user/test","anon");// 测试自定义的序列化方式
        map.put("/user/getImage","anon");// 验证码请求放行
        map.put("/user/loginView","anon");// 放行登录界面跳转请求
        map.put("/user/registerView","anon");// 放行注册界面跳转请求
        map.put("/login.html","anon");// 放行注册界面
        map.put("/register.html","anon");// 放行注册界面
        map.put("/user/indexView","authc"); // authc 表示请求这个资源需要认证和授权,它是一个filter
        map.put("/**","authc"); // 表示请求所有资源都需要认证和授权
        // 默认认证界面路径---当认证不通过时跳转(我们可以自定义,不写默认就是它(/login.jsp))
        shiroFilterFactoryBean.setLoginUrl("/user/loginView");
        shiroFilterFactoryBean.setFilterChainDefinitionMap(map);
        return shiroFilterFactoryBean;
    }

    // 2.创建安全管理器,此处使用DefaultWebSecurityManager,我们之前使用的DefaultSecurityManager不具有web容器的特性
    @Bean
    public DefaultWebSecurityManager getDefaultWebSecurityManager(Realm realm){
        DefaultWebSecurityManager defaultWebSecurityManager = new DefaultWebSecurityManager();
        //给安全管理器设置
        defaultWebSecurityManager.setRealm(realm);
        return defaultWebSecurityManager;
    }

    // 3.创建自定义realm
    @Bean("realm")
    public Realm getRealm(){
        CustomerRealm customerRealm = new CustomerRealm();
        // 设置hashed凭证匹配器
        HashedCredentialsMatcher credentialsMatcher = new HashedCredentialsMatcher();
        // 设置md5加密
        credentialsMatcher.setHashAlgorithmName("md5");
        // 设置散列次数
        credentialsMatcher.setHashIterations(1024);
        customerRealm.setCredentialsMatcher(credentialsMatcher);
        // 开启缓存管理器
        customerRealm.setCacheManager(new RedisCacheManager()); // 使用自定义的RedisCacheManager缓存的实现
        customerRealm.setCachingEnabled(true);// 开启全局的缓存管理
        customerRealm.setAuthenticationCachingEnabled(true);// 开启认证的缓存管理
        // 给认证的缓存在内存中起名字,不写则默认为“包名+authenticationCache“,如此处为com.example.demo.realm.CustomerRealm.authenticationCache
        customerRealm.setAuthenticationCacheName("authenticationCache");
        customerRealm.setAuthorizationCachingEnabled(true);// 开启授权的缓存管理
        // 给授权的缓存在内存中起名字,不写则默认为“包名+authorizationCache“,如此处为com.example.demo.realm.CustomerRealm.authorizationCache
        customerRealm.setAuthorizationCacheName("authorizationCache");
        return customerRealm;
    }

    /* 加入shiro的方言,解决shiro与thymeleaf整合页面中的标签不生效的原因 */
    @Bean(name = "shiroDialect")
    public ShiroDialect shiroDialect(){
        return new ShiroDialect();
    }
}
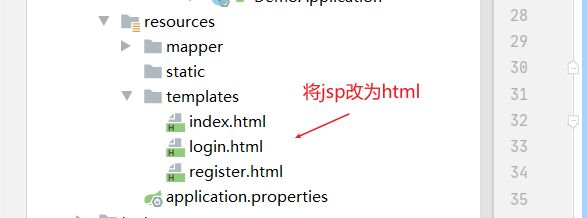
3.将jsp页面更改为html页面,此处需要注意的是我们需要引入thymeleaf和shiro的命名空间,即
<html xmlns="http://www.w3.org/1999/xhtml" xmlns:th="http://www.thymeleaf.org"
      xmlns:shiro="http://www.pollix.at/thymeleaf/shiro">
此处我们先扩展shiro与thymeleaf整合常见权限控制标签使用:
5.常见权限控制标签使用
<p shiro:guest="">Please <a href="login.html">logina>p>


<p shiro:user="">
    Welcome back John! Not John? Click <a href="login.html">herea> to login.
p>


<p shiro:authenticated="">
    Hello, <span shiro:principal="">span>, how are you today?
p>
<a shiro:authenticated="" href="updateAccount.html">Update your contact informationa>


<p>Hello, <shiro:principal/>, how are you today?p>


<p shiro:notAuthenticated="">
    Please <a href="login.html">logina> in order to update your credit card information.
p>


<a shiro:hasRole="admin" href="admin.html">Administer the systema>


<p shiro:lacksRole="developer">
    Sorry, you are not allowed to developer the system.
p>


<p shiro:hasAllRoles="developer, 2">
    You are a developer and a admin.
p>


<p shiro:hasAnyRoles="admin, vip, developer,1">
    You are a admin, vip, or developer.
p>


<a shiro:hasPermission="userInfo:add" href="createUser.html">添加用户a>


<p shiro:lacksPermission="userInfo:del">
    Sorry, you are not allowed to delete user accounts.
p>


<p shiro:hasAllPermissions="userInfo:view, userInfo:add">
    You can see or add users.
p>


<p shiro:hasAnyPermissions="userInfo:view, userInfo:del">
    You can see or delete users.
p>
<a shiro:hasPermission="pp" href="createUser.html">Create a new Usera>
了解了之后,我们书写代码,具体代码如下:
index.html
DOCTYPE html>
<html xmlns="http://www.w3.org/1999/xhtml" xmlns:th="http://www.thymeleaf.org"
xmlns:shiro="http://www.pollix.at/thymeleaf/shiro">
<head>
<meta charset="UTF-8">
<meta name="viewport"
content="width=device-width, user-scalable=no, initial-scale=1.0, maximum-scale=1.0, minimum-scale=1.0">
<meta http-equiv="X-UA-Compatible" content="ie=edge">
<title>主页title>
head>
<body>
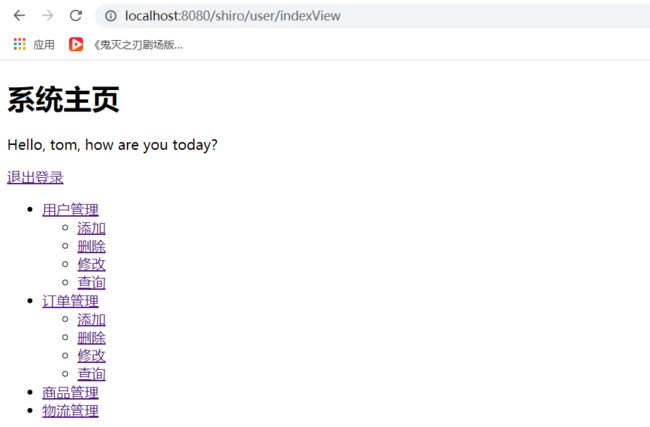
<h1>系统主页h1>
<p>Hello, <shiro:principal/>, how are you today?p>
<a th:href="@{/user/logout}">退出登录a>
<ul>
<shiro:hasAnyRoles name="user_manager,admin,addinfo_manager">
<li><a href="">用户管理a>
<ul>
<shiro:hasPermission name="user:add:*">
<li><a href="">添加a>li>
shiro:hasPermission>
<shiro:hasPermission name="user:delete:*">
<li><a href="">删除a>li>
shiro:hasPermission>
<shiro:hasPermission name="user:update:*">
<li><a href="">修改a>li>
shiro:hasPermission>
<shiro:hasPermission name="user:find:*">
<li><a href="">查询a>li>
shiro:hasPermission>
ul>
li>
shiro:hasAnyRoles>
<shiro:hasAnyRoles name="order_manager,admin,addinfo_manager">
<li><a href="">订单管理a>li>
<ul>
<shiro:hasPermission name="order:add:*">
<li><a href="">添加a>li>
shiro:hasPermission>
<shiro:hasPermission name="order:delete:*">
<li><a href="">删除a>li>
shiro:hasPermission>
<shiro:hasPermission name="order:update:*">
<li><a href="">修改a>li>
shiro:hasPermission>
<shiro:hasPermission name="order:find:*">
<li><a href="">查询a>li>
shiro:hasPermission>
ul>
shiro:hasAnyRoles>
<shiro:hasRole name="admin">
<li><a href="">商品管理a>li>
<li><a href="">物流管理a>li>
shiro:hasRole>
<shiro:hasRole name="user">
<li><a href="">仅普通用户可见a>li>
<li><a href="">公共资源a>li>
shiro:hasRole>
ul>
body>
html>
login.html
DOCTYPE html>
<html xmlns="http://www.w3.org/1999/xhtml" xmlns:th="http://www.thymeleaf.org"
      xmlns:shiro="http://www.pollix.at/thymeleaf/shiro">
<head>
    <meta charset="UTF-8">
    <title>Titletitle>
head>
<body>
<h1>登录界面h1>
<form th:action="@{/user/login}" method="post">
    用户名:<input type="text" name="username"> <br/>
    密 码 : <input type="text" name="password"> <br>
    请输入验证码: <input type="text" name="code"><img th:src="@{/user/getImage}" alt=""><br>
    <input type="submit" value="登录"><br>
    <a th:href="@{/user/registerView}">前往注册a>
form>
body>
html>
register.html
DOCTYPE html>
<html xmlns="http://www.w3.org/1999/xhtml" xmlns:th="http://www.thymeleaf.org"
      xmlns:shiro="http://www.pollix.at/thymeleaf/shiro">
<head>
    <meta charset="UTF-8">
    <title>Titletitle>
head>
<body>
<h1>注册界面h1>
<form th:action="@{/user/register}" method="post">
    用户名:<input type="text" name="username"> <br/>
    密 码 : <input type="text" name="password"> <br/>
    <input type="submit" value="立即注册"><br/>
    <a th:href="@{/user/loginView}">返回登录a>
form>
body>
html>
6.加入shiro的方言配置
-
页面标签不起作用一定要记住加入方言处理
-
之后我们还要引入shiro的方言配置,因为thymeleaf与shiro结合后默认是没有解析shiro的方言的,所以页面上的shiro页面标签不起作用,我们打开ShiroConfig.java文件,加入以下代码,
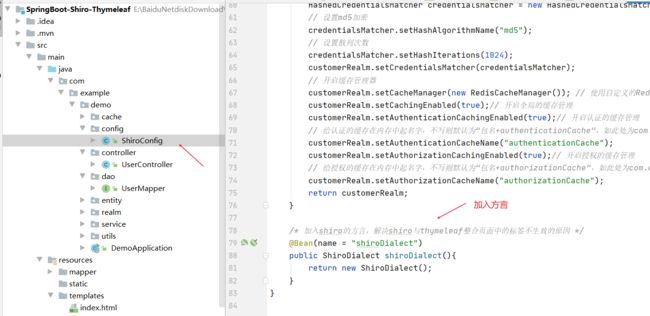
/* 加入shiro的方言,解决shiro与thymeleaf整合页面中的标签不生效的原因 */
@Bean(name = "shiroDialect")
public ShiroDialect shiroDialect(){
    return new ShiroDialect();
}
重启项目,进行登录,登录成功。
源码获取
至此,我们的SpringBoot整合Shiro学习(下)就讲解完成了。源码和数据库文件可以通过关注我的微信公众号 我爱学习呀嘻嘻 ,回复关键字shiro集成进行获取哦。
SpringBoot整合Shiro学习(上):Shiro基础知识
SpringBoot整合Shiro学习(中):Shiro与Jsp页面整合