android otaupdate源码路径,Android学习之OTA Update
之前需要处理一些应用程序用到的update相关问题, 了解到android build system会利用开源的bsdiff进行一些关于package的更新动作. 这篇文章就分析一下android系统的OTA update.
首先,让我们来看看OTA的整体框架
Build System Support, 用来创建需要的OTA update image(包括全部更新及部分更新)
Releasetools (build/tools/releasetools/)
用以与build system配合,生成对应的full/incremental的update.zip包
对应的编译脚本在build/core/main.mk及Makefile, 搜索target-files-package关键字
build/tools/releasetools
├── check_target_files_signatures -- 用来检查cert和update包之间的关系
├── common.py -- 各种工具类,参数处理/META文件处理/image生成/sign certification/patch file 操作等等
├── edify_generator.py -- 用来生成edify脚本, 关于edify,参照bootable/recovery/edify/下的readme及tjworld,
主要是给manufacturer提供一个简单的shell语言 来进行必要的recovery操作. 后面会单独写篇文章单独描述一下edify的使用方法
├── img_from_target_files -- 由生成target zip file的制作被fastboot update命令所使用的xxx.img文件
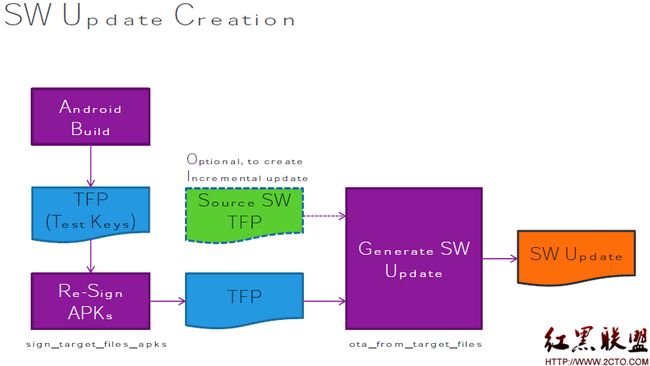
├── ota_from_target_files -- 生成经过各种签名的TFP更新包
└── sign_target_files_apks -- 用来对apk或者生成测zip更新包进行签名, 参照/development/pdk/docs/porting/release_keys.jdhttp://androidxref.com/source/xref/development/中的描述
方便把test-key转换成OEM厂商的release key
使用make target-files-package来编译update.zip, 生成的描述及image文件在
out/target/product/generic/obj/PACKAGING/apkcerts_intermediates/full-apkcerts-eng.txt
out/target/product/generic/obj/PACKAGING/target_files_intermediates/full-target_files-eng.zip
这里需要注意以上都是针对已经通过mkimage(system/core/mkbootimg)的工具生成了boot.img之后,来生成对应的recovery及update image.
上诉工具都不提功boot.img和update image之间的交互操作, 所以在制作update image时,要手动确保你制作的update image能够被安装在预先已经有boot image的device上!!!
同时, 这里提供了给OEM的扩展接口, 可以使得OEM定义一些特有的操作, 并融合到update过程当中. 可以参照资料3的15页的描述, 详细的情况推荐参考CyanogenMod中nexus one中的如下实现:
CyanogenMod/device/htc/passion-common/BoardConfigCommon.mk中releasetools的扩展定义:TARGET_RELEASETOOLS_EXTENSIONS := device/htc/common
CyanogenMod/device/htc/common/updater/ -- 是OEM各自的updater实现
CyanogenMod/device/htc/common/releasetools.py -- 里面都是一些必须要实现extension 接口, 如,FullOTA_Assertions()/FullOTA_InstallEnd()等
下图简要描述了下update.zip的生成过程
这里请注意, re-sign apks是为了apk的security, 用各个oem厂商的签名替代Test的签名.
签名是使用openssl生成的带public exponent 3 的 2048-bit RSA keys.
Related filesystem partition
谈到Update,不得不提到android的分区情况(参见各个OEM的配置)
boot, 包含以下文件:metadata, kernel image, ramdisk, optional 2nd-stage bootloader image, 由mkbooting(system/core/mkbooting)生成
关于boot.img的格式参见system/core/mkbooting/bootimg.h
[plain]
/*
** +-----------------+
** | boot header | 1 page
** +-----------------+
** | kernel | n pages
** +-----------------+
** | ramdisk | m pages
** +-----------------+
** | second stage | o pages
** +-----------------+
**
** n = (kernel_size + page_size - 1) / page_size
** m = (ramdisk_size + page_size - 1) / page_size
** o = (second_size + page_size - 1) / page_size
**
** 0. all entities are page_size aligned in flash
** 1. kernel and ramdisk are required (size != 0)
** 2. second is optional (second_size == 0 -> no second)
** 3. load each element (kernel, ramdisk, second) at
** the specified physical address (kernel_addr, etc)
** 4. prepare tags at tag_addr. kernel_args[] is
** appended to the kernel commandline in the tags.
** 5. r0 = 0, r1 = MACHINE_TYPE, r2 = tags_addr
** 6. if second_size != 0: jump to second_addr
** else: jump to kernel_addr
*/
这个描述,在需要自己定制自己的rom,或者需要把自己编译的kernel烧录到手机上时,很有用. 参见
system, 系统程序及apk等等
data, 用户数据, 会被factory reset clear
recovery, 为了恢复
misc, 包含Bootloader Control Block (BCB), recovery console通过它与bootloader交互
cache, 用来支持update的temp分区,及被特定apk作为temp来使
还有一个重要的文件recovery.fstab, 用来为recovery console及releasetools提供能够加载的文件系统及对应的mount node
如下是nexus one的recovery.fstab
[plain]
# mount point fstype device [device2]
/boot mtd boot
/cache yaffs2 cache
/data yaffs2 userdata
/misc mtd misc
/recovery mtd recovery
/sdcard vfat /dev/block/mmcblk0p1 /dev/block/mmcblk0
/system yaffs2 system
/sd-ext ext4 /dev/block/mmcblk0p2
注:这个recovery.fstab在生成的out/target/product/generic/obj/PACKAGING/target_files_intermediates/full-target_files-eng.zip包中recovery目录下能够看到。
Device Side Support, 用来接收update image并通过recovery模式来更新
所有的代码都在/bootable/recovery, 当然还是参照CyanogeMod中的代码与真正的device比较接近.
因为这时,其实是一个完全独立的小系统, 需要有自己的各种工具函数库(不能使用linux,因为这时linux根本还没开始运行, 这里只是一个简单软硬件交互环境).
从中可以看到很多关于裁剪定制的例子.
后面会写一篇专门分析andorid的bootloader和recovery的分析的文章,请参看,
Recovery Console (RC)
这就是通过开机时,按住指定的键进入的recovery UI界面(经常刷机的,应该很熟悉)
是所有其它recovery工作的总入口, 管理所有recovery工作及与bootloader,framework中的RecoverySystem交互
这里从nexus one中的实现与AOSP的实现可以看出, 大部分厂商都提供了自己的RC UI plugin从而作出各自的recovery UI.
参考资料5中的26页给出了简单更改Console UI的方法:)
bootloader
用来帮助硬件初始化资源并更根据要求选择进入RC还是Andorid系统
它除了跟RC交互,还会通过BCB接受从kenrel来的reboot notification(register_reboot_notifier()).
misc分区及其中的BCB
用来提供RC和bootloader之间的通信环境及命令
Updater
它会包含在OTA update.zip文件之中, 由recovery console控制执行具体的update动作(包括验证, 解压, 安装)
同样也提供了plugin的扩展机制, 允许各个厂商定制一些额外的updater动作
SW Update UI intent from Settings application
代码在
RecoverySystem APIs
