SpringBoot基础学习之SpringBoot Web开发(中篇)
前言:
小伙伴们,大家好,我是狂奔の蜗牛rz,当然你们可以叫我蜗牛君,我是一个学习Java半年多时间的小菜鸟,同时还有一个伟大的梦想,那就是有朝一日,成为一个优秀的Java架构师。
这个SpringBoot基础学习系列用来记录我学习SpringBoot框架基础知识的全过程 (这个系列是参照B站狂神的SpringBoot最新教程来写的,由于是之前整理的,但当时没有发布出来,所以有些地方可能有错误,希望大家能够及时指正!)
之后我将会以一天一更的速度更新这个系列,还没有学习SpringBoot的小伙伴可以参照我的博客学习一下;当然学习过的小伙伴,也可以顺便跟我一起复习一下基础。
最后,希望能够和大家一同进步吧!加油吧!少年们!
由于SpringBoot Web开发涉及的内容比较多,所以蜗牛君打算把这部分将会分成上中下三篇博客,上篇主要分析SpringBoot开发Web的优缺点以及静态资源的配置和使用;中篇主要介绍模板引擎和MVC配置原理,下篇是项目实战,基于SpringBoot构建一个简单的员工管理系统!
SpringBoot Web开发(上篇)博客链接:https://blog.csdn.net/weixin_45301250/article/details/120694674
废话不多说,让我们开始今天的学习内容吧,由于今天我们来到了SpringBoot基础学习的第五站:SpringBoot Web开发(中篇)!
5.3 模板引擎
5.3.1 回忆jsp的使用
前端交给我们的页面,是html页面;如果以前开发,需要把它转换成jsp页面
1.jsp的好处
jsp页面的好处:
- 当我们查出一些数据转发到jsp页面以后,我们可以用jsp轻松实现数据的显示和交互等
- jsp还具有强大功能,包括能写Java代码等
2.jsp的弊端
但是现在使用SpringBoot开发
- 项目是以jar形式进行打包,而不是war包
- 使用的是内嵌的Tomcat,默认不支持jsp
3.解决静态页面开发问题
- SpringBoo默认不支持jsp,如果我们直接用纯静态页面的方式,那么会给开发带来非常大的麻烦
- 为了解决这个问题,SpringBoot推荐我们使用模板引擎
4.引入模板引擎
4-1 模板引擎种类
jsp其实就是一种模板引擎,还有使用较多的freemarker,包括SpringBoot推荐使用的thymeleaf等
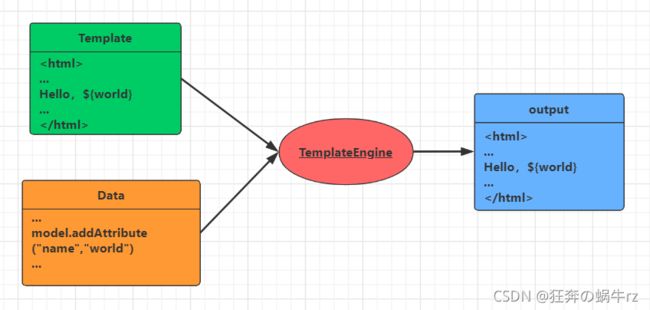
4-2 模板引擎核心思想
- 模板引擎虽然各式各样,但其核心思想都是基本相同的:
4-2 模板引擎作用
模板引擎作用:
比如我们要写一个页面模板,比如有些值是动态的,那么我们可以使用一些表达式
那么这些值从哪里来的呢?
- 首先我们来组装一些数据,并且把这些数据找到
- 然后把这些数据交给模板引擎,模板引擎按照数据把表达式解析,填充到指定位置
- 最后把这个数据最终生成一个我们想要看到的内容渲染出去,这就是模板引擎
不管是jsp还是其他模板引擎,都是这个核心思想;它们之间的不同点,就是语法有些不同
5.3.2 Thymeleaf模板引擎的使用
1.Thymeleaf模板引擎
1-1 什么是Thymeleaf模板引擎?
我们主要学习SpringBoot推荐使用的Thymeleaf模板引擎
- 这个模板引擎是一个高级语言的模板引擎
- 并且它的语法很简单,功能也更加强大
1-2 学习方式和网站链接
建议去Thymeleaf官网或者Spring官网学习
网站链接:
- Thymeleaf官网:https://www.thymeleaf.org/
- Thymeleaf的Github主页:https://github.com/thymeleaf/thymeleaf-spring
- Spring官方文档:https://docs.spring.io/spring-boot/docs/2.0.3.RELEASE/reference/htmlsingle/#boot-features-spring-mvc-template-engines
2.导入资源依赖和查看依赖版本
2-1 导入thymeleaf资源依赖
<dependency>
    <groupId>org.thymeleafgroupId>
    <artifactId>thymeleaf-spring5artifactId>
dependency>
<dependency>
    <groupId>org.thymeleaf.extrasgroupId>
    <artifactId>thymeleaf-extras-java8timeartifactId>
dependency>
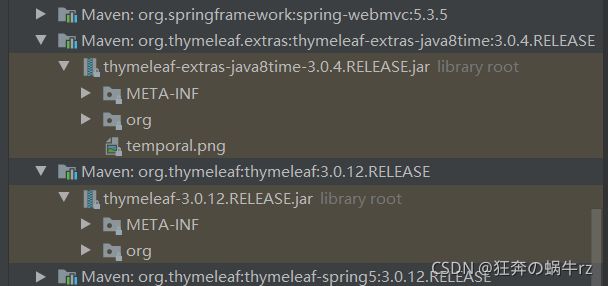
2-2 查看thymeleaf资源依赖版本
2-3 查看ThymeleafProperties类源码
//使用配置属性注解:绑定指定配置文件中的所有属性值
@ConfigurationProperties(prefix = "spring.thymeleaf")
//Thymeleaf属性类
public class ThymeleafProperties {
    private static final Charset DEFAULT_ENCODING;
    public static final String DEFAULT_PREFIX = "classpath:/templates/"; //默认前缀
    public static final String DEFAULT_SUFFIX = ".html"; //默认后缀
    private boolean checkTemplate = true; //检查模板
    private boolean checkTemplateLocation = true; //检查模板位置
    private String prefix = "classpath:/templates/"; //前缀
    private String suffix = ".html"; //后缀
    private String mode = "HTML"; //格式
    ......
}
3.Thymeleaf模板引擎的使用
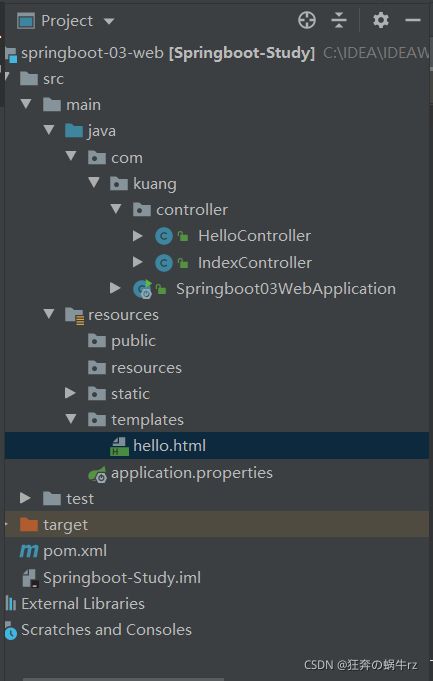
3-1 项目结构
3-2 编写hello.html页面
DOCTYPE html>
<html lang="en">
<head>
    <meta charset="UTF-8">
    <title>Titletitle>
head>
<body>
<h1>testh1>
body>
html>
3-3 编写HelloController控制器类
package com.kuang.controller;
import org.springframework.web.bind.annotation.RequestMapping;
import org.springframework.web.bind.annotation.RestController;
//在templates目录下的所有页面,只能通过controller来跳转
//这个需要模板应请支持:thymeleaf
//使用@RestController注解来实现Controller接口
@RestController
public class HelloController {
     //真实访问路径为:http://loclahost:8080/hello
    //使用@RequestMapping注解,设置请求映射路径
    @RequestMapping("/hello")
    public String hello() {
        return "hello";
    }
}
3-4 测试结果
结果:访问/hello请求,页面跳转成功!
3-5 使用结论
- 只要需要使用Thymeleaf模板引擎,只需要的导入对应的资源依赖即可
- 要将html代码放在templates文件下
4.Thymeleaf的使用升级版
4-1 修改hello.index页面
DOCTYPE html>

<html lang="en" xmlns:th="http://www.thymeleaf.org">
<head>
    <meta charset="UTF-8">
    <title>Titletitle>
head>
<body>

<div th:text="${msg}">div>
body>
html>
4-2 修改HelloController控制器类
package com.kuang.controller;

import org.springframework.stereotype.Controller;
import org.springframework.ui.Model;
import org.springframework.web.bind.annotation.RequestMapping;
//在templates目录下的所有页面,只能通过controller来跳转
//这个需要模板应请支持:thymeleaf
//使用@Controller注解来实现Controller接口
@Controller
public class HelloController {
    //真实访问路径为:http://loclahost:8080/hello
    //使用@RequestMapping注解,设置请求映射路径
    @RequestMapping("/hello")
    public String hello(Model model) {
        model.addAttribute("msg","Hello,SpringBoot!");
        return "hello";
    }
}
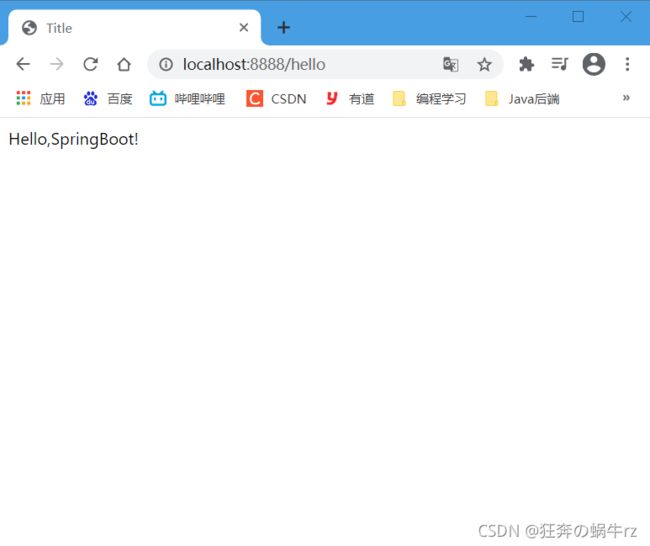
4-3 测试结果
结果:访问/hello请求跳转页面成功!
5.3.3 Thymeleaf的基本语法
1.常用属性和数字优先级
- 所有的Thymeleaf属性都定义了数字优先级,从而确定了它们在标记中的顺序
| 顺序 | 参数 | 特性 |
|---|---|---|
| 1 | th:insert th:repalce | 碎片夹杂,相当于jsp中include |
| 2 | th:each | 片段迭代,for循环遍历 |
| 3 | th:if th:unless th:switch th:case | 条件评估 |
| 4 | th:object th:with | 局部变量定义 |
| 5 | th:attr th:attrprepend th:attrappend | 常规属性修改 |
| 6 | th:value th:href th:src … | 特定属性修改 |
| 7 | th:text th:utext | 转译文本和不转译文本 |
| 8 | th:fragement | 片段规格 |
| 9 | th:remove | 碎片清除 |
这种优先机制意味着:如果属性位置反转,则上述迭代片段将会给出完全相同的结果 (尽管可读性稍差)
2.th:untext的使用
2-1 编写HelloController控制器类
package com.kuang.controller;
import org.springframework.stereotype.Controller;
import org.springframework.ui.Model;
import org.springframework.web.bind.annotation.RequestMapping;
import java.util.Arrays;
//在templates目录下的所有页面,只能通过controller来跳转
//使用@Controller注解来实现Controller接口
@Controller
public class HelloController {
//真实访问路径为:http://loclahost:8080/hello
//使用@RequestMapping注解,设置请求映射路径
@RequestMapping("/hello")
public String hello(Model model) {
//设置模型:设置msg属性和值,进行数据渲染
model.addAttribute("msg","Hello,SpringBoot!
");
//返回视图逻辑名给视图解析器
return "hello";
}
}
2-2 编写hello.html页面
DOCTYPE html>

<html lang="en" xmlns:th="http://www.thymeleaf.org">
<head>
    <meta charset="UTF-8">
    <title>Titletitle>
head>
<body>


<div th:text="${msg}">div>

<div th:utext="${msg}">div>

body>
html>
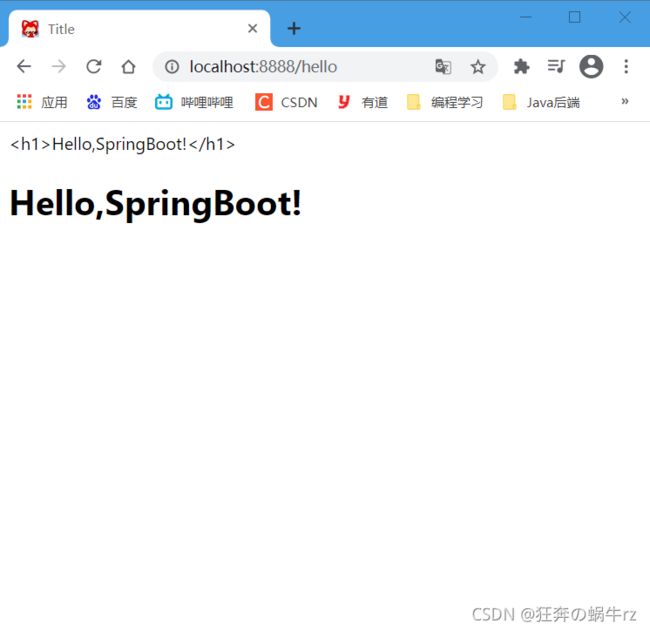
2-3 测试结果
3.th:each的使用
3-1 编写HelloController控制器
package com.kuang.controller;
import org.springframework.stereotype.Controller;
import org.springframework.ui.Model;
import org.springframework.web.bind.annotation.RequestMapping;
import java.util.Arrays;
//在templates目录下的所有页面,只能通过controller来跳转
//使用@Controller注解来实现Controller接口
@Controller
public class HelloController {
    //真实访问路径为:http://loclahost:8080/hello
    //使用@RequestMapping注解,设置请求映射路径
    @RequestMapping("/hello")
    public String hello(Model model) {
        //设置模型:设置msg属性和值,进行数据渲染
        model.addAttribute("users", Arrays.asList("周树人","周星驰","周杰伦"));
        //返回视图逻辑名给视图解析器
        return "hello";
    }
}
3-2 编写hello.html页面
- 方式一:
DOCTYPE html>

<html lang="en" xmlns:th="http://www.thymeleaf.org">
<head>
    <meta charset="UTF-8">
    <title>Titletitle>
head>
<body>

<hr>


<h3 th:each="user:${users}" th:text="${user}">h3>
body>
html>
- 方式二:
DOCTYPE html>

<html lang="en" xmlns:th="http://www.thymeleaf.org">
<head>
    <meta charset="UTF-8">
    <title>Titletitle>
head>
<body>

<hr>


<h3 th:each="user:${users}">[[ ${user} ]]h3>
body>
html>
3-3 测试结果
- 方式一:
- 方式二:
与方式一结果相同
4.标准表达语法
4-1 简单表达式
- 变量表达式:${…}
- 选择变量表达式:*{…}
- 消息表达:#{…}
- 链接URL表达式:@{…}
- 片段表达式:~{…}
4-2 文字
- 文字文本:‘one text’,‘Another one!’,…
- 号码文字:0,34,3.0,12.3,…
- 布尔文字:true,false
- 空文字:null
- 文字标记:one,sometext,main,…
4-3 文字操作
- 字符串串联:+
- 文字替换:|The name is ${name}|
4-4 算术运算
- 二元运算符:+,-,*,/,%
- 减号:(一元运算符):-
4-5 布尔运算
- 二元运算符:and,or
- 布尔否定 (一元运算符):!,not
4-6 比较和等值
- 比较:>,<,>=,<=(gt,It,ge,le)
- 等号运算符:==,!= (eq,ne)
4-7 条件运算符
- 如果-则:(if) ? (then)
- 如果-则-否则:(if) ? (then) : (else)
- 默认:(value) ?: (defaultVaule)
4-8 特殊令牌
- 无操作:_
5.Strings工具类的使用
/*
 * ======================================================================
 * See javadoc API for class org.thymeleaf.expression.Strings
 * ======================================================================
 */

/*
 * Null-safe toString()
 */
${#strings.toString(obj)}                           // also array*, list* and set*

/*
 * Check whether a String is empty (or null). Performs a trim() operation before check
 * Also works with arrays, lists or sets
 */
 // 判断字符串名字是否为空
${#strings.isEmpty(name)}
${#strings.arrayIsEmpty(nameArr)}
${#strings.listIsEmpty(nameList)}
${#strings.setIsEmpty(nameSet)}

/*
 * Perform an 'isEmpty()' check on a string and return it if false, defaulting to
 * another specified string if true.
 * Also works with arrays, lists or sets
 */
${#strings.defaultString(text,default)}
${#strings.arrayDefaultString(textArr,default)}
${#strings.listDefaultString(textList,default)}
${#strings.setDefaultString(textSet,default)}

/*
 * Check whether a fragment is contained in a String
 * Also works with arrays, lists or sets
 */
${#strings.contains(name,'ez')}                     // also array*, list* and set*
${#strings.containsIgnoreCase(name,'ez')}           // also array*, list* and set*

/*
 * Check whether a String starts or ends with a fragment
 * Also works with arrays, lists or sets
 */
${#strings.startsWith(name,'Don')}                  // also array*, list* and set*
${#strings.endsWith(name,endingFragment)}           // also array*, list* and set*

/*
 * Substring-related operations
 * Also works with arrays, lists or sets
 */
${#strings.indexOf(name,frag)}                      // also array*, list* and set*
${#strings.substring(name,3,5)}                     // also array*, list* and set*
${#strings.substringAfter(name,prefix)}             // also array*, list* and set*
${#strings.substringBefore(name,suffix)}            // also array*, list* and set*
${#strings.replace(name,'las','ler')}               // also array*, list* and set*

/*
 * Append and prepend
 * Also works with arrays, lists or sets
 */
${#strings.prepend(str,prefix)}                     // also array*, list* and set*
${#strings.append(str,suffix)}                      // also array*, list* and set*

/*
 * Change case
 * Also works with arrays, lists or sets
 */
${#strings.toUpperCase(name)}                       // also array*, list* and set*
${#strings.toLowerCase(name)}                       // also array*, list* and set*

/*
 * Split and join
 */
${#strings.arrayJoin(namesArray,',')}
${#strings.listJoin(namesList,',')}
${#strings.setJoin(namesSet,',')}
${#strings.arraySplit(namesStr,',')}                // returns String[]
${#strings.listSplit(namesStr,',')}                 // returns List
${#strings.setSplit(namesStr,',')}                  // returns Set

/*
 * Trim
 * Also works with arrays, lists or sets
 */
${#strings.trim(str)}                               // also array*, list* and set*

/*
 * Compute length
 * Also works with arrays, lists or sets
 */
${#strings.length(str)}                             // also array*, list* and set*

/*
 * Abbreviate text making it have a maximum size of n. If text is bigger, it
 * will be clipped and finished in "..."
 * Also works with arrays, lists or sets
 */
${#strings.abbreviate(str,10)}                      // also array*, list* and set*

/*
 * Convert the first character to upper-case (and vice-versa)
 */
${#strings.capitalize(str)}                         // also array*, list* and set*
${#strings.unCapitalize(str)}                       // also array*, list* and set*

/*
 * Convert the first character of every word to upper-case
 */
${#strings.capitalizeWords(str)}                    // also array*, list* and set*
${#strings.capitalizeWords(str,delimiters)}         // also array*, list* and set*

/*
 * Escape the string
 */
${#strings.escapeXml(str)}                          // also array*, list* and set*
${#strings.escapeJava(str)}                         // also array*, list* and set*
${#strings.escapeJavaScript(str)}                   // also array*, list* and set*
${#strings.unescapeJava(str)}                       // also array*, list* and set*
${#strings.unescapeJavaScript(str)}                 // also array*, list* and set*

/*
 * Null-safe comparison and concatenation
 */
${#strings.equals(first, second)}
${#strings.equalsIgnoreCase(first, second)}
${#strings.concat(values...)}
${#strings.concatReplaceNulls(nullValue, values...)}

/*
 * Random
 */
${#strings.randomAlphanumeric(count)}
5.4 MVC配置原理
5.4.1 MVC的拓展配置
1. 如何实现MVC拓展配置
如果你想在保持Spring Boot MVC特性的同时,又想添加MVC的拓展配置,例如 Intercepters (拦截器),formatters (格式转换器),view Controller (视图控制器)等,可以在你的自定义类前添加一个@Configuration注解,使你的类成为WebMvcConfigurer,并且不要使用@EnableWebMvc注解
2.编写自定义配置类
package com.kuang.config;

import org.springframework.context.annotation.Configuration;
import org.springframework.web.servlet.config.annotation.WebMvcConfigurer;
//扩展SpringMVC
//使MyMvcConfig成为配置类
@Configuration
//实现WebMvcConfigurer配置接口
public class MyMvcConfig implements WebMvcConfigurer {

}
5.4.2 分析ContentNegotiatingViewResolver类和自定义视图解析器
1.查看ContentNegotiatingViewResolver类
- 查看ContentNegotiatingViewResolver视图解析器后,发现其实现了ViewResolver接口=
//ContentNegotiatingViewResolver(内容协商视图解析器),它实现了ViewResolver(视图解析器)接口
public class ContentNegotiatingViewResolver extends WebApplicationObjectSupport implements ViewResolver, Ordered, InitializingBean {
    @Nullable
    private ContentNegotiationManager contentNegotiationManager;
    private final ContentNegotiationManagerFactoryBean cnmFactoryBean = new ContentNegotiationManagerFactoryBean();
    private boolean useNotAcceptableStatusCode = false;
    @Nullable
    private List<View> defaultViews;
    @Nullable
    private List<ViewResolver> viewResolvers;
    private int order = -2147483648;
    //NOT_ACCEPTABLE_VIEW(不可接收的视图)方法:创建新的视图对象
    private static final View NOT_ACCEPTABLE_VIEW = new View() {
        @Nullable
        //获取内容状态
        public String getContentType() {
            //返回为空
            return null;
        }
        //提交信息方法:其第一个为Map集合对象
        public void render(@Nullable Map<String, ?> model, HttpServletRequest request, HttpServletResponse response) {
            //响应设置的406状态码
            response.setStatus(406);
        }
    };
}
2.查看resolveViewName方法源码
- 接着查看ViewResolver接口后,发现其有个resolveViewName方法来解析视图逻辑名,既然ContentNegotiatingViewResolver类实现了ViewResolver接口,那么它一定重写了该方法,我们去查看其是如何进行实现的
//视图解析器接口
public interface ViewResolver {
    @Nullable
    //解析视图逻辑名方法:包含两个参数,第一个是视图逻辑名,第二个是事发地点
    View resolveViewName(String var1, Locale var2) throws Exception;
}
- 再继续回到ContentNegotiatingViewResolver类中,找到它重写的resolveViewName方法,查看其重写过程
public class ContentNegotiatingViewResolver extends WebApplicationObjectSupport implements ViewResolver, Ordered, InitializingBean {
    ......
    @Nullable
    //解析视图逻辑名方法:有两个参数:viewName是视图逻辑名;locale:地区
    public View resolveViewName(String viewName, Locale locale) throws Exception {
        //获取请求参数对象(RequestAttributes):通过请求上下文容器的获取请求参数方法获取
        RequestAttributes attrs = RequestContextHolder.getRequestAttributes();
        //断言状态是否为attrs(请求参数),如果是就替换ServletRequestAttributes(Servlet请求参数)
        Assert.state(attrs instanceof ServletRequestAttributes, "No current ServletRequestAttributes");
        //获取请求媒介类型数组集合:通过调用getMediaTypes(获取媒介类型)的getRequest(获取请求)方法获取
        List<MediaType> requestedMediaTypes = this.getMediaTypes(((ServletRequestAttributes)attrs).getRequest());
        //判断请求媒介类型是否为空
        if (requestedMediaTypes != null) {
            //如果不为空,调用getCandidateViews(获取候选视图),将candidateViews(候选视图)对象存入List(视图集合)中
            List<View> candidateViews = this.getCandidateViews(viewName, locale, requestedMediaTypes);
            //获取bestView(最佳视图)对象:通过调用getBestView(获取最佳视图)方法获取
            View bestView = this.getBestView(candidateViews, requestedMediaTypes, attrs);
            //判断最佳视图(bestView)对象是否为空
            if (bestView != null) {
                //如果不为空,就返回最佳视图(bestView)对象
                return bestView;
            }
        }
        //获取媒介类型信息:通过判断日志是否能够Debug,并且请求媒介类型对象是否为空,如果能够Debug并且其不为空,则将请求媒介类型对象转换成字符串形式
        String mediaTypeInfo = this.logger.isDebugEnabled() && requestedMediaTypes != null ? " given " + requestedMediaTypes.toString() : "";
        //判断它是否使用不可接收的状态码
        if (this.useNotAcceptableStatusCode) {
            //如果使用不可接收状态码,判断日志是否能够Debug
            if (this.logger.isDebugEnabled()) {
                //如果满足条件,打印出406不可接收的提示和媒介类型信息
                this.logger.debug("Using 406 NOT_ACCEPTABLE" + mediaTypeInfo);
            }
            //如果不能进行Debug,返则回到不可接收视图方法
            return NOT_ACCEPTABLE_VIEW;
        } else {//如果没有使用不可接收的状态码
        //日志打印debug信息"View remains unresolved"(视图仍然不能被解析)和媒介状态信息
            this.logger.debug("View remains unresolved" + mediaTypeInfo);
            //然后返回空值
            return null;
        }
    }
}
3.查看getCandidateViews方法源码
- 查看 getCandidateViews获取获选视图方法具体内容
public class ContentNegotiatingViewResolver extends WebApplicationObjectSupport implements ViewResolver, Ordered, InitializingBean {
     ......
//获取候选视图的方法:有三个参数:viewName(视图逻辑名);locale(地区);requestedMediaTypes(请求媒介类型集合),返回值类型是一个封装View视图对象的List集合
     private List<View> getCandidateViews(String viewName, Locale locale, List<MediaType> requestedMediaTypes) throws Exception {
         //获取候选视图集合对象
         List<View> candidateViews = new ArrayList();
         //判断viewResolver(视图解析器)是否为空
         if (this.viewResolvers != null) {
             //断言状态:contentNegotiationManager(内容协商管理器)对象是否为空
             Assert.state(this.contentNegotiationManager != null, "No ContentNegotiationManager set");
             //如果不为空,则获取迭代器对象(var5):通过调用视图解析器的iterator方法获取
             Iterator var5 = this.viewResolvers.iterator();
             //判断迭代器中是否存在下一个值
             while(var5.hasNext()) {
                 //如果存在,则通过强制转换获取视图解析器对象
                 ViewResolver viewResolver = (ViewResolver)var5.next();
                 //获取视图对象:通过调用视图解析器的resolveViewName(解析视图逻辑名)方法获取
                 View view = viewResolver.resolveViewName(viewName, locale);
                 //判断视图对象是否为空
                 if (view != null) {
                     //如果不为空,添加视图对象到候选视图集合中去
                     candidateViews.add(view);
                 }
                 //获取请求媒介类型的迭代器var8
                 Iterator var8 = requestedMediaTypes.iterator();
                 //判断请求媒介类型迭代器是否存在下一个值
                 while(var8.hasNext()) {
                     //如果存在,获取其next值,即MediaType对象
                     MediaType requestedMediaType = (MediaType)var8.next();
                     //获取扩展名(extensions)集合:通过调用contentNegotiationManager(内容协商管理器)的resolveFileExtensions(解析文件拓展)方法获取
                     List<String> extensions = this.contentNegotiationManager.resolveFileExtensions(requestedMediaType);                  //获取拓展名集合的迭代器
                     Iterator var11 = extensions.iterator();
                     //判断拓展名集合的迭代器是否存在下一个值
                     while(var11.hasNext()) {
                         //如果存在next值,通过强制转换获取扩展名
                         String extension = (String)var11.next();
                         //获取带有拓展名的视图逻辑名
                         String viewNameWithExtension = viewName + '.' + extension;
                         //调用视图解析器(viewResolver)对象的解析视图逻辑名(resolveViewName)方法来获取视图对象(view):两个参数,第一参数值为带有拓展名的视图逻辑名,第二参数为是事发地点
                         view = viewResolver.resolveViewName(viewNameWithExtension, locale);
                         //判断视图是否空
                         if (view != null) {
                             //如果不为空,将其添加到候选视图集合中去
                             candidateViews.add(view);
                         }
                     }
                 }
             }
         }
         //判断默认的视图集合是否为空
         if (!CollectionUtils.isEmpty(this.defaultViews)) {
             //如果默认视图集合不为空,就将它们加入到候选视图集合中去
             candidateViews.addAll(this.defaultViews);
         }
         //如果默认视图集合为空,直接返回候选视图集合即可
         return candidateViews;
     }
     ......
 }
4.自定义视图解析器MyViewResolver
package com.kuang.config;
import org.springframework.context.annotation.Configuration;
import org.springframework.web.servlet.config.annotation.WebMvcConfigurer;
//扩展SpringMVC
//如果你想DIY一些定制化功能,只要使用@Configuration组件,然后将它交给SpringBoot,SpringBoot就会帮我们自动装配
//使MyMvcConfig成为配置类
@Configuration
//实现WebMvcConfigurer配置接口
public class MyMvcConfig implements WebMvcConfigurer {
    //将myViewResovler方法当做组件装入到IOC容器中
    @Bean
    public ViewResolver myViewResovler() {
        return new MyViewResolver();
    }
    //ContentNegotiatingViewResolver实现了视图解析器接口的类,我们就可以把它看做是一个视图解析器
    //自定义一个实现ViewResolver接口的视图解析器MyViewResolver
    public static class MyViewResolver implements ViewResolver {
        @Override
        public View resolveViewName(String s, Locale locale) throws Exception {
            return null;
        }
    }
}
5.4.3 Debug测试观察视图解析器
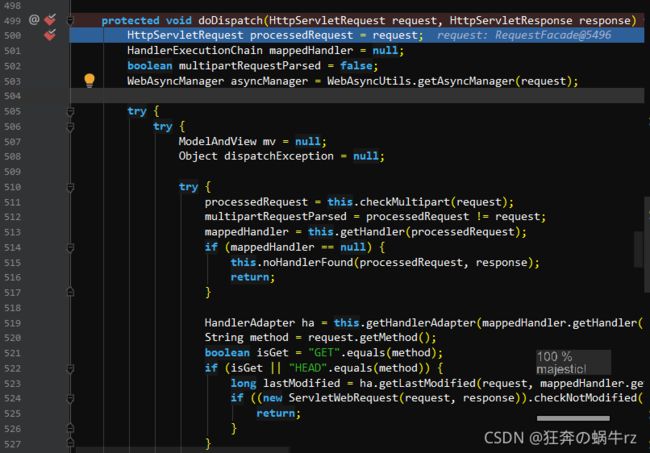
1.在doService方法上设置断点
2.查看debug测试结果
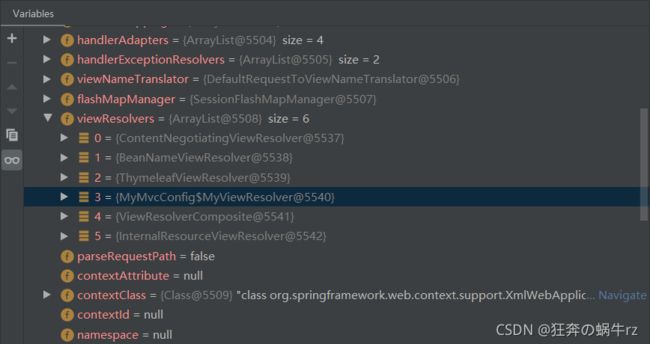
- Debug测试后查看控制台发现分别有this,request和response三个属性
- 点击this属性,查看其下的viewResovlers,其中的第一个是默认的内容协商视图解析器,第三个是Thymeleaf的视图解析器,然后第四个就是自定义的MyConfig配置类,其中包含自定义的视图解析器
3.测试结论
- SpringBoot在自动配置很多组件时,首先会看容器中有没有用户自己配置的,如果用户使用@Bean注解将一些类注册成组件,那就使用用户配置的,如果没有就使用自动配置的
- 如果有些组件存在多个,比如我们自定义一个视图解析器,那么SpringBoot就会将用户配置的和默认的进行组合使用
5.4.4 分析DispatcherServlet类源码和FormattingConversionService方法
1.查看doService方法源码
//DispatcherServlet:前置控制器/请求分发器
public class DispatcherServlet extends FrameworkServlet {
    ......
    //doService执行服务方法
    protected void doService(HttpServletRequest request, HttpServletResponse response) throws Exception {
        this.logRequest(request);
        Map<String, Object> attributesSnapshot = null;
        if (WebUtils.isIncludeRequest(request)) {
            attributesSnapshot = new HashMap();
            Enumeration attrNames = request.getAttributeNames();

            label104:
            while(true) {
                String attrName;
                do {
                    if (!attrNames.hasMoreElements()) {
                        break label104;
                    }

                    attrName = (String)attrNames.nextElement();
                } while(!this.cleanupAfterInclude && !attrName.startsWith("org.springframework.web.servlet"));

                attributesSnapshot.put(attrName, request.getAttribute(attrName));
            }
        }

        request.setAttribute(WEB_APPLICATION_CONTEXT_ATTRIBUTE, this.getWebApplicationContext());
        request.setAttribute(LOCALE_RESOLVER_ATTRIBUTE, this.localeResolver);
        request.setAttribute(THEME_RESOLVER_ATTRIBUTE, this.themeResolver);
        request.setAttribute(THEME_SOURCE_ATTRIBUTE, this.getThemeSource());
        if (this.flashMapManager != null) {
            FlashMap inputFlashMap = this.flashMapManager.retrieveAndUpdate(request, response);
            if (inputFlashMap != null) {
                request.setAttribute(INPUT_FLASH_MAP_ATTRIBUTE, Collections.unmodifiableMap(inputFlashMap));
            }

            request.setAttribute(OUTPUT_FLASH_MAP_ATTRIBUTE, new FlashMap());
            request.setAttribute(FLASH_MAP_MANAGER_ATTRIBUTE, this.flashMapManager);
        }

        RequestPath previousRequestPath = null;
        if (this.parseRequestPath) {
            previousRequestPath = (RequestPath)request.getAttribute(ServletRequestPathUtils.PATH_ATTRIBUTE);
            ServletRequestPathUtils.parseAndCache(request);
        }

        try {
            //调用doDispatch方法
            this.doDispatch(request, response);
        } finally {
            if (!WebAsyncUtils.getAsyncManager(request).isConcurrentHandlingStarted() && attributesSnapshot != null) {
                this.restoreAttributesAfterInclude(request, attributesSnapshot);
            }

            ServletRequestPathUtils.setParsedRequestPath(previousRequestPath, request);
        }
    }
    ......
}
2.查看doDispatch方法
//DispatcherServlet:前置控制器/请求分发器
public class DispatcherServlet extends FrameworkServlet {
       ......
       //未响应都会经过doDispatch方法
       protected void doDispatch(HttpServletRequest request, HttpServletResponse response) throws Exception {
        HttpServletRequest processedRequest = request;
        HandlerExecutionChain mappedHandler = null;
        boolean multipartRequestParsed = false;
        WebAsyncManager asyncManager = WebAsyncUtils.getAsyncManager(request);

        try {
            try {
                ModelAndView mv = null;
                Object dispatchException = null;

                try {
                    processedRequest = this.checkMultipart(request);
                    multipartRequestParsed = processedRequest != request;
                    mappedHandler = this.getHandler(processedRequest);
                    if (mappedHandler == null) {
                        this.noHandlerFound(processedRequest, response);
                        return;
                    }

                    HandlerAdapter ha = this.getHandlerAdapter(mappedHandler.getHandler());
                    String method = request.getMethod();
                    boolean isGet = "GET".equals(method);
                    if (isGet || "HEAD".equals(method)) {
                        long lastModified = ha.getLastModified(request, mappedHandler.getHandler());
                        if ((new ServletWebRequest(request, response)).checkNotModified(lastModified) && isGet) {
                            return;
                        }
                    }

                    if (!mappedHandler.applyPreHandle(processedRequest, response)) {
                        return;
                    }

                    mv = ha.handle(processedRequest, response, mappedHandler.getHandler());
                    if (asyncManager.isConcurrentHandlingStarted()) {
                        return;
                    }

                    this.applyDefaultViewName(processedRequest, mv);
                    mappedHandler.applyPostHandle(processedRequest, response, mv);
                } catch (Exception var20) {
                    dispatchException = var20;
                } catch (Throwable var21) {
                    dispatchException = new NestedServletException("Handler dispatch failed", var21);
                }

                this.processDispatchResult(processedRequest, response, mappedHandler, mv, (Exception)dispatchException);
            } catch (Exception var22) {
                this.triggerAfterCompletion(processedRequest, response, mappedHandler, var22);
            } catch (Throwable var23) {
                this.triggerAfterCompletion(processedRequest, response, mappedHandler, new NestedServletException("Handler processing failed", var23));
            }

        } finally {
            if (asyncManager.isConcurrentHandlingStarted()) {
                if (mappedHandler != null) {
                    mappedHandler.applyAfterConcurrentHandlingStarted(processedRequest, response);
                }
            } else if (multipartRequestParsed) {
                this.cleanupMultipart(processedRequest);
            }

        }
    }
    ......
}
3.查看FormattingConversionService方法源码
@Configuration(proxyBeanMethods = false)
@ConditionalOnWebApplication(type = Type.SERVLET)
@ConditionalOnClass({ Servlet.class, DispatcherServlet.class, WebMvcConfigurer.class })
@ConditionalOnMissingBean(WebMvcConfigurationSupport.class)
@AutoConfigureOrder(Ordered.HIGHEST_PRECEDENCE + 10)
@AutoConfigureAfter({ DispatcherServletAutoConfiguration.class, TaskExecutionAutoConfiguration.class,
		ValidationAutoConfiguration.class })
//WebMVC自动配置类
public class WebMvcAutoConfiguration {
    ......
      @Bean
      //mvc格式转换服务方法:返回值为格式转换服务(FormattingConversionService)
      public FormattingConversionService mvcConversionService() {
            //获取Format(格式)对象:通过调用mvc属性类(从配置文件中获取)的获取格式方法
            Format format = this.mvcProperties.getFormat();
            //创建WebConversionService(Web转换服务)类实例化对象
            WebConversionService conversionService = new WebConversionService((new DateTimeFormatters()).dateFormat(format.getDate()).timeFormat(format.getTime()).dateTimeFormat(format.getDateTime()));
            //将WebConversionService(Web转换服务)类实例化对象添加到格式中去
            this.addFormatters(conversionService);
            //返回web转换服务实例化对象
            return conversionService;
        }
    ......
}
5.4.5 使用总结
- 在SpringBoot中如此多的自动装配,其实它们的原理都是一样的
- 在通过对WebMvc的自动配置原理进行分析后,也发现其是同样的设计思想
- 因此一定要养成这样的好习惯:通过查看官方文档,然后再结合源码,来得出相应的结论,这才是学习编程的最佳方式,也是进阶高级程序员的必经之路
5.5.6 自定义视图控制器
1.编写自定义类并且重写视图控制器方法
package com.kuang.config;
import org.springframework.context.annotation.Configuration;
import org.springframework.web.servlet.config.annotation.ViewControllerRegistry;
import org.springframework.web.servlet.config.annotation.WebMvcConfigurer;
//扩展SpringMVC
//使用@Configuration注解让MyMvcConfig成为配置类
@Configuration
//实现WebMvcConfigurer配置接口
public class MyMvcConfig implements WebMvcConfigurer {
    //视图跳转
    //重写添加视图控制器(addViewControllers)方法
    @Override
    public void addViewControllers(ViewControllerRegistry registry) {
        registry.addViewController("/test").setViewName("hello");
    }
}
SpringBoot官网介绍说,如果你想要进行扩展你的Spring Boot MVC,那么你可以在你的自定义类前添加一个@Configuration注解,使你的类成为WebMvcConfigurer,并且不要使用@EnableWebMvc注解
但是为什么SpringBoot官网会强调不能使用@EnableWebMvc注解呢?如果我们使用了又会造成怎样的结果呢?让我们做个测试
2.使用@EnableWebMvc注解进行测试
- 在自定义的配置类前使用@EnableWebMvc注解
package com.kuang.config;
import org.springframework.context.annotation.Configuration;
import org.springframework.web.servlet.config.annotation.EnableWebMvc;
import org.springframework.web.servlet.config.annotation.ViewControllerRegistry;
import org.springframework.web.servlet.config.annotation.WebMvcConfigurer;
//扩展SpringMVC
//使用@Configuration注解让MyMvcConfig成为配置类
@Configuration
//使用@EnableWebMvc注解:作用是导入DelegatingWebMvcConfiguration(委派WebMvc配置类),从IOC容器中获取所有的WebMvc配置类
@EnableWebMvc
//实现WebMvcConfigurer配置接口
public class MyMvcConfig implements WebMvcConfigurer {
    //视图跳转
    //重写添加视图控制器(addViewControllers)方法
    @Override
    public void addViewControllers(ViewControllerRegistry registry) {
        registry.addViewController("/test").setViewName("hello");
    }
}
- 查看@EnableWebMvc注解的源码,我们发现其导入了一个DelegatingWebMvcConfiguration(委派/授权WebMvc配置类)
@Retention(RetentionPolicy.RUNTIME)
@Target({ElementType.TYPE})
@Documented
//导入DelegatingWebMvcConfiguration(委派/授权WebMvc配置类)
@Import({DelegatingWebMvcConfiguration.class})
public @interface EnableWebMvc {
}
- 接着查看DelegatingWebMvcConfiguration(委派的WebMvc配置类)源码,我们发现其继承了WebMvcConfigurationSupport(WebMvc配置支持类)
@Configuration(proxyBeanMethods = false)
//DelegatingWebMvcConfiguration(委派的WebMvc配置类)继承了WebMvcConfigurationSupport(WebMvc配置支持类)
public class DelegatingWebMvcConfiguration extends WebMvcConfigurationSupport {
    //获取WebMvcConfigurerComposite(WebMvc配置组合)对象
    private final WebMvcConfigurerComposite configurers = new WebMvcConfigurerComposite();
    //DelegatingWebMvcConfiguration类的无参构造
    public DelegatingWebMvcConfiguration() {
    }
    //自动装配setConfigurers(设置配置类)方法
    @Autowired(required = false)
    //设置配置类方法有一个参数:一个WebMvc配置类数组集合
    public void setConfigurers(List<WebMvcConfigurer> configurers) {
        //判断配置类是否为空
        if (!CollectionUtils.isEmpty(configurers)) {
            //如果不为空,将配置类添加到WebMvc配置组合对象中去
            this.configurers.addWebMvcConfigurers(configurers);
        }
    }
}
- 然后我们再次查看WebMvcAutoConfiguration自动配置类,发现其有个条件注解@ConditionalOnMissingBean,即当WebMvcConfigurationSupport类不存在时,下面的所有的自动配置都将会失效
@Configuration(proxyBeanMethods = false)
@ConditionalOnWebApplication(type = Type.SERVLET)
@ConditionalOnClass({ Servlet.class, DispatcherServlet.class, WebMvcConfigurer.class })
//当WebMvcConfigurationSupport类不存在时,下面的所有的自动配置都将会失效
@ConditionalOnMissingBean(WebMvcConfigurationSupport.class)
@AutoConfigureOrder(Ordered.HIGHEST_PRECEDENCE + 10)
@AutoConfigureAfter({ DispatcherServletAutoConfiguration.class, TaskExecutionAutoConfiguration.class,
		ValidationAutoConfiguration.class })
//WebMVC自动配置类
public class WebMvcAutoConfiguration {
}
3.测试结论
这时我们才突然发现SpringBoot设计的精妙之处,如果我们在自定义的配置类中使用了@EnableWebMvc注解,相当于引入WebMvcConfigurationSupport类,那么就会触发@ConditionalOnMissingBean注解中条件,即WebMvcAutoConfiguration自动配置类失效
4.使用总结
在SpringBoot中,有非常多的xxxConfiguration类帮助我们进行扩展配置,只要看到了,我们就要关注它到底为我们配置了什么
好了,今天的有关 SpringBoot基础学习之SpringBoot Web开发(中篇) 的学习就到此结束啦,欢迎小伙伴们积极学习和讨论,喜欢的可以给蜗牛君点个关注,顺便来个一键三连,我们下期见,拜拜啦!
参考视频链接:https://www.bilibili.com/video/BV1PE411i7CV(【狂神说Java】SpringBoot最新教程IDEA版通俗易懂)
