SpringBoot 快速开发
目录
1.SpringBoot 简介
1.1SpringBoot核心功能
2.SpringBoot快速入门
2.1开发环境需求:
2.2Maven搭建SpringBoot工程
2.3快速构建SpringBoot项目
3.SpringBoot的配置文件
3.1yaml配置文件
3.2 yml支持数据格式
3.3 配置文件属性注入Bean
3.3.1 @Value
3.3.2 @ConfigurationProperties
4.SpringBoot 整合其他框架(重点)
4.1 集成Mybatis **
练习:
1.SpringBoot 简介
SpringBoot 提供了一种快速开发使用Spring 的方式,(以前ssm整合的时候,还要自己配置)现在SpringBoot 可以让开发人员不必再配置与逻辑业务之间进行思维的切换,全身心投入到逻辑业务编写中。从而大大的提高了开发效率,一定程度上缩短了项目周期。
官网https://www.baidu.com/link?url=uqdPSphqTeVPwj9ctpa0r9v5gvu6E3QAj4ZVZD0XR5C48c4uVIe0ySa8l1TwqzYoMqJWnhMn2dcx2nf2L1-gEK&wd=&eqid=91c651730032489200000003631d8ea9
了解更多SpringBoot 内容:Springboot入门到精通(超详细文档)_cuiqwei的博客-CSDN博客_springboot文档
1.1SpringBoot核心功能
SpringBoot 提供了一种快速开发Spring项目的方式。而不是对Spring功能上的增强。
1) 自动配置
Spring Boot的自动配置是一个运行时(更准确地说,是应用程序启动时)的过程,考虑了众多因素,才决定Spring配置应该用哪个,不该用哪个。该过程是SpringBoot自动完成的。
2) 起步依赖
起步依赖本质上是一个Maven项目对象模型(Project Object Model,POM),定义了对其他库的传递依赖,这些东西加在一起即支持某项功能。
简单的说,起步依赖就是将具备某种功能的坐标打包到一起,并提供一些默认的功能。
3) 辅助功能
提供了一些大型项目中常见的非功能性特性,如嵌入式服务器、安全、指标,健康检测、外部配置等。
2.SpringBoot快速入门
2.1开发环境需求:
Spring Boot : 2.5.6 版本由官方推荐
jdk: Java8
项目构建工具及版本: Maven ,版本要求是3.3及以上
2.2Maven搭建SpringBoot工程
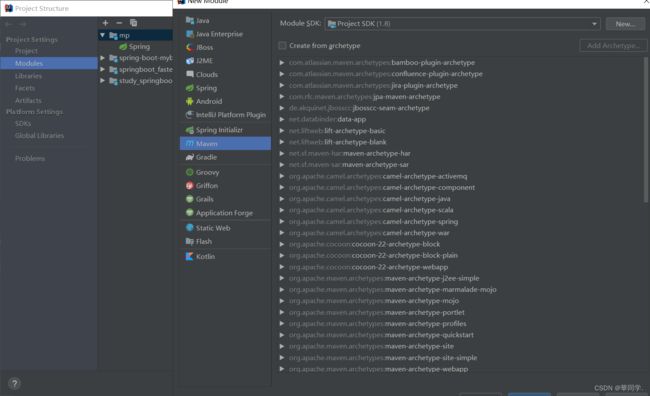
1.创建一个空工程(不创建空工程也可以)
2.创建Maven项目
3.pom.xml 文件 中配置负父坐标 和 web 的起步依赖
    4.0.0

   com.itheima
    study_springboot_01
    1.0


        org.springframework.boot
        spring-boot-starter-parent
        2.5.6


            org.springframework.boot
            spring-boot-starter-web
4.编写 SpringBoot 启动类
@SpringBootApplication
public class DemoApplication {
    public static void main(String[] args) {
        SpringApplication.run(DemoApplication.class,args);
    }
}
5.编写HelloController 写前端访问路径
@RestController
public class HelloController {

    @RequestMapping("/hello")
    public String hello(String name ){
        return "hello world!!!!";
    }
}
6.访问路径http://localhost:8080/hello测试
2.3快速构建SpringBoot项目
1.使用Spring Initializr 创建SpringBoot
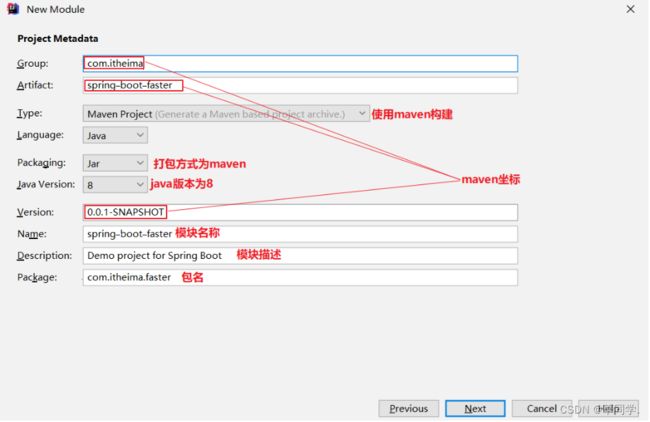
2.配置项目信息
3.勾选起步依赖(根据需求)
4.创建完成后工程目录结构
5.编写Controller代码
@RestController
public class HelloController {

    @RequestMapping("/sayHello")
    public String sayHello(){
        return "hello world !!!";
    }
}
6.访问http://localhost:8080/sayHello接口测试
3.SpringBoot的配置文件
application.properties或application.yml(application.yaml)(两种,yml是yaml简化)自定义配置。SpringBoot默认从Resource目录加载自定义配置文件。
有下面3个要点:
-
SpringBoot提供了2种配置文件类型:properteis和yml/yaml
-
默认配置文件名称:application
-
(了解)在同一级目录下优先级为:properties>yml > yaml
两种形式的不同。
3.1yaml配置文件
YML文件格式是YAML(YAML Aint Markup Language)编写的文件格式。可以直观被电脑识别的格式。容易阅读,容易与脚本语言交互。可以支持各种编程语言(C/C++、Ruby、Python、Java、Perl、C#、PHP),扩展名为.yml或.yaml。
大小写敏感
数据值前边必须有空格,作为分隔符
使用缩进表示层级关系
缩进时不允许使用Tab键,只允许使用空格(各个系统 Tab对应的 空格数目可能不同,导致层次混乱)。
缩进的空格数目不重要,只要相同层级的元素左侧对齐即可
''#" 表示注释,从这个字符一直到行尾,都会被解析器忽略。
3.2 yml支持数据格式
普通数据语法:key: value
# yaml
personName: zhangsan
注意:
Value之前有一个空格
key不要定义为username否则返回的值将是window中的用户名称,username为特定值。
对象(map)数据:
person:
    name: haohao
    age: 31
    addr: beijing
#或者(了解即可)
person: {name: haohao,age: 31,addr: beijing}
注意:yml语法中,相同缩进代表同一个级别
集合、数组数据语法:
# 数组或集合
city:
- beijing
- shanghai
# 行内写法
address: [beijing,shanghai]
#集合中的元素是对象形式
students:
- name: zhangsan
age: 18
score: 100
- name: lisi
age: 28
score: 88
- name: wangwu
age: 38
score: 903.3 配置文件属性注入Bean
3.3.1 @Value
@Value注解将配置文件的值映射到Spring管理的Bean属性值
@Value("${personName}")
private String personName;
// 还可以这样
@Value("${person.name}")
private String persionName;
// 还可以这样
@Value("${students[0].name}")
private String persionName;
3.3.2 @ConfigurationProperties
通过注解@ConfigurationProperties(prefix=''配置文件中的key的前缀")可以将配置文件中的配置自动与实体进行映射。
@Data
@Component
@ConfigurationProperties(prefix = "person")
public class Person {
    private String name;
    private String age;
    private String addr;
}
使用@ConfigurationProperties方式必须提供Setter方法,使用@Value注解不需要Setter方法。同时可以在pom中添加如下坐标,这样可以在配置文件中配置数据时有更加友好的提示。
    org.springframework.boot
    spring-boot-configuration-processor
    true
4.SpringBoot 整合其他框架(重点)
4.1 集成Mybatis **
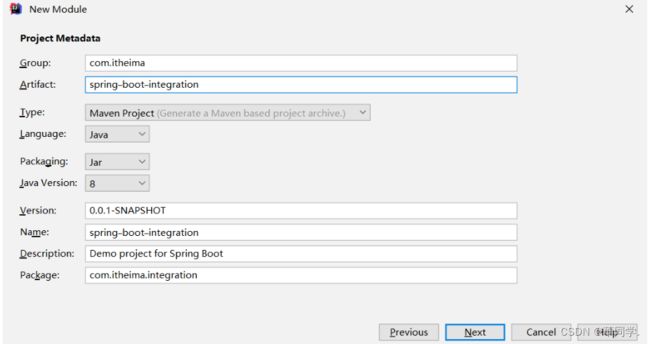
1.创建SpringBoot工程: spring-boot-mybatis
2.勾选依赖坐标
3.在application.xml 中添加数据库连接信息
spring:
  # 数据源相关配置
  datasource:
    username: root
    password: root
    driver-class-name: com.mysql.cj.jdbc.Driver
    #时区必须配置否则报错,注意数据库名切换为自己的数据库名称
    url:  jdbc:mysql://127.0.0.1/itheima?useUnicode=true&characterEncoding=UTF-8&serverTimezone=UTC
#mybatis 相关配置
mybatis:
  # 指定接口映射文件的位置
  mapper-locations: classpath:mapper/*.xml
  # 为POJO类指定别名
  type-aliases-package: com.itheima.integration.pojo
练习:
pom.xml
    4.0.0
    com.itheima
    spring-boot-mybatis
    0.0.1-SNAPSHOT
    spring-boot-mybatis
    Demo project for Spring Boot


        1.8
        UTF-8
        UTF-8
        2.3.7.RELEASE


            org.springframework.boot
            spring-boot-starter-web


            org.mybatis.spring.boot
            mybatis-spring-boot-starter
            2.1.4


            org.projectlombok
            lombok


            mysql
            mysql-connector-java
            runtime


            org.springframework.boot
            spring-boot-starter-test
            test


                    org.junit.vintage
                    junit-vintage-engine


                org.springframework.boot
                spring-boot-dependencies
                ${spring-boot.version}
                pom
                import


                org.apache.maven.plugins
                maven-compiler-plugin
                3.8.1

                    1.8
                    1.8
                    UTF-8


                org.springframework.boot
                spring-boot-maven-plugin
                2.3.7.RELEASE

                    com.itheima.springbootmybatis.SpringBootMybatisApplication


                        repackage

                            repackage
我们的application.xml 配置文件
spring:
  datasource:
    driver-class-name: com.mysql.cj.jdbc.Driver
    username: root
    password: root
      #时区必须配置否则报错,注意数据库名切换为自己的数据库名称
    url:  jdbc:mysql://127.0.0.1/itheima?useUnicode=true&characterEncoding=UTF-8&serverTimezone=UTC


#mybatis 相关配置
mybatis:
  mapper-locations: classpath:mapper/*.xml
  type-aliases-package: com.itheima.springbootmybatis.pojo
#打印日志
logging:
  level:
    com.itheima.springbootmybatis:
      debug
UserMapper.xml 配置文件
启动类
import org.springframework.boot.SpringApplication;
import org.springframework.boot.autoconfigure.SpringBootApplication;

@SpringBootApplication
public class SpringBootMybatisApplication {

    public static void main(String[] args) {
        SpringApplication.run(SpringBootMybatisApplication.class, args);
    }

}
UserService接口
import com.itheima.springbootmybatis.pojo.User;

import java.util.List;

public interface UserService {

//    查询所有
    List selectAll();
}
UserServiceImpl实现类
import java.util.List;

@Service
public class UserServiceImpl implements UserService {

    @Autowired
    private UserMapper userMapper;

    @Override
    public List selectAll() {
        List users = userMapper.selectAll();
        return users;
    }
}
UserMapper 接口
import com.itheima.springbootmybatis.pojo.User;
import org.apache.ibatis.annotations.Mapper;

import java.util.List;
@Mapper//告知 spring 我的mapper接口在这里
public interface UserMapper {
//    查询所有
    List selectAll();
}
注意: 这里 @Mapper 告知spring mapper在这里
UserController
import com.itheima.springbootmybatis.pojo.User;
import com.itheima.springbootmybatis.service.UserService;
import lombok.extern.slf4j.Slf4j;
import org.springframework.beans.factory.annotation.Autowired;
import org.springframework.web.bind.annotation.RequestMapping;
import org.springframework.web.bind.annotation.RestController;

import java.util.List;

@RestController
@Slf4j// lombok打印日志
public class UserController {
    @Autowired
    private UserService userService;

    /*
    * 查询所有
    * */
    @RequestMapping("/findAll")
    public List findAll(){
        System.out.println("查询用户信息:");
//        log.info()
        return userService.selectAll();
    }

}


