Word 模板渲染引擎-Poi-tl - 标签(二)
在文档的任何地方做任何事情(Do Anything Anywhere)是poi-tl的星辰大海.
上一节我们对
Poi-tl进行了简单的介绍以及实现了我们永恒的 HelloWorld, 同时对 poi-tl 的Text 标签进行了讲解, 本文就继续对 poi-tl 的标签进行介绍.
一、标签-图片
1. 图片标签
图片标签以@开始:{{@var}}
2. 图片支持
- 本地图片
- 网络图片
- 图片流
- SVG
- Java BufferedImage — 意味着我们可以利用Java生成图表插入到word文档中
3. 数据模型
- String: 图片url或者本地路径,默认使用图片自身尺寸
- PictureRenderData
{
  "pictureType" : "PNG",  // 图片类型
  "pictureSupplier": () -> byte[], // 运行时获取图片byte[]字节数组的函数
  "pictureStyle": {
    "width": 100,  // 宽度,单位是像素
    "height": 100 // 高度,单位是像素
  },
  "altMeta": "图片不存在"  // 当无法获取图片时展示的文字
}
4. 示例
4.1 创建模板
4.2 渲染模板
// 模板文件
final ClassPathResource templateResource
   = new ClassPathResource("2imgTemplate.docx");

XWPFTemplate template = XWPFTemplate
   // 编译模板
   .compile(templateResource.getInputStream())
   // 渲染模板
   .render(
      // 渲染模板可以通过 Map 或者 POJO
      new HashMap<String, Object>() {
         {
            // 本地图片
            put("image", "/Users/dreamli/Workspace/MyRepository/javafamily/office-product/src/main/resources/static/jf.png");
            // 网络图片
            put("netImg", Pictures.of("https://img0.baidu.com/it/u=1114868985,1024067529&fm=253&fmt=auto&app=138&f=GIF?w=400&h=237")
               .size(200, 200)
               .center()
               .create());
            // 图片流
            put("streamImg", Pictures.ofStream(
               new FileInputStream(
                  "/Users/dreamli/Workspace/MyRepository/javafamily/office-product/src/main/resources/static/jf.png"),
               PictureType.PNG)
               .size(200, 200)
               .center()
               .create());

            // svg
            put("svgImg", "https://img.shields.io/badge/jdk-1.6%2B-orange.svg");

            // Java BufferedImage
            final BufferedImage bufImg = new BufferedImage(300, 300, TYPE_INT_RGB);
            final Graphics graphics = bufImg.getGraphics();

            graphics.setFont(new Font(null, Font.BOLD, 20));
            graphics.drawString("Buffered Image By Java", 10, 150);

            put("bufImg", Pictures.ofBufferedImage(bufImg, PictureType.PNG).create());
         }
      }
   );

// 输出文件
final File outputFile = new File("/Users/dreamli/Workspace/MyRepository/javafamily/office-product/target/output.docx");

if(!outputFile.exists()) {
   if(!outputFile.createNewFile()) {
      throw new RuntimeException("创建文件失败!");
   }
   else {
      log.info("在 {} 创建了新的文件.", outputFile.getAbsolutePath());
   }
}

// 写出渲染后的文件到指定文件
template.writeAndClose(new FileOutputStream(outputFile));
4.3 查看
二、标签-表格
1. 表格标签
表格标签以#开始:{{#var}}
2. 数据模型
- TableRenderData
{
  "rows": [  // 行数据
    {
      "cells": [ //单元格数据
        {
          "paragraphs": [ // 	单元格内段落
            {
              "contents": [
                {
                  [TextRenderData] // 单元格内文本
                },
                {
                  [PictureRenderData] // 单元格内图片
                }
              ],
              "paragraphStyle": null // 单元格内段落文本的样式:对齐
            }
          ],
          "cellStyle": { // 单元格样式:垂直对齐方式,背景色
            "backgroundColor": "00000",
            "vertAlign": "CENTER"
          }
        }
      ],
      "rowStyle": { // 行样式:行高(单位cm)
        "height": 2.0f
      }
    }
  ],
  "tableStyle": { // 表格样式:表格对齐、边框样式
    "width": 14.63f, // 表格宽度(单位cm),表格的最大宽度 = 页面宽度 - 页边距宽度 * 2,页面宽度为A4(20.99 * 29.6,页边距为3.18 * 2.54)的文档最大表格宽度14.63cm。
    "colWidths": null
  },
  "mergeRule": { // 单元格合并规则,比如第0行第0列至第1行第2列单元格合并
    "mapping": {
      "0-0": "1-2"
    }
  }
}
3. 示例
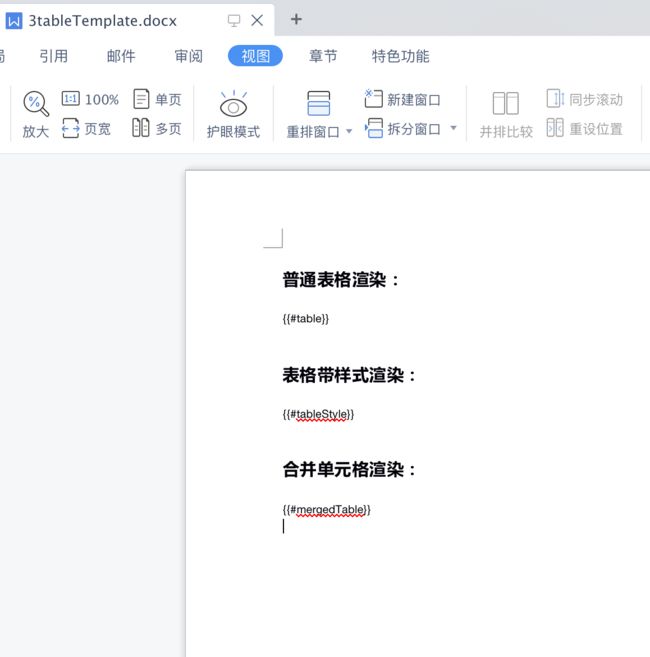
3.1 创建模板
3.2 渲染模板
// 模板文件
final ClassPathResource templateResource
   = new ClassPathResource("3tableTemplate.docx");

XWPFTemplate template = XWPFTemplate
   // 编译模板
   .compile(templateResource.getInputStream())
   // 渲染模板
   .render(
      // 渲染模板可以通过 Map 或者 POJO
      new HashMap<String, Object>() {
         {
            // 普通表格渲染
            put("table", Tables.of(new String[][] {
               new String[] { "组织", "管理员" },
               new String[] { "JavaFamily", "JackLi" }
            }).border(BorderStyle.DEFAULT).create());

            // 表格带样式渲染
            RowRenderData row0 = Rows.of("姓名", "学历")
               .textColor("FFFFFF")
               .bgColor("4472C4")
               .center()
               .create();
            RowRenderData row1 = Rows.of("JackLi", "学士")
               .center()
               .create();

            put("tableStyle", Tables.create(row0, row1));

            // 合并单元格导出
            RowRenderData r0 = Rows.of("第一列", "第二列", "第三列")
               .center()
               .bgColor("4472C4")
               .create();
            RowRenderData r1 = Rows.of("合并单元格", null, "数据")
               .textColor("ff0000")
               .textBold()
               .create();
            MergeCellRule rule = MergeCellRule.builder()
               .map(MergeCellRule.Grid.of(1, 0), // 开始合并的坐标
                  MergeCellRule.Grid.of(1, 1)) // 结束合并的坐标
               .build();
            put("mergedTable", Tables.of(r0, r1).mergeRule(rule).create());
         }
      }
   );
3.3 查看
4. 表格的高级特性
表格的高级特性需要通过
插件实现,
而插件,又称为自定义函数,它允许用户在模板标签位置处执行预先定义好的函数。由于插件机制的存在,我们几乎可以在模板的任何位置执行任何操作。
插件是poi-tl的核心,默认的标签和引用标签都是通过插件加载。
这里先抛砖引玉通过表格对 poi-tl 的插件进行简单引进及介绍, 后面会对
poi-tl 插件进行详细介绍.
4.1 循环表格
表格行循环通过
LoopRowTableRenderPolicy策略, LoopRowTableRenderPolicy 是一个特定场景的插件,根据集合数据循环表格行。
当然, 列循环也完全没有问题, 通过LoopColumnTableRenderPolicy.
4.2 创建模板
4.3 渲染文档
// 模板文件
final ClassPathResource templateResource
   = new ClassPathResource("3tableTemplate2_loop.docx");

List<LoopItemVo> data = Arrays.asList(LoopItemVo.builder()
      .loopName("张三")
      .loopAge(12).build(),
   LoopItemVo.builder()
      .loopName("李四")
      .loopAge(24).build(),
   LoopItemVo.builder()
      .loopName("王五")
      .loopAge(36).build());

// 指定循环行策略
LoopRowTableRenderPolicy rowPolicy
   = new LoopRowTableRenderPolicy();
// 指定循环列策略
LoopColumnTableRenderPolicy colPolicy
   = new LoopColumnTableRenderPolicy();

Configure config = Configure.builder()
   // 绑定循环变量
   .bind("data", rowPolicy)
   .bind("cols", colPolicy)
   .build();

XWPFTemplate template = XWPFTemplate
   // 编译模板, 应用自定义配置
   .compile(templateResource.getInputStream(), config)
   // 渲染模板
   .render(
      // 渲染模板可以通过 Map 或者 POJO
      new HashMap<String, Object>() {
         {
				    // 演示程序, 两个表格用同一份数据
            put("data", data);
            put("cols", data);
         }
      }
   );
4.4 查看
三、下期继续
下期继续 poi-tl 标签的讲解, 包括: 有序/无序列表, 区块对, 图表等…下期再见, 拜了个拜!


