pytorch项目实战之实时人脸属性检测系统
简介
本项目采用CelebA人脸属性数据集训练人脸属性分类模型,使用mediapipe进行人脸检测,使用onnxruntime进行模型的推理,最终在intel的奔腾cpu上实现30-100帧完整的实时人脸属性识别系统。
ps:本来是打算写成付费专栏的,毕竟这是个只要稍微修改就可以商业化的系统,不是那些玩具例子,但考虑到阅读量马上破十万了,就作为纪念作发出来吧。
python包环境
训练环境:
python 3.9.12
torch 1.12.0+cu116
torchvision 0.13.0+cu116
导出模型相关:
onnx 1.12.0
onnxruntime 1.14.0
部署模型环境:
onnxruntime 1.14.0
cv2(opencv-python) 4.7.0
mediapipe 0.9.0.1
python3.10.6
注:版本没有特定要求,写出来只是方便查bug,一般拥有以上的包即可完成本项目,没有包请自行pip安装。
数据集准备
手动下载CelebA数据集
输入截图上面这个网址(不直接放网址是因为外链会被识别为低质量文章的奇葩规定),然后点击图上baidu drive,输入提取码后:

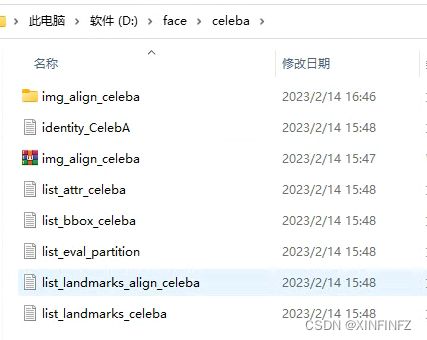
把以上文件夹下的每一个东西都下载下来放到一起,比如我这边下载完后构造如下图所示,一个都不能少和多:
img_align_celeba文件夹是压缩包解压完后的,下面直接就是人脸的图片,没有次级目录:
装载数据集
首先使用torchvision直接加载数据集,划分训练集,测试集。这里download设为False表示你已经手动下载好了,不需要自动下载(速度很慢)。此外root路径为数据集的根路径,我这里所有东西是放在D:/face/celeba下,那么根路径就是写D:/face。
from torchvision import datasets
import torchvision.transforms as transforms
train_dataset = datasets.CelebA(root="D:/face",
                                split='train',
                                transform = transforms.Compose([
                                    transforms.CenterCrop(128),
                                    transforms.ToTensor(),
                                    transforms.Normalize(mean=[0.5, 0.5, 0.5],
                                                        std=[0.5, 0.5, 0.5])]),
                                download=False)
test_dataset = datasets.CelebA(root="D:/face",
                                split='test',
                                transform = transforms.Compose([
                                    transforms.CenterCrop(128),
                                    transforms.ToTensor(),
                                    transforms.Normalize(mean=[0.5, 0.5, 0.5],
                                                        std=[0.5, 0.5, 0.5])]),
                                download=False)
这里对数据集进行了三个预处理,因为涉及到后面推理环节摆脱torch进行相同的处理所以需要详细解释:
| 语句 | 意义 |
|---|---|
| transforms.CenterCrop(128) | 中心裁剪128x128图片 |
| transforms.ToTensor() | 把0-255的像素值除以255转为0-1 |
| transforms.Normalize(mean=[0.5, 0.5, 0.5],std=[0.5, 0.5, 0.5])]) | 对三个通道减去0.5平均值并除以0.5标准差 |
然后我们使用torch的dataloader类来把数据集正式装入可供读取:
import torch
train_dataloader = torch.utils.data.DataLoader(dataset=train_dataset, shuffle=True, batch_size=128,num_workers=4)
test_dataloader = torch.utils.data.DataLoader(dataset=test_dataset, shuffle=False, batch_size=128,num_workers=4)
batch_size我这里调了128,num_workers调了4,这两个指标是影响训练速度的,如果电脑配置不行请适当调小,配置很行请调大加速训练,数据量本身还是很大的,一次epoch大概2分钟。
定义模型类
模型采用2017年的slimnet架构,是一个非常轻量的网络,对slimnet感兴趣的请自行搜索相关论文,这里直接放代码了:
import torch
import torch.nn as nn
import torch.nn.functional as F


class ConvBNReLU(nn.Sequential):
    def __init__(self, in_planes, out_planes, kernel_size=3, stride=1, groups=1):
        padding = (kernel_size - 1) // 2
        super(ConvBNReLU, self).__init__(
            nn.Conv2d(in_planes, out_planes, kernel_size, stride, padding, groups=groups, bias=False),
            nn.BatchNorm2d(out_planes),
            nn.ReLU(inplace=True)
        )


class DWSeparableConv(nn.Module):
    def __init__(self, inp, oup):
        super().__init__()
        self.dwc = ConvBNReLU(inp, inp, kernel_size=3, groups=inp)
        self.pwc = ConvBNReLU(inp, oup, kernel_size=1)

    def forward(self, x):
        x = self.dwc(x)
        x = self.pwc(x)

        return x


class SSEBlock(nn.Module):
    def __init__(self, inp, oup):
        super().__init__()
        out_channel = oup * 4
        self.pwc1 = ConvBNReLU(inp, oup, kernel_size=1)
        self.pwc2 = ConvBNReLU(oup, out_channel, kernel_size=1)
        self.dwc = DWSeparableConv(oup, out_channel)

    def forward(self, x):
        x = self.pwc1(x)
        out1 = self.pwc2(x)
        out2 = self.dwc(x)

        return torch.cat((out1, out2), 1)


class SlimModule(nn.Module):
    def __init__(self, inp, oup):
        super().__init__()
        hidden_dim = oup * 4
        out_channel = oup * 3
        self.sse1 = SSEBlock(inp, oup)
        self.sse2 = SSEBlock(hidden_dim * 2, oup)
        self.dwc = DWSeparableConv(hidden_dim * 2, out_channel)
        self.conv = ConvBNReLU(inp, hidden_dim * 2, kernel_size=1)

    def forward(self, x):
        out = self.sse1(x)
        out += self.conv(x)
        out = self.sse2(out)
        out = self.dwc(out)

        return out


class SlimNet(nn.Module):
    def __init__(self, num_classes):
        super().__init__()
        self.conv = ConvBNReLU(3, 96, kernel_size=7, stride=2)
        self.max_pool0 = nn.MaxPool2d(kernel_size=3, stride=2)

        self.module1 = SlimModule(96, 16)
        self.module2 = SlimModule(48, 32)
        self.module3 = SlimModule(96, 48)
        self.module4 = SlimModule(144, 64)

        self.max_pool1 = nn.MaxPool2d(kernel_size=3, stride=2)
        self.max_pool2 = nn.MaxPool2d(kernel_size=3, stride=2)
        self.max_pool3 = nn.MaxPool2d(kernel_size=3, stride=2)
        self.max_pool4 = nn.MaxPool2d(kernel_size=3, stride=2)

        self.gap = nn.AdaptiveAvgPool2d((1, 1))
        self.fc = nn.Linear(192, num_classes)

    def forward(self, x):
        x = self.max_pool0(self.conv(x))
        x = self.max_pool1(self.module1(x))
        x = self.max_pool2(self.module2(x))
        x = self.max_pool3(self.module3(x))
        x = self.max_pool4(self.module4(x))
        x = self.gap(x)
        x = torch.flatten(x, 1)
        x = self.fc(x)
        return x
device = torch.device('cuda')
model = SlimNet(num_classes=40).to(device=device)
device这里我用了cuda训练,如果你没有英伟达显卡请写cpu,num_classes=40表示最后输出有40个人脸属性特征,以下是我翻译过后的特征,方便理解:

可以看到我们最后是个多分类任务,但这里网络输出的不是0,1的分类,也不是0-1的概率值,需要在预测时先用sigmoid函数转换到0-1的可能性,再以0.5分类。
训练网络
中间的训练过程就不细讲了,都是pytorch的八股文,需要注意的是选取损失函数时要明白它的数据类型,这里target是整数型,需要转为double型才能和score计算loss。本次训练手动设定了一个best_acc表示最好的准确度,一旦在训练中对测试集评估时发现准确度比它更好,就会自动保存当前模型。
loss_criterion = nn.BCEWithLogitsLoss() #定义损失函数
optimizer = torch.optim.Adam(model.parameters(), lr = 0.001) #定义优化器
best_acc = 0.90325 #最好的在测试集上的准确度,可手动修改
seed = 18203861252700 #固定起始种子
for epoch in range(50): #训练五十轮
    torch.manual_seed(seed)
    torch.cuda.manual_seed(seed)
    torch.backends.cudnn.benchmark = False
    torch.backends.cudnn.deterministic = True#以上这些都是企图固定种子,但经过测试只能固定起始种子,可删掉
    total_train = 0 #总共的训练图片数量,用来计算准确率
    correct_train = 0 #模型分类对的训练图片
    running_loss = 0 #训练集上的loss
    running_test_loss = 0 #测试集上的loss
    total_test = 0 #测试的图片总数
    correct_test = 0 #分类对的测试图片数
    model.train() #训练模式
    for data, target in train_dataloader:
        data = data.to(device=device)
        target = target.type(torch.DoubleTensor).to(device=device)

        score = model(data)
        loss = loss_criterion(score, target)
        running_loss += loss.item()
        optimizer.zero_grad()

        loss.backward()

        optimizer.step()
        sigmoid_logits = torch.sigmoid(score)
        predictions = sigmoid_logits > 0.5 #使结果变为true,false的数组
        total_train += target.size(0) * target.size(1)
        correct_train += (target.type(predictions.type()) == predictions).sum().item()
    model.eval() #测试模式
    with torch.no_grad():
         for batch_idx, (images,labels) in enumerate(test_dataloader):
            images, labels = images.to(device), labels.type(torch.DoubleTensor).to(device)
            logits = model.forward(images)
            test_loss = loss_criterion(logits, labels)
            running_test_loss += test_loss.item()
            sigmoid_logits = torch.sigmoid(logits)
            predictions = sigmoid_logits > 0.5
            total_test += labels.size(0) * labels.size(1)
            correct_test += (labels.int() == predictions.int()).sum().item()
    test_acc = correct_test/total_test
    if test_acc > best_acc:
        best_acc = test_acc
        torch.save(model,f"model_{test_acc*100}.pt")
    print(f"For epoch : {epoch} training loss: {running_loss/len(train_dataloader)}")
    print(f'train accruacy is {correct_train*100/total_train}%')
    print(f"For epoch : {epoch} test loss: {running_test_loss/len(test_dataloader)}")
    print(f'test accruacy is {test_acc*100}%')
训练结束后可以在目录下找到以下文件,就是我们训练过程中发现的好模型,用来后续导出:

模型导出onnx
这里最好接着上面在同一个notebook里写,如果另外保存的话,需要把上面定义网络的部分复制粘贴进去,不然会找不到网络的定义。
torch_model = torch.load("model_90.56845506462278.pt", map_location='cpu')
torch_model.eval()
x = torch.randn(1, 3, 128, 128, requires_grad=True) #随机128x128输入
torch_out = torch_model(x)
print(torch_out)
# 导出模型
torch.onnx.export(torch_model,               # 需要导出的模型
                  x,                         # 模型输入
                  "cpu.onnx",   # 保存模型位置
                  export_params=True,        # 保存训练参数
                  opset_version=10,          # onnx的opset版本
                  do_constant_folding=True,  # 是否进行常量折叠优化,这里开关都一样
                  input_names = ['input'],   # 输入名字
                  output_names = ['output'], # 输出名字
                  )
ort_session = onnxruntime.InferenceSession("cpu.onnx",providers=['CPUExecutionProvider'])
#尝试进行推理看是否报错
def to_numpy(tensor):
    return tensor.detach().cpu().numpy() if tensor.requires_grad else tensor.cpu().numpy()

ort_inputs = {ort_session.get_inputs()[0].name: to_numpy(x)}
ort_outs = ort_session.run(None, ort_inputs)
print(ort_outs[0])
# 比较onnx模型推理的结果和torch推理的结果误差是否在可容忍范围内
np.testing.assert_allclose(to_numpy(torch_out), ort_outs[0], rtol=1e-03, atol=1e-05)

print("Exported model has been tested with ONNXRuntime, and the result looks good!")
图片最小推理示例
我们直接把数据集中的第一张图片复制过来并重名为test_face.jpg,

进行推理:
from PIL import Image
import torchvision.transforms as transforms
import onnxruntime
import torch
import numpy as np
img = Image.open("test_face.jpg")
comp = transforms.Compose([transforms.CenterCrop(128),transforms.ToTensor(),transforms.Normalize((0.5, 0.5, 0.5), (0.5, 0.5, 0.5)),]) #torch的预处理
img = comp(img)
img.unsqueeze_(0)
def to_numpy(tensor):
    return tensor.detach().cpu().numpy() if tensor.requires_grad else tensor.cpu().numpy()
x = to_numpy(img)
ort_session = onnxruntime.InferenceSession("cpu.onnx")
ort_inputs = {ort_session.get_inputs()[0].name: x}
ort_outs = ort_session.run(None, ort_inputs)
def sigmoid_array(x): #使用sigmoid转换概率值
    return 1 / (1 + np.exp(-x))
result = sigmoid_array(ort_outs[0]) > 0.5
list_attr_cn = np.array(["早上刚刮下午长出来的一点胡子","拱形眉毛","有吸引力的","眼袋","秃头","刘海","大嘴唇"
,"大鼻子","黑发","金发","模糊的","棕发","浓眉","圆胖","双下巴","眼镜","山羊胡子","灰白发","浓妆","高高的颧骨",
"男性","嘴微微张开","胡子","眯眯眼","没有胡子","鹅蛋脸","苍白皮肤","尖鼻子","后退的发际线","红润脸颊",
"鬓角","微笑","直发","卷发","耳环","帽子","口红","项链","领带","年轻"])
print(list_attr_cn[result[0]])
结果如下:
[‘拱形眉毛’ ‘有吸引力的’ ‘棕发’ ‘浓妆’ ‘高高的颧骨’ ‘嘴微微张开’ ‘没有胡子’ ‘尖鼻子’ ‘微笑’ ‘口红’ ‘年轻’]
有了玩具例子,只要再加上亿点点细节,就可以完成整个系统了。
视频实时人脸检测
直接放代码,如果要细细解释得讲很多,不如直接代码注释看起来方便,总之就是用opencv来读取视频并画文字,使用Mediapipe来进行快速人脸识别。
import onnxruntime
import time
import numpy as np
import cv2
import mediapipe as mp
mp_face_detection = mp.solutions.face_detection
mp_drawing = mp.solutions.drawing_utils
cap = cv2.VideoCapture("test_face3.mp4") #视频输入,如果需要摄像头,请改成数字0,并修改下面的break为continue
ort_session = onnxruntime.InferenceSession("cpu.onnx")
list_attr_en = np.array(["5_o_Clock_Shadow","Arched_Eyebrows","Attractive","Bags_Under_Eyes","Bald",
"Bangs","Big_Lips","Big_Nose","Black_Hair","Blond_Hair","Blurry","Brown_Hair",
"Bushy_Eyebrows","Chubby","Double_Chin","Eyeglasses","Goatee","Gray_Hair",
"Heavy_Makeup","High_Cheekbones","Male","Mouth_Slightly_Open","Mustache","Narrow_Eyes",
"No_Beard","Oval_Face","Pale_Skin","Pointy_Nose","Receding_Hairline","Rosy_Cheeks",
"Sideburns","Smiling","Straight_Hair","Wavy_Hair","Wearing_Earrings","Wearing_Hat",
"Wearing_Lipstick","Wearing_Necklace","Wearing_Necktie","Young"]) #英文原版属性
width = int(cap.get(cv2.CAP_PROP_FRAME_WIDTH)) #获取视频宽度
height = int(cap.get(cv2.CAP_PROP_FRAME_HEIGHT)) #获取视频高度
fps =  cap.get(cv2.CAP_PROP_FPS) #获取视频FPS,如果是实时摄像头请手动设定帧数
out = cv2.VideoWriter('output3.avi', cv2.VideoWriter_fourcc(*"MJPG"), fps, (width,height)) #保存视频,没需求可去掉
def cv2_preprocess(img): #numpy预处理和torch处理一样
    img = cv2.resize(img, (128, 128), interpolation=cv2.INTER_NEAREST)
    img = cv2.cvtColor(img, cv2.COLOR_BGR2RGB)
    mean = [0.5,0.5,0.5] #一定要是3个通道,不能直接减0.5
    std = [0.5,0.5,0.5]
    img = ((img / 255.0 - mean) / std)
    img = img.transpose((2,0,1)) #hwc变为chw
    img = np.expand_dims(img, axis=0) #3维到4维
    img = np.ascontiguousarray(img, dtype=np.float32) #转换浮点型
    return img
def sigmoid_array(x): #sigmoid函数手动设定
    return 1 / (1 + np.exp(-x))
def result_inference(input_array): #推理环节
    ort_inputs = {ort_session.get_inputs()[0].name: input_array}
    ort_outs = ort_session.run(None, ort_inputs)
    possibility = sigmoid_array(ort_outs[0]) > 0.5
    result = list_attr_en[possibility[0]]
    return result
with mp_face_detection.FaceDetection(
    model_selection=1, min_detection_confidence=0.5) as face_detection:
    #人脸识别,1为通用模型,0为近距离模型
  while cap.isOpened():
    a1 = time.time()
    success, image = cap.read()
    if not success:
      print("Ignoring empty camera frame.")
      break
    image.flags.writeable = False #据说这样写可以加速人脸识别推理
    image = cv2.cvtColor(image, cv2.COLOR_BGR2RGB)
    results = face_detection.process(image)
    image.flags.writeable = True
    image = cv2.cvtColor(image, cv2.COLOR_RGB2BGR)
    image2 = image.copy() #copy复制,因为cv2会直接覆盖原有数组
    if results.detections:
      for detection in results.detections:
        mp_drawing.draw_detection(image, detection)
        image_rows, image_cols, _ = image.shape
        location = detection.location_data.relative_bounding_box #获取人脸位置
        start_point = mp_drawing._normalized_to_pixel_coordinates(location.xmin, location.ymin,image_cols,image_rows) #获取人脸左上角的点
        end_point = mp_drawing._normalized_to_pixel_coordinates(location.xmin + location.width, location.ymin + location.height,image_cols,image_rows) #获取右下角的点
        x1,y1 = start_point #左上点坐标
        x2,y2 = end_point #右下点坐标
        img_infer = image2[y1-70:y2,x1-50:x2+50].copy() #为了营造相似环境,把左上角和右上角的点连线囊括的区域扩大提高准确度
        img_infer = cv2_preprocess(img_infer)
        result = result_inference(img_infer)
    #     # cv2.imshow('test',img_infer)
        # if cv2.waitKey(5) & 0xFF == 27:
        #   break
        for i in range(0,len(result)):
            image = cv2.putText(image, result[i],(x1,y1+i*40), cv2.FONT_HERSHEY_SIMPLEX,
                   1, (255,255,255), 1, cv2.LINE_AA) #画文字,一行一行画,如果想要中文请自行编译安装freetype版opencv,不推荐用别的库包裹转换中文,速度慢
      a2 = time.time()
    out.write(image)
    print(f'one pic time is {a2 - a1} s')
此外,mediapipe本身提供的功能是自带画人脸关键点的,如果不想要关键点可以和我一样把它注释掉:

最终成果

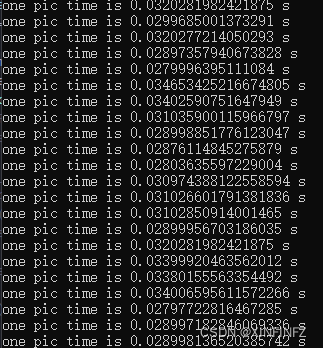
推理时间测试了多个视频,一帧完整的从读取到检测画图画完的时间大约在0.01-0.035之间,换算下来每秒可以达到30-100帧。
从下图可以看到识别出来的属性还是挺准的,图上是一位棕色头发没有胡子的有吸引力的年轻女性。属性条有变化是因为人脸识别捕捉的区域不同,也没有加上人脸跟踪的算法。


