spring cloud alibaba
一、spring cloud alibaba介绍
中文官方文档参考
Spring Cloud Alibaba 致力于提供微服务开发的一站式解决方案。此项目包含开发分布式应用微服务的必需组件,方便开发者通过 Spring Cloud 编程模型轻松使用这些组件来开发分布式应用服务。依托 Spring Cloud Alibaba,您只需要添加一些注解和少量配置,就可以将 Spring Cloud 应用接入阿里微服务解决方案,通过阿里中间件来迅速搭建分布式应用系统。此外,阿里云同时还提供了 Spring Cloud Alibaba 企业版 微服务解决方案,包括无侵入服务治理(全链路灰度,无损上下线,离群实例摘除等),企业级 Nacos 注册配置中心和企业级云原生网关等众多产品。
spring cloud alibaba主要功能:
- 服务限流降级:默认支持 WebServlet、WebFlux、OpenFeign、RestTemplate、Spring Cloud Gateway、Zuul、Dubbo 和 RocketMQ 限流降级功能的接入,可以在运行时通过控制台实时修改限流降级规则,还支持查看限流降级 Metrics 监控。
- 服务注册与发现:适配 Spring Cloud 服务注册与发现标准,默认集成了 Ribbon 的支持。
- 分布式配置管理:支持分布式系统中的外部化配置,配置更改时自动刷新。
- 消息驱动能力:基于 Spring Cloud Stream 为微服务应用构建消息驱动能力。
- 分布式事务:使用 @GlobalTransactional 注解, 高效并且对业务零侵入地解决分布式事务问题。
- 阿里云对象存储:阿里云提供的海量、安全、低成本、高可靠的云存储服务。支持在任何应用、任何时间、任何地点存储和访问任意类型的数据。
- 分布式任务调度:提供秒级、精准、高可靠、高可用的定时(基于 Cron 表达式)任务调度服务。同时提供分布式的任务执行模型,如网格任务。网格任务支持海量子任务均匀分配到所有 Worker(schedulerx-client)上执行。
- 阿里云短信服务:覆盖全球的短信服务,友好、高效、智能的互联化通讯能力,帮助企业迅速搭建客户触达通道。
spring cloud alibaba 组件(自己的组件,不包含第三方组件):
- Sentinel:把流量作为切入点,从流量控制、熔断降级、系统负载保护等多个维度保护服务的稳定性。
- Nacos:一个更易于构建云原生应用的动态服务发现、配置管理和服务管理平台。
- RocketMQ:一款开源的分布式消息系统,基于高可用分布式集群技术,提供低延时的、高可靠的消息发布与订阅服务。
- Seata:阿里巴巴开源产品,一个易于使用的高性能微服务分布式事务解决方案。
- Alibaba Cloud OSS: 阿里云对象存储服务(Object Storage Service,简称 OSS),是阿里云提供的海量、安全、低成本、高可靠的云存储服务。您可以在任何应用、任何时间、任何地点存储和访问任意类型的数据。
- Alibaba Cloud SchedulerX: 阿里中间件团队开发的一款分布式任务调度产品,提供秒级、精准、高可靠、高可用的定时(基于 Cron 表达式)任务调度服务。
- Alibaba Cloud SMS: 覆盖全球的短信服务,友好、高效、智能的互联化通讯能力,帮助企业迅速搭建客户触达通道。
实际开发中除了使用spring cloud alibaba组件外,还会使用第三方组件,实际开发中的常用组件如下图中的标红组件。

二、Nacos
SpringCloud Alibaba Nacos参考
Nacos作用:服务注册/发现、配置中心。
2.1、Nacos下载安装
Nacos下载(下载zip即可)
下载解压nacos后,进入bin目录双击运行startup.cmd
新版本的nacos默认是以cluster方式启动,此时会报错,需要修改startup.cmd的启动方式,修改如下地方(红色标记为修改后的内容)

nacos运行成功如下:

访问localhost:8848/nacos,用户名密码都是nacos,登录后页面如下:

2.2、服务管理
2.2.1、新建服务提供者模块
新建两个服务提供者模块(聚合工程模块)
cloudalibaba-provider-payment01
cloudalibaba-provider-payment02
注意:两个模块工程里的配置文件端口号不同,其它的均保持一致。
pom.xml
<?xml version="1.0" encoding="UTF-8"?>
<project xmlns="http://maven.apache.org/POM/4.0.0"
         xmlns:xsi="http://www.w3.org/2001/XMLSchema-instance"
         xsi:schemaLocation="http://maven.apache.org/POM/4.0.0 http://maven.apache.org/xsd/maven-4.0.0.xsd">
    <modelVersion>4.0.0</modelVersion>

    <groupId>cn.zxj.com</groupId>
    <artifactId>cloudalibaba-provider-payment01</artifactId>
    <version>1.0-SNAPSHOT</version>

    <!-- Spring Boot 启动父依赖 -->
    <parent>
        <groupId>org.springframework.boot</groupId>
        <artifactId>spring-boot-starter-parent</artifactId>
        <version>2.3.12.RELEASE</version>
    </parent>

    <dependencies>
        <!--SpringCloud ailibaba nacos -->
        <dependency>
            <groupId>com.alibaba.cloud</groupId>
            <artifactId>spring-cloud-starter-alibaba-nacos-discovery</artifactId>
            <version>2.2.6.RELEASE</version>
        </dependency>
        <!--SpringBoot整合Spring Cloud-->
            <dependency>
                <groupId>org.springframework.cloud</groupId>
                <artifactId>spring-cloud-dependencies</artifactId>
                <version>Greenwich.SR1</version>
                <type>pom</type>
                <scope>import</scope>
            </dependency>
            <!--SpringBoot整合Spring Cloud Alibaba-->
            <dependency>
                <groupId>com.alibaba.cloud</groupId>
                <artifactId>spring-cloud-alibaba-dependencies</artifactId>
                <version>2.1.0.RELEASE</version>
                <type>pom</type>
                <scope>import</scope>
            </dependency>
        <!-- SpringBoot整合Web组件 -->
        <dependency>
            <groupId>org.springframework.boot</groupId>
            <artifactId>spring-boot-starter-web</artifactId>
        </dependency>
        <dependency>
            <groupId>org.springframework.boot</groupId>
            <artifactId>spring-boot-starter-actuator</artifactId>
        </dependency>
        <!--日常通用jar包配置-->
        <dependency>
            <groupId>org.springframework.boot</groupId>
            <artifactId>spring-boot-devtools</artifactId>
            <scope>runtime</scope>
            <optional>true</optional>
        </dependency>
        <dependency>
            <groupId>org.projectlombok</groupId>
            <artifactId>lombok</artifactId>
            <optional>true</optional>
        </dependency>
        <dependency>
            <groupId>org.springframework.boot</groupId>
            <artifactId>spring-boot-starter-test</artifactId>
            <scope>test</scope>
        </dependency>
    </dependencies>


</project>
IDEA中spring-cloud-starter-alibaba-nacos-discovery 无法引入问题参考
application.yml
注意:cloudalibaba-provider-payment02中prot需要修改为9999
server:
  port: 9998

spring:
  application:
    name: nacos-payment-provider
  cloud:
    nacos:
      discovery:
        server-addr: localhost:8848 #配置Nacos地址

# springboot actuator 监控
management:
  endpoints:
    web:
      exposure:
        include: '*'
编写主启动类
package cn.zxj;

import org.springframework.boot.SpringApplication;
import org.springframework.boot.autoconfigure.SpringBootApplication;
import org.springframework.cloud.client.discovery.EnableDiscoveryClient;

@SpringBootApplication
@EnableDiscoveryClient //服务注册与发现
public class PaymentMain {
    public static void main(String[] args) {
        SpringApplication.run(PaymentMain.class,args);
    }
}
编写业务类
package cn.zxj.com;

import org.springframework.beans.factory.annotation.Value;
import org.springframework.web.bind.annotation.GetMapping;
import org.springframework.web.bind.annotation.PathVariable;
import org.springframework.web.bind.annotation.RestController;

@RestController
public class PaymentController {

    @Value("${server.port}")
    private String serverPort;

    @GetMapping("/payment/nacos/{id}")
    public String getPayment(@PathVariable("id") Integer id){

        return "nacos registry,serverPort:"+serverPort+"\t"+id;
    }

}
2.2.2、新建服务消费者模块
cloudalibaba-consumer-nacos-01(聚合工程模块)
pom.xml(这里消费者远程调用提供者运用OpenFegin进行远程调用,所以引入了OpenFegin的依赖)
<?xml version="1.0" encoding="UTF-8"?>
<project xmlns="http://maven.apache.org/POM/4.0.0"
         xmlns:xsi="http://www.w3.org/2001/XMLSchema-instance"
         xsi:schemaLocation="http://maven.apache.org/POM/4.0.0 http://maven.apache.org/xsd/maven-4.0.0.xsd">
    <modelVersion>4.0.0</modelVersion>

    <groupId>cn.zxj.com</groupId>
    <artifactId>cloudalibaba-consumer-nacos-01</artifactId>
    <version>1.0-SNAPSHOT</version>

    <!-- Spring Boot 启动父依赖 -->
    <parent>
        <groupId>org.springframework.boot</groupId>
        <artifactId>spring-boot-starter-parent</artifactId>
        <version>2.3.12.RELEASE</version>
    </parent>

    <dependencies>
        <!--openfeign-->
        <dependency>
            <groupId>org.springframework.cloud</groupId>
            <artifactId>spring-cloud-starter-openfeign</artifactId>
            <version>2.2.6.RELEASE</version>
        </dependency>
        <!--SpringCloud ailibaba nacos -->
        <dependency>
            <groupId>com.alibaba.cloud</groupId>
            <artifactId>spring-cloud-starter-alibaba-nacos-discovery</artifactId>
            <version>2.2.6.RELEASE</version>
        </dependency>
        <!--SpringBoot整合Spring Cloud-->
        <dependency>
            <groupId>org.springframework.cloud</groupId>
            <artifactId>spring-cloud-dependencies</artifactId>
            <version>Greenwich.SR1</version>
            <type>pom</type>
            <scope>import</scope>
        </dependency>
        <!--SpringBoot整合Spring Cloud Alibaba-->
        <dependency>
            <groupId>com.alibaba.cloud</groupId>
            <artifactId>spring-cloud-alibaba-dependencies</artifactId>
            <version>2.1.0.RELEASE</version>
            <type>pom</type>
            <scope>import</scope>
        </dependency>
        <!-- SpringBoot整合Web组件 -->
        <dependency>
            <groupId>org.springframework.boot</groupId>
            <artifactId>spring-boot-starter-web</artifactId>
        </dependency>
        <dependency>
            <groupId>org.springframework.boot</groupId>
            <artifactId>spring-boot-starter-actuator</artifactId>
        </dependency>
        <!--日常通用jar包配置-->
        <dependency>
            <groupId>org.springframework.boot</groupId>
            <artifactId>spring-boot-devtools</artifactId>
            <scope>runtime</scope>
            <optional>true</optional>
        </dependency>
        <dependency>
            <groupId>org.projectlombok</groupId>
            <artifactId>lombok</artifactId>
            <optional>true</optional>
        </dependency>
        <dependency>
            <groupId>org.springframework.boot</groupId>
            <artifactId>spring-boot-starter-test</artifactId>
            <scope>test</scope>
        </dependency>
    </dependencies>


</project>
application.yml
server:
  port: 83


spring:
  application:
    name: nacos-order-consumer
  cloud:
    nacos:
      discovery:
        server-addr: localhost:8848
创建启动类
package cn.zxj;

import org.springframework.boot.SpringApplication;
import org.springframework.boot.autoconfigure.SpringBootApplication;
import org.springframework.cloud.client.discovery.EnableDiscoveryClient;
import org.springframework.cloud.openfeign.EnableFeignClients;

@SpringBootApplication
@EnableDiscoveryClient
@EnableFeignClients
public class OrderNacosMain {
    public static void main(String[] args) {
        SpringApplication.run(OrderNacosMain.class,args);
    }
}
编写远程调用接口
package cn.zxj.com;

import org.springframework.cloud.openfeign.FeignClient;
import org.springframework.stereotype.Component;
import org.springframework.web.bind.annotation.GetMapping;
import org.springframework.web.bind.annotation.PathVariable;

@Component
@FeignClient(value = "nacos-payment-provider")
public interface PaymentOpenService {

    @GetMapping("/payment/nacos/{id}")
    public String getPayment(@PathVariable("id") Integer id);
}
编写业务类
package cn.zxj.com;

import org.springframework.beans.factory.annotation.Autowired;
import org.springframework.web.bind.annotation.GetMapping;
import org.springframework.web.bind.annotation.PathVariable;
import org.springframework.web.bind.annotation.RestController;

@RestController
public class PayMentController {
    @Autowired
    private PaymentOpenService paymentOpenService;

    @GetMapping("/consumer/payment/nacos/{id}")
    public String getPayment(@PathVariable("id") Integer id){
        return paymentOpenService.getPayment(id);
    }
}
2.2.3、测试
启动nacos服务
启动两个提供者和消费者
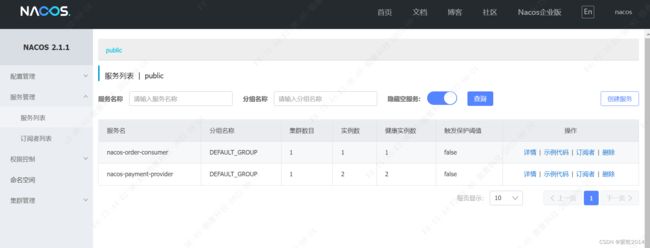
查看都已注册进nacos

发现调用成功,因为openfegin默认支持ribbon,所以发现进行了轮询


2.3、配置中心
2.3.1、nacos配置中心演示
新建cloudalibaba-config-nacos-client01模块
pom.xml
<?xml version="1.0" encoding="UTF-8"?>
<project xmlns="http://maven.apache.org/POM/4.0.0"
         xmlns:xsi="http://www.w3.org/2001/XMLSchema-instance"
         xsi:schemaLocation="http://maven.apache.org/POM/4.0.0 http://maven.apache.org/xsd/maven-4.0.0.xsd">
    <modelVersion>4.0.0</modelVersion>

    <groupId>cn.zxj.com</groupId>
    <artifactId>cloudalibaba-config-nacos-client01</artifactId>
    <version>1.0-SNAPSHOT</version>


    <!-- Spring Boot 启动父依赖 -->
    <parent>
        <groupId>org.springframework.boot</groupId>
        <artifactId>spring-boot-starter-parent</artifactId>
        <version>2.3.12.RELEASE</version>
    </parent>

    <dependencies>
        <!--openfeign-->
        <dependency>
            <groupId>org.springframework.cloud</groupId>
            <artifactId>spring-cloud-starter-openfeign</artifactId>
            <version>2.2.6.RELEASE</version>
        </dependency>
        <!--nacos-config-->
        <dependency>
            <groupId>com.alibaba.cloud</groupId>
            <artifactId>spring-cloud-starter-alibaba-nacos-config</artifactId>
            <version>2.2.6.RELEASE</version>
        </dependency>
        <!--SpringCloud ailibaba nacos -->
        <dependency>
            <groupId>com.alibaba.cloud</groupId>
            <artifactId>spring-cloud-starter-alibaba-nacos-discovery</artifactId>
            <version>2.2.6.RELEASE</version>
        </dependency>
        <!--SpringBoot整合Spring Cloud-->
        <dependency>
            <groupId>org.springframework.cloud</groupId>
            <artifactId>spring-cloud-dependencies</artifactId>
            <version>Greenwich.SR1</version>
            <type>pom</type>
            <scope>import</scope>
        </dependency>
        <!--SpringBoot整合Spring Cloud Alibaba-->
        <dependency>
            <groupId>com.alibaba.cloud</groupId>
            <artifactId>spring-cloud-alibaba-dependencies</artifactId>
            <version>2.1.0.RELEASE</version>
            <type>pom</type>
            <scope>import</scope>
        </dependency>
        <!-- SpringBoot整合Web组件 -->
        <dependency>
            <groupId>org.springframework.boot</groupId>
            <artifactId>spring-boot-starter-web</artifactId>
        </dependency>
        <dependency>
            <groupId>org.springframework.boot</groupId>
            <artifactId>spring-boot-starter-actuator</artifactId>
        </dependency>
        <!--日常通用jar包配置-->
        <dependency>
            <groupId>org.springframework.boot</groupId>
            <artifactId>spring-boot-devtools</artifactId>
            <scope>runtime</scope>
            <optional>true</optional>
        </dependency>
        <dependency>
            <groupId>org.projectlombok</groupId>
            <artifactId>lombok</artifactId>
            <optional>true</optional>
        </dependency>
        <dependency>
            <groupId>org.springframework.boot</groupId>
            <artifactId>spring-boot-starter-test</artifactId>
            <scope>test</scope>
        </dependency>
    </dependencies>


</project>
application.yml
spring:
  profiles:
#    active: info
#    active: test
    active: dev
bootstrap.yml
# nacos配置
server:
  port: 3377

spring:
  application:
    name: nacos-config-client
  cloud:
    nacos:
      discovery:
        server-addr: localhost:8848 #Nacos服务注册中心地址
      config:
        server-addr: localhost:8848 #Nacos作为配置中心地址
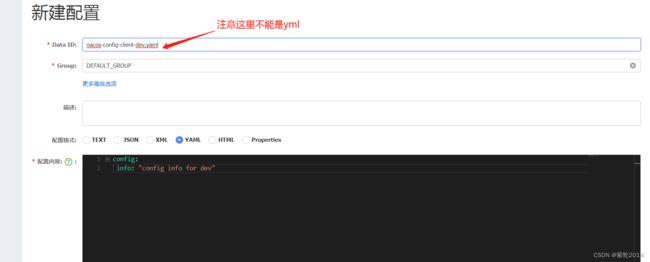
        file-extension: yaml #指定yaml格式的配置  #如果是yaml的要指定yaml nacos没有yml
#        group: DEV_GROUP
#        namespace: 0ecdf74a-a934-4272-b6c0-acac8734c46d
#        group: TEST_GROUP


# ${spring.application.name}-${spring.profile.active}.${spring.cloud.nacos.config.file-extension}
主启动类
package cn.zxj;

import org.springframework.boot.SpringApplication;
import org.springframework.boot.autoconfigure.SpringBootApplication;
import org.springframework.cloud.client.discovery.EnableDiscoveryClient;

@EnableDiscoveryClient
@SpringBootApplication
public class NacosConfigClientMain
{
    public static void main(String[] args) {
        SpringApplication.run(NacosConfigClientMain.class, args);
    }
}
业务类
package cn.zxj.com;

import org.springframework.beans.factory.annotation.Value;
import org.springframework.cloud.context.config.annotation.RefreshScope;
import org.springframework.web.bind.annotation.GetMapping;
import org.springframework.web.bind.annotation.RestController;

@RestController
@RefreshScope //在控制器类加入@RefreshScope注解使当前类下的配置支持Nacos的动态刷新功能。
public class ConfigClientController
{
    @Value("${config.info}")
    private String configInfo;

    @GetMapping("/config/info")
    public String getConfigInfo() {
        return configInfo;
    }
}
配置新增

启动工程测试

修改配置文件内容试试


发现 成功!!!
2.3.2、nacos配置说明
why配置两个?
配置两个配置文件 application.yml 和 bootstrap.yml。
Nacos同springcloud-config一样,在项目初始化时,要保证先从配置中心进行配置拉取,拉取配置之后,才能保证项目的正常启动。
springboot中配置文件的加载是存在优先级顺序的,bootstrap优先级高于application。
Nacos中的dataid的组成格式及与SpringBoot配置文件中的匹配规则
官网参考

三、Sentinel
3.1、Sentinel介绍
参考官网
随着微服务的流行,服务和服务之间的稳定性变得越来越重要。Sentinel以流量为切入点,从流量控制、流量路由、熔断降级、系统自适应过载保护、热点流量防护等多个维度保护服务的稳定性。
Sentinel 具有以下特征:
- 丰富的应用场景:Sentinel 承接了阿里巴巴近10年的双十一大促流量的核心场景,例如秒杀(即突发流量控制在系统容量可以承受的范围)、消息削峰填谷、集群流量控制、实时熔断下游不可用应用等。
- 完备的实时监控:Sentinel 同时提供实时的监控功能。您可以在控制台中看到接入应用的单台机器秒级数据,甚至500台以下规模的集群的汇总运行情况。
- 广泛的开源生态:Sentinel 提供开箱即用的与其它开源框架/库的整合模块,例如与 Spring Cloud、Apache Dubbo、gRPC、Quarkus 的整合。您只需要引入相应的依赖并进行简单的配置即可快速地接入 Sentinel。同时 Sentinel 提供 Java/Go/C++ 等多语言的原生实现。
- 完善的 SPI 扩展机制:Sentinel 提供简单易用、完善的 SPI 扩展接口。您可以通过实现扩展接口来快速地定制逻辑。例如定制规则管理、适配动态数据源等。
3.2、Sentinel使用
3.2.1、控制台使用
下载 Sentinel 控制台
启动控制台:
使用java-jar 的指令启动sentinel dashboard,sentinel其实是一个Spring boot项目。官方启动指令如下:
java -Dserver.port=8080 -Dcsp.sentinel.dashboard.server=localhost:8080 -Dproject.name=sentinel-dashboard -jar sentinel-dashboard-1.8.5.jar
//换成自己的sentinel-dashboard的包名
其中 -Dserver.port=8080 用于指定 Sentinel 控制台端口为 8080。这里的启动指令比较长,把dashboard自己也当成一个资源加入到了dashboard中来进行监控,如果不想把dashboard自己加入控制台监控可以使用简单启动指令如下:
java -Dserver.port=8088 -jar sentinel-dashboard-1.8.5.jar
启动之后,浏览器访问8088能够看到sentinel登录界面,说明启动成功(sentinel1.6版本之后新增了登录功能),默认用户名密码均为 sentinel,登录后界面如下:

3.2.2、使用sentinel(客户端)
pom.xml
<?xml version="1.0" encoding="UTF-8"?>
<project xmlns="http://maven.apache.org/POM/4.0.0"
         xmlns:xsi="http://www.w3.org/2001/XMLSchema-instance"
         xsi:schemaLocation="http://maven.apache.org/POM/4.0.0 http://maven.apache.org/xsd/maven-4.0.0.xsd">
    <modelVersion>4.0.0</modelVersion>

    <groupId>cn.zxj.com</groupId>
    <artifactId>sentinel-client01</artifactId>
    <version>1.0-SNAPSHOT</version>

    <!-- Spring Boot 启动父依赖 -->
    <parent>
        <groupId>org.springframework.boot</groupId>
        <artifactId>spring-boot-starter-parent</artifactId>
        <version>2.3.12.RELEASE</version>
    </parent>

    <dependencies>
        <!-- https://mvnrepository.com/artifact/org.springframework.cloud/spring-cloud-starter-alibaba-sentinel -->
        <dependency>
            <groupId>org.springframework.cloud</groupId>
            <artifactId>spring-cloud-starter-alibaba-sentinel</artifactId>
            <version>0.9.0.RELEASE</version>
        </dependency>
        <!--openfeign-->
        <dependency>
            <groupId>org.springframework.cloud</groupId>
            <artifactId>spring-cloud-starter-openfeign</artifactId>
            <version>2.2.6.RELEASE</version>
        </dependency>
        <!--SpringCloud ailibaba nacos -->
        <dependency>
            <groupId>com.alibaba.cloud</groupId>
            <artifactId>spring-cloud-starter-alibaba-nacos-discovery</artifactId>
            <version>2.2.6.RELEASE</version>
        </dependency>
        <!--SpringBoot整合Spring Cloud-->
        <dependency>
            <groupId>org.springframework.cloud</groupId>
            <artifactId>spring-cloud-dependencies</artifactId>
            <version>Greenwich.SR1</version>
            <type>pom</type>
            <scope>import</scope>
        </dependency>
        <!--SpringBoot整合Spring Cloud Alibaba-->
        <dependency>
            <groupId>com.alibaba.cloud</groupId>
            <artifactId>spring-cloud-alibaba-dependencies</artifactId>
            <version>2.1.0.RELEASE</version>
            <type>pom</type>
            <scope>import</scope>
        </dependency>
        <!-- SpringBoot整合Web组件 -->
        <dependency>
            <groupId>org.springframework.boot</groupId>
            <artifactId>spring-boot-starter-web</artifactId>
        </dependency>
        <dependency>
            <groupId>org.springframework.boot</groupId>
            <artifactId>spring-boot-starter-actuator</artifactId>
        </dependency>
        <!--日常通用jar包配置-->
        <dependency>
            <groupId>org.springframework.boot</groupId>
            <artifactId>spring-boot-devtools</artifactId>
            <scope>runtime</scope>
            <optional>true</optional>
        </dependency>
        <dependency>
            <groupId>org.projectlombok</groupId>
            <artifactId>lombok</artifactId>
            <optional>true</optional>
        </dependency>
        <dependency>
            <groupId>org.springframework.boot</groupId>
            <artifactId>spring-boot-starter-test</artifactId>
            <scope>test</scope>
        </dependency>
    </dependencies>


</project>
application.yml
spring:
  profiles:
#    active: info
#    active: test
    active: dev
bootstrap.yml
# nacos配置
server:
  port: 8891

spring:
  application:
    name: sentinel-client
  cloud:
    nacos:
      discovery:
        server-addr: localhost:8848 #Nacos服务注册中心地址
    #向sentinel控制台注册服务
    sentinel:
      transport:
        dashboard: localhost:8088
      #取消控制台懒加载
      eager: true
主启动类
package cn.zxj;

import org.springframework.boot.SpringApplication;
import org.springframework.boot.autoconfigure.SpringBootApplication;
import org.springframework.cloud.client.discovery.EnableDiscoveryClient;

@EnableDiscoveryClient
@SpringBootApplication
public class SentinelClientMain {
    public static void main(String[] args) {
        SpringApplication.run(SentinelClientMain.class, args);
    }
}
业务类
package cn.zxj.com;

import org.springframework.web.bind.annotation.GetMapping;
import org.springframework.web.bind.annotation.RestController;

@RestController
public class UserController {
    @GetMapping("/user")
    public String getUser() {
        return "xiaohuozi";
    }
}
启动项目,然后多访问几次接口

查看sentinel控制台

新增流控规则测试


流控规则添加之后,可做大量访问刷新接口测试,会在规定阈值内只执行一次,后面的会执行快速失败的操作。

四、openFeign
基本介绍
使用可参考 2.2.2、新建服务消费者模块中的openFeign使用
五、Ribbon
六、seata
七、gateway
https://blog.csdn.net/a745233700/article/details/122917167
