STM32F4_按键输入实验
目录
1. 硬件分析:
2. 软件分析:
2.1 扫描IO口
2.2 书写步骤
2.3 程序_按键输入
2.3.1 位段的用处
2.3.2 按键扫描式_程序
2.3.3 51学习的判断是否松开按键的程序(参考)
1. 硬件分析:
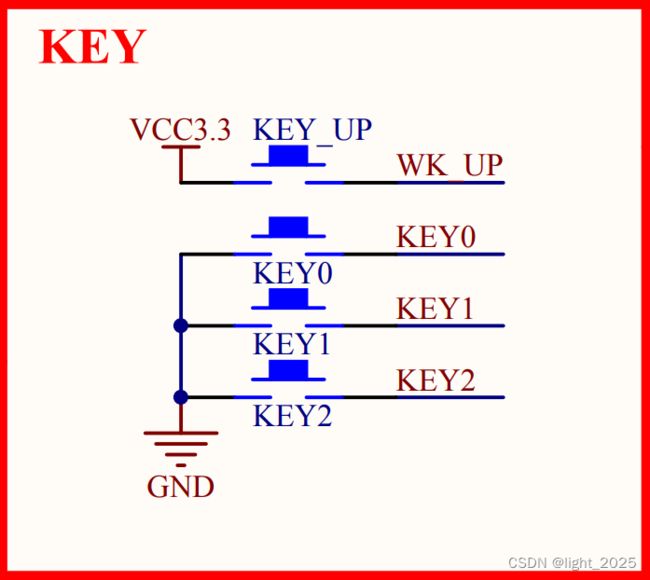
STM32F4xx系列按键 KEY0接MCU微控制器 PE4 引脚,KEY1接MCU微控制器 PE3 引脚,KEY2接MCU微控制器 PE2 引脚,KEY_UP接 PA0 引脚;
因为KEY_UP左侧接VCC3.3V,所以KEY_UP按下,IO口检测到高电平;KEY0/KEY1/KEY2左侧接GND,所以KEY0/KEY1/KEY2按下,IO口检测到低电平;KEY0->PE4,上拉输入;KEY1->PE3,上拉输入;KEY2->PE2,上拉输入;(因为 KEY0/KEY1/KEY2 按键不按下时,按键处当做断路来处理,所以对应的微控制器引脚需要上拉输入,此时GPIO引脚电平呈现高阻态,按键一旦按下,GPIO口检测到低电平;如果GPIO口不设置为上拉,按键按键,直接短路)WK_UP->PA0,下拉输入( PA0引脚 GPIO 口设置时设置为下拉输入,KEY_UP处相当于断路,KEY_UP按下,相应的 GPIO 口检测到高电平;否则会造成短路);
上拉输入的好处就是输入的电平不会上下浮动而导致输入信号不稳定,在没有信号输入的情况下可以稳定在高电平。下拉输入的好处就是输入的电平不会上下浮动而导致输入信号不稳定,在没有信号输入的情况下可以稳定在低电平。
2. 软件分析:
2.1 扫描IO口
读取IO口输入电平函数:1. 调用库函数 2. 使用输入电平操作寄存器 3. 使用位带操作
uint8_t GPIO_ReadInputDataBit(GPIO_TypeDef* GPIOx,uint16_t GPIO_Pin);参数(指定哪一种IO,指定哪一个IO);作用:读取某个GPIO输入电平;
ag. GPIO_ReadInputDataBit(GPIOA,GPIO_Pin_5)读取GPIOA5的输入电平;
uint16_t GPIO_ReadInputData(GPIO_TypeDef* GPIOx);作用:读取某组GPIO输入电平;ag. GPIO_ReadInputData(GPIOA)读取GPIOA组的所有输入电平;
实际上操作的都是GPIOx_IDR输入寄存器;
使用位带操作读取IO口输入电平方法:PEin(4)----读取GPIOE.4口电平 PEin(n)----读取 GPIOE.n 口电平;
2.2 书写步骤
1. 使能按键对应IO口时钟。调用函数:RCC_AHB1PeriphClockCmd();
2. 初始化IO模式:上拉/下拉输入。调用函数:GPIO_Init();
3. 扫描IO口电平(库函数/寄存器/位操作);
2.3 程序_按键输入
在介绍程序之前,先复习一下C语言的static关键字:
int getValue(void)
{
	int flag = 0;
	flag++;
	return flag;
}
int getValue(void)
{
	static int flag = 0;
	flag++;
	return flag;
}
程序1:每次调用 getValue 时, return 的值都是 1;每使用一次,函数都会将 flag 初始化为 0;
程序2: static 的作用是保留上一次 flag 的值,并且后续调用 getValue 时,跳过 static int flag=0 的代码;
2.3.1 位段的用处
位段的宏定义是按照51编程方式编写代码的,更易于理解;两个是等价的;
#define KEY0 GPIO_ReadInputDataBit(GPIOE,GPIO_Pin_4)
#define KEY1 GPIO_ReadInputDataBit(GPIOE,GPIO_Pin_3)
#define KEY2 GPIO_ReadInputDataBit(GPIOE,GPIO_Pin_2)
#define WK_UP GPIO_ReadInputDataBit(GPIOA,GPIO_Pin_0)


#define KEY0 PEin(4)
#define KEY1 PEin(3)
#define KEY2 PEin(2)
#define WK_UP PAin(0)
2.3.2 按键扫描式_程序
在此章节之后,将采用模块化编程:
main.c
#include "stm32f4xx.h"
#include "delay.h"
#include "LED.h"
#include "BEEP.h"
#include "Key.h"

int main(void)
{
	unsigned char Key;
	LED_Init();
	BEEP_Init();
	delay_init(168);
	Key_Init();
	LED0=0; //初始化LED不亮
	while(1)
	{
		Key=KEY_Scan(0);
		if(Key)
		{
			switch(Key)
			{
				case KEY_UP_PRESS:
					BEEP=!BEEP;
					break;
				case KEY0_PRESS:
					LED0=!LED0;
					break;
				case KEY1_PRESS:
					LED1=!LED1;
					break;
				case KEY2_PRESS:
					LED0=!LED0;
					LED1=!LED1;
					break;
			}
	}
		else
		{
			delay_ms(10);
		}
  }
}
Key.c
#include "stm32f4xx.h"
#include "Key.h"
#include "delay.h"


void Key_Init(void)
{
	GPIO_InitTypeDef GPIO_InitStructure;
	RCC_AHB1PeriphClockCmd(RCC_AHB1Periph_GPIOE|RCC_AHB1Periph_GPIOA,ENABLE);  //使能对应时钟
	GPIO_InitStructure.GPIO_Pin=GPIO_Pin_2|GPIO_Pin_3|GPIO_Pin_4;   //设置GPIO引脚
	GPIO_InitStructure.GPIO_Mode=GPIO_Mode_IN;  //GPIO模式设置为按键输入
	GPIO_InitStructure.GPIO_Speed=GPIO_Speed_100MHz;
	GPIO_InitStructure.GPIO_PuPd=GPIO_PuPd_UP; //KEY0 KEY1 KEY2 设置为上拉输入
	GPIO_Init(GPIOE,&GPIO_InitStructure);

	GPIO_InitStructure.GPIO_PuPd=GPIO_PuPd_DOWN;  //KEY_UP设置为下拉
	GPIO_InitStructure.GPIO_Pin=GPIO_Pin_0;  //设置对应的引脚
	GPIO_Init(GPIOA,&GPIO_InitStructure);
}

//按键处理函数
//返回按键值
//mode:0不支持连按;1支持连续按
//0:没有按键按下
//1:key0按下
//2:key1按下
unsigned char KEY_Scan(unsigned char mode)   // KEY_Scan(0); 表示单按一次键
{
	static unsigned char Key_up=1;//没有按键按下   按键松开标志
	//static的功能:初始化Key_up=1,static表示将Key_up这个变量存储在静态工作区
	//也就是说我第一次调用KEY_Scan这个函数时,默认的Key_up=1,;切记是第一次
	//那么第二次再调用这个函数时的Key_up的值并不会初始化为1,而是根据第一次结束这个函数时的Key_up值进行赋值的;
	//也就是说如果我第一次使用KEY_Scan函数,函数程序执行完以后,Key_up是等于0的,那么下一次调用KEY_Scan函数时,Key_up等于0而不是等于1
	if(mode)
		Key_up=1; //Key_up=1表示按键松开标志
	if(Key_up&&(KEY0==0||KEY1==0||KEY2==0||KEY_UP==1))
	{
		delay_ms(10); //按键去抖
		Key_up=0;  //表示KEY0==0||KEY1==0||KEY2==0||KEY_UP==1 一定是有一个按键被按下了
		if(KEY0==0)
			return 1; //按键 0 按下
		else if(KEY1==0)
			return 2; //按键 1 按下
		else if(KEY2==0)
			return 3; //按键 2 按下
		else if(KEY_UP==1)
			return 4; //KEY_UP按键按下
	}
    // 一定要注意 离开这个if判断语句的时候Key_up是等于 0 的

	else if(KEY0==1&&KEY1==1&&KEY2==1&&KEY_UP==0) //四个按键哪个也没有按下
		Key_up=1; //Key_up表示的是按键松开标志
	return 0;
}
//按键扫描函数不是只运行一次的,我们要认为按键扫描函数是一直在运行的,一直不断的在扫描按键的情况,不断的在判断按键是按下还是松开;
//第一次使用KEY_Scan按键扫描函数时,Key_up一定是1,所以首先就会进入if(Key_up&&(KEY0==0||KEY1==0||KEY2==0||KEY_UP==1))判断语句,当第二次调用KEY_Scan函数时,因为有Static修饰Key_up,所以第二次会跳过该代码,Key_up是0,如果不支持连按,调用一次按键扫描函数就会退出;如果支持连按,mode设置为1,那么第二次调用该函数,Key_up就会被重新置为1;
//无限重复第一次调用该函数的场景,表示支持按键连按。
Key.h
#ifndef _KEY__H_
#define _KEY__H_
#include "sys.h"

#define KEY0 GPIO_ReadInputDataBit(GPIOE,GPIO_Pin_4) //宏定义
#define KEY1 GPIO_ReadInputDataBit(GPIOE,GPIO_Pin_3)
#define KEY2 GPIO_ReadInputDataBit(GPIOE,GPIO_Pin_2)
#define KEY_UP GPIO_ReadInputDataBit(GPIOA,GPIO_Pin_0)

#define KEY0_PRESS 1
#define KEY1_PRESS 2
#define KEY2_PRESS 3
#define KEY_UP_PRESS 4

void Key_Init(void);
unsigned char KEY_Scan(unsigned char mode);


#endif
LED.c
#include "stm32f4xx.h"
#include "LED.h"

void LED_Init(void)
{
	GPIO_InitTypeDef GPIO_InitStructure;
	RCC_AHB1PeriphClockCmd(RCC_AHB1Periph_GPIOF,ENABLE);
	GPIO_InitStructure.GPIO_Pin=GPIO_Pin_9|GPIO_Pin_10;
	GPIO_InitStructure.GPIO_Mode=GPIO_Mode_OUT;
	GPIO_InitStructure.GPIO_OType=GPIO_OType_PP;
	GPIO_InitStructure.GPIO_Speed=GPIO_Speed_100MHz;
	GPIO_InitStructure.GPIO_PuPd=GPIO_PuPd_UP;
	GPIO_SetBits(GPIOF,GPIO_Pin_9|GPIO_Pin_10);
	GPIO_Init(GPIOF,&GPIO_InitStructure);
}
LED.h
#ifndef _LED__H_
#define _LED__H_
#include "sys.h"

#define LED0 PFout(9)
#define LED1 PFout(10)

void LED_Init(void);

#endif
BEEP.c
#include "stm32f4xx.h"
#include "BEEP.h"

void BEEP_Init(void)
{
	GPIO_InitTypeDef GPIO_InitStructure;
	GPIO_InitStructure.GPIO_Pin=GPIO_Pin_8;
	GPIO_InitStructure.GPIO_Mode=GPIO_Mode_OUT;
	GPIO_InitStructure.GPIO_OType=GPIO_OType_PP;
	GPIO_InitStructure.GPIO_Speed=GPIO_Speed_100MHz;
	GPIO_InitStructure.GPIO_PuPd=GPIO_PuPd_DOWN;
	RCC_AHB1PeriphClockCmd(RCC_AHB1Periph_GPIOF,ENABLE);
	GPIO_ResetBits(GPIOF,GPIO_Pin_8);
	GPIO_Init(GPIOF,&GPIO_InitStructure);
}
BEEP.h
#ifndef _BEEP__H_
#define _BEEP__H_
#include "sys.h"


#define BEEP PFout(8)

void BEEP_Init(void);

#endif
2.3.3 51学习的判断是否松开按键的程序(参考)
注:此程序是根据51学习按键程序所写的,尚存在一些问题(KEY1和KEY2现象不明显,其他均和2.3.2的程序现象相同),如有明白问题所在的,欢迎评论。
main.c
#include "stm32f4xx.h"
#include "delay.h"
#include "LED.h"
#include "BEEP.h"
#include "Key.h"

int main()
{
	unsigned char Key=0;
	LED_Init();
	BEEP_Init();
	delay_init(168);
	Key_Init();
	LED0=0;
	while(1)
	{
		Key=KeyNum();
		switch(Key)
		{
			case 4:
				BEEP=!BEEP;
				break;
			case 1:
				LED0=!LED0;
				break;
			case 2:
				LED1=!LED1;
				break;
			case 3:
				LED0=!LED0;
				LED1=!LED1;
				break;
		}
}
}
Key.c
#include "stm32f4xx.h"                  // Device header
#include "Key.h"
#include "delay.h"


void Key_Init(void)
{
	GPIO_InitTypeDef GPIO_InitStructure;
	RCC_AHB1PeriphClockCmd(RCC_AHB1Periph_GPIOE|RCC_AHB1Periph_GPIOA,ENABLE);
	GPIO_InitStructure.GPIO_Pin=GPIO_Pin_2|GPIO_Pin_3|GPIO_Pin_4;
	GPIO_InitStructure.GPIO_Mode=GPIO_Mode_IN;
	GPIO_InitStructure.GPIO_Speed=GPIO_Speed_100MHz;
	GPIO_InitStructure.GPIO_PuPd=GPIO_PuPd_UP;
	GPIO_Init(GPIOE,&GPIO_InitStructure);

	GPIO_InitStructure.GPIO_PuPd=GPIO_PuPd_DOWN;
	GPIO_InitStructure.GPIO_Pin=GPIO_Pin_0;
	GPIO_Init(GPIOA,&GPIO_InitStructure);
}

//unsigned char KEY_Scan(unsigned char mode)
//{
//	static unsigned char Key_up=1;
//	if(mode)Key_up=1;
//	if(Key_up&&(KEY0==0||KEY1==0||KEY2==0||KEY_UP==1))
//	{
//		delay_ms(10);
//		Key_up=0;
//		if(KEY0==0)return 1;
//		else if(KEY1==0)return 2;
//		else if(KEY2==0)return 3;
//		else if(KEY_UP==1)return 4;
//	}
//	else if(KEY0==1&&KEY1==1&&KEY2==1&&KEY_UP==0)Key_up=1;
//		return 0;
//}

//以下代码是参照 51 开发板写的 32 按键扫描函数
unsigned char KeyNum()
{
	unsigned char KeyNum=0;
	if(KEY0==0){delay_ms(20);while(KEY0==0)delay_ms(20);KeyNum=1;}
	if(KEY1==0){delay_ms(20);while(KEY0==0)delay_ms(20);KeyNum=2;}
	if(KEY2==0){delay_ms(20);while(KEY0==0)delay_ms(20);KeyNum=3;}
	if(KEY_UP==1){delay_ms(20);while(KEY_UP==1)delay_ms(20);KeyNum=4;}

	return KeyNum;
	//这样写的思路是:
    //首先判断按键是否按下,如果按下,延迟20ms消抖,while条件判断,只要按下一直在按下,我就一直在while循环中等待,一旦跳出while循环,就表示按键松开了,延迟20ms;返回一个变量的值,供主函数判断是哪个按键按下了
}
Key.h
#ifndef _KEY__H_
#define _KEY__H_
#include "sys.h"

#define KEY0 GPIO_ReadInputDataBit(GPIOE,GPIO_Pin_4)
#define KEY1 GPIO_ReadInputDataBit(GPIOE,GPIO_Pin_3)
#define KEY2 GPIO_ReadInputDataBit(GPIOE,GPIO_Pin_2)
#define KEY_UP GPIO_ReadInputDataBit(GPIOA,GPIO_Pin_0)

#define KEY0_PRESS 1
#define KEY1_PRESS 2
#define KEY2_PRESS 3
#define KEY_UP_PRESS 4

void Key_Init(void);
//unsigned char KEY_Scan(unsigned char mode);

unsigned char KeyNum();

#endif
其他头文件见 2.3.2;
