SpringBoot——多文件配置
文章目录
-
-
- 一 、@PropertySource 和 @ImportResource
-
- 1、@PropertySource
- 2、@ImportResource
- 3、@Configuration
- 二 、Profile的使用
- 三 、配置文件的加载顺序
- 四 、配置位置优先级
-
SpringBoot: 2.2.1.RELEASE
IDE: IDEA
使用模块为WEB模块和测试模块
在软件开发中我们需要配置许多的配置文件,例如通过配置文件给某些对象初始化,比如利用 @ConfigurationProperties 给对象注入值,但是在默认的情况下我们的配置文件都是 classpath 路径下的 application.properties 我们不可能所有的信息都保存在这个文件里,于是我们就要有目的的读取我们的配置文件。
一 、@PropertySource 和 @ImportResource
1、@PropertySource
在我们使用**@ConfigurationProperties** 获取注入值时,springboot 默认是 classpath 路径下的 application.properties 文件,我们可以通过@PropertySource注解来切换注入文件的位置,举例:
@PropertySource(value = {"classpath:person.properties"})
@Component
@ConfigurationProperties(prefix = "person")
public class Person {
    private String name;
    private Integer age;
    private Boolean student;
    private Date birth;

    private Map<String,Object> maps;
    private List<Object> lists;

    private School school;
    // getter 、setter 和toString省略
}
我们在classpath 路径下创建person.properties文件
person.name=黎明
person.age=12
person.student=true
person.birth-date=2019/11/14
person.maps.k1=v1
person.maps.k2=v2
person.lists=list1,list2
person.school.name=曙光
person.school.start-date=2019/09/01
运行测试类
@SpringBootTest
class DemoApplicationTests {
    @Autowired
    Person person;

    @Test
    void contextLoads() {
        System.out.println(person);
    }
}
结果
Person{name='黎明', age=12, student=true, birthDate=Thu Nov 14 00:00:00 GMT+08:00 2019, maps={k1=v1, k2=v2}, lists=[list1, list2], school=School{name='曙光', startDate=Sun Sep 01 00:00:00 GMT+08:00 2019}}
但是我们改成yml文件时就不可以了
person:
  name: Li Ming
  age: 12
  student: true
  birth: 2019/11/14
  maps: {k1: v1,k2: v2}
  lists: [list1,list2]
  school:
    name: shuguang
    start-date: 2019/09/01
@PropertySource(value = {"classpath:person.yml"})
@Component
@ConfigurationProperties(prefix = "person")
public class Person {
    private String name;
    private Integer age;
    private Boolean student;
    private Date birth;

    private Map<String,Object> maps;
    private List<Object> lists;

    private School school;
    // getter 、setter 和toString省略
}
结果
Person{name='null', age=null, student=null, birthDate=null, maps=null, lists=null, school=null}
我们发现配置文件里的值是注入不进来的,所以,这个注解只对properties 文件好使
2、@ImportResource
在以前我们手动将bean添加到ioc容器中我们一般需要写一个类,再将整个类配置在bean文件中,下面我们试一下
我们创建一个类
public class HelloService {}
将这个类配置到bean文件里
<beans xmlns="http://www.springframework.org/schema/beans"
       xmlns:xsi="http://www.w3.org/2001/XMLSchema-instance"
       xsi:schemaLocation="http://www.springframework.org/schema/beans http://www.springframework.org/schema/beans/spring-beans.xsd">
    <bean id="helloService" class="com.demo.services.HelloService">bean>
beans>
我们创建测试方法,看看ioc容器中是否存在这个bean
//注入iOC容器
@Autowired
ApplicationContext ioc;
@Test
void contextLoads2() {
    //判断ioc容器是否存在helloService的bean
    System.out.println(ioc.containsBean("helloService"));
}
运行结果
false
我们发现并不能将这个bean添加到我们的容器中
下面我们通过添加@ImportResource来实现bean的添加
我们将这个注解添加在主方法上
@ImportResource(value = {"classpath:beans.xml"})
@SpringBootApplication
public class DemoApplication {

    public static void main(String[] args) {
        SpringApplication.run(DemoApplication.class, args);
    }

}
这样把beams.xml添加进行,就可以读到这个文件了
运行结果
true
我们可以知道这个bean添加到容器中了;
当然我们还有一个方法来实现这个功能;
3、@Configuration
首先我们需要创建一个配置类
/**
 * @Configuration 告诉springBoot这是一个配置类相等于bean.xml文件
 */
@Configuration
public class MyBeanConfig {
    /**
     * @Bean 这是告诉springBoot它的返回值就是一个bean,它的id就是这个函数名称
     * @return
     */
    @Bean
    HelloService helloService2(){
        return new HelloService();
    }
}
修改一下我们的测试方法
//注入iOC容器
    @Autowired
    ApplicationContext ioc;
    @Test
    void contextLoads2() {
        //判断ioc容器是否存在helloService的bean
        System.out.println("helloService是否存在:"+ ioc.containsBean("helloService"));
        System.out.println("helloService2是否存在:"+ ioc.containsBean("helloService2"));
    }
结果
helloService是否存在:false
helloService2是否存在:true
我们可以知道这种方式我们将 HelloService 添加到容器中了,它的id是函数名称。
二 、Profile的使用
在项目开发中我们会有许多的环境,在这些环境里我们一般会有不同的配置文件,如何控制使用不同的配置文件,我们一般通过profile的使用来控制
他的格式是由文件名称来表明的,文件名称一般是 application-[profile].yml/properties ,下面我们创建一个
application-dev.yml和一个application-prod.yml
application-dev.yml:
server:
  port: 8081
application-prod.yml:
server:
  port: 8082
我们测试第一个:
application.yml:
server:
  port: 8080
spring:
  profiles:
    active: dev
运行结果
The following profiles are active: dev
Tomcat initialized with port(s): 8081 (http)
测试第二个
application.yml:
server:
  port: 8080
spring:
  profiles:
    active: prod
运行结果:
The following profiles are active: prod
Tomcat initialized with port(s): 8082 (http)
从运行结果上看,我们知道这些文件的配置是生效的,application.yml的配置会被自己调用的配置文件覆盖掉,从生效端口就可以看出来
三 、配置文件的加载顺序
对于配置文件的使用是非常灵活的,用好配置文件对运维有莫大的好处,所以我们要知道文件的优先级,我们以application.yml文件为例,他的优先级从高到低如下面所示,高优先级会覆盖低优先级的配置项,为什么这么说,这里还有一个关键词就是互补配置,就是相同的配置项高优先级覆盖低优先级,不同的,无论高低都生效
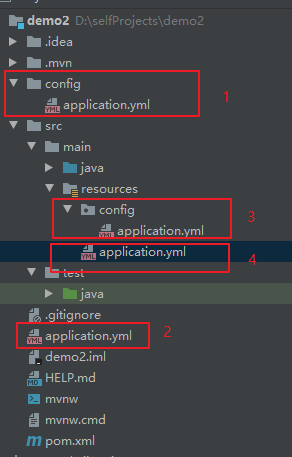
- file/config/配置文件
- file/配置文件
- classpath/config/配置文件
- classpath/配置文件
现在我们在这四个位置创建这四个配置文件
上面四个文件都是空的,下面一个一个配置
首先从低到高,先配置4号文件
server:
  port: 8081
运行结果
Tomcat initialized with port(s): 8081 (http)
配置3号文件
server:
  port: 8082
运行结果
Tomcat initialized with port(s): 8082 (http)
配置2号文件
server:
  port: 8083
运行结果
Tomcat initialized with port(s): 8083 (http)
配置1号文件
server:
  port: 8084
运行结果
Tomcat initialized with port(s): 8084 (http)
上面的运行结果可以了解到他们的顺序是生效的,下面我们了解一下什么是互补,
在现在的基础上我们修改优先级最低的4号文件,创建一个profile文件application-dev.yml
server:
  port: 8085
运行结果
The following profiles are active: dev
Tomcat initialized with port(s): 8085 (http)
从这里可以看出,4号文件的第二项配置生效了,同时启用了profile文件,从这里可以看出profile文件的优先级高于application文件;
四 、配置位置优先级
说完了同名文件加载位置的优先级,现在说一下不同位置,相同配置命令的优先级,
首先我们看一下开发模式下的命令优先级在我们现在已有的基础上继续配置
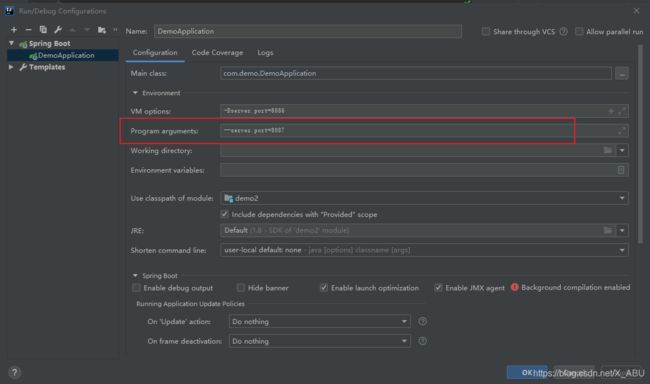
如下:在编辑器的运行配置里有两个配置VM options和Program arguments 这两个,首先我们用VM options来运行
命令:-Dserver.port=8086记住命令要加 D
运行结果
The following profiles are active: dev
Tomcat initialized with port(s): 8086 (http)
由上面可以知道profile文件的配置被它覆盖了;
下面再这个基础上再加配置,使用Program arguments
命令:--server.port=8087记住命令前是两个横杠
运行结果
The following profiles are active: dev
Tomcat initialized with port(s): 8087 (http)
我们可以看到VM options的配置被Program arguments 覆盖了,由这里我们大致可以总结开发环境下的配置,上述几种方法的优先级顺序,从从高到底:
- Program arguments
- VM options
- profile文件
- 全局配置文件application
上面介绍了开发环境的,下面介绍一下部署环境的配置,首先我们需要创建一个配置文件在随便一个目录下,不在项目文件就可以,我放在项目的根目录下;
server.port=8088
我们用命令行的方式运行
命令如下:
demo2\target>java -jar demo2-0.0.1-SNAPSHOT.jar --spring.config.location=D:/application.properties
运行结果
Tomcat initialized with port(s): 8088 (http)
我们发现可以直接调用外部文件
下面我们在用一个命令
demo2\target>java -jar demo2-0.0.1-SNAPSHOT.jar --server.port=8089
结果如下
Tomcat initialized with port(s): 8089 (http)
现在我们综合使用
demo2\target>java -jar demo2-0.0.1-SNAPSHOT.jar --spring.config.location=D:/application.properties --server.port=8089
结果如下
Tomcat initialized with port(s): 8089 (http)
由上面可得,命令行高于上面所有。
当然具体的要看官方文档 文档第四章有一节 Externalized Configuration 有具体介绍
- 当devtools处于活动状态时,$ HOME / .config / spring-boot文件夹中的Devtools全局设置属性。
- 测试上的@TestPropertySource批注。
- 测试中的properties属性。在@SpringBootTest和测试注释上可用,用于测试应用程序的特定部分。
- 命令行参数。
- 来自SPRING_APPLICATION_JSON的属性(嵌入在环境变量或系统属性中的嵌入式JSON)。
- ServletConfig的初始化参数。
- ServletContext的初始化参数。
- 来自Java:comp / env的JNDI属性。
- Java系统属性(System.getProperties())。
- 操作系统环境变量。
- 一个RandomValuePropertySource,仅具有random。*属性。
- 打包的jar之外的特定于配置文件的应用程序属性(application- {profile} .properties和YAML变体)。
- 打包在jar中的特定于配置文件的应用程序属性(application- {profile} .properties和YAML变体)。
- 打包的jar之外的应用程序属性(application.properties和YAML变体)。
- 打包在jar中的应用程序属性(application.properties和YAML变体)。
- @Configuration类上的@PropertySource批注。
- 默认属性(通过设置SpringApplication.setDefaultProperties指定)。
一般常用的就就这几种了。


