SpringBoot 结合RabbitMQ与Redis实现商品的并发下单【SpringBoot系列12】
SpringCloud 大型系列课程正在制作中,欢迎大家关注与提意见。
程序员每天的CV 与 板砖,也要知其所以然,本系列课程可以帮助初学者学习 SpringBooot 项目开发 与 SpringCloud 微服务系列项目开发
1 项目准备
- SpringBoot 整合 RabbitMQ 消息队列【SpringBoot系列11】本文章 基于这个项目来开发
本文章是系列文章 ,每节文章都有对应的代码,每节的源码都是在上一节的基础上配置而来,对应的视频讲解课程正在火速录制中。
订单系统,用户下单,即要保存即时性,也要保证流畅性,同时还要防止超卖,本文章是基于 RabbitMQ 消息队列 + Redis 实现的下单,当然后续还会的秒杀系统设计 以及后续的微服务以及熔断控制等等
如这里 我的商品 库存有 10 个

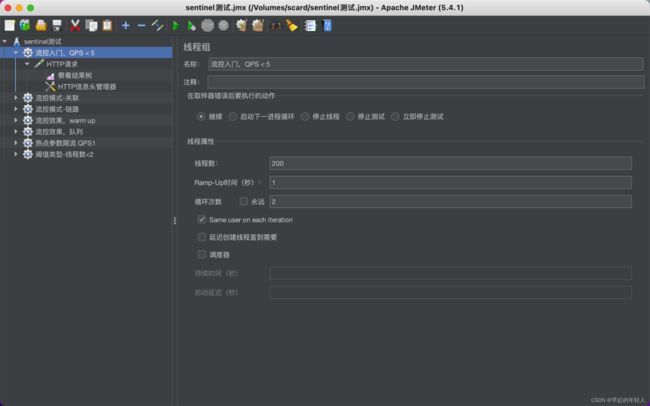
然后我使用 apache-jmeter-5.5 压测,200个用户1秒内请求完成,每个用户请求2次,也就是1秒有400次下单请求

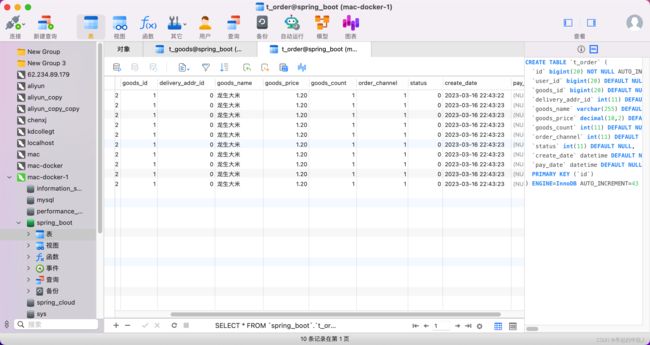
测试完成后,商品库存为0,然后订单生成10个,完美解决并发问题

这是实现的普通订单,基本实现逻辑是
1、redis 校验库存,预下单
2、消息队列减库存 生成 订单 (数据库、redis、es)
3、用户查询到订单成功,发起支付
4、支付回调 修改订单数据 (数据库、redis 、es)
1 预下单接口
@Api(tags="订单模块")
@RestController()
@RequestMapping("/orders")
@Slf4j
public class OrderController {
    @Autowired
    private OrderService orderService;

    /**
     * 下单
     * @param goodsId 商品ID
     * @param userId
     * @return
     */
    @GetMapping("/create/{id}")
    public R createOrder(@PathVariable("id") Long goodsId,@RequestHeader Long userId) {
        return orderService.createPreOrder(goodsId,userId);
    }
}
    @Autowired
    private RedisTemplate redisTemplate;
    @Autowired
    private OrderMQSender mqSender;
    @Override
    public R createPreOrder(Long goodsId, Long userId) {
        log.info("预下单处理 userId:{} goodsId:{} ",userId,goodsId);

        //获取redis中的商品库存 先判断商品是否有库存
        Boolean aBoolean = redisTemplate.hasKey("goodStock:" + goodsId);
        if(Boolean.FALSE.equals(aBoolean)){
           return R.error("下单失败 商品库存不足");
        }
        //获取商品库存
        int goodsStock = Integer.valueOf(redisTemplate.opsForValue().get("goodStock:" +goodsId).toString());
        if(goodsStock==0){
            return R.error("下单失败 商品库存不足");
        }
        //发送下单消息
        SecKillMessage message = new SecKillMessage(userId, goodsId);
        mqSender.sendCommonOrderMessage(JsonUtils.toJson(message));
        return R.okData("预下单成功");
    }
redisTemplate 的 hasKey 可以直接判断key是否存在,在这里如果商品的key不存在,则商品无库存,redis 的商品库存是在服务启动后,自动同步进入的
@Service
@Slf4j
public class OrderServiceImpl implements OrderService , InitializingBean {

    @Autowired
    private RedisTemplate redisTemplate;

    @Autowired
    private GoodsService goodsService;

    /**
     * 初始化秒杀商品数量到 redis 中
     *
     * @return
     */
    @Override
    public R startSeckillInit() {
        List<SeckillGoods> goods = secKillGoodsService.findAllSecKillGoods();
        if (CollectionUtils.isEmpty(goods)) {
            return R.error("无秒杀商品");
        }

        goods.forEach(g -> {
            log.info("初始化秒杀商品 goodsId:{} stock: {}", g.getGoodsId(), g.getStockCount());
            redisTemplate.opsForValue().set("goodStock:" + g.getGoodsId(), g.getStockCount());
        });
        return R.ok("初始化完成");
    }

    @Override
    public void afterPropertiesSet() throws Exception {
        this.startSeckillInit();
    }
InitializingBean 当一个类实现这个接口之后,Spring启动后,初始化Bean时,若该Bean实现InitialzingBean接口,会自动调用afterPropertiesSet()方法,完成一些用户自定义的初始化操作。
2 消息队列的定义
在这里单独定义普通下单使用的队列与交换机
import org.springframework.amqp.core.Binding;
import org.springframework.amqp.core.BindingBuilder;
import org.springframework.amqp.core.Queue;
import org.springframework.amqp.core.TopicExchange;
import org.springframework.context.annotation.Bean;
import org.springframework.context.annotation.Configuration;

@Configuration
public class OrderRabbitMQTopicConfig {


    private static final String commonOrderQueue = "commonOrderQueue";
    private static final String commonExchange = "commonOrderExchange";

    @Bean
    public Queue commonOrderQueue() {
        return new Queue(commonOrderQueue);
    }
    @Bean
    public TopicExchange commonExchange() {
        return new TopicExchange(commonExchange);
    }
    @Bean
    public Binding commonOrderBinding() {
        return BindingBuilder.bind(commonOrderQueue()).to(commonExchange()).with("commonOrder.#");
    }
}
然后就是订单的发送者
@Service
@Slf4j
public class OrderMQSender {
    @Autowired
    private RabbitTemplate rabbitTemplate;
    /**
     * 普通订单走的队列
     * @param msg
     */
    public void sendCommonOrderMessage(String msg) {
        log.info("预下单发送消息:{}", msg);
        rabbitTemplate.convertAndSend("commonOrderExchange", "commonOrder.message", msg);
    }
}
然后定义普通订单的消息接收者
@Service
@Slf4j
public class OrderMQReceiver {

    @Autowired
    private OrderService orderService;

    @RabbitListener(queues = "commonOrderQueue")
    public void receiveCommonOrderMessage(String message) {
        log.info("接收的秒杀订单消息:{}", message);
        SecKillMessage secKillMessage = JsonUtils.toObj(message, SecKillMessage.class);
        Long userId = secKillMessage.getUserId();
        Long goodsId = secKillMessage.getGoodsId();
        //普通下单
        orderService.createOrder(goodsId, userId);
    }

}
普通下单里,就是减库存,生成订单的过程
    @Override
    @Transactional
    public R createOrder(Long goodsId, Long userId) {

        log.info("下单处理 userId:{} goodsId:{} ",userId,goodsId);
       //查询商品详情
        Goods goods = goodsService.findGoods(goodsId);
        //商品的实际库存
        if (goods.getGoodsStock() < 1) {
            // 设置该商品库存为空
            redisTemplate.opsForValue().set("goodStock:" + goods.getId(), "0");
            log.info("库存不足 下单失败");
            return R.error("商品库存不足");
        }
        //减库存
        int currentStock = goods.getGoodsStock() -1;
        //更新数据库 库存
        goods.setGoodsStock(currentStock);
        int update = goodsService.updateGoodsStock(goods);
        if(update<=0){
            log.info("更新库存失败 下单失败");
            return R.error("商品库存不足");
        }
        //更新redis 缓存
        redisTemplate.opsForValue().set("goodStock:" + goods.getId(), currentStock);
        // 下订单
        Order order = new Order();
        order.setUserId(userId);
        order.setGoodsId(goodsId);
        order.setDeliveryAddrId(0L);
        order.setGoodsName(goods.getGoodsName());
        order.setGoodsCount(1);
        order.setGoodsPrice(goods.getGoodsPrice());
        order.setOrderChannel(1);
        order.setStatus(0); // 订单创建中
        order.setCreateDate(new Date());
        orderMapper.insert(order);
        log.info("下单成功 userId:{} goodsId:{} orderId:{}",userId,goodsId,order.getId());
        //缓存普通订单
        redisTemplate.opsForValue().set("order:" +userId + ":" + goodsId, order);
        //保存数据到ES中
        //后续实现
        return R.okData(order);
    }
本文章是系列文章 ,每节文章都有对应的代码,每节的源码都是在上一节的基础上配置而来,对应的视频讲解课程正在火速录制中。
本文章只有核心代码,全部代码请查看对应源码
项目源码在这里 :https://gitee.com/android.long/spring-boot-study/tree/master/biglead-api-10-seckill
有兴趣可以关注一下公众号:biglead
- 创建SpringBoot基础项目
- SpringBoot项目集成mybatis
- SpringBoot 集成 Druid 数据源【SpringBoot系列3】
- SpringBoot MyBatis 实现分页查询数据【SpringBoot系列4】
- SpringBoot MyBatis-Plus 集成 【SpringBoot系列5】
- SpringBoot mybatis-plus-generator 代码生成器 【SpringBoot系列6】
- SpringBoot MyBatis-Plus 分页查询 【SpringBoot系列7】
- SpringBoot 集成Redis缓存 以及实现基本的数据缓存【SpringBoot系列8】
- SpringBoot 整合 Spring Security 实现安全认证【SpringBoot系列9】
- SpringBoot Security认证 Redis缓存用户信息【SpringBoot系列10】
- SpringBoot 整合 RabbitMQ 消息队列【SpringBoot系列11】