基于DPDK收包的suricata的安装和运行
操作系统版本:Ubuntu 20.04.5
suricata版本: suricata-7.0.0-rc1
suricata是一个基于规则的入侵检测和防御引擎,功能强大,但性能可能 差强人意,不过目前最新的7版本已经支持DPDK收包了,DPDK是Intel提供的高性能网络收发包开源库,可想而知,suricata支持DPDK收包会带来性能的极大提升。
下面我们来看一下,如何安装基于DPDK收发包的suricata:
1、安装依赖包:
sudo apt-get -y install autoconf automake libtool && sudo apt-get -y install pkg-config && sudo apt-get -y install zlib1g-dev && apt install -y libpcre2-dev && apt install -y libpcre3-dev && apt-get -y install libyaml-dev && apt install -y libjansson-dev && apt install -y libpcap-dev && apt-get -y install libmagic-dev && apt-get -y install liblz4-dev && apt-get -y install libcap-ng-dev && apt -y install rustc cargo && sudo apt-get install -y libnet-dev && cargo install --force cbindgen
2、安装DPDK开发库:
apt-get install dpdk-dev
如果dpdk下载的版本太低(suricata支持的DPDK最低版本为19.11),需要更新apt的源,即修改/etc/apt/sources.list文件。
当然也可以下载自己想安装的DPDK版本,然后按照安装步骤把DPDK先安装好。DPDK的安装步骤可以参照之前的文章:DPDK的源码编译安装
3、下载igb_uio驱动并编译驱动:
git clone git://dpdk.org/dpdk-kmods
cd dpdk-kmods/linux/igb_uio
make
成功编译后,可以看到生成了igb_uio.ko驱动文件,后面会加载这个文件。
4、如果想使用Hyperscan来进行模式匹配,还需要事先安装好Hyperscan:
Hyperscan的安装步骤可以参照之前的文章:Hyperscan的源码编译安装
5、从github上下载suricata源码
git clone https://github.com/OISF/suricata.git suricata-7.0.0-rc1
6、切换到7.0.0-rc1版本:
cd suricata-7.0.0-rc1
git checkout suricata-7.0.0-rc1
7、从github下载http解析库libhtp,并生成Makefile:
git clone https://github.com/OISF/libhtp
cd libhtp
./autogen.sh
./configure --enable-rust=yes --enable-gccmarch-native=no CPPFLAGS=-I/usr/include/ CFLAGS=-g
cd …
8、编译和安装suricata:
./autogen.sh
./configure --enable-rust=yes --enable-gccmarch-native=no --enable-dpdk=yes --enable-libmagic=yes CPPFLAGS=-I/usr/include/ CFLAGS=-g
make -j
make install
make install-conf
make install-full
9、下载suricata规则:
sudo apt install -y python3-pip python-yaml
sudo pip install --upgrade suricata-update
suricata-update
10、检查编译的suricata是否支持DPDK:
suricata --build-info

11、修改suricata DPDK收包网卡配置:
先用lshw -C network -businfo命令找到网卡的pcie地址,然后在/usr/local/etc/suricata/suricata.yaml文件中配置suricata DPDK收包,主要修改interface和copy-iface配置。

dpdk:
  eal-params:
    proc-type: primary

  # DPDK capture support
  # RX queues (and TX queues in IPS mode) are assigned to cores in 1:1 ratio
  interfaces:
    - interface: 0000:0b:00.0 # PCIe address of the NIC port
      # Threading: possible values are either "auto" or number of threads
      # - auto takes all cores
      # in IPS mode it is required to specify the number of cores and the numbers on both interfaces must match
      threads: 1
      promisc: true # promiscuous mode - capture all packets
      multicast: true # enables also detection on multicast packets
      checksum-checks: true # if Suricata should validate checksums
      checksum-checks-offload: false # if possible offload checksum validation to the NIC (saves Suricata resources)
      mtu: 1500 # Set MTU of the device in bytes
      # rss-hash-functions: 0x0 # advanced configuration option, use only if you use untested NIC card and experience RSS warnings,
      # For `rss-hash-functions` use hexadecimal 0x01ab format to specify RSS hash function flags - DumpRssFlags can help (you can see output if you use -vvv option during Suri startup)
      # setting auto to rss_hf sets the default RSS hash functions (based on IP addresses)

      # To approximately calculate required amount of space (in bytes) for interface's mempool: mempool-size * mtu
      # Make sure you have enough allocated hugepages.
      # The optimum size for the packet memory pool (in terms of memory usage) is power of two minus one: n = (2^q - 1)
      mempool-size: 65535 # The number of elements in the mbuf pool

      # Mempool cache size must be lower or equal to:
      #     - RTE_MEMPOOL_CACHE_MAX_SIZE (by default 512) and
      #     - "mempool-size / 1.5"
      # It is advised to choose cache_size to have "mempool-size modulo cache_size == 0".
      # If this is not the case, some elements will always stay in the pool and will never be used.
      # The cache can be disabled if the cache_size argument is set to 0, can be useful to avoid losing objects in cache
      # If the value is empty or set to "auto", Suricata will attempt to set cache size of the mempool to a value
      # that matches the previously mentioned recommendations
      mempool-cache-size: 257
      rx-descriptors: 1024
      tx-descriptors: 1024
      #
      # IPS mode for Suricata works in 3 modes - none, tap, ips
      # - none: IDS mode only - disables IPS functionality (does not further forward packets)
      # - tap: forwards all packets and generates alerts (omits DROP action) This is not DPDK TAP
      # - ips: the same as tap mode but it also drops packets that are flagged by rules to be dropped
      copy-mode: ips
      copy-iface: 0000:13:00.0 # or PCIe address of the second interface

    - interface: 0000:13:00.0
      threads: 1
      promisc: true
      multicast: true
      checksum-checks: true
      checksum-checks-offload: false
      mtu: 1500
      #rss-hash-functions: auto
      mempool-size: 65535
      mempool-cache-size: 257
      rx-descriptors: 1024
      tx-descriptors: 1024
      copy-mode: ips
      copy-iface: 0000:0b:00.0
12、配置DPDK大页内存:
在/etc/default/grub中添加GRUB_CMDLINE_LINUX=“net.ifnames=0 biosdevname=0 default_hugepagesz=2M hugepagesz=2M hugepages=2048”,也可以根据CPU的配置为1G大页。

重新生成grub配置文件: grub-mkconfig -o /boot/grub/grub.cfg
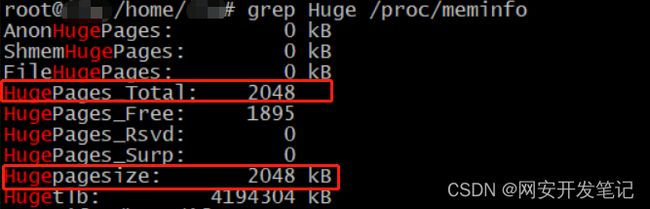
13、查看大页内存是否生效:
reboot重启系统后,使用grep Huge /proc/meminfo查看大页内存配置
14、加载igb_uio驱动,并绑定网卡使用igb_uio驱动:
modprobe uio
insmod dpdk-kmods/linux/igb_uio/igb_uio.ko
先使用dpdk-devbind.py -s查看网卡驱动绑定情况:

绑定两张网卡使用igb_uio驱动:
dpdk-devbind.py -b igb_uio 0000:0b:00.0
dpdk-devbind.py -b igb_uio 0000:13:00.0
15、运行suricata:
至此,DPDK和suricata的运行环境都已经配置好了,我们现在使用suricata --dpdk来启动suricata试试:
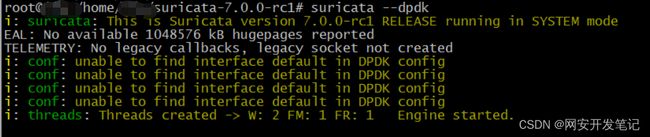
OK,大功告成,我们已经成功迈出了学习研究suricata的第一步。
如果想测试下DPDK收发包是否正常,可以让刚刚DPDK收包指定的两个网卡分别连上两台主机,并配置同网段的IP地址,看两台主机能否互相访问。