【Unity】2019 HDRP 7.3 CustomPass 高斯模糊
2021HDRP模糊效果Demo git参考:
GitHub - alelievr/HDRP-Custom-Passes: A bunch of custom passes made for HDRP
1、创建HDRP项目
2、创建CustomPass物体
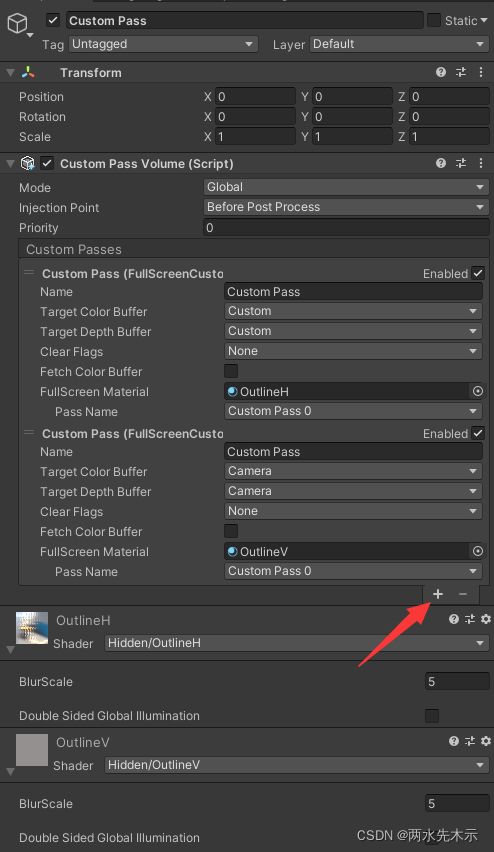
新增2个FullScreenCustomPass
创建一个OutlineH材质球和OutlineH着色器,将OutlineH着色器拖拽给OutlineH材质球,OutlineH着色器代码如下:
Shader "Hidden/OutlineH"
{
	Properties{
		_BlurScale("BlurScale", float) = 1
	}
	HLSLINCLUDE

		#pragma vertex Vert

		#pragma target 4.5
		#pragma only_renderers d3d11 playstation xboxone vulkan metal switch

		#include "Packages/com.unity.render-pipelines.high-definition/Runtime/RenderPipeline/RenderPass/CustomPass/CustomPassCommon.hlsl"

		float _BlurScale;

		float2 ClampUVs(float2 uv)
		{
			uv = clamp(uv, 0, _RTHandleScale.xy - _ScreenSize.zw * 2); // clamp UV to 1 pixel to avoid bleeding
			return uv;
		}

		float2 GetSampleUVs(Varyings varyings)
		{
			float depth = LoadCameraDepth(varyings.positionCS.xy);
			PositionInputs posInput = GetPositionInput(varyings.positionCS.xy, _ScreenSize.zw, depth, UNITY_MATRIX_I_VP, UNITY_MATRIX_V);
			return posInput.positionNDC.xy * _RTHandleScale.xy;
		}

		float4 FullScreenPass(Varyings varyings) : SV_Target
		{
			UNITY_SETUP_STEREO_EYE_INDEX_POST_VERTEX(varyings);

			float depth = LoadCameraDepth(varyings.positionCS.xy);
			PositionInputs posInput = GetPositionInput(varyings.positionCS.xy, _ScreenSize.zw, depth, UNITY_MATRIX_I_VP, UNITY_MATRIX_V);
			float4 color = float4(0.0, 0.0, 0.0, 0.0);

			// Load the camera color buffer at the mip 0 if we're not at the before rendering injection point
			if (_CustomPassInjectionPoint != CUSTOMPASSINJECTIONPOINT_BEFORE_RENDERING)
				color = float4(CustomPassSampleCameraColor(posInput.positionNDC.xy, 0), 1);

			//UV获取方式,varyings.positionCS.xy * _ScreenSize.zw为NDC坐标,_RTHandleScale.xy是对NDC坐标进行一个缩放获取uv
			//float2 uv = ClampUVs(varyings.positionCS.xy * _ScreenSize.zw * _RTHandleScale.xy);

			//横向模糊(需要起另一个CustomPass处理纵向模糊)
			float3 sumColor = 0;
			float weight[3] = { 0.4026, 0.2442, 0.0545 };

			sumColor = color.rgb * weight[0];
			for (int i = 1; i < 3; i++)
			{
				//注意因为采样坐标是用NDC坐标,故float2(_BlurScale * i, 0) * _ScreenSize.zw是获取一个NDC坐标系上的增量(偏移值) 进行对周围横向或纵向像素采样!
				sumColor += CustomPassSampleCameraColor(posInput.positionNDC.xy + float2(_BlurScale * i, 0) * _ScreenSize.zw, 0).rgb * weight[i];
				sumColor += CustomPassSampleCameraColor(posInput.positionNDC.xy + float2(_BlurScale * -i, 0) * _ScreenSize.zw, 0).rgb * weight[i];
			}

			return float4(sumColor, 1);
		}

	ENDHLSL

	SubShader
	{
		Pass
		{
			Name "Custom Pass 0"

			ZWrite On
			ZTest Always
			Blend SrcAlpha OneMinusSrcAlpha
			Cull Off

			HLSLPROGRAM
				#pragma fragment FullScreenPass
			ENDHLSL
		}
	}
	Fallback Off
}
这一个材质效果是进行一次横向模糊,将结果缓存在CustomPass的缓冲区,默认是Camera(即直接输出到屏幕 但它还是会做一次混合的 仔细看Shader就能发现 Blend SrcAlpha OneMinusSrcAlpha)
新建一个OutlineV材质球和着色器,着色器代码:
Shader "Hidden/OutlineV"
{
	Properties{
		_BlurScale("BlurScale", float) = 1
	}
	HLSLINCLUDE

		#pragma vertex Vert

		#pragma target 4.5
		#pragma only_renderers d3d11 playstation xboxone vulkan metal switch

		#include "Packages/com.unity.render-pipelines.high-definition/Runtime/RenderPipeline/RenderPass/CustomPass/CustomPassCommon.hlsl"

		float _BlurScale;

		float2 ClampUVs(float2 uv)
		{
			uv = clamp(uv, 0, _RTHandleScale.xy - _ScreenSize.zw * 2); // clamp UV to 1 pixel to avoid bleeding
			return uv;
		}

		float2 GetSampleUVs(Varyings varyings)
		{
			float depth = LoadCameraDepth(varyings.positionCS.xy);
			PositionInputs posInput = GetPositionInput(varyings.positionCS.xy, _ScreenSize.zw, depth, UNITY_MATRIX_I_VP, UNITY_MATRIX_V);
			return posInput.positionNDC.xy * _RTHandleScale.xy;
		}

		float4 FullScreenPass(Varyings varyings) : SV_Target
		{
			UNITY_SETUP_STEREO_EYE_INDEX_POST_VERTEX(varyings);

			float depth = LoadCameraDepth(varyings.positionCS.xy);
			PositionInputs posInput = GetPositionInput(varyings.positionCS.xy, _ScreenSize.zw, depth, UNITY_MATRIX_I_VP, UNITY_MATRIX_V);
			float4 color = float4(0.0, 0.0, 0.0, 0.0);


			//纵向从CustomPass(上一个横向模糊处理后的图片采样,即CustomColor缓冲区) 使用的是uv
// float4 SampleCustomColor(float2 uv);
// float4 LoadCustomColor(uint2 pixelCoords);

			//UV获取方式,varyings.positionCS.xy * _ScreenSize.zw为NDC坐标,_RTHandleScale.xy是对NDC坐标进行一个缩放获取uv
			float2 uv = ClampUVs(varyings.positionCS.xy * _ScreenSize.zw * _RTHandleScale.xy);

			// Load the camera color buffer at the mip 0 if we're not at the before rendering injection point
			if (_CustomPassInjectionPoint != CUSTOMPASSINJECTIONPOINT_BEFORE_RENDERING)
				color = SampleCustomColor(uv);


			//纵向向模糊
			float3 sumColor = 0;
			float weight[3] = { 0.4026, 0.2442, 0.0545 };

			sumColor = color.rgb * weight[0];
			for (int i = 1; i < 3; i++)
			{
				//注意采用使用的是UV坐标,因此float2(0, _BlurScale * i) * _ScreenSize.zw * _RTHandleScale.xy获取UV坐标增量(偏移值)
				sumColor += SampleCustomColor(uv + float2(0, _BlurScale * i) * _ScreenSize.zw * _RTHandleScale.xy).rgb * weight[i];
				sumColor += SampleCustomColor(uv + float2(0, _BlurScale * -i) * _ScreenSize.zw * _RTHandleScale.xy).rgb * weight[i];
			}

			return float4(sumColor, 1);
		}

	ENDHLSL

	SubShader
	{
		Pass
		{
			Name "Custom Pass 0"

			ZWrite On
			ZTest Always
			Blend SrcAlpha OneMinusSrcAlpha
			Cull Off

			HLSLPROGRAM
				#pragma fragment FullScreenPass
			ENDHLSL
		}
	}
	Fallback Off
}
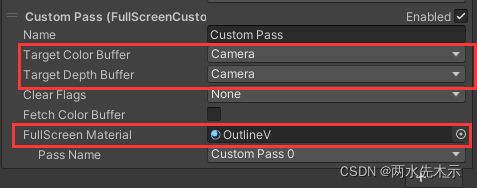
注意看选中的是Camera,第二次采样的是CustomPass的图片(第一次横向模糊输出的图片)对它进行了一个纵向模糊,然后输出到Camera。
代码很简单,比较难理解的是第一个横向模糊shader是使用
CustomPassSampleCameraColor(posInput.positionNDC.xy, 0) 获取了一个float3,其中采样坐标是NDC坐标。
第二个纵向模糊shader是使用
SampleCustomColor(uv) 获取float4 它是从CustomPass缓存的图片采样的,必须先进行横向模糊输出custom后 才能进行纵向模糊 ,当然你也可以反过来,使用先纵向后横向,但肯定是最后一个进行的模糊要是从Custom来获取上一次的处理结果,而不能再去使用CustomPassSampleCameraColor,因为这个看英文就知道它就是从摄像机缓存获取图片,这个就是当前渲染到的屏幕图而已。
重点内容是:
UV获取方式:varyings.positionCS.xy * _ScreenSize.zw为NDC坐标,_RTHandleScale.xy是对NDC坐标进行一个缩放获取uv
即 uv = varyings.positionCS.xy * _ScreenSize.zw * _RTHandleScale.xy);
uv = clamp(uv, 0, _RTHandleScale.xy - _ScreenSize.zw * 2); // clamp UV to 1 pixel to avoid bleeding
对uv进行clamp处理是将uv约束在1个像素范围以内,这个不太懂了。
其中NDC坐标系是用 varyings.positionCS.xy * _ScreenSize.zw 获取的,当你想做偏移float2(1,0)时,只要将这个float2(1,0)理解成positionCS.xy即可。
positonCS是Homogenous clip spaces(同质剪辑空间)裁剪空间?
_ScreenSize.zw是一个能让裁剪空间缩放回NDC坐标系的缩放系数?


