使用acme.sh申请Let‘s Encrypt免费的SSL证书
使用acme.sh申请Let’s Encrypt免费的SSL证书
说明:Let’s Encrypt —— 是一个由非营利性组织 互联网安全研究小组(ISRG)提供的免费、自动化和开放的证书颁发机构(CA),简单的说,就是为网站提供免费的 SSL/TLS 证书。
acme.sh 实现了 acme 协议,可以从letsencrypt生成免费的证书。接下来将为大家介绍怎样申请Let’s Encrypt通配符证书。
步骤:
一、安装 acme.sh
curl https://get.acme.sh | sh -s [email protected]
curl https://get.acme.sh | sh -s [email protected]
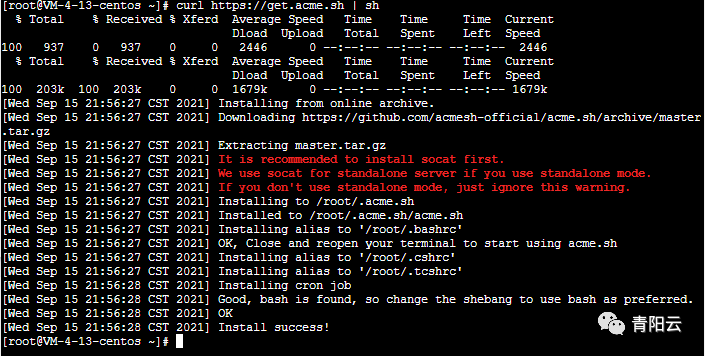
显示这样代表安装成功。
注意如果提示没有curl,可以运行下面命令安装
apt update -y          # Debian/Ubuntu 命令
apt install -y curl    #Debian/Ubuntu 命令
yum update -y          #CentOS 命令
yum install -y curl    #CentOS 命令
二、生成证书
acme.sh强大之处在于,可以自动配置DNS,目前支持 cloudflare, dnspod, cloudxns, godaddy 以及 ovh 等数十种解析商,不用去域名后台操作解析记录了,我的域名是在DNSPod的,下面给DNSPod解析的例子。
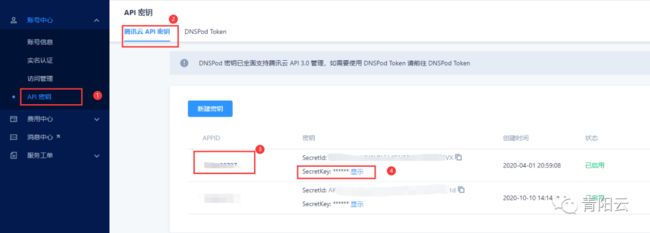
你需要先登录到 dnspod 账号, 生成你的 api id 和 api key传送阵,然后执行脚本 密钥可以使用腾讯云 API 密钥  也可以使用DNSPod Token
# 替换成从腾讯云后台获取的密钥

export DP_Id="1234"

export DP_Key="sADDsdasdgdsf"

# 换成自己的域名
acme.sh   --issue   --dns dns_dp   -d aa.com  -d *.aa.com
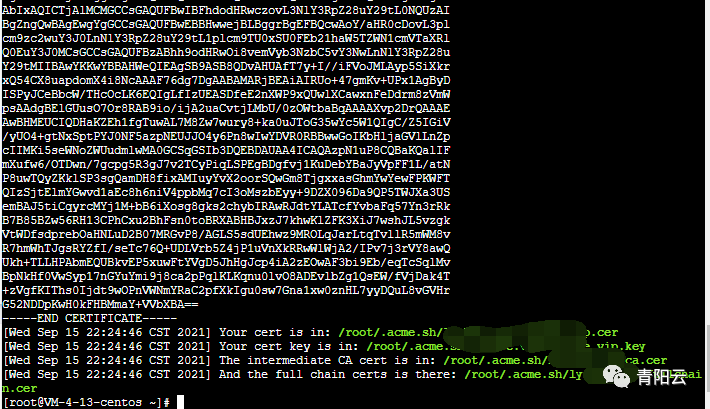
到了这一步大功告成,撒花
生成的证书放在该目录下: ~/acme.sh/domain/
/root/.acme.sh/domain/domain.cer
/root/.acme.sh/domainp/domain.key
#可以在上面的提示上面看到
三、copy/安装 证书
前面证书生成以后, 接下来需要把证书 copy 到真正需要用它的地方.
注意, 默认生成的证书都放在安装目录下: ~/.acme.sh/, 请不要直接使用此目录下的文件, 例如: 不要直接让 nginx/apache 的配置文件使用这下面的文件. 这里面的文件都是内部使用, 而且目录结构可能会变化.
正确的使用方法是使用 --install-cert 命令,并指定目标位置, 然后证书文件会被copy到相应的位置, 例如:
Apache example:
acme.sh --install-cert -d example.com \
--cert-file      /path/to/certfile/in/apache/cert.pem  \
--key-file       /path/to/keyfile/in/apache/key.pem  \
--fullchain-file /path/to/fullchain/certfile/apache/fullchain.pem \
--reloadcmd     "service apache2 force-reload"
Nginx example:
acme.sh --install-cert -d example.com \
--key-file       /path/to/keyfile/in/nginx/key.pem  \
--fullchain-file /path/to/fullchain/nginx/cert.pem \
--reloadcmd     "service nginx force-reload"
(一个小提醒, 这里用的是 service nginx force-reload, 不是 service nginx reload, 据测试, reload 并不会重新加载证书, 所以用的 force-reload)
Nginx 的配置 ssl_certificate 使用 /etc/nginx/ssl/fullchain.cer ,而非 /etc/nginx/ssl/.cer ,否则 SSL Labs 的测试会报 Chain issues Incomplete 错误。
–install-cert命令可以携带很多参数, 来指定目标文件. 并且可以指定 reloadcmd, 当证书更新以后, reloadcmd会被自动调用,让服务器生效.
值得注意的是, 这里指定的所有参数都会被自动记录下来。
acme.sh比certbot的方式更加自动化,省去了手动去域名后台改DNS记录的步骤,而且不用依赖Python。
四、更新证书
目前证书在 60 天以后会自动更新, 你无需任何操作. 今后有可能会缩短这个时间, 不过都是自动的, 你不用关心.
五、最后
一个Nginx运用证书简单的例子,仅供参考
# domain自行替换成自己的域名
server {
    server_name xx.domain.com;
    listen 443 http2 ssl;
    ssl_certificate /path/.acme.sh/domain/fullchain.cer;
    ssl_certificate_key /path/.acme.sh/domain/domain.key;
    ssl_trusted_certificate  /path/.acme.sh/domain/ca.cer;

    location / {
        proxy_set_header X-Forwarded-For $proxy_add_x_forwarded_for;
        proxy_set_header Host $host;
        proxy_pass http://127.0.0.1:10086;
    }
}
更新 acme.sh
目前由于 acme 协议和 letsencrypt CA 都在频繁的更新, 因此 acme.sh 也经常更新以保持同步.
升级 acme.sh 到最新版 :
acme.sh --upgrade
如果你不想手动升级, 可以开启自动升级:
acme.sh --upgrade --auto-upgrade
之后, acme.sh 就会自动保持更新了.
你也可以随时关闭自动更新:
acme.sh --upgrade --auto-upgrade 0


