基于springboot+bootstrap+mysql+redis搭建一套完整的权限架构【二】【整合springSecurity】
1、创建数据库
注意:mysql默认字符集为utf8,默认排序规则为utf8_general_ci。一般我们也会选择字符集为utf-8
MySQL在5.5.3之后增加了这个utf8mb4的编码,utf8mb4完全向下兼容utf8,为了节省空间,一般情况下使用utf8也就够了,我这边没有utf8。所以选择了utf8mb4 。

2、建表
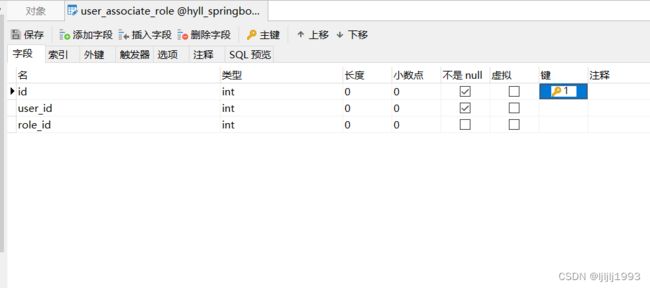
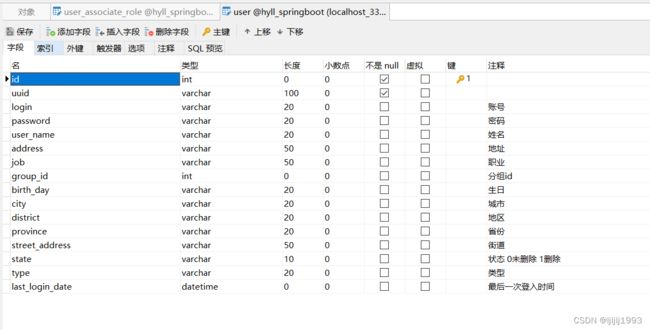
若需要整合我们的springSecurity,一种是直接使用springSecurity自带的权限架构,另外一种是使用我们自己设计的数据架构,本文所阐述的就是使用自己设计的RBAC权限架构,因此我们要事先设计好用户权限架构的PDM如下图所示,并创建我们的数据库:数据库名:hyll_springboot,以及我们的三张表:user、user_role、user_associate_role:
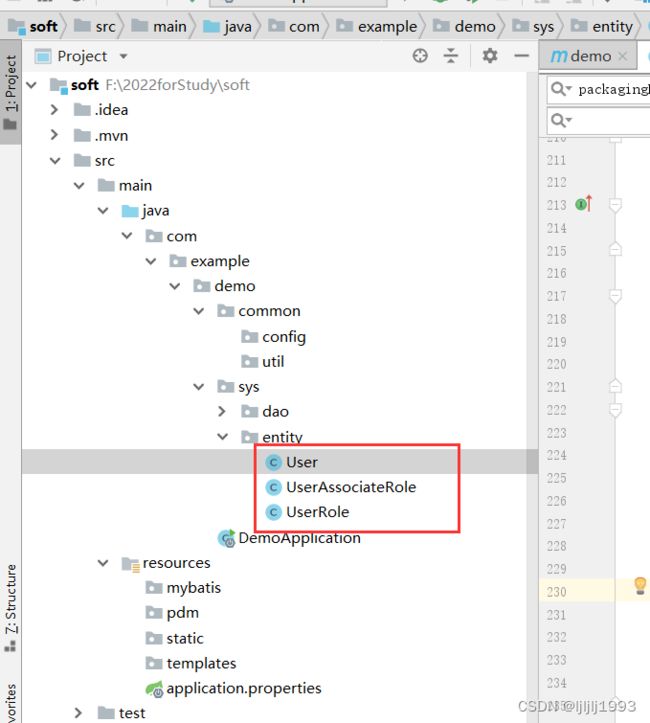
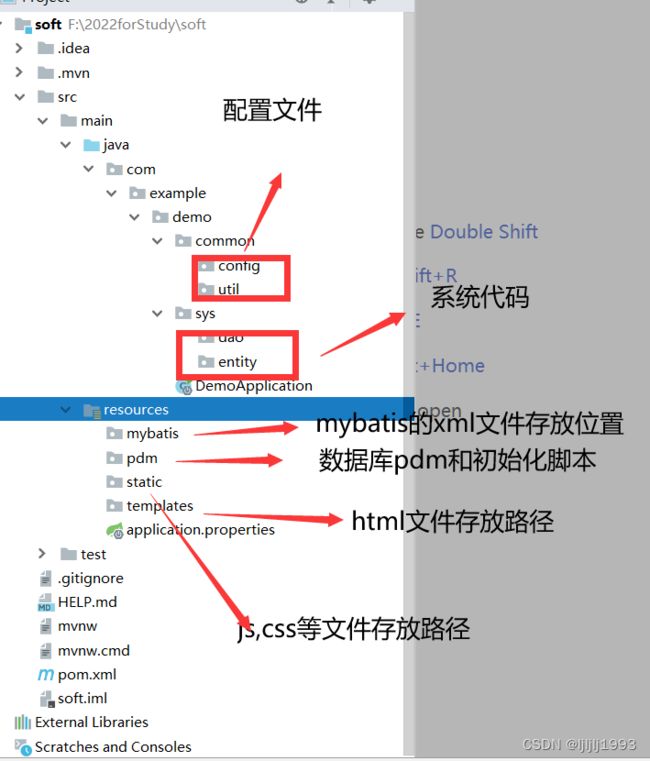
接着在我们的sys包底下新建entity和dao这两个包:

同时打开我们的pom.xml引入该工程所需要的所有依赖,接着我们的IDEA会弹出一个框,我们点击import就自动会去maven给我们下载依赖,若你有自己的私有maven则将其指向自己的私有maven,若这边有缺少不懂的直接去我的第一章的github上的源代码中自己去copy下来:
		UTF-8
		UTF-8
		1.8
		5.1.41
		18.0
		1.1.0.Final


			com.alibaba
			druid-spring-boot-starter
			1.1.3


			org.mybatis.spring.boot
			mybatis-spring-boot-starter
			1.3.1


			org.mapstruct
			mapstruct-jdk8
			${org.mapstruct.version}


			org.mapstruct
			mapstruct-processor
			${org.mapstruct.version}


			javax.inject
			javax.inject
			1


			net.sf.json-lib
			json-lib
			2.4
			jdk15


			org.springframework.boot
			spring-boot-starter-websocket


			org.springframework.boot
			spring-boot-starter-security


			org.thymeleaf.extras
			thymeleaf-extras-springsecurity4


			net.sourceforge.nekohtml
			nekohtml
			1.9.22


			org.springframework.boot
			spring-boot-starter-redis
			1.3.8.RELEASE


			org.springframework.boot
			spring-boot-starter-cache


			net.sf.ehcache
			ehcache


			org.springframework.boot
			spring-boot-starter-data-rest


			org.springframework.boot
			spring-boot-starter-data-jpa


			mysql
			mysql-connector-java
			${mysql.version}


			com.google.guava
			guava
			${guava.version}


			org.springframework.boot
			spring-boot-starter-thymeleaf


			org.springframework.boot
			spring-boot-starter-websocket


			org.springframework.boot
			spring-boot-starter-test
			test


			javax.servlet
			javax.servlet-api
			3.1.0
			provided


			org.springframework.boot
			spring-boot-starter-tomcat
			1.3.5.RELEASE
			provided


			org.springframework.boot
			spring-boot-devtools
			true


			com.xiaoleilu
			hutool-all
			3.0.9


			io.springfox
			springfox-swagger2
			2.6.1


			io.springfox
			springfox-swagger-ui
			2.6.1


			com.vaadin.external.google
			android-json
			0.0.20131108.vaadin1
同时在我们的entity包底下新建我们刚刚的三个实体:

UserRole 的代码部分
package com.example.demo.sys.entity;

/**
 * @author lj
 * @version 1.0
 * @date 2023/1/314:18
 * Description:com.example.demo.sys.entity
 */
public class UserRole {
    private long id;
    private String name;
    private String roleName;

    public long getId() {
        return id;
    }

    public void setId(long id) {
        this.id = id;
    }

    public String getName() {
        return name;
    }

    public void setName(String name) {
        this.name = name;
    }

    public String getRoleName() {
        return roleName;
    }

    public void setRoleName(String roleName) {
        this.roleName = roleName;
    }
}
User 代码部分
package com.example.demo.sys.entity;

import org.springframework.security.core.GrantedAuthority;
import org.springframework.security.core.authority.SimpleGrantedAuthority;
import org.springframework.security.core.userdetails.UserDetails;

import java.util.ArrayList;
import java.util.Collection;
import java.util.Date;
import java.util.List;

/**
 * @author lj
 * @version 1.0
 * @date 2023/1/310:01
 * Description:com.example.demo.sys.entity
 */
public class User implements UserDetails {

    private int id;
    private String login;
    private String password;
    private String userName;
    private String address;
    private String job;
    private long groupId;
    private Date birthDate;
    private String city;
    private String district;
    private String province;
    private String streetAddress;
    private String state;
    private String type;
    private Date lastLoginDate;
    // 用户角色信息
    private List roles;
    // 权限集合数据
    private String roleArray;


    public int getId() {
        return id;
    }

    public void setId(int id) {
        this.id = id;
    }

    public String getLogin() {
        return login;
    }

    public void setLogin(String login) {
        this.login = login;
    }

    public void setPassword(String password) {
        this.password = password;
    }

    public String getUserName() {
        return userName;
    }

    public void setUserName(String userName) {
        this.userName = userName;
    }

    public String getAddress() {
        return address;
    }

    public void setAddress(String address) {
        this.address = address;
    }

    public String getJob() {
        return job;
    }

    public void setJob(String job) {
        this.job = job;
    }

    public long getGroupId() {
        return groupId;
    }

    public void setGroupId(long groupId) {
        this.groupId = groupId;
    }

    public Date getBirthDate() {
        return birthDate;
    }

    public void setBirthDate(Date birthDate) {
        this.birthDate = birthDate;
    }

    public String getCity() {
        return city;
    }

    public void setCity(String city) {
        this.city = city;
    }

    public String getDistrict() {
        return district;
    }

    public void setDistrict(String district) {
        this.district = district;
    }

    public String getProvince() {
        return province;
    }

    public void setProvince(String province) {
        this.province = province;
    }

    public String getStreetAddress() {
        return streetAddress;
    }

    public void setStreetAddress(String streetAddress) {
        this.streetAddress = streetAddress;
    }

    public String getState() {
        return state;
    }

    public void setState(String state) {
        this.state = state;
    }

    public String getType() {
        return type;
    }

    public void setType(String type) {
        this.type = type;
    }

    public Date getLastLoginDate() {
        return lastLoginDate;
    }

    public void setLastLoginDate(Date lastLoginDate) {
        this.lastLoginDate = lastLoginDate;
    }

    public List getRoles() {
        return roles;
    }

    public void setRoles(List roles) {
        this.roles = roles;
    }

    public String getRoleArray() {
        return roleArray;
    }

    public void setRoleArray(String roleArray) {
        this.roleArray = roleArray;
    }

    @Override
    public Collection getAuthorities() {
        List auths = new ArrayList();
        if (this.getRoles() != null) {
            List roles = this.getRoles();
            for (UserRole role : roles) {
                if (role.getName() != null) {
                    auths.add(new SimpleGrantedAuthority(role.getName()));
                }
            }
        }
        return auths;
    }

    @Override
    public String getPassword() {
        return null;
    }

    @Override
    public String getUsername() {
        return null;
    }

    @Override
    public boolean isAccountNonExpired() {
        return false;
    }

    @Override
    public boolean isAccountNonLocked() {
        return false;
    }

    @Override
    public boolean isCredentialsNonExpired() {
        return false;
    }

    @Override
    public boolean isEnabled() {
        return false;
    }

    /**
     * 功能描述:组装角色数据集合
     *
     * @param roleArray
     */
    public void packagingRoles(String roleArray) {
        List roles = new ArrayList();
        if (roleArray != null) {
            UserRole userRole = null;
            for (String roleId : roleArray.split(",")) {
                if (!roleId.isEmpty()) {
                    userRole = new UserRole();
                    userRole.setId(Long.parseLong(roleId));
                    roles.add(userRole);
                }
            }
        }
        this.setRoles(roles);
    }

}
UserAssociateRole 代码部分
package com.example.demo.sys.entity;

/**
 * @author lj
 * @version 1.0
 * @date 2023/1/314:26
 * Description:com.example.demo.sys.entity
 */
public class UserAssociateRole {

    private int userId;
    private long roleId;

    public UserAssociateRole() {
        super();
    }

    public int getUserId() {
        return userId;
    }

    public void setUserId(int userId) {
        this.userId = userId;
    }

    public long getRoleId() {
        return roleId;
    }

    public void setRoleId(long roleId) {
        this.roleId = roleId;
    }
}
接着我们在dao包里面创建以下的接口:
package com.example.demo.sys.dao;

import com.example.demo.sys.entity.User;

/**
 * @author lj
 * @version 1.0
 * @date 2023/1/314:54
 * Description:com.example.demo.sys.dao
 */
public interface UserDao {
    /**
     * 功能描述:根据账户获取用户信息
     *
     * @param user
     * @return com.example.demo.sys.entity.User
     * @author: LJ
     * @date: 2023/1/3
     */

    User findByLogin(String user);
}
接着我们引入我们的mybatis配置以及我们的security和快速切换环境配置,
首先在我们的application.properties底下增加以下配置:
spring.profiles.active=dev

#配置放行的目录和方法
security.ignored=/api/*,/css/*,/js/*,/images/*,/fonts/*,/font-awesome/*
#表示对thymeleaf模板不再是用默认的HTML5标准来做严格限制
spring.thymeleaf.mode = LEGACYHTML5

#配置mybatis的扫描的包的文件的入口
mybatis.config-locations=classpath:mybatis/mybatis-config.xml
mybatis.mapper-locations=classpath:mybatis/mapper/*.xml
同时在我们的resources目录底下创建一个目录mybatis并在该目录底下创建一个文件mybatis-config.xml和mapper目录如下所示:

mybatis-config.xml代码如下所示
同时在我们的resource目录底下创建我们的application-dev.properties文件信息如下:
server.port = 8080
#数据库连接配置
spring.datasource.driverClassName=com.mysql.jdbc.Driver
spring.datasource.url=jdbc:mysql://localhost:3306/hyll_springboot?characterEncoding=utf-8
spring.datasource.username=root
spring.datasource.password=111111
接着我们在resource/mapper目录底下创建一个mybatis_user.xml内容如下:
同时在我们的resource目录底下创建我们的application-dev.properties文件信息如下
server.port = 8080
#数据库连接配置
spring.datasource.driverClassName=com.mysql.jdbc.Driver
spring.datasource.url=jdbc:mysql://localhost:3306/hyll_springboot?characterEncoding=utf-8
spring.datasource.username=root
spring.datasource.password=111111
接着我们在resource/mapper目录底下创建一个mybatis_user.xml内容如下:
接着开始我们的springsecurity的配置,找到我们的config包在该包底下我们创建一个security和mybatis包如下所示

接着在我们的security增加以下三个类分别是(CustomPasswordEncoder:密码加密类;CustomUserService:登陆逻辑重写类;WebSecurityConfig:security实现配置类):
注意maven的版本,如果版本高的话,就没有Md5PasswordEncoder的依赖
package com.example.demo.common.config.security;

import org.springframework.security.crypto.password.PasswordEncoder;
import org.springframework.security.authentication.encoding.Md5PasswordEncoder;

/**
 * 功能描述:spring-security登陆的密码进行MD5加密传到数据库
 *
 * @author: LJ
 * @date: 2023/1/3
 * @return
 */

public class CustomPasswordEncoder implements PasswordEncoder {
    @Override
    public String encode(CharSequence rawPassword) {
        Md5PasswordEncoder encoder = new Md5PasswordEncoder();
        return encoder.encodePassword(rawPassword.toString(), "hyll");

    }

    @Override
    public boolean matches(CharSequence rawPassword, String encodedPassword) {
        Md5PasswordEncoder encoder = new Md5PasswordEncoder();
        return encoder.isPasswordValid(encodedPassword, rawPassword.toString(), "hyll");
    }
}
注意,你得密码是经过md5加密得,所以比如我得密码是1,那么加密后得a2098ac42fe033111a1f678b8d621899,这个填入到数据库中对应user表得密码中,你可以根据自己的密码进行加密,加密后的结果放到数据库中
  public static void main(String[] args) {
        Md5PasswordEncoder encoder = new Md5PasswordEncoder();

        System.out.println(encoder.encodePassword("1", "hyll"));
        System.out.println( encoder.isPasswordValid("a2098ac42fe033111a1f678b8d621899","1", "hyll"));

    }
package com.example.demo.common.config.security;

import com.example.demo.sys.dao.UserDao;
import com.example.demo.sys.entity.User;
import org.springframework.security.authentication.LockedException;
import org.springframework.security.core.userdetails.UserDetails;
import org.springframework.security.core.userdetails.UserDetailsService;
import org.springframework.security.core.userdetails.UsernameNotFoundException;

import javax.annotation.Resource;

/**
 * @author lj
 * @version 1.0
 * @date 2023/1/510:51
 * Description:com.example.demo.common.config.security
 */
public class CustomUserService implements UserDetailsService {

    @Resource
    private UserDao userDao;

    @Override
    public UserDetails loadUserByUsername(String s) throws UsernameNotFoundException {
        User user = userDao.findByLogin(s);
        if (user == null) {
            throw new UsernameNotFoundException("用户名不存在");
        }
// 自定义错误的文章说明的地址:http://blog.csdn.net/z69183787/article/details/21190639?locationNum=1&fps=1
        if (user.getState().equalsIgnoreCase("0")) {
            throw new LockedException("用户账号被冻结,无法登陆请联系管理员!");
        }
        return user;
    }
}
package com.example.demo.common.config.security;

import org.springframework.context.annotation.Bean;
import org.springframework.context.annotation.Configuration;
import org.springframework.security.authentication.AuthenticationManager;
import org.springframework.security.config.annotation.authentication.builders.AuthenticationManagerBuilder;
import org.springframework.security.config.annotation.method.configuration.EnableGlobalMethodSecurity;
import org.springframework.security.config.annotation.web.builders.HttpSecurity;
import org.springframework.security.config.annotation.web.builders.WebSecurity;
import org.springframework.security.config.annotation.web.configuration.WebSecurityConfigurerAdapter;
import org.springframework.security.core.userdetails.UserDetailsService;
import org.springframework.security.crypto.password.PasswordEncoder;

/**
 * @author lj
 * @version 1.0
 * @date 2023/1/513:34
 * 实现Security的配置
 */
@Configuration
@EnableGlobalMethodSecurity(prePostEnabled = true)
//当我们想要开启spring方法级安全时,只需要在任何 @Configuration实例上使用 @EnableGlobalMethodSecurity 注解就能达到此目的
public class WebSecurityConfig extends WebSecurityConfigurerAdapter {
    @Bean
    UserDetailsService customUserService() {
        return new CustomUserService();
    }

    @Bean
    PasswordEncoder passwordEncoder() {
        return new CustomPasswordEncoder();
    }


    @Override
    protected void configure(AuthenticationManagerBuilder auth) throws Exception {
        auth.userDetailsService(customUserService()).passwordEncoder(passwordEncoder());
    }

    @Override
    protected AuthenticationManager authenticationManager() throws Exception {
        return super.authenticationManager();
    }

    /**
     * 功能描述: csrf().disable()为了关闭跨域访问的限制,若不关闭则websocket无法与后台进行连接
     *
     * @param http
     * @return void
     * @author: LJ
     * @date: 2023/1/5
     */

    @Override
    protected void configure(HttpSecurity http) throws Exception {

        http.headers().frameOptions().disable();
        http.csrf().disable().authorizeRequests()
                .anyRequest().authenticated()
                .and()
                .formLogin()
                .loginPage("/login")
                .defaultSuccessUrl("/main")
                .failureUrl("/login?error=true")
                .permitAll()
                .and()
                .logout()
                .logoutSuccessUrl("/login")
                .permitAll();
    }
}
接着我们在mybatis包底下新增MyBatisConfig 配置类如下所示 MapperScan扫描的是我们的dao接口的存放路径,因此此处大家一定要注意自己的dao包的路径是否正确,否则会导致调用dao方法出错】:
package com.example.demo.common.config.mybatis;

import org.mybatis.spring.annotation.MapperScan;
import org.springframework.context.annotation.Configuration;

/**
 * @author lj
 * @version 1.0
 * @date 2023/1/2520:15
 * Description:com.example.demo.common.config.mybatis
 */
@Configuration
@MapperScan("com.example.demo.*.dao")
public class MyBatisConfig {
}
接着在我们的config目录底下创建我们的WebMvcConfig配置文件如下所示:
package com.example.demo.common.config;

import org.springframework.context.annotation.Configuration;
import org.springframework.web.servlet.config.annotation.ViewControllerRegistry;
import org.springframework.web.servlet.config.annotation.WebMvcConfigurerAdapter;

/**
 * @author lj
 * @version 1.0
 * @date 2023/1/2520:21
 * Description:com.example.demo.common.config
 */
@Configuration
public class WebMvcConfig extends WebMvcConfigurerAdapter {

    /**
     * 重写方法描述:实现在url中输入相应的地址的时候直接跳转到某个地址
     *
     * @param registry
     */
    @Override
    public void addViewControllers(ViewControllerRegistry registry) {
        registry.addViewController("/login").setViewName("login");
        registry.addViewController("/main").setViewName("main");
        registry.addViewController("/error").setViewName("error");
    }

}
到此处我们的整个基础工程已经构建完成,我们可以直接将该工程运行起来,访问http://127.0.0.1:8080/login,由于还没有引入bootstrap因此整个页面显得不叫的丑,后续将bootstrap引入那么你们就会发现我们的页面越来越漂亮,运行效果如下图所示:


