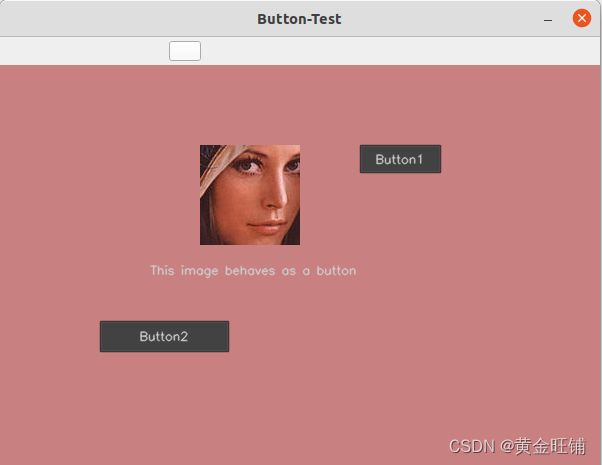
【OpenCV-Python】cvui 之 按钮
CVUI 之 按钮
Python
import numpy as np
import cv2
import cvui

def button_test():
    WINDOW_NAME = 'Button-Test'

    # 创建画布
    frame = np.zeros((400, 600, 3), np.uint8)

    # 图像按钮不同状态的图像
    idle_mat = cv2.imread("lena-face.jpg", cv2.IMREAD_COLOR)
    over_mat = cv2.imread("lena-face-red.jpg", cv2.IMREAD_COLOR)
    down_mat = cv2.imread("lena-face-gray.jpg", cv2.IMREAD_COLOR)
    cvui.init(WINDOW_NAME)

    while True:
        # 画布填色
        frame[:] = (128, 128, 200)

        # 渲染图像按钮
        if cvui.button(frame, 200, 80, idle_mat, over_mat, down_mat):
            print('Image button clicked!')

        # 写文字
        cvui.text(frame, 150, 200, 'This image behaves as a button')

		# 常规按钮
        if cvui.button(frame, 360, 80, 'Button1'):
            print('Button1 clicked!')

        # 设置按钮的宽高
        if cvui.button(frame, 100, 256, 128, 30, 'Button2'):
            print('Button2 clicked!')

        # 显示
        cvui.imshow(WINDOW_NAME, frame)

		# ESC 退出
        if cv2.waitKey(20) == 27:
            break


if __name__ == '__main__':
    button_test()
CPP
cvui::button() 渲染一个按钮,常用函数原型是:
bool button(cv::Mat& theWhere, int theX, int theY, const cv::String& theLabel)
参数
theWhere: button 需要渲染到哪一个图像上;
theX: 横坐标
theY: 纵坐标
theWidth: 按钮宽
theHeight: 按钮高
theLabel: 按钮标题
theFontScale: 按钮字体
theInsideColor: 按钮颜色
返回: 点击返回true,其他返回false。
button 的宽度根据 label 自适应。
/**
 Display a button. The size of the button will be automatically adjusted to
 properly house the label content.

 \param theWhere image/frame where the component should be rendered.
 \param theX position X where the component should be placed.
 \param theY position Y where the component should be placed.
 \param theLabel text displayed inside the button.
 \param theFontScale size of the text.
 \param theInsideColor the color used to fill the button (other button colors, like its border, are derived from it)
 \return `true` everytime the user clicks the button.
*/
bool button(cv::Mat& theWhere, int theX, int theY, const cv::String& theLabel, double theFontScale = DEFAULT_FONT_SCALE, unsigned int theInsideColor = DEFAULT_BUTTON_COLOR);

/**
 Display a button. The button size will be defined by the width and height parameters,
 no matter the content of the label.

 \param theWhere image/frame where the component should be rendered.
 \param theX position X where the component should be placed.
 \param theY position Y where the component should be placed.
 \param theWidth width of the button.
 \param theHeight height of the button.
 \param theLabel text displayed inside the button.
 \param theFontScale size of the text.
 \param theInsideColor the color used to fill the button (other button colors, like its border, are derived from it)
 \return `true` everytime the user clicks the button.
*/
bool button(cv::Mat& theWhere, int theX, int theY, int theWidth, int theHeight, const cv::String& theLabel, double theFontScale = DEFAULT_FONT_SCALE, unsigned int theInsideColor = DEFAULT_BUTTON_COLOR);
图像按钮
可以将图像当做一个按钮,这个按钮接受3种状态:空(无鼠标交互)、滑过(鼠标滑过按钮)、按下(鼠标点击);
/**
 Display a button whose graphics are images (cv::Mat). The button accepts three images to describe its states,
 which are idle (no mouse interaction), over (mouse is over the button) and down (mouse clicked the button).
 The button size will be defined by the width and height of the images.

 \param theWhere image/frame where the component should be rendered.
 \param theX position X where the component should be placed.
 \param theY position Y where the component should be placed.
 \param theIdle an image that will be rendered when the button is not interacting with the mouse cursor.
 \param theOver an image that will be rendered when the mouse cursor is over the button.
 \param theDown an image that will be rendered when the mouse cursor clicked the button (or is clicking).
 \return `true` everytime the user clicks the button.

 \sa button()
 \sa image()
 \sa iarea()
*/
bool button(cv::Mat& theWhere, int theX, int theY, cv::Mat& theIdle, cv::Mat& theOver, cv::Mat& theDown);
cv::Mat idle = cv::imread("btn_idle_state.jpg", cv::IMREAD_COLOR);
cv::Mat over = cv::imread("btn_over_state.jpg", cv::IMREAD_COLOR);
cv::Mat down = cv::imread("btn_down_state.jpg", cv::IMREAD_COLOR);

// cv::Mat, x, y, cv::Mat, cv::Mat, cv::Mat
if (cvui::button(frame, 200, 80, idle, over, down)) {
    // button was clicked
}
【参考】
cvui-button
