Android Studio SQLite数据库应用(二)
Android Studio SQLite数据库应用(二)
版本 Android Studio 1.5.1
事务处理
升级数据库的最佳写法
哈哈刚刚写完 SQLite数据库应用(一),接着把后面的写完吧;
事务处理
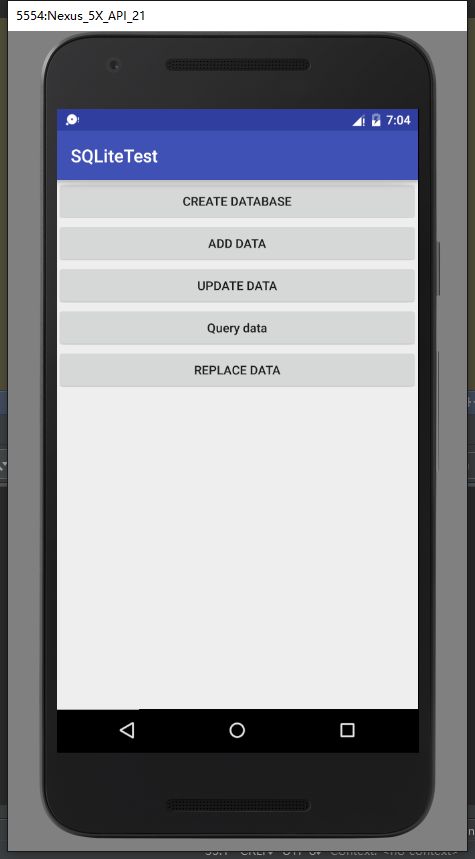
所谓事务处理就是,保证在完成一系列操作的时候,要么全部完成要么一个都完成不了。我还用之前的代码作为案例;现在我要把Book表中的数据都删掉,让后写入新的数据;如果在这个操作过程中出现了异常,那么表中的数据还是原先的,一切都回到事务开始之前。(具体看程序中的注释)
 Button replaceData = (Button) findViewById(R.id.replace_data);
        replaceData.setOnClickListener(new View.OnClickListener() {
            @Override
            public void onClick(View v) {
                SQLiteDatabase db = dbHelper.getWritableDatabase();
                //开启一个事务
                db.beginTransaction();
                try {
                    db.delete("Book",null,null);
                    //这边手动抛出一个异常(NullPointerException())
                    //这样之后添加新的数据是执行不到的,由于中途出现了异常导致事务的失败,那么旧的数据也是删不掉的,可以看下面的图片。
                    if (true){
                        throw new NullPointerException();
                    }
                    ContentValues values = new ContentValues();
                    values.put("name","Game of Thrones");
                    values.put("author","Katty");
                    values.put("pages",720);
                    values.put("price",60);
                    db.insert("Book", null, values);
                    //事务执行成功
                    db.setTransactionSuccessful();
                }catch (Exception e){
                    e.printStackTrace();
                }finally {
                //结束事务
                    db.endTransaction();
                }
            }
        });
当有异常时显示的还是上一篇Book表中的数据
事务操作的好处就在我们完成一系列操作的时候,防止因为异常的发生导致数据的丢失。就好比你支付宝转账给你盆友,结果中途出现了异常导致,你的支付宝的钱是被扣了,但是你盆友的支付宝了金额并没有增加,那岂不是很DT。哈哈。
升级数据库的最佳写法
之前一篇中数据升级是在onUpgrade()方法中删掉当前所有的表,然后强制执行onCreate()方法,实现数据库升级。
我们都知道只要指定数据库的版本号比当前的数据库版本号高的时候就会进入到onUpgrade()中,这我先在onUpgrade()中先判断当前数据库的版本号,再执行相应的改变操作。
首先第一个版本(就是之前创建的两个表):
先将虚拟机上的APP删除掉
public class MainActivity extends AppCompatActivity {


    private MyDatabaseHelper dbHelper;
    @Override
    protected void onCreate(Bundle savedInstanceState) {
        super.onCreate(savedInstanceState);
        setContentView(R.layout.activity_main);
        //版本1
        dbHelper = new MyDatabaseHelper(this,"BookStore.db",null,1);
        Button createDatabase = (Button) findViewById(R.id.create_database);
        createDatabase.setOnClickListener(new View.OnClickListener() {
            @Override
            public void onClick(View v) {
                dbHelper.getWritableDatabase();
            }
        });
public class MyDatabaseHelper extends SQLiteOpenHelper {

    public static final String CREATE_BOOK = "create table Book(" +
            //primary key 将id列设为主键    autoincrement表示id列是自增长的
            "id integer primary key autoincrement," +
            "author text," +
            "price real," +
            "pages integer," +
            "name text)";


    public static final String CREATE_CATEGORY = "create table Category (" +
            "id integer primary key autoincrement," +
            "category_name text," +
            "category_code integer)";

    private Context mContext;
    //构造方法:第一个参数Context,第二个参数数据库名,
    // 第三个参数cursor允许我们在查询数据的时候返回一个自定义的光标位置,
    // 一般传入的都是null,第四个参数表示目前库的版本号(用于对库进行升级)
    public  MyDatabaseHelper(Context context,String name,SQLiteDatabase.CursorFactory factory , int version){
        super(context,name ,factory,version);
        mContext = context;
    }

    @Override
    public void onCreate(SQLiteDatabase db) {
        //调用SQLiteDatabase中的execSQL()执行建表语句。
        db.execSQL(CREATE_BOOK);
        db.execSQL(CREATE_CATEGORY);
        Toast.makeText(mContext, "Create succeeded", Toast.LENGTH_SHORT).show();
    }

    @Override
    public void onUpgrade(SQLiteDatabase db, int oldVersion, int newVersion) {

    }
}
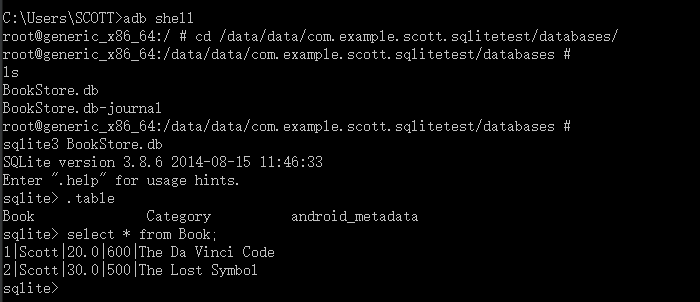
好第一个版本安装完成后 按一下create database 数据库创建成功,然后按 add data添加数据。在数据库中的结果如下:

好,现在已经在表中添加了内容,接下来APP更新了,要在数据库中加入新的表。升级数据库版本 为2
public class MainActivity extends AppCompatActivity {


    private MyDatabaseHelper dbHelper;
    @Override
    protected void onCreate(Bundle savedInstanceState) {
        super.onCreate(savedInstanceState);
        setContentView(R.layout.activity_main);
        //版本2
        dbHelper = new MyDatabaseHelper(this,"BookStore.db",null,2);
        Button createDatabase = (Button) findViewById(R.id.create_database);
        createDatabase.setOnClickListener(new View.OnClickListener() {
            @Override
            public void onClick(View v) {
                dbHelper.getWritableDatabase();
            }
        });
更改MyDatabaseHelper代码如下
public class MyDatabaseHelper extends SQLiteOpenHelper {

    public static final String CREATE_BOOK = "create table Book(" +
            //primary key 将id列设为主键    autoincrement表示id列是自增长的
            "id integer primary key autoincrement," +
            "author text," +
            "price real," +
            "pages integer," +
            "name text)";


    public static final String CREATE_CATEGORY = "create table Category (" +
            "id integer primary key autoincrement," +
            "category_name text," +
            "category_code integer)";
//创建Picture表
    public static final String CREATE_PICTURE = "create table Picture(" +
            "id integer primary key autoincrement," +
            "name text," +
            "price real)";

    private Context mContext;
    //构造方法:第一个参数Context,第二个参数数据库名,
    // 第三个参数cursor允许我们在查询数据的时候返回一个自定义的光标位置,
    // 一般传入的都是null,第四个参数表示目前库的版本号(用于对库进行升级)
    public  MyDatabaseHelper(Context context,String name,SQLiteDatabase.CursorFactory factory , int version){
        super(context,name ,factory,version);
        mContext = context;
    }

    @Override
    public void onCreate(SQLiteDatabase db) {
        //调用SQLiteDatabase中的execSQL()执行建表语句。
        db.execSQL(CREATE_BOOK);
        db.execSQL(CREATE_CATEGORY);
        db.execSQL(CREATE_PICTURE);
        Toast.makeText(mContext, "Create succeeded", Toast.LENGTH_SHORT).show();
    }

    @Override
    public void onUpgrade(SQLiteDatabase db, int oldVersion, int newVersion) {
        //判断当前版本号。如果当前版本号是1,则只执行创建picture表的操作。
        //如果之前没有安装过,则执行onCreate()中创建三个表的操作
        switch(oldVersion){
            case 1:
                db.execSQL(CREATE_PICTURE);
                default:
        }
    }
}
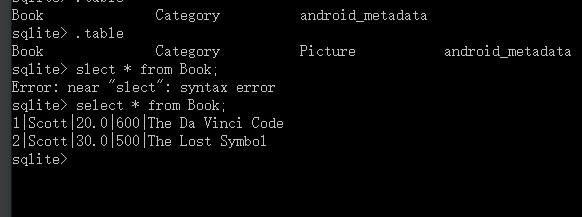
好现在安装到虚拟机上测试,结果如下:

可以看到现在数据库中已有三个表。查看之前Book表中的数据也没有丢失。完成了一次完美的升级。
好接下来继续更新第三个版本 让Book表和Category表之间建立联系。我们可以在Book表中添加一个category_id 的字段,然后我们修改MyDatabaseHelper中的代码如下:
public class MyDatabaseHelper extends SQLiteOpenHelper {

    public static final String CREATE_BOOK = "create table Book(" +
            //primary key 将id列设为主键    autoincrement表示id列是自增长的
            "id integer primary key autoincrement," +
            "author text," +
            "price real," +
            "pages integer," +
            "name text," +
            "category_id integer)";


    public static final String CREATE_CATEGORY = "create table Category (" +
            "id integer primary key autoincrement," +
            "category_name text," +
            "category_code integer)";

    public static final String CREATE_PICTURE = "create table Picture(" +
            "id integer primary key autoincrement," +
            "name text," +
            "price real)";

    private Context mContext;
    //构造方法:第一个参数Context,第二个参数数据库名,
    // 第三个参数cursor允许我们在查询数据的时候返回一个自定义的光标位置,
    // 一般传入的都是null,第四个参数表示目前库的版本号(用于对库进行升级)
    public  MyDatabaseHelper(Context context,String name,SQLiteDatabase.CursorFactory factory , int version){
        super(context,name ,factory,version);
        mContext = context;
    }

    @Override
    public void onCreate(SQLiteDatabase db) {
        //调用SQLiteDatabase中的execSQL()执行建表语句。
        db.execSQL(CREATE_BOOK);
        db.execSQL(CREATE_CATEGORY);
         db.execSQL(CREATE_PICTURE);
        Toast.makeText(mContext, "Create succeeded", Toast.LENGTH_SHORT).show();
    }

    @Override
    public void onUpgrade(SQLiteDatabase db, int oldVersion, int newVersion) {

        switch(oldVersion){
            case 1:
                db.execSQL(CREATE_PICTURE);
            case 2:
            //执行alter命令在Book表新增一个category_id 列
                db.execSQL("alter table Book add column category_id integer");
                default:
        }
    }
}
记得改完之后要在MainActivity 中将数据库的版本改为3。
好,看一下结果:

百度盘代码:http://pan.baidu.com/s/1qYpd3Da
注意我的gradle的版本是2.8,如果你没有这个版本打开的时候会下载,如果你网速够快的那就没啥问题,如果下载太慢,或者遇到什么问题。到我的另一篇博文@gradle 下载及代理设置
好了就到这里了。利用中午休息的时间赶完了,,,估计下午上班的时候要奔溃了,赶紧趁老板不在,趴会儿。。。
关注微信公众号,每天都有优质技术文章,搞笑GIF图片推送哦。
![]()
2016-7-18
Scott
星期六,星期天回家看小白了,哈哈超可爱。


