《深入浅出SpringCloud》SpringCloud Stream 消息驱动
SpringCloud Stream 消息驱动
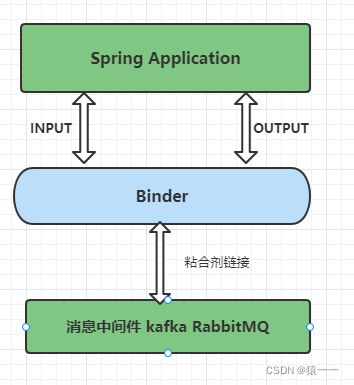
Spring Cloud Stream官方的说法是一个构建消息驱动微服务的框架。我们可以这么理解,这个Spring Cloud Stream封装了mq的玩法,统一了模型,然后屏蔽各个mq产品中间件不同,降低了我们的学习成本,不过目前只支持kafka与rabbitmq。我们的应用程序,也就是spring Application ,通过这个input 与output 这两种channel 与binder 进行交互,binder(绑定器对象)屏蔽了咱们的消息中间件产品的差异, 封装了消息中间件,可以很方便的链接中间件
我们可以看下这个Spring Cloud Stream的架构图
简单使用
消息生产者
-
创建Stream-Service
-
引入依赖
            org.springframework.cloud
            spring-cloud-stream


            org.springframework.cloud
            spring-cloud-starter-stream-rabbit


            org.springframework.cloud
            spring-cloud-stream-binder-rabbit
- 配置application.yml
server:
  port: 7001 #服务端口
spring:
  application:
    name: stream_service #指定服务名
  rabbitmq:
    addresses: localhost
    username: guest
    password: guest
    port: 5672
  cloud:
    stream:
      bindings:
        output:
          destination: yuan11-topic  #指定消息发送的目的地,在rabbitmq中,发送到一个yuan11-topic的exchange中
      binders:  #配置绑定器
        defaultRabbit:
          type: rabbit  # 绑定的是rabbit
- contentType:用于指定消息的类型。具体可以参考 spring cloud stream docs
- destination:指定了消息发送的目的地,对应 RabbitMQ,会发送到 exchange 是 yuan11-topic的所有消息队列中。
- 运行启动类,查看rabbitmq 的通道,可以看到通道已经添加了

- 创建消息发送类HelloController
/**
 * @title: HelloController
 * @Author yuan11
 * @Date: 2022/4/27 1:09
 * @Version 1.0
 */
@RestController
// 绑定controller 为消息发送者 output
@EnableBinding(Source.class)
public class HelloController {
    // 注入stream 内置的消息通道
    @Autowired
    private MessageChannel output;

    @GetMapping("/hello")
    public void hello(){
        // 通道发送消息
        output.send(MessageBuilder.withPayload("hello stream message").build());
    }
}
- 可以看一下Source.class 实际为接口,指明它是消息生产类
public interface Source {
    String OUTPUT = "output";

    @Output("output")
    MessageChannel output();
}
消息消费者
- 创建消息消费者Stream-Client
- 引入相同的包pom文件添加依赖
            org.springframework.boot
            spring-boot-starter-web


            org.springframework.cloud
            spring-cloud-stream


            org.springframework.cloud
            spring-cloud-stream-binder-rabbit


            org.springframework.cloud
            spring-cloud-starter-stream-rabbit
- 添加application.yml文件配置
server:
  port: 7002 #服务端口
spring:
  application:
    name: stream-client #指定服务名
  rabbitmq:
    addresses: localhost
    username: guest
    password: guest
  cloud:
    stream:
      bindings:
        input: #内置的获取消息的通道 , 从yuan11-topic中获取消息 ,注意消费者这里是input
          destination: yuan11-topic
      binders:
        defaultRabbit:
          type: rabbit
- 添加消费接收类,来接收消息
/**
 * @title: MessageReceiver
 * @Author yuan11
 * @Date: 2022/4/28 0:06
 * @Version 1.0
 */
// 绑定消费者
@EnableBinding(Sink.class)
public class MessageReceiver {

    // 消费通道监听器
    @StreamListener(Sink.INPUT)
    public void input(String message){
        System.out.println("获取到的消息是:"+message);
    }
}
- 查看Sink.class 实际为input
public interface Sink {
    String INPUT = "input";

    @Input("input")
    SubscribableChannel input();
}
自定义消息通道
上面是默认用的stream 内置的消息通道,下面我们使用自己定义的消费通道
- 消息生产者 自定义通道 MyChannel
/**
 * @title: MyChannel
 * @Author yuan11
 * @Date: 2022/4/28 0:14
 * @Version 1.0
 */
public interface MyChannel {
    /**
     * 消息生产者的配置
     */
    String MYOUTPUT="myoutput";

    @Output(MYOUTPUT)
    MessageChannel myoutput();
}
- 修改消息生产者controller,注入自定义通道,通过自定义通道发送消息
/**
 * @title: HelloController
 * @Author yuan11
 * @Date: 2022/4/27 1:09
 * @Version 1.0
 */
@RestController
// 绑定controller 为消息发送者 output
//@EnableBinding(Source.class)
@EnableBinding(MyChannel.class)
public class HelloController {
    // 注入stream 内置的消息通道
//    @Autowired
//    private MessageChannel output;

    // 这里注入自定义的channel
    @Autowired
    private MyChannel myChannel;

    @GetMapping("/hello")
    public void hello(){
        // 通道发送消息
        //output.send(MessageBuilder.withPayload("hello stream message").build());

        // 自定义的通道发送消息
        myChannel.myoutput().send(MessageBuilder.withPayload("hello stream myouput message").build());
    }
}
- 修改消息生产者application.yml文件
server:
  port: 7001 #服务端口
spring:
  application:
    name: stream_service #指定服务名
  rabbitmq:
    addresses: localhost
    username: guest
    password: guest
    port: 5672
  cloud:
    stream:
      bindings:
        output:
          destination: yuan11-topic  #指定消息发送的目的地,在rabbitmq中,发送到一个yuan11-topic的exchange中
        myoutput: # 自定义的通道也就是发送者
          destination: yuan11-custom-output  #规定发送给哪个通道   即接收者
      binders:  #配置绑定器
        defaultRabbit:
          type: rabbit  # 绑定的是rabbit
- 自定义消费者通道MyChannel
// 绑定消费者
//@EnableBinding(Sink.class)
@EnableBinding(MyChannel.class)
public class MessageReceiver {

    // 消费通道监听器
   // @StreamListener(Sink.INPUT)
    @StreamListener(MyChannel.MYINPUT)
    public void input(String message){
        System.out.println("获取到的消息是:"+message);
    }
}
- 修改消费者消息接收器
// 绑定消费者
//@EnableBinding(Sink.class)
@EnableBinding(MyChannel.class)
public class MessageReceiver {

    // 消费通道监听器
   // @StreamListener(Sink.INPUT)
    @StreamListener(MyChannel.MYINPUT)
    public void input(String message){
        System.out.println("获取到的消息是:"+message);
    }
}
- 修改消费者application.yml 文件
server:
  port: 7002 #服务端口
spring:
  application:
    name: stream-client #指定服务名
  rabbitmq:
    addresses: localhost
    username: guest
    password: guest
  cloud:
    stream:
      bindings:
        input: #内置的获取消息的通道 , 从yuan11-topic中获取消息 ,注意消费者这里是input
          destination: yuan11-topic
        myinput: # 自定义消费者通道
          destination: yuan11-custom-output
      binders:
        defaultRabbit:
          type: rabbit
消息分组
通常在生产环境,我们的每个服务都不会以单节点的方式运行在生产环境,当同一个服务启动多个实例的时候,这些实例都会绑定到同一个消息通道的目标主题(Topic)上。默认情况下,当生产者发出一条消息到绑定通道上,这条消息会产生多个副本被每个消费者实例接收和处理,但是有些业务场景之下,我们希望生产者产生的消息只被其中一个实例消费,这个时候我们需要为这些消费者设置消费组来实现这样的功能
- 添加消息分组配配置,消费者和生产者都要配置到对应的input下面
- 消费者分组 group1
  cloud:
    stream:
      bindings:
        input: #内置的获取消息的通道 , 从yuan11-topic中获取消息 ,注意消费者这里是input
          destination: yuan11-topic
        myinput: # 自定义消费者通道
          destination: yuan11-custom-output
          group: group1 # #设置消.息的组名称(同名组中的多个消费者,只会有一个去消费消息.)
- 生产者分组group1
    stream:
      bindings:
        output:
          destination: yuan11-topic  #指定消息发送的目的地,在rabbitmq中,发送到一个yuan11-topic的exchange中
        myoutput: # 自定义的通道也就是发送者
          destination: yuan11-custom-output  #规定发送给哪个通道   即接收者
          group: group1  #设置消.息的组名称(同名组中的多个消费者,只会有一个去消费消息.)
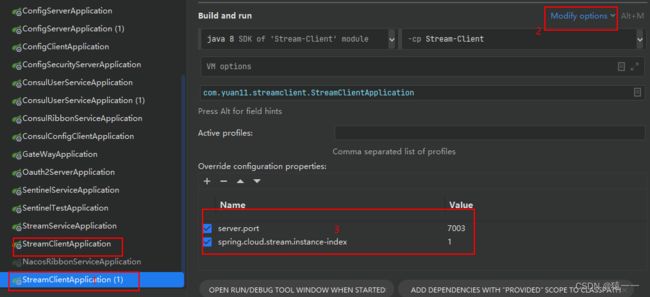
- 启动生产者service-service ,启动两个消费者stream-client 7002 7003
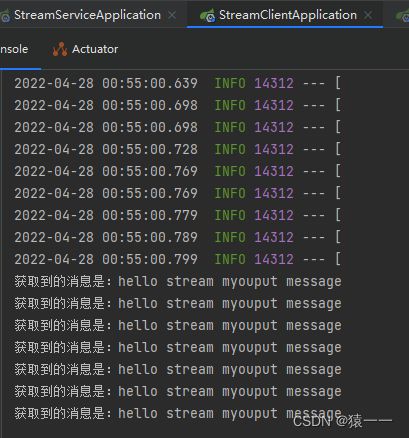
- 调用接口http://localhost:7001/hello 发现,两个消费者轮训的收到消息,而不会是消费者同时收到相同的消息。

消息分区
有一些场景需要满足, 同一个特征的数据被同一个实例消费, 比如同一个id的传感器监测数据必须被同一个实例统计计算分析, 否则可能无法获取全部的数据。又比如部分异步任务,首次请求启动task,二次请求取消task,此场景就必须保证两次请求至同一实例
消息生产者
- 生产者设置分区的标识,分区个数
        myoutput: # 自定义的通道也就是发送者
          destination: yuan11-custom-output  #规定发送给哪个通道   即接收者
          group: group1  #设置消.息的组名称(同名组中的多个消费者,只会有一个去消费消息.)
          producer:
            partition-key-expression: payload  #分区关键字   对象中的id,对象
            partition-count: 2  #分区大小
- 消费者设置支持分区标识
  cloud:
    stream:
      bindings:
        input: #内置的获取消息的通道 , 从yuan11-topic中获取消息 ,注意消费者这里是input
          destination: yuan11-topic
        myinput: # 自定义消费者通道
          destination: yuan11-custom-output
          group: group1 # #设置消.息的组名称(同名组中的多个消费者,只会有一个去消费消息.)
          consumer:
            partitioned: true  #开启分区支持
      binders:
        defaultRabbit:
          type: rabbit
      instance-count: 2 # 实例个数
      instance-index: 0  # 当前实例的编号


