手把手从零搭建一个 vue3 组件库 (二):为组件编写文档
本期任务如下:
- 抽离 eslint-config
- 定义 css 变量
- 编写一个 Button 组件
- 使用 vitepress 为组件编写文档
在线预览
github 地址
gitee 地址
抽离 eslint-config
一般市面上的组件库都会将 eslint-config 单独抽离出来,今天我们也来照猫画虎学习一下吧
-
在 packages 下新建一个项目 eslint-config
-
进入 packages/eslint-config,初始化 package.json
{
  "name": "@vangle/eslint-config",
  "version": "1.0.0",
  "description": "eslint config of vangle",
  "main": "index.js",
  "files": ["index.js"],
  "keywords": ["eslint", "tslint", "config", "vangle"],
  "dependencies": {
    "@typescript-eslint/eslint-plugin": "^5.33.1",
    "@typescript-eslint/parser": "^5.33.1",
    "eslint-config-prettier": "^8.5.0",
    "eslint-plugin-prettier": "^4.2.1",
    "eslint-plugin-vue": "^9.3.0"
  },
  "author": "",
  "license": "ISC"
}
提示:需要将上面的依赖从根目录移入到本项目中,根目录的 package.json 里的这些依赖就可以移除了,但需要保留 eslint
- packages/eslint-config 下创建 index.js,将根目录的 .eslintrc.js 的内容拷贝过来。把 root 属性删除了
// packages/eslint-config/index.js
module.exports = {
  // root: true, // delete
  parser: '@typescript-eslint/parser',
  extends: [
    'eslint:recommended',
    'plugin:vue/recommended',
    'plugin:@typescript-eslint/recommended',
    'prettier',
    'plugin:prettier/recommended'
  ],
  env: {
    browser: true,
    es2021: true
  },
  extends: ['eslint:recommended'],
  plugins: ['@typescript-eslint', 'prettier', 'vue'],
  parserOptions: {
    ecmaVersion: 'latest',
    sourceType: 'module'
  },
  rules: {
    'prettier/prettier': 'error',
    'no-extra-semi': 'off',
    '@typescript-eslint/camelcase': 'off',
    '@typescript-eslint/ban-ts-ignore': 'off',
    '@typescript-eslint/no-var-requires': 'off',
    '@typescript-eslint/no-extra-semi': 'off',
    '@typescript-eslint/no-explicit-any': 'off',
    '@typescript-eslint/no-empty-function': 'off',
    '@typescript-eslint/no-non-null-assertion': 'off',
    '@typescript-eslint/explicit-function-return-type': 'off',
    '@typescript-eslint/explicit-module-boundary-types': 'off',
    '@typescript-eslint/no-empty-interface': 'off'
  }
}
- 改造根目录的 .eslintrc.js
// .eslintrc.js
module.exports = {
  root: true,
  extends: ['@vangle/eslint-config']
}
- 根目录 package.json 添加 @vangle/eslint-config 依赖
{
  "devDependencies": {
    "@vangle/eslint-config": "workspace:*"
  }
}
- 在根目录执行 pnpm install 安装一下就完成了
大家按照上面的步骤可以抽离一下 utils 工具包,这里就不展开了,完整的请参考 github
定义 css 变量
为了统一风格和以后便于维护,以及让使用者轻松的实现自定义主题,在开始编写组件之前都会提前定义好一些 css 变量。我们会使用 less + css 变量的方式
-
在 packages/components 下创建 styles 目录用于存放样式变量
-
styles/var.less 存放通用 less 变量
// 文字
@font-size-xs: 10px;
@font-size-sm: 12px;
@font-size-md: 14px;
@font-size-lg: 16px;

// 图标
@icon-size-xs: 16px;
@icon-size-sm: 18px;
@icon-size-md: 20px;
@icon-size-lg: 22px;

//颜色
@color-body: #fff;
@color-text: #333;
@color-primary: #3a7afe;
@color-info: #00afef;
@color-success: #00c48f;
@color-warning: #ff9f00;
@color-danger: #f44336;
@color-disabled: #e0e0e0;
@color-text-disabled: #aaa;
- styles/common.less 定义全局 css 变量
@import './var';
:root {
  --font-size-xs: @font-size-xs;
  --font-size-sm: @font-size-sm;
  --font-size-md: @font-size-md;
  --font-size-lg: @font-size-lg;
  --icon-size-xs: @icon-size-xs;
  --icon-size-sm: @icon-size-sm;
  --icon-size-md: @icon-size-md;
  --icon-size-lg: @icon-size-lg;
  --color-body: @color-body;
  --color-text: @color-text;
  --color-primary: @color-primary;
  --color-info: @color-info;
  --color-success: @color-success;
  --color-warning: @color-warning;
  --color-danger: @color-danger;
  --color-disabled: @color-disabled;
  --color-text-disabled: @color-text-disabled;
}
- 现在为了方便直接在 components/index.ts 导入样式即可
import './styles/common.less'
编写一个 Button 组件
上期介绍了一个组件的目录结构,这里再贴出来回忆一下
|-- button
    |-- index.ts
    |-- src
    |   |-- button.ts
    |   |-- button.vue
    |   |-- button.less
    |-- __test__
- 在编写组件之前,我们还需要确定 组件类名的命名空间,例如 element 的 el-button、el-button–primary 等,我们需要封装一个公用的方法。
// packages/utils/component.ts
type ClassName = string | undefined | null
type Classes = (ClassName | [any, ClassName, ClassName?])[]
export function createNamespace(name: string) {
  const namespace = `van-${name}`

  const createBEM = (suffix?: string): string => {
    if (!suffix) return namespace

    return suffix.startsWith('--')
      ? `${namespace}${suffix}`
      : `${namespace}__${suffix}`
  }

  const classes = (...classes: Classes): any[] => {
    return classes.map(className => {
      if (Array.isArray(className)) {
        const [condition, truthy, falsy = null] = className
        return condition ? truthy : falsy
      }

      return className
    })
  }

  return {
    n: createBEM,
    classes
  }
}
- 定义组件的 css 变量
其它的就是一些手工活,搭建参考 github 仓库即可
使用 vitepress 为组件编写文档
使用 vitepress 编写组件文档,
- packages 下创建 docs 目录
cd packages/docs
pnpm init -y
yarn add --dev vitepress
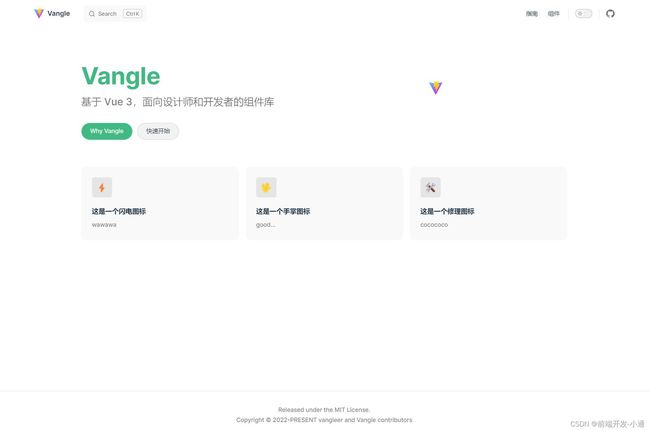
- 在 docs 下创建 index.md
---
layout: home

hero:
  name: Vangle
  text:
  tagline: 基于 Vue 3,面向设计师和开发者的组件库
  actions:
    - theme: brand
      text: Why Vangle
      link: /articles/组件库环境搭建
    - theme: alt
      text: 快速开始
      link: /component/button

features:
  - icon: ⚡️
    title: 这是一个闪电图标
    details: wawawa
  - icon:
    title: 这是一个手掌图标
    details: good...
  - icon: ️
    title: 这是一个修理图标
    details: cocococo
---
- 在 package.json.添加一些 script 后运行 pnpm docs:dev
{
  "scripts": {
    "docs:dev": "vitepress dev .",
    "docs:build": "vitepress build .",
    "docs:serve": "vitepress serve ."
  }
}
- 给 vitepress 添加配置,docs 目录下创建 .vitepress/config.ts,关于配置详情请参考官网
import type { UserConfig } from 'vitepress'

export const config: UserConfig = {
  title: 'Vangle',
  description: 'a Vue 3 based component library for designers and developers',
  themeConfig: {
    logo: '/images/vite.svg',
    footer: {
      message: 'Released under the MIT License.',
      copyright: 'Copyright © 2022-PRESENT vangleer and Vangle contributors'
    },
    algolia: {
      apiKey: 'your_api_key',
      indexName: 'index_name'
    },
    nav: [
      { text: '指南', link: '/guide/design' },
      { text: '组件', link: '/component/button' }
    ],
    socialLinks: [{ icon: 'github', link: 'https://github.com/vangleer' }],
    sidebar: {
      '/guide/': [],
      '/component/': [
        {
          text: 'Basic',
          items: [
            {
              text: 'Button',
              link: '/component/button'
            }
          ]
        }
      ]
    }
  }
}

export default config
- 创建 guide 和 component 目录,在 component 目录下编写组件文档,button.md
注意:文件的目录结构需要和 sidebar 的配置相对应
小结:
这篇文章主要讲解了如何抽离 eslint-config,这部分内容很简单相信搭建看看就能理解。
第二部分讲的是 配置 css 变量,对于一个组件库来说,合理的设置变量,后期维护会方便很多。
编写组件大家肯定都会,所以在第三部分我直接贴的代码。
第四部分是编写组件库文档,对于项目搭建和 congig 的配置 可以直接参考 vitepress 官网。
结束语
到这里就是本篇文章的全部内容了,如果对大家有用,希望多多支持一下,你们的支持就是我的动力呀 (●’◡’●)
这次组件库文档只是初级的版本,只是加载 md 文件,下一篇准备模拟 element 组件库文档的处理和渲染

