实战:ingress-nginx 高级配置2-2022.1.7
实战:ingress-nginx 高级配置2-2022.1.7
目录
文章目录
-
- 实战:ingress-nginx 高级配置2-2022.1.7
- 目录
- 实验环境
- 实验软件
- 1、HTTPS
-
- 演示1:用 HTTPS 来访问我们的应用
- 2、TCP与UDP
-
- 演示1:TCP与UDP
- 3、全局配置
-
- 演示1:全局配置
- 注意事项
-
- helm chart知识点
- 关于ingress-nginx更多使用方法
- 关于我
- 最后
实验环境
实验环境:
1、win10,vmwrokstation虚机;
2、k8s集群:3台centos7.6 1810虚机,1个master节点,2个node节点
   k8s version:v1.22.2
   containerd://1.5.5
实验软件
无
1、HTTPS
如果我们需要用 HTTPS 来访问我们这个应用的话,就需要监听 443 端口了,同样用 HTTPS 访问应用必然就需要证书。
注意:在安装ingress-nginx时,默认已经在监听443端口了。
[root@master1 ~]#netstat -antlp|grep 443
tcp 0 0 0.0.0.0:443 0.0.0.0:* LISTEN 8872/nginx: master
演示1:用 HTTPS 来访问我们的应用
这里我们用 openssl 来创建一个自签名的证书:
[root@master1 ~]#openssl req -x509 -nodes -days 365 -newkey rsa:2048 -keyout tls.key -out tls.crt -subj "/CN=foo.bar.com"
Generating a 2048 bit RSA private key
....................................+++
.............+++
writing new private key to 'tls.key'
-----
然后通过 Secret 对象来引用证书文件:
# 要注意证书文件名称必须是 tls.crt 和 tls.key
[root@master1 ~]#kubectl create secret tls foo-tls --cert=tls.crt --key=tls.key
secret/foo-tls created
[root@master1 ~]#kubectl get secrets foo-tls
NAME      TYPE                DATA   AGE
foo-tls   kubernetes.io/tls   2      13s
这个时候我们就可以创建一个 HTTPS 访问应用的:
记得提前创建好应用:
# my-nginx.yaml
apiVersion: apps/v1
kind: Deployment
metadata:
  name: my-nginx
spec:
  selector:
    matchLabels:
      app: my-nginx
  template:
    metadata:
      labels:
        app: my-nginx
    spec:
      containers:
      - name: my-nginx
        image: nginx
        ports:
        - containerPort: 80
---
apiVersion: v1
kind: Service
metadata:
  name: my-nginx
  labels:
    app: my-nginx
spec:
  ports:
  - port: 80
    protocol: TCP
    name: http
  selector:
    app: my-nginx

#查看应用
[root@master1 basic-auth]#kubectl get po,deploy,svc,ingress
NAME                            READY   STATUS    RESTARTS   AGE
pod/my-nginx-7c4ff94949-7zwxw   1/1     Running   0          6h30m

NAME                       READY   UP-TO-DATE   AVAILABLE   AGE
deployment.apps/my-nginx   1/1     1            1           6h30m

NAME                 TYPE        CLUSTER-IP      EXTERNAL-IP   PORT(S)   AGE
service/kubernetes   ClusterIP   10.96.0.1       >        443/TCP   67d
service/my-nginx     ClusterIP   10.103.81.161   >        80/TCP    6h30m

NAME                                 CLASS   HOSTS                ADDRESS       PORTS   AGE
ingress.networking.k8s.io/my-nginx   nginx   ngdemo.qikqiak.com   172.29.9.51   80      6h30m
编写ingress:
[root@master1 ~]#vim ingress-https.yaml
apiVersion: networking.k8s.io/v1
kind: Ingress
metadata:
  name: ingress-https
spec:
  ingressClassName: nginx
  tls:  # 配置 tls 证书
  - hosts:
    - foo.bar.com
    secretName: foo-tls #包含证书的一个secret对象名称
  rules:
  - host: foo.bar.com
    http:
      paths:
      - path: /
        pathType: Prefix
        backend:
          service:
            name: my-nginx
            port:
              number: 80

#本地pc配置下域名解析
这里记得在自己本地pc的hosts里面做下域名解析:
C:\WINDOWS\System32\drivers\etc
172.29.9.51 foo.bar.com
部署并测试:
[root@master1 https]#kubectl apply -f ingress-https.yaml
ingress.networking.k8s.io/ingress-https created
[root@master1 https]#kubectl get ingress
NAME            CLASS   HOSTS                ADDRESS       PORTS     AGE
ingress-https   nginx   foo.bar.com          172.29.9.51   80, 443   6s
my-nginx        nginx   ngdemo.qikqiak.com   172.29.9.51   80        6h40m
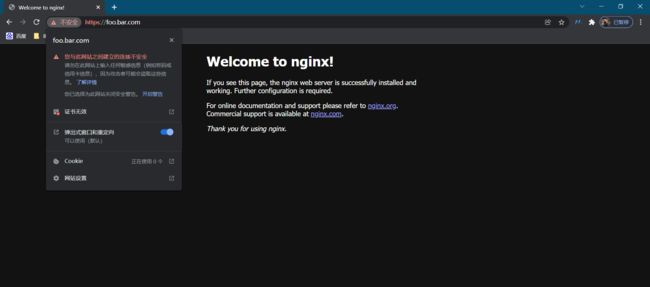
在自己pc浏览器里进行验证:
测试结束。
⚠️ 除了自签名证书或者购买正规机构的 CA 证书之外,我们还可以通过一些工具来自动生成合法的证书,cert-manager 是一个云原生证书管理开源项目,可以用于在 Kubernetes 集群中提供 HTTPS 证书并自动续期,支持
Let's Encrypt/HashiCorp/Vault这些免费证书的签发。在 Kubernetes 中,可以通过 Kubernetes Ingress 和 Let’s Encrypt 实现外部服务的自动化 HTTPS。感觉很厉害的样子哦哈哈
2、TCP与UDP
演示1:TCP与UDP
由于在 Ingress 资源对象中没有直接对 TCP 或 UDP 服务的支持,要在 ingress-nginx 中提供支持,需要在控制器启动参数中添加 --tcp-services-configmap 和 --udp-services-configmap 标志指向一个 ConfigMap,其中的 key 是要使用的外部端口,value 值是使用格式
比如现在我们要通过 ingress-nginx 来暴露一个 MongoDB 服务,首先创建如下的应用:
[root@master1 ~]#mkdir tcp
[root@master1 ~]#cd tcp
[root@master1 tcp]#vim mongo.yaml
# mongo.yaml
apiVersion: apps/v1
kind: Deployment
metadata:
  name: mongo
  labels:
    app: mongo
spec:
  selector:
    matchLabels:
      app: mongo
  template:
    metadata:
      labels:
        app: mongo
    spec:
      volumes:
      - name: data
        emptyDir: {}
      containers:
      - name: mongo
        image: mongo:4.0
        ports:
        - containerPort: 27017
        volumeMounts:
        - name: data
          mountPath: /data/db
---
apiVersion: v1
kind: Service
metadata:
  name: mongo
spec:
  selector:
    app: mongo
  ports:
  - port: 27017
直接创建上面的资源对象:
[root@master1 tcp]#kubectl apply -f mongo.yaml
deployment.apps/mongo created
service/mongo created
[root@master1 tcp]#kubectl get svc
NAME         TYPE        CLUSTER-IP      EXTERNAL-IP   PORT(S)     AGE
kubernetes   ClusterIP   10.96.0.1       <none>        443/TCP     67d
mongo        ClusterIP   10.103.108.49   <none>        27017/TCP   2m57s
my-nginx     ClusterIP   10.103.81.161   <none>        80/TCP      7h49m
[root@master1 tcp]#kubectl get po -l app=mongo
NAME                     READY   STATUS    RESTARTS   AGE
mongo-7885fb6bd4-28p8x   1/1     Running   0          3m20s
现在我们要通过 ingress-nginx 来暴露上面的 MongoDB 服务,我们需要创建一个如下所示的 ConfigMap:
[root@master1 tcp]#vim tcp-services.yaml
apiVersion: v1
kind: ConfigMap
metadata:
  name: tcp-services
  namespace: ingress-nginx
data:
  "27017": default/mongo:27017

#这里是不用部署的,因为我们下面是使用helm方式部署的。
然后在 ingress-nginx 的启动参数中添加 --tcp-services-configmap=$(POD_NAMESPACE)/ingress-nginx-tcp 这样的配置即可,由于我们这里使用的是 Helm Chart 进行安装的,我们只需要去覆盖 Values 值重新安装即可,修改 ci/daemonset-prod.yaml(因为自己当时新建的文件就是这个) 文件:
[root@master1 ingress-nginx]#ls
CHANGELOG.md  Chart.yaml  ci  OWNERS  README.md  templates  values.yaml
[root@master1 ingress-nginx]#vim ci/daemonset-prod.yaml
# ...... 其他部分省略,和之前的保持一致

tcp:  # 配置 tcp 服务
  27017: "default/mongo:27017"  # 使用 27017 端口去映射 mongo 服务
  # 9000: "default/test:8080"   # 如果还需要暴露其他 TCP 服务,继续添加即可
配置完成后重新更新当前的 ingress-nginx:
➜ helm upgrade --install ingress-nginx . -f ./ci/daemonset-prod.yaml --namespace ingress-nginx
⚠️ 注意:在执行这一步时,会发现一直卡在那里
![]()
这里的等一会儿,原始是有admission webhook
耐心等待一会儿就好了:
重新部署完成后会自动生成一个名为 ingress-nginx-tcp 的 ConfigMap 对象,如下所示:
[root@master1 ~]#kubectl get cm -ningress-nginx
NAME                        DATA   AGE
ingress-controller-leader   0      4d5h
ingress-nginx-controller    1      4d5h
ingress-nginx-tcp           1      2m22s
kube-root-ca.crt            1      4d5h
tcp-services                1      8m26s
[root@master1 ~]#kubectl get configmap -n ingress-nginx ingress-nginx-tcp -o yaml
apiVersion: v1
data:
  "27017": default/mongo:27017
kind: ConfigMap
metadata:
  annotations:
    meta.helm.sh/release-name: ingress-nginx
    meta.helm.sh/release-namespace: ingress-nginx
  creationTimestamp: "2022-01-06T12:59:55Z"
  labels:
    app.kubernetes.io/component: controller
    app.kubernetes.io/instance: ingress-nginx
    app.kubernetes.io/managed-by: Helm
    app.kubernetes.io/name: ingress-nginx
    app.kubernetes.io/version: 1.1.0
    helm.sh/chart: ingress-nginx-4.0.13
  name: ingress-nginx-tcp
  namespace: ingress-nginx
  resourceVersion: "1309200"
  uid: be0b9e3d-d201-4166-917d-39197724b1ce
在 ingress-nginx 的启动参数中也添加上 --tcp-services-configmap=$(POD_NAMESPACE)/ingress-nginx-tcp 这样的配置:
[root@master1 ~]#kubectl get po -ningress-nginx
NAME                                            READY   STATUS    RESTARTS     AGE
ingress-nginx-controller-jfq9r                  1/1     Running   0            4m38s
ingress-nginx-defaultbackend-84854cd6cb-zct8c   1/1     Running   4 (8h ago)   4d5h
[root@master1 ~]#kubectl get po ingress-nginx-controller-jfq9r -ningress-nginx -oyaml
apiVersion: v1
kind: Pod
……
  containers:
  - args:
    - /nginx-ingress-controller
    - --default-backend-service=$(POD_NAMESPACE)/ingress-nginx-defaultbackend
    - --election-id=ingress-controller-leader
    - --controller-class=k8s.io/ingress-nginx
    - --configmap=$(POD_NAMESPACE)/ingress-nginx-controller
    - --tcp-services-configmap=$(POD_NAMESPACE)/ingress-nginx-tcp
    - --validating-webhook=:8443
    - --validating-webhook-certificate=/usr/local/certificates/cert
    - --validating-webhook-key=/usr/local/certificates/key
……
    ports:
    - containerPort: 80
      hostPort: 80
      name: http
      protocol: TCP
    - containerPort: 443
      hostPort: 443
      name: https
      protocol: TCP
    - containerPort: 8443
      hostPort: 8443
      name: webhook
      protocol: TCP
    - containerPort: 27017
      hostPort: 27017
      name: 27017-tcp
      protocol: TCP
现在我们就可以通过 ingress-nginx 暴露的 27017 端口去访问 Mongo 服务了:
[root@master1 ~]#netstat -antlp|grep 27017
tcp        0      0 0.0.0.0:27017           0.0.0.0:*               LISTEN      118681/nginx: maste
tcp6       0      0 :::27017                :::*                    LISTEN      118681/nginx: maste

[root@master1 ~]#kubectl exec -it mongo-7885fb6bd4-28p8x -- bash> show dbs
root@mongo-7885fb6bd4-28p8x:/# mongo --host 172.29.9.51  --port 27017
……
> show dbs
admin   0.000GB
config  0.000GB
local   0.000GB
>
同样的我们也可以去查看最终生成的 nginx.conf 配置文件:
[root@master1 ~]#kubectl get po -ningress-nginx
NAME                                            READY   STATUS    RESTARTS     AGE
ingress-nginx-controller-jfq9r                  1/1     Running   0            17m
ingress-nginx-defaultbackend-84854cd6cb-zct8c   1/1     Running   4 (8h ago)   4d5h
[root@master1 ~]#kubectl exec  ingress-nginx-controller-jfq9r -ningress-nginx -- cat /etc/nginx/nginx.conf
......
stream {
    ......
    # TCP services
    server {
            preread_by_lua_block {
                    ngx.var.proxy_upstream_name="tcp-default-mongo-27017";
            }
            listen                  27017;
            listen                  [::]:27017;
            proxy_timeout           600s;
            proxy_next_upstream     on;
            proxy_next_upstream_timeout 600s;
            proxy_next_upstream_tries   3;
            proxy_pass              upstream_balancer;
    }
    # UDP services
}
TCP 相关的配置位于 stream 配置块下面。
从 Nginx 1.9.13 版本开始提供 UDP 负载均衡,同样我们也可以在 ingress-nginx 中来代理 UDP 服务,比如我们可以去暴露 kube-dns 的服务,同样需要创建一个如下所示的 ConfigMap:
apiVersion: v1
kind: ConfigMap
metadata:
  name: udp-services
  namespace: ingress-nginx
data:
  53: "kube-system/kube-dns:53"
然后需要在 ingress-nginx 参数中添加一个 - --udp-services-configmap=$(POD_NAMESPACE)/udp-services 这样的配置,当然我们这里只需要去修改 Values 文件值即可,修改 ci/daemonset-prod.yaml 文件:
# ci/daemonset-prod.yaml
# ...... 其他部分省略,和之前的保持一致

tcp:  # 配置 tcp 服务
  27017: "default/mongo:27017"  # 使用 27017 端口去映射 mongo 服务
  # 9000: "default/test:8080"   # 如果还需要暴露其他 TCP 服务,继续添加即可

udp:  # 配置 udp 服务
  53: "kube-system/kube-dns:53"
然后重新更新即可。
测试结束。
3、全局配置
演示1:全局配置
除了可以通过 annotations 对指定的 Ingress 进行定制之外,我们还可以配置 ingress-nginx 的全局配置,在控制器启动参数中通过标志 --configmap 指定了一个全局的 ConfigMap 对象,我们可以将全局的一些配置直接定义在该对象中即可:
[root@master1 ~]#kubectl get po -ningress-nginx
NAME                                            READY   STATUS    RESTARTS     AGE
ingress-nginx-controller-jfq9r                  1/1     Running   0            83m
ingress-nginx-defaultbackend-84854cd6cb-zct8c   1/1     Running   4 (9h ago)   4d6h
[root@master1 ~]#kubectl edit pod ingress-nginx-controller-jfq9r -ningress-nginx
……
containers:
  - args:
    - /nginx-ingress-controller
    - --configmap=$(POD_NAMESPACE)/ingress-nginx-controller
    ......
比如这里我们用于全局配置的 ConfigMap 名为 ingress-nginx-controller:(这个是当初用helm安装ingress-nginx默认就创建好的)
[root@master1 ~]#kubectl get cm -ningress-nginx
NAME                        DATA   AGE
ingress-controller-leader   0      4d6h
ingress-nginx-controller    1      4d6h #是这个
ingress-nginx-tcp           1      88m
kube-root-ca.crt            1      4d6h
tcp-services                1      94m
[root@master1 ~]#
比如我们可以添加如下所示的一些常用配置:
➜ kubectl edit configmap ingress-nginx-controller -n ingress-nginx
apiVersion: v1
data:
  allow-snippet-annotations: "true"
  client-header-buffer-size: 32k  # 注意不是下划线
  client-max-body-size: 5m
  use-gzip: "true"
  gzip-level: "7"
  large-client-header-buffers: 4 32k
  proxy-connect-timeout: 11s
  proxy-read-timeout: 12s
  keep-alive: "75"   # 启用keep-alive,连接复用,提高QPS,一般线上都是建议启用这个keep-alive的;
  keep-alive-requests: "100"
  upstream-keepalive-connections: "10000"
  upstream-keepalive-requests: "100"
  upstream-keepalive-timeout: "60"
  disable-ipv6: "true"
  disable-ipv6-dns: "true"
  max-worker-connections: "65535"
  max-worker-open-files: "10240"
kind: ConfigMap
......
修改完成后 Nginx 配置会自动重载生效,我们可以查看 nginx.conf 配置文件进行验证:
➜ kubectl exec -it ingress-nginx-controller-gc582 -n ingress-nginx -- cat /etc/nginx/nginx.conf |grep large_client_header_buffers
        large_client_header_buffers     4 32k;
由于我们这里是 Helm Chart 安装的,为了保证重新部署后配置还在,我们同样需要通过 Values 进行全局配置:
# vim ci/daemonset-prod.yaml
controller:
  config: #注意下这个层级关系
    allow-snippet-annotations: "true"
    client-header-buffer-size: 32k  # 注意不是下划线,这里写的横杠:-最后在nginx.conf配置文件里会被翻译成下划线_的;
    client-max-body-size: 5m
    use-gzip: "true"
    gzip-level: "7"
    large-client-header-buffers: 4 32k
    proxy-connect-timeout: 11s
    proxy-read-timeout: 12s
    keep-alive: "75"   # 启用keep-alive,连接复用,提高QPS
    keep-alive-requests: "100"
    upstream-keepalive-connections: "10000"
    upstream-keepalive-requests: "100"
    upstream-keepalive-timeout: "60"
    disable-ipv6: "true"
    disable-ipv6-dns: "true"
    max-worker-connections: "65535"
    max-worker-open-files: "10240"

# 其他省略
Will add custom configuration options to Nginx https://kubernetes.github.io/ingress-nginx/user-guide/nginx-configuration/configmap/

配置了vim ci/daemonset-prod.yaml文件后,我们重新应用下:
[root@master1 ingress-nginx]#ls
CHANGELOG.md  Chart.yaml  ci  OWNERS  README.md  templates  values.yaml
[root@master1 ingress-nginx]#helm upgrade --install ingress-nginx . -f ./ci/daemonset-prod.yaml --namespace ingress-nginx
验证下:
[root@master1 ingress-nginx]#kubectl get po -ningress-nginx
NAME                                            READY   STATUS    RESTARTS      AGE
ingress-nginx-controller-jfq9r                  1/1     Running   0             113m
ingress-nginx-defaultbackend-84854cd6cb-zct8c   1/1     Running   4 (10h ago)   4d6h
[root@master1 ingress-nginx]#kubectl exec ingress-nginx-controller-jfq9r -ningress-nginx -- cat /etc/nginx/nginx.conf|grep keepalive
        keepalive_timeout  75s;
        keepalive_requests 100;
                # See http://nginx.org/en/docs/http/ngx_http_upstream_module.html#keepalive
                keepalive 320;
                keepalive_timeout  60s;
                keepalive_requests 10000;
                keepalive_timeout 0;
此外往往我们还需要对 ingress-nginx 部署的节点进行性能优化,修改一些内核参数,使得适配 Nginx 的使用场景,一般我们是直接去修改节点上的内核参数,为了能够统一管理,我们可以使用 initContainers 来进行配置:
[root@master1 ingress-nginx]#ls
CHANGELOG.md  Chart.yaml  ci  OWNERS  README.md  templates  values.yaml
[root@master1 ingress-nginx]#vim values.yaml
  extraInitContainers: []
  ## Containers, which are run before the app containers are started.
  # - name: init-myservice
  #   image: busybox
  #   command: ['sh', '-c', 'until nslookup myservice; do echo waiting for myservice; sleep 2; done;']
initContainers:
- command:
  - /bin/sh
  - -c
  - |
    mount -o remount rw /proc/sys
    sysctl -w net.core.somaxconn=65535  # 具体的配置视具体情况而定
    sysctl -w net.ipv4.tcp_tw_reuse=1
    sysctl -w net.ipv4.ip_local_port_range="1024 65535"
    sysctl -w fs.file-max=1048576
    sysctl -w fs.inotify.max_user_instances=16384
    sysctl -w fs.inotify.max_user_watches=524288
    sysctl -w fs.inotify.max_queued_events=16384
image: busybox
imagePullPolicy: IfNotPresent
name: init-sysctl
securityContext:
  capabilities:
    add:
    - SYS_ADMIN
    drop:
    - ALL
......
由于我们这里使用的是 Helm Chart 安装的 ingress-nginx,同样只需要去配置 Values 值即可,模板中提供了对 initContainers 的支持,配置如下所示:
[root@master1 ingress-nginx]#ls
CHANGELOG.md  Chart.yaml  ci  OWNERS  README.md  templates  values.yaml
[root@master1 ingress-nginx]#vim ci/daemonset-prod.yaml
……
controller:
  # 其他省略,配置 initContainers
  extraInitContainers:
  - name: init-sysctl
    image: busybox
    securityContext:
      capabilities:
        add:
        - SYS_ADMIN
        drop:
        - ALL
    command:
    - /bin/sh
    - -c
    - |
      mount -o remount rw /proc/sys
      sysctl -w net.core.somaxconn=65535  # socket监听的backlog上限
      sysctl -w net.ipv4.tcp_tw_reuse=1  # 开启重用,允许将 TIME-WAIT sockets 重新用于新的TCP连接
      sysctl -w net.ipv4.ip_local_port_range="1024 65535"
      sysctl -w fs.file-max=1048576
      sysctl -w fs.inotify.max_user_instances=16384
      sysctl -w fs.inotify.max_user_watches=524288
      sysctl -w fs.inotify.max_queued_events=16384
同样重新部署即可:
➜ helm upgrade --install ingress-nginx . -f ./ci/daemonset-prod.yaml --namespace ingress-nginx
部署完成后通过 initContainers 就可以修改节点内核参数了,生产环境建议对节点内核参数进行相应的优化。
查看并验证:
[root@master1 ~]#kubectl get po -ningress-nginx
NAME                                            READY   STATUS    RESTARTS      AGE
ingress-nginx-controller-rq77g                  1/1     Running   0             30s
ingress-nginx-defaultbackend-84854cd6cb-zct8c   1/1     Running   4 (17h ago)   4d13h
[root@master1 ~]#kubectl exec ingress-nginx-controller-rq77g -ningress-nginx -- sysctl -a|grep fs.inotify.max_queued_events
Defaulted container "controller" out of: controller, init-sysctl (init)
fs.inotify.max_queued_events = 16384
[root@master1 ~]#kubectl exec ingress-nginx-controller-rq77g -ningress-nginx -- sysctl -a|grep fs.inotify.max_user_watches
Defaulted container "controller" out of: controller, init-sysctl (init)
fs.inotify.max_user_watches = 524288
#可以看到已生效,符合预期
测试结束。
注意事项
helm chart知识点
vim values.yaml:
vim ci/daemonset-prod.yaml
template内容
_params.tml
关于ingress-nginx更多使用方法
Will add custom configuration options to Nginx https://kubernetes.github.io/ingress-nginx/user-guide/nginx-configuration/configmap/

当然,我们也是可以定制404的
annotations配置是针对单个域名生效的
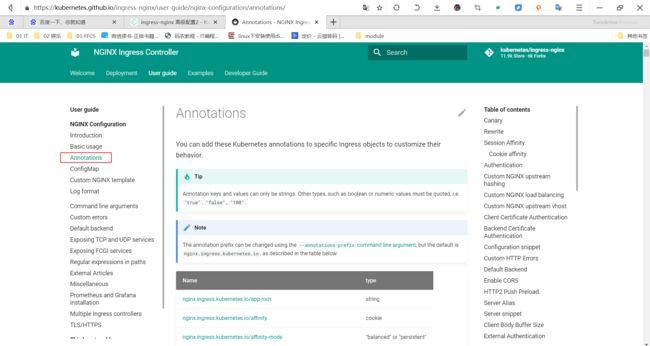
注意:你想要针对单个域名或者ingress对象配置的话,是通过annotations来配置的。至于具体能配哪些东西,这里可以查看官方链接。
https://kubernetes.github.io/ingress-nginx/user-guide/nginx-configuration/annotations/
在nginx能做的配置大多数是可以在ingress的anotations里面配置的。
关于我
我的博客主旨:我希望每一个人拿着我的博客都可以做出实验现象,先把实验做出来,然后再结合理论知识更深层次去理解技术点,这样学习起来才有乐趣和动力。并且,我的博客内容步骤是很完整的,也分享源码和实验用到的软件,希望能和大家一起共同进步!
各位小伙伴在实际操作过程中如有什么疑问,可随时联系本人免费帮您解决问题:
-
个人微信二维码:x2675263825 (舍得), qq:2675263825。
-
个人博客地址:www.onlyonexl.cn
-
个人微信公众号:云原生架构师实战
-
个人github
https://github.com/OnlyOnexl
-
个人csdn
https://blog.csdn.net/weixin_39246554?spm=1010.2135.3001.5421
最后
好了,关于ingress-nginx 高级配置2实验就到这里了,感谢大家阅读,最后贴上我女神的photo,祝大家生活快乐,每天都过的有意义哦,我们下期见!


