06_Elasticsearch 7.4.2集群部署以及X-Pack 安全配置(Es、kibana)【超详细版】
本文章收录于【Elasticsearch 系列】,将详细的讲解 Elasticsearch 整个大体系,包括但不限于ELK讲解、ES调优、海量数据处理等。
在之前的文章中有讲解es的单机部署方式,详情请移步
03、Elasticsearch 安装和配置指南(Windows、Linux)
本文大纲
一、Elasticsearch 集群部署
1、第一个节点部署(9200)
(1)解压下载或者是上传的压缩包
(2)创建es账号
(3)改变文件夹的归属
(4)修改配置文件elasticsearch.yml,完整的配置文件如下所示
(5)启动elasticsearch
(6)验证是否启动成功
2、剩下的节点部署
(1)解压下载或者是上传的压缩包
(2)改变文件夹的归属
(3)修改配置文件elasticsearch.yml,完整的配置文件如下所示
(4)启动elasticsearch
(5)验证集群是否部署成功
二、X-Pack 安全配置
1、生成证书
2、生成秘钥
3、密钥文件转移
4、为第一个节点添加密码
5、第一个节点添加配置文件
6、其他节点的配置
(1)elastic-certificates.p12文件拷贝
(2)文件授权
(3)配置密钥密码
(4)添加配置文件
7、设置各种密码(注意需要先把集群中的所有节点都给启动起来)
8、验证集群的X-Pack 安全配置
(1)es-head访问认证的es
(2)浏览器访问
三、基于es集群和X-Pack安全配置的kibana 的安装
1、kibana的下载
(1)官网直接下载
(2)Linux 服务器直接下载(需要能够访问互联网的服务器)
2、权限赋予
3、配置文件的修改
四、部署过程中出现的问题:
1、x-pack 密钥配置问题
一、Elasticsearch 集群部署
官网下载Elasticsearch安装包可能有些慢,因此一般采用国内镜像或者是其他人下载好上传到网盘的版本,这里将我使用的挂出来,里面包含有整套ELK7.4.2的所有文件。
由于服务器资源有限,这里只演示在单台服务器上部署两个集群节点,多台服务器多个节点配置与下述的步骤完全一致。
本篇文章所采用集群节点:172.19.44.51:9200、172.19.44.51:8200
节点的安装路径:
es01: /usr/local/huaxing/elasticsearch-7.4.2-9200
es02: /usr/local/huaxing/elasticsearch-7.4.2-8200
1、第一个节点部署(9200)
(1)解压下载或者是上传的压缩包
tar -zxvf elasticsearch-7.4.2-linux-x86_64.tar.gz重新命名,防止等下解压其他节点时文件名重复
mv elasticsearch-7.4.2 elasticsearch-7.4.2-9200(2)创建es账号
useradd es(3)改变文件夹的归属
chown -R es:es /usr/local/huaxing/elasticsearch-7.4.2-9200(4)修改配置文件elasticsearch.yml,完整的配置文件如下所示
cluster.name: huaxingxt


node.name: es01
node.master: true
node.data: true


bootstrap.memory_lock: false
bootstrap.system_call_filter: false


network.host: 172.19.44.51
http.port: 9200
#设置节点间交互的tcp端口,默认是9300。transport.tcp.port: 9300


discovery.seed_hosts: ["172.19.44.51:9300", "172.19.44.51:8300"]
cluster.initial_master_nodes: es01


#删除索引时需要显式名称
action.destructive_requires_name: true
## 开启跨域访问(配置文件末尾添加即可)
http.cors.enabled: true
http.cors.allow-origin: "*"
#设置为false以禁用X-Pack机器学习功能。xpack.ml.enabled:  false
(5)启动elasticsearch
#前台启动的方式
bin/elasticsearch
#后台启动方式(推荐使用)
bin/elasticsearch -d
成功标识如下
(6)验证是否启动成功
浏览器输入http://【外网ip】:9200/,也可以服务器中验证:curl 'http://127.0.0.1:9200',出现截图所示则说明配置成功
2、剩下的节点部署
注意!!!注意!!!注意!!!
重要的事情说三遍
建议重新解压 elasticsearch-7.4.2-linux-x86_64.tar.gz 文件,防止因为直接拷贝原来解压的es目录下的data和log目录数据一致。
因为若是data和log目录下的数据一致的话会默认为一个节点,新启用的节点加入不了集群。
es安装过程中的一个误区,集群搭建过程中会先配置好一个节点配置文件,之后会启动一下试试看是否有问题,没问题了再分发到其他节点。
如果直接拷贝出来的es文件夹,此时分发操作会把把配置文件中指定的data和log路径下的文件也分发出去,这就造成新节点的数据环境并不是初始状态。
那么新的节点上的data和log都将继续使用原节点的数据,即便是改了配置文件也不能使用新的配置,
所以需要清空这两个路径,让新节点以全新初始环境启动。
(1)解压下载或者是上传的压缩包
tar -zxvf elasticsearch-7.4.2-linux-x86_64.tar.gz重新命名,防止等下解压其他节点时文件名重复
elasticsearch-7.4.2-8200(2)改变文件夹的归属
chown -R es:es /usr/local/huaxing/elasticsearch-7.4.2-8200(3)修改配置文件elasticsearch.yml,完整的配置文件如下所示
# Use a descriptive name for your cluster:
cluster.name: huaxingxt


# Use a descriptive name for the node:
node.name: es02
node.master: true
node.data: true


# Path to directory where to store the data (separate multiple locations by comma):
path.data: /usr/local/huaxing/elasticsearch-7.4.2-8200/data


# Path to log files:
path.logs: /usr/local/huaxing/elasticsearch-7.4.2-8200/logs


# Lock the memory on startup:
bootstrap.memory_lock: false
bootstrap.system_call_filter: false


# Set the bind address to a specific IP (IPv4 or IPv6):
network.host: 172.19.44.51


# Set a custom port for HTTP:
http.port: 8200
#设置节点间交互的tcp端口,默认是9300。transport.tcp.port: 8300


# Pass an initial list of hosts to perform discovery when this node is started:
# The default list of hosts is ["127.0.0.1", "[::1]"]
discovery.seed_hosts: ["172.19.44.51:9300", "172.19.44.51:8300"]


# Bootstrap the cluster using an initial set of master-eligible nodes:
cluster.initial_master_nodes: es01


# Require explicit names when deleting indices:
action.destructive_requires_name: true
## 开启跨域访问(配置文件末尾添加即可)
http.cors.enabled: true
http.cors.allow-origin: "*"
#设置为false以禁用X-Pack机器学习功能。xpack.ml.enabled:  false
(4)启动elasticsearch
#前台启动的方式
bin/elasticsearch
#后台启动方式(推荐使用)
bin/elasticsearch -d
(5)验证集群是否部署成功
浏览器输入 http://ip:9200/_cat/health?v,若出现如下所示则说明集群启动成功
epoch      timestamp cluster   status node.total node.data shards pri relo init unassign pending_tasks max_task_wait_time active_shards_percent
1637202277 02:24:37  huaxingxt green           2         2      2   1    0    0        0             0                  -                100.0%
其参数的含义如下所示:
-
cluster:集群名称
-
status:集群状态 green代表健康;yellow代表分配了所有主分片,但至少缺少一个副本,此时集群数据仍旧完整;red代表部分主分片不可用,可能已经丢失数据。
-
node.total:代表在线的节点总数量
-
node.data:代表在线的数据节点的数量
-
shards:active_shards 存活的分片数量
-
pri:active_primary_shards 存活的主分片数量 正常情况下 shards的数量是pri的两倍。
-
relo:relocating_shards 迁移中的分片数量,正常情况为 0
-
init:initializing_shards 初始化中的分片数量 正常情况为 0
-
unassign:unassigned_shards 未分配的分片 正常情况为 0
-
pending_tasks:准备中的任务,任务指迁移分片等 正常情况为 0
-
max_task_wait_time:任务最长等待时间
-
active_shards_percent:正常分片百分比 正常情况为 100%
二、X-Pack 安全配置
ES(ElasticSearch)数据库没有开启授权认证,需要开启授权认证,防止非法访问
在上述的步骤中,我们已经成功的把集群搭建了起来,但现在整个es集群是属于裸奔的状态,不可控性非常高,故需要使用X-Pack进行安全配置
1、生成证书
ElasticSearch 6.x 版本以后,已经默认集成了x-pack的功能,只需要我们把对应的配置启动就好。首先切换到es安装目录/usr/local/huaxing/elasticsearch-7.4.2-9200,执行以下语句:
bin/elasticsearch-certutil ca执行之后会提示输入输出的文件名,这个时候一般直接敲回车采用默认的文件名称(elastic-stack-ca.p12)就好,若是有特殊要求的也可以自定义。生成CA证书 bin/elasticsearch-certutil ca 将产生新文件elastic-stack-ca.p12 该 elasticsearch-certutil 命令还会提示你输入密码以保护文件和密钥,请保留该文件的副本并记住其密码;
接下来会提示输入密码,输入自定义的密码就好,密码最好留个备份以免忘记
![]()
完成后会生成一个文件:elastic-stack-ca.p12。
2、生成秘钥
bin/elasticsearch-certutil cert --ca elastic-stack-ca.p12--ca 后面跟的就是刚刚默认(elastic-stack-ca.p12)或者自定义的文件名,上述我采用的是默认文件名
接下来需要认证密码,输入上述步骤自定义的密码,整个操作的步骤如下图所示,整个步骤完成。
为集群中的每个节点生成证书和私钥bin/elasticsearch-certutil cert --ca elastic-stack-ca.p12将产生新文件elastic-certificates.p12系统还会提示你输入密码,你可以输入证书和密钥的密码,也可以按Enter键将密码留空。默认情况下 elasticsearch-certutil生成没有主机名信息的证书,这意味着你可以将证书用于集群中的每个节点,另外要关闭主机名验证。我采取的是把凭证移动至每一台集群下面把elastic-certificates.p12这个文件移动到每一台服务器es安装目录的相同路径
3、密钥文件转移
最好将这两个文件移到到config里边
# 先创建目录
mkdir ./config/certificates
# 移动凭证至config的certificates下
mv ./elastic-certificates.p12 ./config/certificates/
# 赋值权限,不然会出问题
chmod 777 ./config/certificates/elastic-certificates.p12
4、为第一个节点添加密码
在各个节点上添加密码(每一台es都需要操作),输入密码:生成密钥步骤设置的密码
bin/elasticsearch-keystore add xpack.security.transport.ssl.keystore.secure_password
bin/elasticsearch-keystore add xpack.security.transport.ssl.truststore.secure_password
5、第一个节点添加配置文件
vim ./config/elasticsearch.yml添加以下配置
# 跨域
http.cors.enabled: true
http.cors.allow-origin: "*"
http.cors.allow-headers: Authorization,X-Requested-With,Content-Type,Content-Length


########################启用xpack并指定访问节点证书所需的信息########################
#设置为true以开启X-Pack安全功能。
xpack.security.enabled: true
xpack.security.transport.ssl.enabled: true
xpack.security.transport.ssl.verification_mode: certificate
#存放elastic-certificates.p12文件路径
xpack.security.transport.ssl.keystore.path: 【es的安装路径】/config/certificates/elastic-certificates.p12
xpack.security.transport.ssl.truststore.path: 【es的安装路径】/config/certificates/elastic-certificates.p12
########################启用xpack并指定访问节点证书所需的信息########################
启动elasticsearch,并查看日志是否启动成功,若是启动成功,这时在浏览器中访问会提示要输入账号密码,但只有等集群里面所有的节点都设置X-Pack安全配置成功后才会生效。
#前台启动的方式
bin/elasticsearch
#后台启动方式(推荐使用)
bin/elasticsearch -d
6、其他节点的配置
其他节点相对于第一个节点来说,配置会比较简单一些。若有多个其他节点,按照这一步操作循环部署即可。
(1)elastic-certificates.p12文件拷贝
把生成的elastic-certificates.p12文件拷贝到对应节点下/config/certificates目录下
(2)文件授权
方式一:使用chown 命令对整个文件夹重新授权 ps:需要使用root账号操作
chown -R es:es /usr/local/huaxing/elasticsearch-7.4.2-8200方式二:使用chmod 对elastic-certificates.p12文件赋权
chmod 777 /config/certificates/elastic-certificates.p12(3)配置密钥密码
在之前的步骤中,我们对elastic-certificates.p12 文件配置了密码,故需要配置密码。输入密码:生成密钥步骤设置的密码
bin/elasticsearch-keystore add xpack.security.transport.ssl.keystore.secure_password
bin/elasticsearch-keystore add xpack.security.transport.ssl.truststore.secure_password
(4)添加配置文件
vim ./config/elasticsearch.yml添加以下配置,和第一个节点的配置一样
# 跨域
http.cors.enabled: true
http.cors.allow-origin: "*"
http.cors.allow-headers: Authorization,X-Requested-With,Content-Type,Content-Length


########################启用xpack并指定访问节点证书所需的信息########################
#设置为true以开启X-Pack安全功能。
xpack.security.enabled: true
xpack.security.transport.ssl.enabled: true
xpack.security.transport.ssl.verification_mode: certificate
#存放elastic-certificates.p12文件路径
xpack.security.transport.ssl.keystore.path: 【es的安装路径】/config/certificates/elastic-certificates.p12
xpack.security.transport.ssl.truststore.path: 【es的安装路径】/config/certificates/elastic-certificates.p12
########################启用xpack并指定访问节点证书所需的信息########################
最后重新启动es
bin/elasticsearch -d7、设置各种密码(注意需要先把集群中的所有节点都给启动起来)
./bin/elasticsearch-setup-passwords interactive下面会要输入很多密码,都要自己能记住,以后要用,建议统一设置一个密码,共需要设置 elastic,apm_system,kibana,kibana_system,logstash_system,beats_system,remote_monitoring_user 这些用户的密码
设置成功的结果如下:
[es@iZ7xv710y1af2acjy4eopeZ elasticsearch-7.4.2]$ ./bin/elasticsearch-setup-passwords  interactive
Initiating the setup of passwords for reserved users elastic,apm_system,kibana,logstash_system,beats_system,remote_monitoring_user.
You will be prompted to enter passwords as the process progresses.
Please confirm that you would like to continue [y/N]y


Enter password for [elastic]:
Reenter password for [elastic]:
Enter password for [apm_system]:
Reenter password for [apm_system]:
Enter password for [kibana]:
Reenter password for [kibana]:
Enter password for [logstash_system]:
Reenter password for [logstash_system]:
Enter password for [beats_system]:
Reenter password for [beats_system]:
Enter password for [remote_monitoring_user]:
Reenter password for [remote_monitoring_user]:
Changed password for user [apm_system]
Changed password for user [kibana]
Changed password for user [logstash_system]
Changed password for user [beats_system]
Changed password for user [remote_monitoring_user]
Changed password for user [elastic]
8、验证集群的X-Pack 安全配置
到了这一步,可以说整个集群的搭建和X-Pack 安全配置已经完美成功
(1)es-head访问认证的es
在没有开启X-Pack安全配置时,可以直接使用 ip:9200 的方式访问,但是此方法显然不支持带认证的es所以此处需要带上账户名和密码:
ip:9200/?auth_user=elastic&auth_password=xxx(2)浏览器访问
直接访问会被直接拦截,需要验证账号密码,数据之前配置的账号密码即可
三、基于es集群和X-Pack安全配置的kibana 的安装
1、kibana的下载
(1)官网直接下载
kibana下载地址:https://www.elastic.co/cn/downloads/kibana
下载你需要的版本
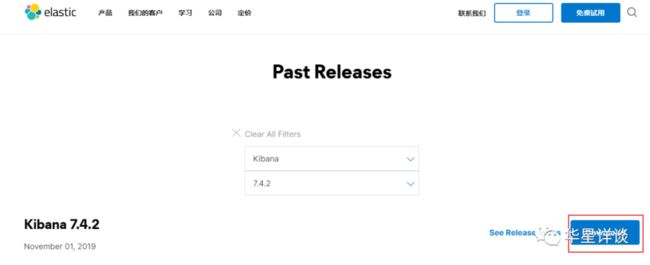
点击 View past releases 进入这个页面就可以选择需要的版本了
点击 Download 进入页面下载linux或其他版本的kibana
(2)Linux 服务器直接下载(需要能够访问互联网的服务器)
本人使用的Elasticsearch为7.4.2版本所以使用7.7.4.2的kibana
wget https://artifacts.elastic.co/downloads/kibana/kibana-7.4.2-linux-x86_64.tar.gz然后解压到指定的文件夹中
tar -zxvf /usr/local/huaxing/kibana-7.2.0-linux-x86_64.tar.gz -C /usr/local/huaxing2、权限赋予
使用root 账号把该文件夹赋值给es账号
chown -R es:es /usr/local/huaxing/kibana-7.4.23、配置文件的修改
完整的配置文件如下
server.port: 5601
server.host: 172.19.44.51
server.name: "huaxing-kibana"
elasticsearch.hosts: ["http://172.19.44.51:9200"]
#es账号密码
elasticsearch.username: "elastic"
elasticsearch.password: "xxxx"
#汉化界面
i18n.locale: "zh-CN"
#开启x-pack
xpack.security.enabled: true
最后使用后台的方式启动,并浏览器进行访问就部署成功了
nohup ./kibana &由于开启了x-pack安全认证,故需要输入账号密码,用户名默认是elastic,密码为之前在部署es集群的x-pack设置时自定义的
四、部署过程中出现的问题:
1、x-pack 密钥配置问题
[2021-11-18T09:14:10,976][WARN ][o.e.b.ElasticsearchUncaughtExceptionHandler] [es02] uncaught exception in thread [main]
org.elasticsearch.bootstrap.StartupException: java.lang.IllegalStateException: failed to load plugin class [org.elasticsearch.xpack.core.XPackPlugin]
  at org.elasticsearch.bootstrap.Elasticsearch.init(Elasticsearch.java:163) ~[elasticsearch-7.4.2.jar:7.4.2]
  at org.elasticsearch.bootstrap.Elasticsearch.execute(Elasticsearch.java:150) ~[elasticsearch-7.4.2.jar:7.4.2]
  at org.elasticsearch.cli.EnvironmentAwareCommand.execute(EnvironmentAwareCommand.java:86) ~[elasticsearch-7.4.2.jar:7.4.2]
  at org.elasticsearch.cli.Command.mainWithoutErrorHandling(Command.java:125) ~[elasticsearch-cli-7.4.2.jar:7.4.2]
  at org.elasticsearch.cli.Command.main(Command.java:90) ~[elasticsearch-cli-7.4.2.jar:7.4.2]
  at org.elasticsearch.bootstrap.Elasticsearch.main(Elasticsearch.java:115) ~[elasticsearch-7.4.2.jar:7.4.2]
  at org.elasticsearch.bootstrap.Elasticsearch.main(Elasticsearch.java:92) ~[elasticsearch-7.4.2.jar:7.4.2]
Caused by: java.io.IOException: keystore password was incorrect
  at sun.security.pkcs12.PKCS12KeyStore.engineLoad(PKCS12KeyStore.java:2118) ~[?:?]
  at sun.security.util.KeyStoreDelegator.engineLoad(KeyStoreDelegator.java:222) ~[?:?]
  at java.security.KeyStore.load(KeyStore.java:1472) ~[?:?]
  at org.elasticsearch.xpack.core.ssl.TrustConfig.getStore(TrustConfig.java:97) ~[?:?]
  at org.elasticsearch.xpack.core.ssl.StoreTrustConfig.createTrustManager(StoreTrustConfig.java:65) ~[?:?]
  at org.elasticsearch.xpack.core.ssl.SSLService.createSslContext(SSLService.java:384) ~[?:?]
  at java.util.HashMap.computeIfAbsent(HashMap.java:1138) ~[?:?]
  ... 6 more
Caused by: java.security.UnrecoverableKeyException: failed to decrypt safe contents entry: javax.crypto.BadPaddingException: Given final block not properly padded. Such issues can arise if a bad key is used during decryption.
  at sun.security.pkcs12.PKCS12KeyStore.engineLoad(PKCS12KeyStore.java:2118) ~[?:?]
  at sun.security.util.KeyStoreDelegator.engineLoad(KeyStoreDelegator.java:222) ~[?:?]
  at java.security.KeyStore.load(KeyStore.java:1472) ~[?:?]
  ... 6 more
解决办法:
1:可能是elastic-certificates.p12文件归属权不属于es账号所拥有
#执行以下语句,把整个目录的归属权给es账号
chown -R es:es /usr/local/huaxing/elasticsearch-7.4.2-8200
chmod 777 elastic-certificates.p12
2:若是上述问题还没解决,那可能是在生成密钥时设置了密码,需要执行以下命令。弹出提示输入密码就是在生成密钥时设置的密码
./bin/elasticsearch-keystore add xpack.security.transport.ssl.keystore.secure_password
./bin/elasticsearch-keystore add xpack.security.transport.ssl.truststore.secure_password
< END >
本文章收录于【Elasticsearch 系列】,将详细的讲解 Elasticsearch 整个大体系,包括但不限于ELK讲解、ES调优、海量数据处理等。


