阿里云ecs服务器搭建CTFd(ubuntu20)
1.更新apt包索引
sudo apt-get update
更新源
1、使用快捷键【ctrl+alt+t】打开终端。
2、输入以下命令备份原有软件源文件。
cp /etc/apt/sources.list /etc/apt/sources.list.bak_yyyymmdd
3、再输入以下命令打开sources.list文件并添加新的软件源地址。
vim /etc/apt/sources.list #打开sources.list文件
PS: 新安装的Ubuntu可能没有安装Vim, 用如下命令先安装Vim:
sudo apt-get install vim-gtk
在文件末尾添加新的软件源地址,常用国内源地址如下:
#阿里源地址
deb http://mirrors.aliyun.com/ubuntu/ bionic main restricted universe multiverse
deb http://mirrors.aliyun.com/ubuntu/ bionic-security main restricted universe multiverse
deb http://mirrors.aliyun.com/ubuntu/ bionic-updates main restricted universe multiverse
deb http://mirrors.aliyun.com/ubuntu/ bionic-proposed main restricted universe multiverse
deb http://mirrors.aliyun.com/ubuntu/ bionic-backports main restricted universe multiverse
deb-src http://mirrors.aliyun.com/ubuntu/ bionic main restricted universe multiverse
deb-src http://mirrors.aliyun.com/ubuntu/ bionic-security main restricted universe multiverse
deb-src http://mirrors.aliyun.com/ubuntu/ bionic-updates main restricted universe multiverse
deb-src http://mirrors.aliyun.com/ubuntu/ bionic-proposed main restricted universe multiverse
deb-src http://mirrors.aliyun.com/ubuntu/ bionic-backports main restricted universe multiverse
安装docker
使用的是通过版本安装
更新系统包索引
sudo apt-get update
添加HTTPS协议,允许apt从HTTPS安装软件包
sudo apt-get install apt-transport-https ca-certificates curl software-properties-common
添加Docker公共密钥 Docker 官方源
curl -fsSL https://download.docker.com/linux/ubuntu/gpg | sudo apt-key add
设置版本库类型,软件版本包括三种: stable、edge、test
sudo add-apt-repository “deb [arch=amd64] https://download.docker.com/linux/ubuntu $(lsb_release -cs) stable”

安装最新版docker-ce
sudo apt-get install docker-ce
设置开机自启动并启动docker
sudo systemctl enable docker
sudo systemctl start docker


安装docker-compose
通过GitHub安装
进入https://github.com/docker/compose/releases 查看最新版本。
sudo curl -L https://github.com/docker/compose/releases/download/1.26.2/docker-compose-uname -s-uname -m -o /usr/local/bin/docker-compose
设置权限
sudo chmod +x /usr/local/bin/docker-compose
查看是否安装成功
docker-compose --version
出现docker-compose version 1.26.2即安装成功

使用鲸喵师傅打包好的ctfd和whale插件
先准备好docker环境和docker-compose
创建swarm集群
docker swarm init
加入集群
docker node update --label-add=‘name=linux-1’ $(docker node ls -q)
拉取镜像
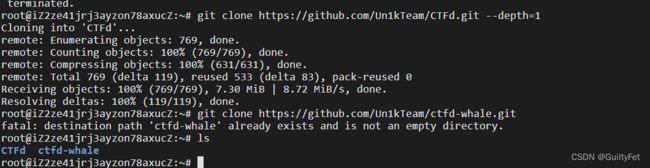
git clone https://github.com/VaalaCat/CTFd.git --depth=1
git clone https://github.com/VaalaCat/ctfd-whale.git
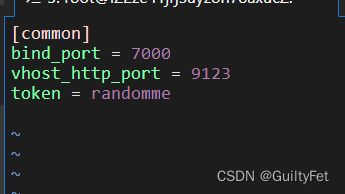
修改token
两个文件的token值修改成一样的,如果用到了域名记得修改subdomain_host
vim CTFd/conf/frp/frps.ini
修改前

修改后
vim CTFd/conf/frp/frpc.ini

安装插件(在CTFd目录下运行)
git submodule update --init

启动(在CTFd目录下运行)
docker-compose up -d
过程中报错
WARNING: The candidate selected for download or install is a yanked version: 'sqlalchemy-utils' candidate (version 0.36.6 at http://mirrors.aliyun.com/pypi/packages/aa/d3/f397b61a2eee34d023e7c1f2519b6e5a7058f3d857461eaa539cc38e1e85/SQLAlchemy-Utils-0.36.6.tar.gz#sha256=7a7fab14bed80df065412bbf71a0a9b0bfeb4b7c111c2d9bffe57283082f3a6b (from http://mirrors.aliyun.com/pypi/simple/sqlalchemy-utils/))
Reason for being yanked: Wrong required python
WARNING: Running pip as the 'root' user can result in broken permissions and conflicting behaviour with the system package manager. It is recommended to use a virtual environment instead: https://pip.pypa.io/warnings/venv
WARNING: You are using pip version 22.0.4; however, version 23.0 is available.
You should consider upgrading via the '/usr/local/bin/python -m pip install --upgrade pip' command.

安装过程中报错不用管
只要最后成功


设置

填完flag 一定要visiable


CONTAINER ID   IMAGE               COMMAND                  CREATED             STATUS             PORTS                                                                                                      NAMES
d05abef4e079   glzjin/frp:latest   "/usr/local/bin/frpc…"   About an hour ago   Up About an hour                                                                                                              ctfd_frpc_1
3add0d65a717   ctfd_ctfd           "/opt/CTFd/docker-en…"   About an hour ago   Up About an hour   0.0.0.0:9124->8000/tcp, :::9124->8000/tcp                                                                  ctfd_ctfd_1
879b46bb2a24   redis:4             "docker-entrypoint.s…"   About an hour ago   Up About an hour                                                                                                              ctfd_cache_1
42451ba23359   mariadb:10.4.12     "docker-entrypoint.s…"   About an hour ago   Up About an hour                                                                                                              ctfd_db_1
91ec1e86c71c   glzjin/frp          "/usr/local/bin/frps…"   About an hour ago   Up About an hour   0.0.0.0:9123->9123/tcp, :::9123->9123/tcp, 0.0.0.0:9125-9129->9125-9129/tcp, :::9125-9129->9125-9129/tcp   ctfd_frps_1
docker stop 3add0d65a717
3add0d65a717
root@iZ2ze41jrj3ayzon78axucZ:~# docker start 3add0d65a717
docker start 3add0d65a717


访问http://xx.xx.xx.xx:9124 (默认是9124,想要80可以修改docker-compose.yml)
平台配置
右上角的插件中进入 Whale 设置,其中,左侧 Docker/Limits/Challenges 菜单栏根据需求自行更改, Frp 菜单栏中的内容需要更改一下几个选项
Http Domain Suffix node.lewiserii.top 这里填写使用http方式访问靶机的泛解析域名
Http Port 8080 这里填写frps中的vhost_http_port,该端口为http方式靶机访问的端口
Direct IP Address xxx.xxx.xxx.xxx 这里填写服务器ip,用于显示Direct方式访问的题目的IP
Direct Minimum Port 9000 这里填写用于动态靶机Direct方式的开始端口
Direct Maximum Port 9200 这里填写结束端口
优点:非常稳定,基本都能一次成功
pwn题部署
运行CTFd
root@iZ2ze41jrj3ayzon78axucZ:~/CTFd# python3 serve.py
在公网可访问
root@iZ2ze41jrj3ayzon78axucZ:~/CTFd# sudo gunicorn --bind 0.0.0.0:8000 -w 1 “CTFd:create_app()”
-bash: syntax error near unexpected token `gunicorn'
切换到ctfd目录下执行