kubernetes——快速部署
2. Kubernetes快速部署
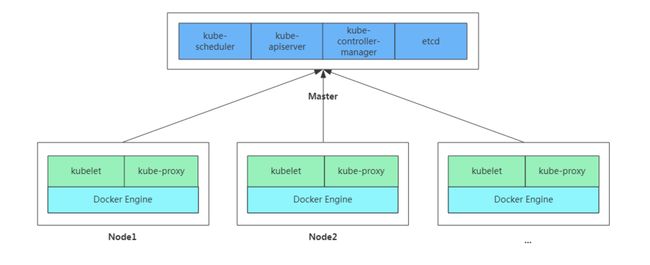
kubeadm是官方社区推出的一个用于快速部署kubernetes集群的工具。
这个工具能通过两条指令完成一个kubernetes集群的部署:
# 创建一个 Master 节点
$ kubeadm init

# 将一个 Node 节点加入到当前集群中
$ kubeadm join
k8s部署方式:
- 二进制部署
- kubeadm部署
2.1 安装要求
在开始之前,部署Kubernetes集群机器需要满足以下几个条件:
-至少3台机器,操作系统 CentOS7+
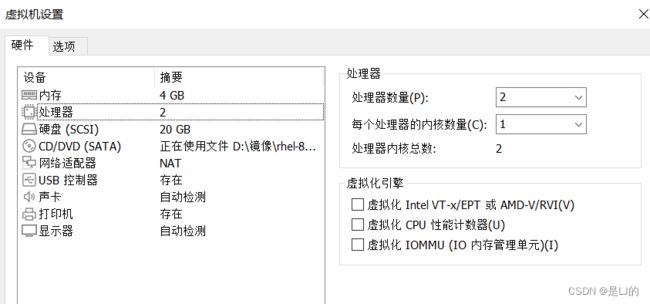
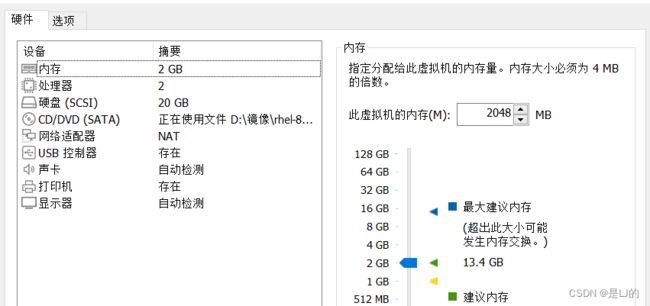
- 硬件配置:2GB或更多RAM,2个CPU或更多CPU,硬盘20GB或更多
- 集群中所有机器之间网络互通
- 可以访问外网,需要拉取镜像
- 禁止swap分区
2.2 学习目标
- 在所有节点上安装Docker和kubeadm
- 部署Kubernetes Master
- 部署容器网络插件
- 部署 Kubernetes Node,将节点加入Kubernetes集群中
- 部署Dashboard Web页面,可视化查看Kubernetes资源
2.3 准备环境
| 角色 | IP |
|---|---|
| master | 192.168.2.129 |
| node1 | 192.168.2.128 |
| node2 | 192.168.2.131 |
master
node1,node2
master
//配置yum源
//设置主机名:
[root@localhost ~]# hostnamectl set-hostname k8s-master
[root@localhost ~]# bash

//关闭防火墙:
[root@k8s-master ~]# systemctl disable --now firewalld
Removed /etc/systemd/system/multi-user.target.wants/firewalld.service.
Removed /etc/systemd/system/dbus-org.fedoraproject.FirewallD1.service.
[root@k8s-master ~]# vi /etc/selinux/config

//关闭swap:
[root@k8s-master ~]# free -m
              total        used        free      shared  buff/cache   available
Mem:           3709         235        3251           8         222        3247
Swap:          2047           0        2047
[root@k8s-master ~]# vi /etc/fstab
#/dev/mapper/rhel-swap   none                    swap    defaults        0 0
//这一行注释掉,或者删掉,#代表注释

//在master添加hosts:
[root@k8s-master ~]# cat >> /etc/hosts << EOF
> 192.168.122.131 master master.example.com
> 192.168.122.132 node1 node1.example.com
> 192.168.122.133 node2 node2.example.com
> EOF
[root@k8s-master ~]# vi /etc/hosts
[root@k8s-master ~]# cat /etc/hosts
127.0.0.1   localhost localhost.localdomain localhost4 localhost4.localdomain4
::1         localhost localhost.localdomain localhost6 localhost6.localdomain6
192.168.2.129 k8s-master
192.168.2.128 k8s-node1
192.168.2.131 k8s-node2

//将桥接的IPv4流量传递到iptables的链:
[root@k8s-master ~]# cat > /etc/sysctl.d/k8s.conf << EOF
> net.bridge.bridge-nf-call-ip6tables = 1
> net.bridge.bridge-nf-call-iptables = 1
> EOF
[root@k8s-master ~]# sysctl --system      //使其生效
* Applying /usr/lib/sysctl.d/10-default-yama-scope.conf ...
kernel.yama.ptrace_scope = 0
* Applying /usr/lib/sysctl.d/50-coredump.conf ...
kernel.core_pattern = |/usr/lib/systemd/systemd-coredump %P %u %g %s %t %c %h %e
kernel.core_pipe_limit = 16
* Applying /usr/lib/sysctl.d/50-default.conf ...
kernel.sysrq = 16
kernel.core_uses_pid = 1
kernel.kptr_restrict = 1
net.ipv4.conf.all.rp_filter = 1
net.ipv4.conf.all.accept_source_route = 0
net.ipv4.conf.all.promote_secondaries = 1
net.core.default_qdisc = fq_codel
fs.protected_hardlinks = 1
fs.protected_symlinks = 1
* Applying /usr/lib/sysctl.d/50-libkcapi-optmem_max.conf ...
net.core.optmem_max = 81920
* Applying /usr/lib/sysctl.d/50-pid-max.conf ...
kernel.pid_max = 4194304
* Applying /etc/sysctl.d/99-sysctl.conf ...
* Applying /etc/sysctl.d/k8s.conf ...
* Applying /etc/sysctl.conf ...
[root@k8s-master ~]#

//安装chrony,时间同步:
[root@k8s-master ~]# yum -y install chrony
[root@k8s-master ~]# vi /etc/chrony.conf
# Use public servers from the pool.ntp.org project.
# Please consider joining the pool (http://www.pool.ntp.org/join.html).
pool time1.aliyun.com iburst     //这里修改成这样
[root@k8s-master ~]# systemctl enable chronyd
[root@k8s-master ~]# systemctl restart chronyd
[root@k8s-master ~]# systemctl status chronyd
● chronyd.service - NTP client/server
   Loaded: loaded (/usr/lib/systemd/system/chronyd.service; enabled; vendor prese>
   Active: active (running) since Tue 2022-09-06 19:24:19 CST; 10s ago
     Docs: man:chronyd(8)
           man:chrony.conf(5)
  Process: 10368 ExecStartPost=/usr/libexec/chrony-helper update-daemon (code=exi>
  Process: 10364 ExecStart=/usr/sbin/chronyd $OPTIONS (code=exited, status=0/SUCC>
 Main PID: 10366 (chronyd)
    Tasks: 1 (limit: 23502)
   Memory: 928.0K
   CGroup: /system.slice/chronyd.service
           └─10366 /usr/sbin/chronyd

Sep 06 19:24:19 k8s-master systemd[1]: Starting NTP client/server...
Sep 06 19:24:19 k8s-master chronyd[10366]: chronyd version 4.1 starting (+CMDMON >
Sep 06 19:24:19 k8s-master chronyd[10366]: Using right/UTC timezone to obtain lea>
Sep 06 19:24:19 k8s-master systemd[1]: Started NTP client/server.
Sep 06 19:24:23 k8s-master chronyd[10366]: Selected source 203.107.6.88 (time1.al>
Sep 06 19:24:23 k8s-master chronyd[10366]: System clock TAI offset set to 37 seco>
[root@k8s-master ~]#

//ping通
[root@k8s-master ~]# ping k8s-master
PING k8s-master (192.168.2.129) 56(84) bytes of data.
64 bytes from k8s-master (192.168.2.129): icmp_seq=1 ttl=64 time=0.022 ms
64 bytes from k8s-master (192.168.2.129): icmp_seq=2 ttl=64 time=0.025 ms
64 bytes from k8s-master (192.168.2.129): icmp_seq=3 ttl=64 time=0.026 ms
^C
--- k8s-master ping statistics ---
3 packets transmitted, 3 received, 0% packet loss, time 2067ms
rtt min/avg/max/mdev = 0.022/0.024/0.026/0.004 ms
[root@k8s-master ~]# ping k8s-node1
PING k8s-node1 (192.168.2.128) 56(84) bytes of data.
64 bytes from k8s-node1 (192.168.2.128): icmp_seq=1 ttl=64 time=0.513 ms
^C
--- k8s-node1 ping statistics ---
1 packets transmitted, 1 received, 0% packet loss, time 0ms
rtt min/avg/max/mdev = 0.513/0.513/0.513/0.000 ms
[root@k8s-master ~]# ping k8s-node2
PING k8s-node2 (192.168.2.131) 56(84) bytes of data.
64 bytes from k8s-node2 (192.168.2.131): icmp_seq=1 ttl=64 time=0.382 ms
64 bytes from k8s-node2 (192.168.2.131): icmp_seq=2 ttl=64 time=0.184 ms
^C
--- k8s-node2 ping statistics ---
2 packets transmitted, 2 received, 0% packet loss, time 1003ms
rtt min/avg/max/mdev = 0.184/0.283/0.382/0.099 ms

//免密认证:
[root@k8s-master ~]# ssh-keygen -t rsa
Generating public/private rsa key pair.
Enter file in which to save the key (/root/.ssh/id_rsa):
Created directory '/root/.ssh'.
Enter passphrase (empty for no passphrase):
Enter same passphrase again:
Your identification has been saved in /root/.ssh/id_rsa.
Your public key has been saved in /root/.ssh/id_rsa.pub.
The key fingerprint is:
SHA256:RwugXvub6ww2VfjmO+5g3P0vOlUIQLCUxa1yMf4YjZI root@k8s-master
The key's randomart image is:
+---[RSA 3072]----+
|      . o*+o     |
|     . o.o+ o    |
|    . . +oo* . . |
|   . . .E=*.. . .|
|    . . S+=+   . |
|       + =... .  |
|      + = o ..   |
|     . = +.....  |
|       .*++..o.o.|
+----[SHA256]-----+
[root@k8s-master ~]# ssh-copy-id k8s-master
/usr/bin/ssh-copy-id: INFO: Source of key(s) to be installed: "/root/.ssh/id_rsa.pub"
The authenticity of host 'k8s-master (192.168.2.129)' can't be established.
ECDSA key fingerprint is SHA256:JeZEZhOE/qB+6NrLG1w1lTH0Xxq5DkSKcwB52MRz8sI.
Are you sure you want to continue connecting (yes/no/[fingerprint])? y
Please type 'yes', 'no' or the fingerprint: yes
/usr/bin/ssh-copy-id: INFO: attempting to log in with the new key(s), to filter out any that are already installed
/usr/bin/ssh-copy-id: INFO: 1 key(s) remain to be installed -- if you are prompted now it is to install the new keys
root@k8s-master's password:

Number of key(s) added: 1

Now try logging into the machine, with:   "ssh 'k8s-master'"
and check to make sure that only the key(s) you wanted were added.

[root@k8s-master ~]# ssh-copy-id k8s-node1
/usr/bin/ssh-copy-id: INFO: Source of key(s) to be installed: "/root/.ssh/id_rsa.pub"
The authenticity of host 'k8s-node1 (192.168.2.128)' can't be established.
ECDSA key fingerprint is SHA256:2JdpZK5SgG9DOucrJuqlG7Q9z3c3tFAtl7aeCdhCwNs.
Are you sure you want to continue connecting (yes/no/[fingerprint])? yes
/usr/bin/ssh-copy-id: INFO: attempting to log in with the new key(s), to filter out any that are already installed
/usr/bin/ssh-copy-id: INFO: 1 key(s) remain to be installed -- if you are prompted now it is to install the new keys
root@k8s-node1's password:

Number of key(s) added: 1

Now try logging into the machine, with:   "ssh 'k8s-node1'"
and check to make sure that only the key(s) you wanted were added.

[root@k8s-master ~]# ssh-copy-id k8s-node2
/usr/bin/ssh-copy-id: INFO: Source of key(s) to be installed: "/root/.ssh/id_rsa.pub"
The authenticity of host 'k8s-node2 (192.168.2.131)' can't be established.
ECDSA key fingerprint is SHA256:zCNimrLLFBPBCKUnieOGA5MoEcKoTrWCWI9Ot1aactg.
Are you sure you want to continue connecting (yes/no/[fingerprint])? yes
/usr/bin/ssh-copy-id: INFO: attempting to log in with the new key(s), to filter out any that are already installed
/usr/bin/ssh-copy-id: INFO: 1 key(s) remain to be installed -- if you are prompted now it is to install the new keys
root@k8s-node2's password:

Number of key(s) added: 1

Now try logging into the machine, with:   "ssh 'k8s-node2'"
and check to make sure that only the key(s) you wanted were added.

[root@k8s-master ~]#
[root@k8s-master ~]# reboot
node1
[root@localhost ~]# hostnamectl set-hostname k8s-node1
[root@localhost ~]# bash

[root@k8s-node1 ~]# systemctl disable --now firewalld
Removed /etc/systemd/system/multi-user.target.wants/firewalld.service.
Removed /etc/systemd/system/dbus-org.fedoraproject.FirewallD1.service.
[root@k8s-node1 ~]# vi /etc/selinux/config

[root@k8s-node1 ~]# vi /etc/fstab
#/dev/mapper/rhel-swap   none                    swap    defaults        0 0
//这一行注释掉,或者删掉,#代表注释

[root@k8s-node1 ~]# yum -y install chrony
[root@k8s-node1 ~]# vi /etc/chrony.conf
[root@k8s-node1 ~]# systemctl enable --now chronyd
Created symlink /etc/systemd/system/multi-user.target.wants/chronyd.service → /usr/lib/systemd/system/chronyd.service.
[root@k8s-node1 ~]# systemctl restart chronyd
[root@k8s-node1 ~]# systemctl status chronyd
● chronyd.service - NTP client/server
   Loaded: loaded (/usr/lib/systemd/system/chronyd.service; enabled; vendor prese>
   Active: active (running) since Tue 2022-09-06 19:26:55 CST; 5s ago
     Docs: man:chronyd(8)
           man:chrony.conf(5)
  Process: 2962 ExecStopPost=/usr/libexec/chrony-helper remove-daemon-state (code>
  Process: 2973 ExecStartPost=/usr/libexec/chrony-helper update-daemon (code=exit>
  Process: 2967 ExecStart=/usr/sbin/chronyd $OPTIONS (code=exited, status=0/SUCCE>
 Main PID: 2971 (chronyd)
    Tasks: 1 (limit: 11088)
   Memory: 928.0K
   CGroup: /system.slice/chronyd.service
           └─2971 /usr/sbin/chronyd

Sep 06 19:26:55 k8s-node1 systemd[1]: Starting NTP client/server...
Sep 06 19:26:55 k8s-node1 chronyd[2971]: chronyd version 4.1 starting (+CMDMON +N>
Sep 06 19:26:55 k8s-node1 chronyd[2971]: Frequency 0.000 +/- 1000000.000 ppm read>
Sep 06 19:26:55 k8s-node1 chronyd[2971]: Using right/UTC timezone to obtain leap >
Sep 06 19:26:55 k8s-node1 systemd[1]: Started NTP client/server.
Sep 06 19:26:59 k8s-node1 chronyd[2971]: Selected source 203.107.6.88 (time1.aliy>
Sep 06 19:26:59 k8s-node1 chronyd[2971]: System clock TAI offset set to 37 seconds
[root@k8s-node1 ~]#

[root@k8s-node1 ~]# vi /etc/hosts
[root@k8s-node1 ~]# cat /etc/hosts
127.0.0.1   localhost localhost.localdomain localhost4 localhost4.localdomain4
::1         localhost localhost.localdomain localhost6 localhost6.localdomain6
192.168.2.129 k8s-master
192.168.2.128 k8s-node1
192.168.2.131 k8s-node2
[root@k8s-node1 ~]# reboot
node2
[root@localhost ~]# hostnamectl set-hostname k8s-node2
[root@localhost ~]# bash

[root@k8s-node2 ~]# systemctl disable --now firewalld
Removed /etc/systemd/system/multi-user.target.wants/firewalld.service.
Removed /etc/systemd/system/dbus-org.fedoraproject.FirewallD1.service.
[root@k8s-node2 ~]# vi /etc/selinux/config

[root@k8s-node2 ~]# vi /etc/fstab
#/dev/mapper/rhel-swap   none                    swap    defaults        0 0
//这一行注释掉,或者删掉,#代表注释

[root@k8s-node2 ~]# yum -y install chrony
[root@k8s-node2 ~]# vi /etc/chrony.conf
[root@k8s-node2 ~]# systemctl enable --now chronyd
[root@k8s-node2 ~]# systemctl restart chronyd
[root@k8s-node2 ~]# systemctl status chronyd
● chronyd.service - NTP client/server
   Loaded: loaded (/usr/lib/systemd/system/chronyd.service; enabled; vendor prese>
   Active: active (running) since Tue 2022-09-06 19:28:00 CST; 10s ago
     Docs: man:chronyd(8)
           man:chrony.conf(5)
  Process: 10356 ExecStopPost=/usr/libexec/chrony-helper remove-daemon-state (cod>
  Process: 10367 ExecStartPost=/usr/libexec/chrony-helper update-daemon (code=exi>
  Process: 10362 ExecStart=/usr/sbin/chronyd $OPTIONS (code=exited, status=0/SUCC>
 Main PID: 10365 (chronyd)
    Tasks: 1 (limit: 11216)
   Memory: 916.0K
   CGroup: /system.slice/chronyd.service
           └─10365 /usr/sbin/chronyd

Sep 06 19:28:00 k8s-node2 systemd[1]: chronyd.service: Succeeded.
Sep 06 19:28:00 k8s-node2 systemd[1]: Stopped NTP client/server.
Sep 06 19:28:00 k8s-node2 systemd[1]: Starting NTP client/server...
Sep 06 19:28:00 k8s-node2 chronyd[10365]: chronyd version 4.1 starting (+CMDMON +>
Sep 06 19:28:00 k8s-node2 chronyd[10365]: Frequency 0.000 +/- 1000000.000 ppm rea>
Sep 06 19:28:00 k8s-node2 chronyd[10365]: Using right/UTC timezone to obtain leap>
Sep 06 19:28:00 k8s-node2 systemd[1]: Started NTP client/server.
Sep 06 19:28:05 k8s-node2 chronyd[10365]: Selected source 203.107.6.88 (time1.ali>
Sep 06 19:28:05 k8s-node2 chronyd[10365]: System clock TAI offset set to 37 secon>
[root@k8s-node2 ~]#

[root@k8s-node2 ~]# vi /etc/hosts
[root@k8s-node2 ~]# cat /etc/hosts
127.0.0.1   localhost localhost.localdomain localhost4 localhost4.localdomain4
::1         localhost localhost.localdomain localhost6 localhost6.localdomain6
192.168.2.129 k8s-master
192.168.2.128 k8s-node1
192.168.2.131 k8s-node2
[root@k8s-node2 ~]# reboot
2.4.所有节点安装Docker/kubeadm/kubelet
Kubernetes默认CRI(容器运行时)为Docker,因此先安装Docker。
2.4.1 安装Docker
master
//安装docker
[root@k8s-master ~]# wget https://mirrors.aliyun.com/docker-ce/linux/centos/docker-ce.repo -O /etc/yum.repos.d/docker-ce.repo
--2022-09-07 11:03:55--  https://mirrors.aliyun.com/docker-ce/linux/centos/docker-ce.repo
Resolving mirrors.aliyun.com (mirrors.aliyun.com)... 61.241.149.116, 124.163.196.216, 123.6.16.237, ...
Connecting to mirrors.aliyun.com (mirrors.aliyun.com)|61.241.149.116|:443... connected.
HTTP request sent, awaiting response... 200 OK
Length: 2081 (2.0K) [application/octet-stream]
Saving to: ‘/etc/yum.repos.d/docker-ce.repo’

/etc/yum.repos.d/doc 100%[====================>]   2.03K  --.-KB/s    in 0s

2022-09-07 11:03:55 (47.4 MB/s) - ‘/etc/yum.repos.d/docker-ce.repo’ saved [2081/2081]

[root@k8s-master ~]# cd /etc/yum.repos.d/
[root@k8s-master yum.repos.d]# ls
CentOS-Base.repo  docker-ce.repo  redhat.repo
[root@k8s-master yum.repos.d]# cd
[root@k8s-master ~]# yum list all | grep docker
containerd.io.x86_64                                   1.6.8-3.1.el8                                          docker-ce-stable
docker-ce.x86_64                                       3:20.10.17-3.el8                                       docker-ce-stable
docker-ce-cli.x86_64                                   1:20.10.17-3.el8                                       docker-ce-stable
docker-ce-rootless-extras.x86_64                       20.10.17-3.el8                                         docker-ce-stable
docker-compose-plugin.x86_64                           2.6.0-3.el8                                            docker-ce-stable
docker-scan-plugin.x86_64                              0.17.0-3.el8                                           docker-ce-stable
pcp-pmda-docker.x86_64                                 5.3.1-5.el8                                            AppStream
podman-docker.noarch                                   3.3.1-9.module_el8.5.0+988+b1f0b741                    AppStream
[root@k8s-master ~]# yum -y install docker-ce
[root@k8s-master ~]# systemctl enable --now docker
Created symlink /etc/systemd/system/multi-user.target.wants/docker.service → /usr/lib/systemd/system/docker.service.
[root@k8s-master ~]# docker --version
Docker version 20.10.17, build 100c701

//配置加速器
[root@k8s-master ~]# cat > /etc/docker/daemon.json << EOF
> {
>   "registry-mirrors": ["https://b9pmyelo.mirror.aliyuncs.com"],
>   "exec-opts": ["native.cgroupdriver=systemd"],
>   "log-driver": "json-file",
>   "log-opts": {
>     "max-size": "100m"
>   },
>   "storage-driver": "overlay2"
> }
> EOF
node1
[root@k8s-node1 ~]# wget https://mirrors.aliyun.com/docker-ce/linux/centos/docker-ce.repo -O /etc/yum.repos.d/docker-ce.repo
--2022-09-07 11:03:17--  https://mirrors.aliyun.com/docker-ce/linux/centos/docker-ce.repo
Resolving mirrors.aliyun.com (mirrors.aliyun.com)... 61.241.149.116, 124.163.196.216, 123.6.16.237, ...
Connecting to mirrors.aliyun.com (mirrors.aliyun.com)|61.241.149.116|:443... connected.
HTTP request sent, awaiting response... 200 OK
Length: 2081 (2.0K) [application/octet-stream]
Saving to: ‘/etc/yum.repos.d/docker-ce.repo’

/etc/yum.repos.d/doc 100%[====================>]   2.03K  --.-KB/s    in 0s

2022-09-07 11:03:17 (8.04 MB/s) - ‘/etc/yum.repos.d/docker-ce.repo’ saved [2081/2081]

[root@k8s-node1 ~]# cd /etc/yum.repos.d/
[root@k8s-node1 yum.repos.d]# ls
CentOS-Base.repo  docker-ce.repo  redhat.repo
[root@k8s-node1 yum.repos.d]# cd
[root@k8s-node1 ~]# yum -y install docker-ce
[root@k8s-node1 ~]# systemctl enable --now docker
Created symlink /etc/systemd/system/multi-user.target.wants/docker.service → /usr/lib/systemd/system/docker.service.
[root@k8s-node1 ~]# docker --version
Docker version 20.10.17, build 100c701


[root@k8s-node2 ~]# cat > /etc/docker/daemon.json << EOF
> {
>   "registry-mirrors": ["https://b9pmyelo.mirror.aliyuncs.com"],
>   "exec-opts": ["native.cgroupdriver=systemd"],
>   "log-driver": "json-file",
>   "log-opts": {
>     "max-size": "100m"
>   },
>   "storage-driver": "overlay2"
> }
> EOF
node2
[root@k8s-node2 ~]# wget https://mirrors.aliyun.com/docker-ce/linux/centos/docker-ce.repo -O /etc/yum.repos.d/docker-ce.repo
--2022-09-07 11:03:17--  https://mirrors.aliyun.com/docker-ce/linux/centos/docker-ce.repo
Resolving mirrors.aliyun.com (mirrors.aliyun.com)... 61.241.149.116, 124.163.196.216, 123.6.16.237, ...
Connecting to mirrors.aliyun.com (mirrors.aliyun.com)|61.241.149.116|:443... connected.
HTTP request sent, awaiting response... 200 OK
Length: 2081 (2.0K) [application/octet-stream]
Saving to: ‘/etc/yum.repos.d/docker-ce.repo’

/etc/yum.repos.d/doc 100%[====================>]   2.03K  --.-KB/s    in 0s

2022-09-07 11:03:17 (8.04 MB/s) - ‘/etc/yum.repos.d/docker-ce.repo’ saved [2081/2081]

[root@k8s-node2 ~]# cd /etc/yum.repos.d/
[root@k8s-node2 yum.repos.d]# ls
CentOS-Base.repo  docker-ce.repo  redhat.repo
[root@k8s-node2 yum.repos.d]# cd
[root@k8s-node2 ~]# yum -y install docker-ce
[root@k8s-node2 ~]# systemctl enable --now docker
Created symlink /etc/systemd/system/multi-user.target.wants/docker.service → /usr/lib/systemd/system/docker.service.
[root@k8s-node2 ~]# docker --version
Docker version 20.10.17, build 100c701


[root@k8s-node2 ~]# cat > /etc/docker/daemon.json << EOF
> {
>   "registry-mirrors": ["https://b9pmyelo.mirror.aliyuncs.com"],
>   "exec-opts": ["native.cgroupdriver=systemd"],
>   "log-driver": "json-file",
>   "log-opts": {
>     "max-size": "100m"
>   },
>   "storage-driver": "overlay2"
> }
> EOF
2.4.2 添加kubernetes阿里云YUM软件源
//master
[root@k8s-master ~]# cat > /etc/yum.repos.d/kubernetes.repo << EOF
> [kubernetes]
> name=Kubernetes
> baseurl=https://mirrors.aliyun.com/kubernetes/yum/repos/kubernetes-el7-x86_64
> enabled=1
> gpgcheck=0
> repo_gpgcheck=0
> gpgkey=https://mirrors.aliyun.com/kubernetes/yum/doc/yum-key.gpg https://mirrors.aliyun.com/kubernetes/yum/doc/rpm-package-key.gpg
> EOF

//node1
[root@k8s-node1 ~]# cat > /etc/yum.repos.d/kubernetes.repo << EOF
> [kubernetes]
> name=Kubernetes
> baseurl=https://mirrors.aliyun.com/kubernetes/yum/repos/kubernetes-el7-x86_64
> enabled=1
> gpgcheck=0
> repo_gpgcheck=0
> gpgkey=https://mirrors.aliyun.com/kubernetes/yum/doc/yum-key.gpg https://mirrors.aliyun.com/kubernetes/yum/doc/rpm-package-key.gpg
> EOF


//node2
[root@k8s-node2 ~]# cat > /etc/yum.repos.d/kubernetes.repo << EOF
> [kubernetes]
> name=Kubernetes
> baseurl=https://mirrors.aliyun.com/kubernetes/yum/repos/kubernetes-el7-x86_64
> enabled=1
> gpgcheck=0
> repo_gpgcheck=0
> gpgkey=https://mirrors.aliyun.com/kubernetes/yum/doc/yum-key.gpg https://mirrors.aliyun.com/kubernetes/yum/doc/rpm-package-key.gpg
> EOF
2.4.3 安装kubeadm,kubelet和kubectl
由于版本更新频繁,这里指定版本号部署:
//master
[root@k8s-master ~]# yum -y install kubelet kubeadm kubectl
//设置为开机自启,现在不要启动
[root@k8s-master ~]# systemctl enable kubelet
Created symlink /etc/systemd/system/multi-user.target.wants/kubelet.service → /usr/lib/systemd/system/kubelet.service.


//node1
[root@k8s-node1 ~]# yum -y install kubelet kubeadm kubectl
[root@k8s-node1 ~]# systemctl enable kubelet
Created symlink /etc/systemd/system/multi-user.target.wants/kubelet.service → /usr/lib/systemd/system/kubelet.service.

//node2
[root@k8s-node2 ~]# yum -y install kubelet kubeadm kubectl
[root@k8s-node2 ~]# systemctl enable kubelet
Created symlink /etc/systemd/system/multi-user.target.wants/kubelet.service → /usr/lib/systemd/system/kubelet.service.
2.5 部署Kubernetes Master
在192.168.2.129(Master)执行。
[root@k8s-master ~]# cd /etc/containerd/
[root@k8s-master containerd]# ls
config.toml
[root@k8s-master containerd]# vim config.toml
#disabled_plugins = ["cri"]   //加#注释掉
[root@k8s-master containerd]# cd
[root@k8s-master ~]# containerd config default > config.toml
[root@k8s-master ~]# cd /etc/containerd/
[root@k8s-master containerd]# ls
config.toml
[root@k8s-master containerd]# mv config.toml /opt/
[root@k8s-master containerd]# ls
[root@k8s-master containerd]# mv ~/config.toml .
[root@k8s-master containerd]# ls
config.toml
[root@k8s-master containerd]# vim config.toml
:%s#k8s.gcr.io#registry.cn-beijing.aliyuncs.com/abcdocker#g  //在编辑模式输入这个
[root@k8s-master containerd]# cd
[root@k8s-master ~]# systemctl stop kubelet
[root@k8s-master ~]# systemctl restart containerd
[root@k8s-master ~]#  kubeadm init  --apiserver-advertise-address=192.168.2.129 --image-repository registry.aliyuncs.com/google_containers --kubernetes-version v1.25.0 --service-cidr=10.96.0.0/12 --pod-network-cidr=10.244.0.0/16
....//下面是成功初始化显示,下面内容关联这下面的配置
Your Kubernetes control-plane has initialized successfully!

To start using your cluster, you need to run the following as a regular user:

  mkdir -p $HOME/.kube
  sudo cp -i /etc/kubernetes/admin.conf $HOME/.kube/config
  sudo chown $(id -u):$(id -g) $HOME/.kube/config

Alternatively, if you are the root user, you can run:

  export KUBECONFIG=/etc/kubernetes/admin.conf

You should now deploy a pod network to the cluster.
Run "kubectl apply -f [podnetwork].yaml" with one of the options listed at:
  https://kubernetes.io/docs/concepts/cluster-administration/addons/

Then you can join any number of worker nodes by running the following on each as root:

kubeadm join 192.168.2.129:6443 --token iak6gu.0j7nshlse33daxt8 \    //7的配置
	--discovery-token-ca-cert-hash sha256:3badabe8f279193032aae4fe8a54a2185d12da1e1b5dbb1a7619dda77a645102
由于默认拉取镜像地址k8s.gcr.io国内无法访问,这里指定阿里云镜像仓库地址。
使用kubectl工具:
//如果是root用户,那么
[root@k8s-master ~]# vim /etc/profile.d/k8s.sh
[root@k8s-master ~]# cat /etc/profile.d/k8s.sh
export KUBECONFIG=/etc/kubernetes/admin.conf
[root@k8s-master ~]# source /etc/profile.d/k8s.sh
[root@k8s-master ~]# echo $KUBECONFIG
/etc/kubernetes/admin.conf
[root@k8s-master ~]# kubectl get nodes
NAME         STATUS     ROLES           AGE     VERSION
k8s-master   NotReady   control-plane   6m51s   v1.25.0


//如果是普通用户,那么
# mkdir -p $HOME/.kube
# sudo cp -i /etc/kubernetes/admin.conf $HOME/.kube/config
# sudo chown $(id -u):$(id -g) $HOME/.kube/config
# kubectl get nodes
2.6 安装Pod网络插件(CNI)
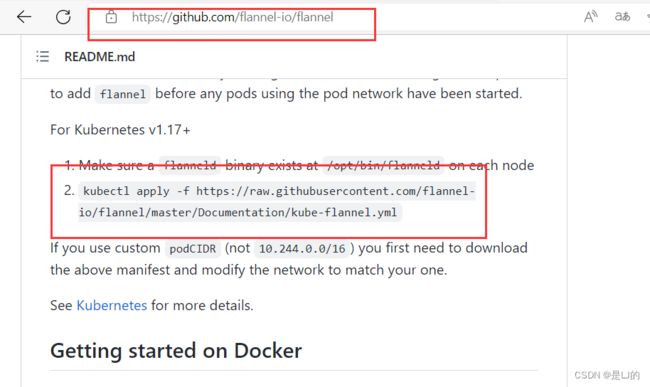
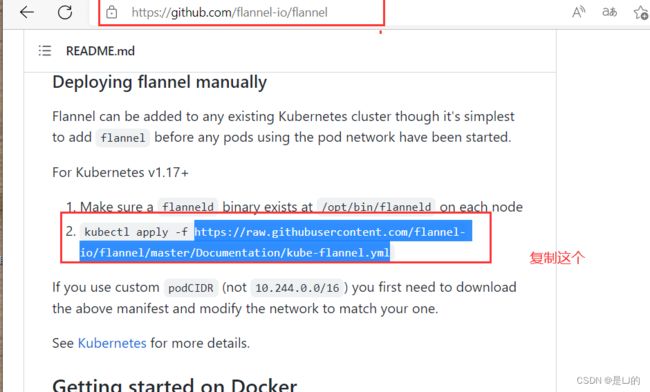
第一种方式:
[root@k8s-master ~]# kubectl apply -f https://raw.githubusercontent.com/flannel-io/flannel/master/Documentation/kube-flannel.yml
确保能够访问到quay.io这个registery。
这样显示就代表成功了
第二种方式:
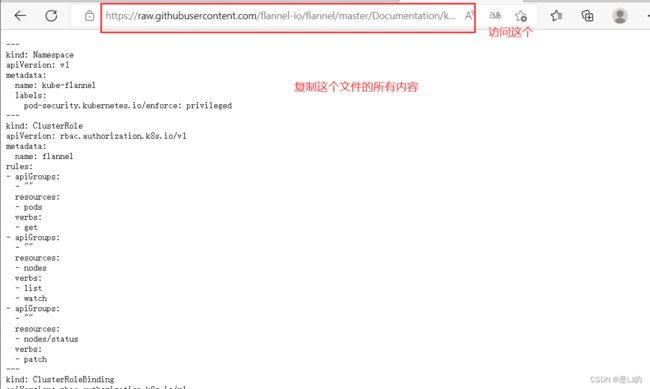
[root@k8s-master ~]# vi kube-flannel.yml
[root@k8s-master ~]# kubectl apply -f kube-flannel.yml
namespace/kube-flannel created
clusterrole.rbac.authorization.k8s.io/flannel created
clusterrolebinding.rbac.authorization.k8s.io/flannel created
serviceaccount/flannel created
configmap/kube-flannel-cfg created
daemonset.apps/kube-flannel-ds created
2.7 加入Kubernetes Node
在192.168.2.128、192.168.2.131上(Node)执行。
向集群添加新节点,执行在kubeadm init输出的kubeadm join命令:
[root@k8s-master ~]# cd /etc/containerd/
[root@k8s-master containerd]# ls
config.toml
[root@k8s-master containerd]# scp /etc/containerd/config.toml k8s-node1:/etc/containerd/
[root@k8s-master containerd]# scp /etc/containerd/config.toml k8s-node2:/etc/containerd/
config.toml                                     100% 6952     6.7MB/s   00:00

[root@k8s-node1 ~]# systemctl restart containerd
[root@k8s-node1 ~]# kubeadm join 192.168.2.129:6443 --token iak6gu.0j7nshlse33daxt8 --discovery-token-ca-cert-hash sha256:3badabe8f279193032aae4fe8a54a2185d12da1e1b5dbb1a7619dda77a645102

[root@k8s-node2 ~]# systemctl restart containerd
[root@k8s-node2 ~]# kubeadm join 192.168.2.129:6443 --token iak6gu.0j7nshlse33daxt8 --discovery-token-ca-cert-hash sha256:3badabe8f279193032aae4fe8a54a2185d12da1e1b5dbb1a7619dda77a645102
...
[preflight] Running pre-flight checks
	[WARNING FileExisting-tc]: tc not found in system path
[preflight] Reading configuration from the cluster...
[preflight] FYI: You can look at this config file with 'kubectl -n kube-system get cm kubeadm-config -o yaml'
[kubelet-start] Writing kubelet configuration to file "/var/lib/kubelet/config.yaml"
[kubelet-start] Writing kubelet environment file with flags to file "/var/lib/kubelet/kubeadm-flags.env"
[kubelet-start] Starting the kubelet
[kubelet-start] Waiting for the kubelet to perform the TLS Bootstrap...

This node has joined the cluster:
* Certificate signing request was sent to apiserver and a response was received.
* The Kubelet was informed of the new secure connection details.

Run 'kubectl get nodes' on the control-plane to see this node join the cluster.
2.8 测试kubernetes集群
在Kubernetes集群中创建一个pod,验证是否正常运行:
[root@k8s-master ~]# cat /etc/profile.d/k8s.sh
export KUBECONFIG=/etc/kubernetes/admin.conf
[root@k8s-master ~]# scp /etc/kubernetes/admin.conf k8s-node1:/etc/kubernetes/
[root@k8s-master ~]# scp /etc/kubernetes/admin.conf k8s-node2:/etc/kubernetes/
admin.conf                                      100% 5641     5.4MB/s   00:00
[root@k8s-master ~]# scp /etc/profile.d/k8s.sh k8s-node1:/etc/profile.d/
k8s.sh                                          100%   45    62.1KB/s   00:00
[root@k8s-master ~]# scp /etc/profile.d/k8s.sh k8s-node2:/etc/profile.d/
k8s.sh                                          100%   45    80.1KB/s   00:00

[root@k8s-node1 ~]# bash
[root@k8s-node1 ~]# echo $KUBECONFIG
/etc/kubernetes/admin.conf
[root@k8s-node1 ~]# kubectl get nodes

[root@k8s-node2 ~]# bash
[root@k8s-node2 ~]# echo $KUBECONFIG
/etc/kubernetes/admin.conf
[root@k8s-node2 ~]# kubectl get nodes


[root@k8s-master ~]# kubectl create deployment nginx --image=nginx
deployment.apps/nginx created
[root@k8s-master ~]# kubectl expose deployment nginx --port=80 --type=NodePort
service/nginx exposed
[root@k8s-master ~]# kubectl get pod,svc
NAME                        READY   STATUS    RESTARTS   AGE
pod/nginx-76d6c9b8c-6qckb   0/1     Pending   0          98s

NAME                 TYPE        CLUSTER-IP      EXTERNAL-IP   PORT(S)        AGE
service/kubernetes   ClusterIP   10.96.0.1               443/TCP        59m
service/nginx        NodePort    10.111.30.236           80:32261/TCP   53s
[root@k8s-master ~]#
[root@k8s-master ~]# ss -antl
State    Recv-Q   Send-Q     Local Address:Port      Peer Address:Port  Process
LISTEN   0        128            127.0.0.1:10248          0.0.0.0:*
LISTEN   0        128            127.0.0.1:10249          0.0.0.0:*
LISTEN   0        128        192.168.2.129:2379           0.0.0.0:*
LISTEN   0        128            127.0.0.1:2379           0.0.0.0:*
LISTEN   0        128        192.168.2.129:2380           0.0.0.0:*
LISTEN   0        128            127.0.0.1:2381           0.0.0.0:*
LISTEN   0        128            127.0.0.1:10257          0.0.0.0:*
LISTEN   0        128            127.0.0.1:10259          0.0.0.0:*
LISTEN   0        128            127.0.0.1:46067          0.0.0.0:*
LISTEN   0        128              0.0.0.0:22             0.0.0.0:*
LISTEN   0        128                    *:10250                *:*
LISTEN   0        128                    *:6443                 *:*
LISTEN   0        128                    *:10256                *:*
LISTEN   0        128                 [::]:22                [::]:*
[root@k8s-master ~]#
192.168.2.129:32261访问
访问地址:http://NodeIP:Port
