一、SpringBoot高级之缓存
Table of Contents
一、Spring缓存抽象
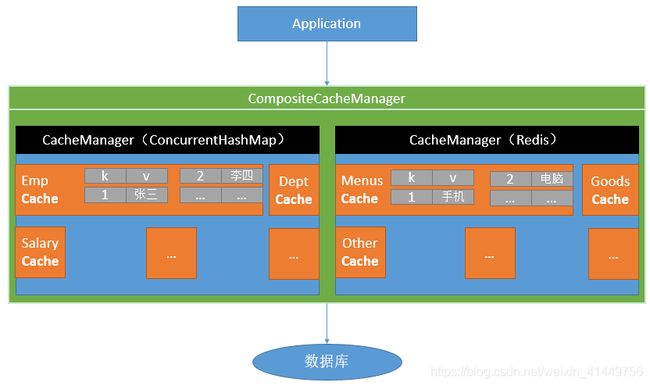
1、原理:CacheManager按照名字得到cache缓存组件来实际给缓存中存取数据
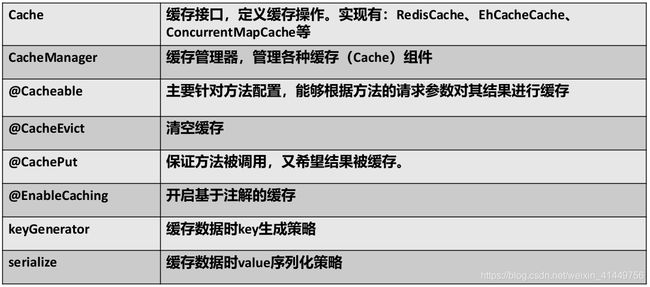
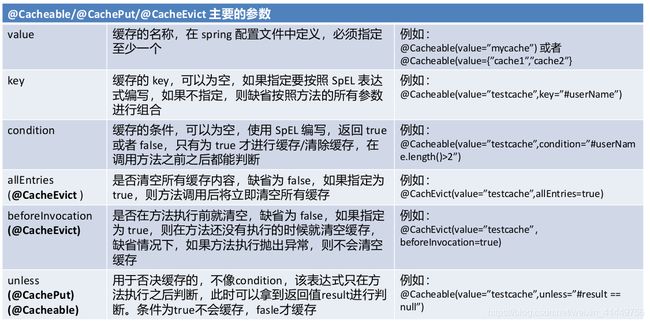
2、几个重要概念&缓存注解
二、缓存使用
1、步骤
2、实例
三、整合redis实现缓存
1、引入依赖
2. 在配置文件中配置redis连接地址
3. 使用RestTemplate操作redis
4、自定义CacheManager
一、Spring缓存抽象
1、原理:CacheManager按照名字得到cache缓存组件来实际给缓存中存取数据
2、几个重要概念&缓存注解
二、缓存使用
1、步骤
1、引入spring-boot-starter-cache模块
    org.springframework.boot
    spring-boot-starter-cache
2、@EnableCaching开启缓存
/**
 * 一、快速体验缓存
 * 步骤:
 *  1、开启基于注解的缓存 @EnableCaching
 *  2、标注缓存注解
 *      @Cacheable
 *      @CacheEvict
 *      @CachePut
 *  默认使用ConcurrentMapCacheManager==ConcurrentMapCache;将数据保存在ConcurrentMap中
 *  开发中使用缓存中间件:redis、memcached、ehcache;
*/
@EnableCaching
@SpringBootApplication
@MapperScan("com.zm.mapper")
public class Springboot01CacheApplication {

    public static void main(String[] args) {
        SpringApplication.run(Springboot01CacheApplication.class, args);
    }

}
3、使用缓存注解
@Cacheable、@CacheEvict、@CachePut
package com.zm.service.impl;

import com.zm.bean.Department;
import com.zm.mapper.DepartmentMapper;
import com.zm.service.IDepartmentService;
import org.springframework.beans.factory.annotation.Autowired;
import org.springframework.cache.annotation.*;
import org.springframework.stereotype.Service;

@CacheConfig(cacheNames = "dept")
@Service
public class DepartmentServiceImpl implements IDepartmentService {
    @Autowired
    private DepartmentMapper departmentMapper;

    @Cacheable(value = "dept")
    @Override
    public Department getDept(Integer id) {
        return departmentMapper.getDept(id);
    }
}
4、切换为其他缓存(redis)
2、实例
1、代码展示
package com.zm.config;

import org.springframework.cache.interceptor.KeyGenerator;
import org.springframework.context.annotation.Bean;
import org.springframework.context.annotation.Configuration;

import java.util.Arrays;


@Configuration
public class MyCacheConfig {
    @Bean("myKeyGenerator")
    public KeyGenerator keyGenerator() {
        return (o, method, objects) -> method.getName() + "[" + Arrays.asList(objects).toString() + "]";
    }
}
package com.zm.service.impl;

import com.zm.bean.Employee;
import com.zm.mapper.EmployeeMapper;
import com.zm.service.IEmployeeService;
import org.springframework.beans.factory.annotation.Autowired;
import org.springframework.cache.annotation.*;
import org.springframework.stereotype.Service;

@CacheConfig(cacheNames = "emp")  // 统一指定Cache组件
@Service
public class EmployeeServiceImpl implements IEmployeeService {
    @Autowired
    private EmployeeMapper employeeMapper;

    /**
     * 将方法的运行结果进行缓存;以后再要有相同的数据,就直接从缓存中获取,不用调用方法
     * CacheManager管理多个Cache组件的,对缓存的真正CRUD操作在cache组件中,每一个缓存组件都有自己唯一的一个名字;
     * 几个属性:
     *      cacheNames/value 指定缓存组件的名字;指定将方法的返回结果放在哪个缓存中,以数组的方式,可以指定多个缓存
     *      key:缓存数据使用的key:可以用它来指定。默认使用方法参数的值;缓存的数据默认是以键值对形式存储的
     *      编写SpEl:#id(参数id的值) #root.args[0]/#a0/#p0(第一个参数,0代表参数的索引)
     *      keyGenerator:key的生成器;可以自己指定key的生成器的组件id
     *      key/keyGenerator:二选一
     *      cacheManager:指定缓存管理器与cacheResolver类似
     *      condition:指定符合调节的情况下才缓存: condition = "#id>0"
     *      unless:否定缓存,当unless指定的条件为true,方法的返回值不会缓存:unless = "#result==null"
     *      sync:是否使用异步
     * 原理:
     * 1、自动配置类:CacheAutoConfiguration
     * 2、缓存的配置类:
     *       org.springframework.boot.autoconfigure.cache.GenericCacheConfiguration
     *       org.springframework.boot.autoconfigure.cache.JCacheCacheConfiguration
     *       org.springframework.boot.autoconfigure.cache.EhCacheCacheConfiguration
     *       org.springframework.boot.autoconfigure.cache.HazelcastCacheConfiguration
     *       org.springframework.boot.autoconfigure.cache.InfinispanCacheConfiguration
     *       org.springframework.boot.autoconfigure.cache.CouchbaseCacheConfiguration
     *       org.springframework.boot.autoconfigure.cache.RedisCacheConfiguration
     *       org.springframework.boot.autoconfigure.cache.CaffeineCacheConfiguration
     *       org.springframework.boot.autoconfigure.cache.SimpleCacheConfiguration
     *       org.springframework.boot.autoconfigure.cache.NoOpCacheConfiguration
     * 3、哪个配置类默认会生效:SimpleCacheConfiguration
     * 4、给容器中注册了一个CacheManager:ConcurrentMapCacheManager
     * 5、可以获取创建和创建ConcurrentMapCache类型的组件;他的作用是将数据保存到ConcurrentMap中
     * @Cacheable 运行流程:
     *
     *      1、运行之前,先查看Catch(缓存组件),按照cacheNames指定的位置获取;
     *      (CacheManager先获取相应的缓存组件),第一次没有获取到,会创建缓存组件
     *      2、去Cache中查找缓存的内容,使用一个key,默认就是方法的参数;
     *         key按照某种策略生成,默认是使用KeyGenerator生成的,默认使用的是SimpleKeyGenerator生成key;
     *          SimpleKeyGenerator生成key的策略:
     *          如果没有参数:key= new SimpleKey()
     *          如果有一个参数:key=参数的值
     *          如果有多个参数:key=new SimpleKey(params)
     *      3、没有查找到缓存就调用目标方法;
     *      4、将目标方法的返回结果放进缓存中
     * @Cacheable标注的方法之前先检查缓存中是否有数据,默认按照参数的值作为key去查询缓存, 如果没有就运行目标方法,并将结果放入缓存;以后再来调用就直接从缓存中获取
     * 核心:
     * 1、使用CacheManager【ConcurrentMapCacheManager】按照名字得到cache【CurrentMapCache】组件
     * 2、key使用KeyGenerator生成的,默认是SimpleGenerator
     */
    @Cacheable(cacheNames = {"emp"})
    public Employee getEmp(Integer id) {
        return employeeMapper.getEmpById(id);
    }

    /**
     * @CachePut:即调用方法,又更新缓存数据; 修改数据库的某个数据,同事更新缓存
     * 运行时机:
     *    1、先调用目标方法
     *    2、将目标方法的结果缓存起来
     * 测试:
     *    1、查询1号员工,查到的结果会放到缓存中
     *    2、以后查询还是之前的结果
     *    3、更新1号员工:
     *          将方法的返回值也存入到缓存:要达到查询的结果是最新的需要查询的key和更新的key要一致
     *    4、查询1号员工?
     *          应该是更新后的员工信息
     *          key="#employee.id":使用传入的参数的员工id;
     *          key="#result.id":使用返回后的id
     *          @Cacheable的key是不能使用#result.id的:因为@Cacheable方法还未运行之前就要得到key去缓存中查找
     */

    @CachePut(key = "#employee.id")
    public Employee updateEmp(Employee employee) {
        employeeMapper.updateEmp(employee);
        return employee;
    }

    /**
     * @CacheEvict:缓存清除 key:指定要清除的数据
     * allEntries=true:会清空当前缓存中间中的所有数据
     * beforeInvocation=false(默认值):在方法执行之后清除缓存,出错了就不会清空缓存
     */
    @CacheEvict(key = "#id")
    public void deleteEmp(Integer id) {
        System.out.println("deleteEmp" + id);
    }

    /**
     * Caching给一个函数添加多种缓存模式
     *
     * @CachePut标注的目标函数不管有没有缓存都会被调用
     */
    @Caching(
            cacheable = {
                    @Cacheable(key = "#last_name")
            },
            put = {
                    @CachePut(key = "#result.id"),
                    @CachePut(key = "#result.email")

            }
    )
    public Employee getEmpByLastName(String last_name) {

        return employeeMapper.getEmpByLastName(last_name);
    }
}
2、原理分析
1)自动配置类CacheAutoConfiguration默认导入的缓存的配置类
默认生效的是哪一个可以在配置文件中指定:debug=true,查看--->SimpleCacheConfiguration
2、缓存分析
1)SimpleCacheConfiguration会注册一个ConcurrentMapCacheManager(CacheManager管理器)
2)ConcurrentMapCacheManager类
@Nullable// 根据Cache组件的名称获取Cache组件
public Cache getCache(String name) {
    Cache cache = (Cache)this.cacheMap.get(name);
    if (cache == null && this.dynamic) {
        synchronized(this.cacheMap) {
            cache = (Cache)this.cacheMap.get(name);
            if (cache == null) {
                // 没有就创建组件
                cache = this.createConcurrentMapCache(name);
                // 将组件存入管理器
                this.cacheMap.put(name, cache);
            }
        }
    }

    return cache;
}
protected Cache createConcurrentMapCache(String name) {
    SerializationDelegate actualSerialization = this.isStoreByValue() ? this.serialization : null;
    return new ConcurrentMapCache(name, new ConcurrentHashMap(256), this.isAllowNullValues(), actualSerialization);
}
3)ConcurrentMapCache类
// 创建ConcurrentMapCache类型的组件
protected ConcurrentMapCache(String name, ConcurrentMap store, boolean allowNullValues, @Nullable SerializationDelegate serialization) {
    super(allowNullValues);
    Assert.notNull(name, "Name must not be null");
    Assert.notNull(store, "Store must not be null");
    this.name = name;
    this.store = store;
    this.serialization = serialization;
}
@Nullable
// 根据key获取值
protected Object lookup(Object key) {
    return this.store.get(key);
}
// 将值以k-v的形式存入到缓存中
// store的类型为:private final ConcurrentMap store;
public void put(Object key, @Nullable Object value) {
    this.store.put(key, this.toStoreValue(value));
}
4)CacheAspectSupport生成key
@Nullable
// 使用keyGenerator生成key
protected Object generateKey(@Nullable Object result) {
    if (StringUtils.hasText(this.metadata.operation.getKey())) {
        EvaluationContext evaluationContext = this.createEvaluationContext(result);
        return CacheAspectSupport.this.evaluator.key(this.metadata.operation.getKey(), this.metadata.methodKey, evaluationContext);
    } else {
        return this.metadata.keyGenerator.generate(this.target, this.metadata.method, this.args);
    }
}
三、整合redis实现缓存
1、引入依赖
    org.springframework.boot
    spring-boot-starter-data-redis
当引入了redis依赖,RedisCacheConfiguration就会起作用
2. 在配置文件中配置redis连接地址
spring.redis.host=localhost3. 使用RestTemplate操作redis
Redis常见的五大数据类型
String、List、Set、Hash(散列)、ZSet(有序集合)
stringRedisTemplate.opsForValue()[String]
stringRedisTemplate.opsForList()[List]
stringRedisTemplate.opsForSet()[Set 无序集合]
stringRedisTemplate.opsForZSet()[ZSet 有序集合]
stringRedisTemplate.opsForHash()[Hash 散列]
4、自定义CacheManager
让对象以json字符串的形式存储在redis数据库中
package com.zm.config;
import com.fasterxml.jackson.annotation.JsonAutoDetect;
import com.fasterxml.jackson.annotation.PropertyAccessor;
import com.fasterxml.jackson.databind.ObjectMapper;
import org.springframework.cache.CacheManager;
import org.springframework.context.annotation.Bean;
import org.springframework.context.annotation.Configuration;
import org.springframework.data.redis.cache.RedisCacheConfiguration;
import org.springframework.data.redis.cache.RedisCacheManager;
import org.springframework.data.redis.connection.RedisConnectionFactory;
import org.springframework.data.redis.serializer.Jackson2JsonRedisSerializer;
import org.springframework.data.redis.serializer.RedisSerializationContext;
import org.springframework.data.redis.serializer.RedisSerializer;
import org.springframework.data.redis.serializer.StringRedisSerializer;
@Configuration
public class MyRedisConfig {
@Bean
public CacheManager cacheManager(RedisConnectionFactory factory) {
RedisSerializer redisSerializer = new StringRedisSerializer();
Jackson2JsonRedisSerializer


