spring源码之Ioc容器加载过程详解
一、前言
针对于spring源码的初步学习,首先应该掌握四大块,基于四大块全部掌握的基础上在进行扩展深入研究学习,具体四块如下:
1.Ioc容器加载的过程
2.spring解决循环依赖方式
3.spring Aop的实现
4.spring 事务管理实现
如果掌握了上面的四点,那么基本上就可以很自豪的说精通spring了,也算掌握了spring大概一半的内容了。
本文主要研究Ioc容器的加载过程。
二、什么是Ioc容器?
我们常说Ioc是一个容器,是的,ioc就是一个容器,并且它并不神秘,说白了,spring就是用一个ConcurrentHashMap来作为Ioc容器的,key就是beanName,value就是Bean的实例对象,所以Ioc容器就是这么简单易懂。
虽然我们都知道它就是一个简单的Map,但是spring如何创建这个Map,且往这个Map里面存值? 下面一起学习。
所谓的Ioc容器的加载过程,我能否换句话说,就是向一个Map中存值的过程?
这个过程也很简单,简单到就四步:
1.找到要存的数据
2.处理要存的数据
3.创建要存的数据的值
4.把值存到容器map中
转化为spring的逻辑描述:
1.基于注解或者xml配扫描配置的类
2.注册为BeanDefinition到BeanDefinitionMap中
3.BeanFactory基于BeanDefinition创建Bean
4.把Bean存入Ioc容器
这就是Ioc的加载过程,但是.....光知道这些可还不够,我们还需是需要了解一下具体加载的细节,方便我们在开发spring应用时,能灵活使用并且能够基于Spring做一些扩展,毕竟spring提供的那么多扩展点,可以不是闹着玩的。
三、Ioc的加载过程
上面已经大致了解了Ioc加载的四大步,现在对这四步一一展开分析:
首先假设我们有一个配置类:
import org.springframework.context.annotation.ComponentScan;
import org.springframework.context.annotation.EnableAspectJAutoProxy;
import org.springframework.transaction.annotation.EnableTransactionManagement;

@EnableTransactionManagement
@EnableAspectJAutoProxy //底层是@Import注解
@ComponentScan(basePackages = {"com.zb.study"})
public class Config {

}
然后有一个Service
@Service
public class CarServiceImpl implements CarService {

	public CarServiceImpl() {
		System.out.println("这是CarServiceImpl的构造方法");
	}
}
然后我们通过spring的ApplicationContext获取CarServiceImpl的实例对象
import com.zb.study.service.CarService;
import org.springframework.context.annotation.AnnotationConfigApplicationContext;


public class TestMain {

	public static void main(String[] args) {
        //把主配置类传进去
		AnnotationConfigApplicationContext configApplicationContext = new AnnotationConfigApplicationContext(Config.class);
		String[] beanDefinitionNames = configApplicationContext.getBeanDefinitionNames();
		CarService carService = (CarService) configApplicationContext.getBean("carServiceImpl");
		carService.getCar("奔驰");
		configApplicationContext.close();

	}
}
3.1基于注解或者xml配扫描配置的类并注册成BeanDefinition
在我们启动spring的时候,一般都会有对应的配置,两种方式:1.xml配置 (现在不常用) 2.注解方式,这两种方式,创建两个ApplicationContext,ClassPathXmlApplicationContext和AnnotationConfigApplicationContext,比如AnnotationConfigApplicationContext。
在创建时,
public AnnotationConfigApplicationContext(Class... annotatedClasses) {
		/**
		 * 1.注册spring内部的一些组件的bean定义,例如ConfigurationClassPostProcessor等
		 */
		this();
		/**
		 * 注册传入的annotatedClasses的bean定义
		 */
		register(annotatedClasses);
		refresh();
	}
首先,看下构造方法this()中做的事:
	/**
	 * Create a new AnnotationConfigApplicationContext that needs to be populated
	 * through {@link #register} calls and then manually {@linkplain #refresh refreshed}.
	 */
	public AnnotationConfigApplicationContext() {
		/**
		 * 注解bean定义的读取器 在里面注册spring内部的一些组件
		 * 注册ConfigurationClassPostProcessor bean定义
		 * 注册AutowiredAnnotationBeanPostProcessor bean定义
		 * 注册CommonAnnotationBeanPostProcessor bean定义
		 * 注册EventListenerMethodProcessor bean定义
		 * 注册DefaultEventListenerFactory bean定义
		 */
		this.reader = new AnnotatedBeanDefinitionReader(this);
		/**
		 * 这里创建的scanner不是给spring用的 是给用户用的,
         * 用户可以通过这个扫描器,把在定义的类扫描进spring容器中
		 */
		this.scanner = new ClassPathBeanDefinitionScanner(this);
	}
帮我们创建了两个类:
new AnnotatedBeanDefinitionReader(this)//配置读取器
new ClassPathBeanDefinitionScanner(this)//类扫描器
在创建AnnotatedBeanDefinitionReader时,帮我们注册一些Spring内部的Bean定义,其中有一个ConfigurationClassPostProcessor类的Bean定义比较重要,先来看一下这个类的继承类图

它实现了BeanDefinitionRegistryPostProcessor且继承了BeanFactoryPostProcessor,也就是说它是一个BeanFactory的后置处理器,这个类的Bean定义被注册之后,在后面会被调用,用于扫描包下的类并注册成BeanDefinition。
ClassPathBeanDefinitionScanner这个扫描器是提供给用户使用的,spring并不会使用这个scanner,它会再创建一个扫描器进行类的扫描。
其次,register(annotatedClasses)这个方法是把我们传入的配置类注册成Bean定义
最后最重要的方法refresh()
@Override
	public void refresh() throws BeansException, IllegalStateException {
		synchronized (this.startupShutdownMonitor) {
			// Prepare this context for refreshing.
			prepareRefresh();

			// Tell the subclass to refresh the internal bean factory.
			ConfigurableListableBeanFactory beanFactory = obtainFreshBeanFactory();

			// Prepare the bean factory for use in this context.
			prepareBeanFactory(beanFactory);

			try {
				// Allows post-processing of the bean factory in context subclasses.
				//允许在上下文的子类中对bean factory进行后处理
				postProcessBeanFactory(beanFactory);

				// Invoke factory processors registered as beans in the context.
				/**
				 * 找出ConfigurationClassPostProcessor类 并执行其postProcessBeanDefinitionRegistry()方法  筛选自定义的配置类
				 */
				invokeBeanFactoryPostProcessors(beanFactory);

				// Register bean processors that intercept bean creation.
				//把所有的bean的后处理器排序,在bean实例化后调用 如果在这一步 有bean实现了BeanPostProcessor,则这一步就会完成bean的创建
				registerBeanPostProcessors(beanFactory);

				// Initialize message source for this context.
				initMessageSource();

				// Initialize event multicaster for this context.
				initApplicationEventMulticaster();

				// Initialize other special beans in specific context subclasses.
				onRefresh();

				// Check for listener beans and register them.
				registerListeners();

				// Instantiate all remaining (non-lazy-init) singletons.
				finishBeanFactoryInitialization(beanFactory);

				// Last step: publish corresponding event.
				finishRefresh();
			}

			catch (BeansException ex) {
				if (logger.isWarnEnabled()) {
					logger.warn("Exception encountered during context initialization - " +
							"cancelling refresh attempt: " + ex);
				}

				// Destroy already created singletons to avoid dangling resources.
				destroyBeans();

				// Reset 'active' flag.
				cancelRefresh(ex);

				// Propagate exception to caller.
				throw ex;
			}

			finally {
				// Reset common introspection caches in Spring's core, since we
				// might not ever need metadata for singleton beans anymore...
				resetCommonCaches();
			}
		}
	}
这个方法中调用了很多方法,针对Ioc容器加载过程相关的就两个方法,其他的统统不要看,不然就是还未入门就放弃了。
第一个方法invokeBeanFactoryPostProcessors(beanFactory) 调用BeanFactory的后置处理器,
在这一步中,获取到我们一开始就注册的spring内部的一些Bean定义,找到BeanFactoryPostProcessor类型的Bean定义,其中就有我们刚刚说的ConfigurationClassPostProcessor,因为这个类也是一个BeanFactory的后置处理器。
然后调用getBean()方法创建这些BeanFactory的后置处理器的实例。
再然后依次调用这些后置处理器。
插入一条说明:这个时候调用的都是spring内部的BeanFactory后置处理器,如果你自定义的有BeanFactory后置处理器,这时候还不会调用,为什么?因为你自定义的BeanFactory后置处理器此时还是一个空气中运动的分子,它现在连个Bean定义都不是,spring如何调用?
继续
ConfigurationClassPostProcessor被调用时,会找到你传入的Config配置类,解析配置类的注解,并根据配置的包扫描包下的所有类,然后筛选出带有@Component,@Configuration,@Important @Bean @service等等注解的类,并注册成Bean定义到BeanDefinitionMap中
这一步过后,你的一些自定义的Bean,BeanFactory后置处理器才会由空气分子转为Bean定义,才有机会被调用。
spring会继续找出BeanFactory后置处理器,这里包括用户自定义的BeanFactory后置处理器,然后继续getBean(),然后继续调用后置处理器。
当然,之前调用过的,不会重复调用。
再插入一条说明:对于spring的扩展点,在这个地方会最先调用BeanFactory的后置处理器,这一点比较重要,如果你的Bean实现了或者继承了BeanFactoryPostProcessor,那么你的Bean在这里就会被创建,且在这里被调用,你可以在这里对BeanFactory做一些修改。
到了这里,我们的Bean都被扫描成BeanDefinition并注册到BeanDefinitionMap容器中了。
这是Ioc容器加载过程中比较重要的一步,也可以看出,spring是基于BeanFactoryPostProcessor后置处理器来做我们的bean的扫描和注册工作的。
当然了里面有一些细节就不多做说明了,可以跟个源码多看看,比如,后置处理器的调用顺序,如何避免重复调用的,如何扫描的bean的,如何注册的,这些也是比较重要的,但是这里不做过多说明,否则能说到天荒地老。
3.2 Bean的创建
Spring 通过BeanFactory创建Bean实例,一般是通过反射创建Bean,如果你实现FactoryBean接口,那么你的Bean会被定义为一个FactoryBean,此时spring会调用你的getObject()方法,在这个方法中你可以返回自定义的bean实例,spring存入ioc容器的就是getObject方法返回的bean。
spring为用户提供了很多扩展点,前面说的BeanFactoryPostProcessor是一种,BeanPostProcessor也是Spring提供的一种扩展方式,spring为啥能够集成那么多的第三方组件,比如Mybatis,Hibernate等多种中间件,几乎全部都是基于这些扩展点实现的。
在bean创建过程中,spring会多次调用Bean的后置处理器,还有一些Aware。
正常情况下,spring分为三步创建bean,实例化,属性填充,初始化
1.在实例化Bean之前 如果你的Bean实现了InstantiationAwareBeanPostProcessor->postProcessBeforeInstantiation(beanClass, beanName)方法,则spring会调用这个方法,如果在方法中返回了Bean,则spring不在创建Bean,直接使用自定义返回的Bean。
2.如果你实现了InstantiationAwareBeanPostProcessor的->postProcessAfterInitialization(),且你实现的postProcessBeforeInstantiation()正确返回了Bean,则spring会调用postProcessAfterInitialization()。
第一步:实例化bean。
3.在实例化时,如果实现了SmartInstantiationAwareBeanPostProcessor->determineCandidateConstructors()的方法,spring会在实例化的时候调用此后置处理器,可以通过这个方法指定构造函数
4.在实例化之后,给属性赋值之前,调用Bean的后置处理器:
循环所有实现了MergedBeanDefinitionPostProcessor的后置处理器
MergedBeanDefinitionPostProcessor->postProcessMergedBeanDefinition(mbd, beanType, beanName),对@Autowired @Value预解析处理。以便后面的第二步,填充Bean的属性做准备。
5.紧接着,spring会往三级缓存中存一个 ObjectFactory singletonFactory,这是一个接口,接口方法实现会找出所有实现SmartInstantiationAwareBeanPostProcessor的后置处理器,依次调用getEarlyBeanReference(exposedObject, beanName)一般是为解决循环依赖时AOP创建代理类的。
第二步:为bean填充属性,例如通过@Autowired注解依赖的其他bean等。
6.在给Bean填充属性时,依次调用实现InstantiationAwareBeanPostProcessor的后置处理器的postProcessAfterInstantiation()方法,如果你实现了这个接口,并且返回了false,那么赋值终止。
7.接着 依次调用实现了InstantiationAwareBeanPostProcessor-> postProcessPropertyValues()方法,@Autowited 依赖注入就是在这实现的
第三步:初始化bean,如果你实现了BeanPostProcessor,会调用bean的后置处理器,如果实现了InitializingBean接口,则会调用afterPropertiesSet()方法。如果你自定义了init方法,在这一步也会调用你的自定义的初始化方法。
8.实例化时会调用很多Bean的后置处理器BeanPostProcessor->postProcessBeforeInitialization()
如果你有@PostContruct注解的方法,则会再此处调用,如果你实现了BeanPostProcessor的postProcessBeforeInitialization()的方法,也会在此时调用
9.如果你实现了BeanPostProcessor的postProcessAfterInitialization()的方法,也是在初始化Bean时调用
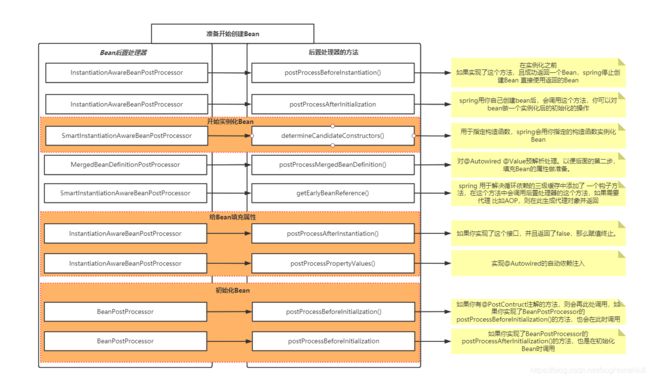
以上就是Ioc容器加载的大致逻辑,spring把大部分的bean定义注册交给了后置处理器实现,然后基于BeanPostProcessor 后置处理器做一些扩展。