SpringBoot 初识
SpringBoot 初识
IOC
在我们接触Springboot之前,先了解一下一个概念 IOC 。
ioc - Inversion Of Control 即 控制反转。这并不是某个语言专有的特性,而是一种编程思想。
我们之前编程的时候都是主动的去注入对象,即频繁的使用new去新建一个对象。这种编程方式看似没有什么大的问题,但是其实有很多可以改善的地方。
我们可以发现,当我们一个类特别复杂的时候,我们在代码中可能要new 数以百计甚至更多的对象,并且不主动使用垃圾回收机制进行清除,这种方式对于内存堆是非常不友好的,并且程序也非常繁冗,类与类之间耦合度极高,之后对代码的修改也非常困难。
所以呢,我们就引入了一个新的编程思想,就是IOC。IOC的核心思想便是使用容器去查找创建需要创建的对象。具体来说,就是我们只需要在代码中告诉容器,我整个过程需要会将使用到什么对象,那么之后容器便会在需要使用的时候自动去创建所需要的资源以供使用。
@Data
public class B {
    private final String name = "B";
}
---------------------------------------------
@Data
public class A {
    private final String name="A";
    public void test(){
        B b= new  B();
        System.out.println(b.getName());
    }
}
我们可以看到上面demo中有两个类,当A想使用B的时候,我是主动注入B,即new了一个B对象。这就是传统的创建对象的控制权在我们自己手中。
@Data
@Component
public class B {
    private final String name = "B";
}
--------------------------------------------
@Data
public class A {
    private final String name = "A";
    //自动注入
    @Autowired
    private B b;
    public void test(){
        System.out.println(b.getName());
    }
}
可以看到这次demo中我并没有使用new去新建对象,而是使用@Autowired将B组件注入到A中,即当A发现我需要使用B的时候,容器便会自动创建对象B以供使用。此时B需要加上@Component注解标明这是一个组件,然后将它放入容器中,这样容器之后才会在组件列表中找到并创建它。
这里说下
@Component和@Bean的区别。在Springboot中,
@Component用于注解一个类,告诉Sprongboot,在程序启动之前需要将整个类作为Bean对象放入IOC容器中。而
@Bean则是用于注解一个方法,该方法为创建一个实例对象的具体逻辑。注解在方法上便是告诉程序启动之前将该方法的返回实例注入到IOC容器中。
DI
当我们说到IOC的时候,往往会提及一个概念DI,Dependency Injection即依赖注入。
其实上面我们介绍IOC的时候就已经介绍完了DI,因为DI就是我们实现IOC思想的一个具体方法。即在IOC容器运行过程中,当前实体被动地被IOC容器注入其依赖的组件。
Springboot结构概览
了解完IOC之后,我们其实也就了解了Springboot框架的一个整体思想。就是构建不同的组件,自动装配这些组件然后运行以完成我们的具体需求。
本人所有java代码都是使用idea进行编写,所以直接使用idea创建Springboot initializr创建Springboot工程文件。
我们先来看一下Springboot的一个大概的文件结构
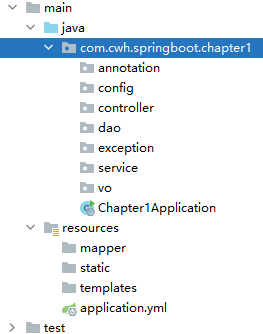
配置文件
我们先看一下application.yml的一个demo
spring:
  datasource:
    url: jdbc:mysql://localhost:3306/testdatabase?useUnicode=true&characterEncoding=utf-8&allowMultiQueries=true&serverTimezone=GMT%2B8
    username: root
    password: 1234
    driver-class-name: com.mysql.cj.jdbc.Driver
server:
  port: 8080
  servlet:
    context-path: /mybatis

mybatis:
  type-aliases-package: com.springstudy.mybatistest.entity
  mapper-locations: classpath:com.springstudy.mybatis.DAO/*Mapper.xml
这里是Springboot的一些设定,例如服务器端口server.port,数据源spring.datasource,Mybatis的mapper文件位置等等。具体设定看使用需求。
springboot 默认配置文件原来是application.properties,这里改为yml只是为了格式易读,规范。
Controller
现在的项目都是前后端分离开发的,常见的项目框架便是
Vue+Springboot去构建。整体思路便是前端发送请求给后端,后端根据不同请求以及请求中携带的参数进行一些处理,然后将处理结果以及其他一些数据传给前端。这样前后端便可以分离开来,大大减轻了开发难度。后端人员专注于后端,前端人员专注于前端。
那么Controller便作为Springboot中接受请求的一层。
@RestController
public class TestController {
    @GetMapping("/getmessage")
    public String getMessage(){
        return "getMessage success";
    }
}
这便是一个十分简单的controller,该controller捕获前端在URL为/getmessage的GET请求,然后将String对象返回给前端。
这里@RestController告诉IOC容器这是一个Controller组件,并且返回实体内容,等于@Controller+@RequestBody,如果没有@RequestBody,则返回String对象时会自动进行重定向识别。
@GetMapping("/getmessage")表明该方法匹配Get请求,对应Url为括号里的参数.
我们使用Postman看一下返回结果(Postman用于测试各种请求非常方便,具体使用可以自行查询。)
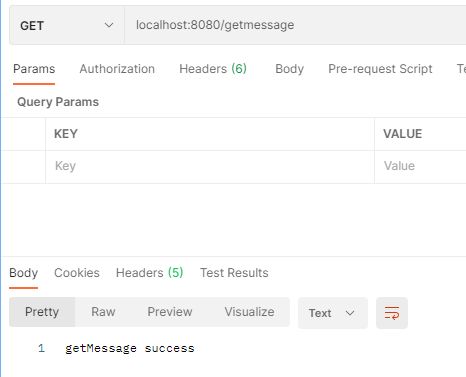
可以看到String对象返回成功。
上面的Controller只是一个非常简单的demo,让我们来看下具体项目中的一个Controller
@Slf4j
@RestController
@RequestMapping("/API/user")
@Auth(id = 1000, name = "用户管理")
public class UserController {
    @Autowired
    private UserService userService;
    @Autowired
    private ResourceService resourceService;

    @PostMapping
    @Auth(id = 1, name = "新增用户")
    public String createUser(@RequestBody @Validated(UserParam.CreateUser.class) UserParam param) {
        userService.createUser(param);
        return "操作成功";
    }

    @DeleteMapping
    @Auth(id = 2, name = "删除用户")
    public String deleteUser(Long[] ids) {
        if (ArrayUtils.isEmpty(ids)) {
            throw new ApiException(ResultCode.VALIDATE_FAILED);
        }
        userService.removeByIds(Arrays.asList(ids));
        return "操作成功";
    }

    @PutMapping
    @Auth(id = 3, name = "编辑用户")
    public String updateRoles(@RequestBody @Validated(UserParam.Update.class) UserParam param) {
        userService.update(param);
        return "操作成功";
    }
这是一个简单的实现CRUD(增删改查)的用户管理controller。
该Controller匹配/API/user的各种请求。对于不同请求匹配不同的方法,返回不同的结果给前端。
@Slf4j 该注释标明使用日志模块log4j,这个后续会具体说明。
@Auth 是自己定义的注解,用于权限设定,后面也会具体讲到如何自定义注解。
这里相同的url根据不同的请求方式调用不同方法便是RESTful 的编程风格
Get 用于获取数据。
Put 用于发送数据,常用于更新修改操作。
Post 用于创建新内容。
Delete 就是用于删除内容。
	 @Autowired
    private ResourceService resourceService;
这里使用@Autowired 注解注入resourceService,告诉IOC容器该controller需要使用resouceService组件,并在之后使用过程自动注入。
上面代码中使用@RequestBody标明参数是以json形式整体发送过来。
当然我们也可以发送单独的参数,即使用@RequestParam,@PathVariable
    @PostMapping("/addmessage")
    public String addmessage(@RequestParam(value="name",required = true)String name,@RequestParam("age") Integer age) {
        return "name:" + name + " age:" + age;
    }
返回结果:
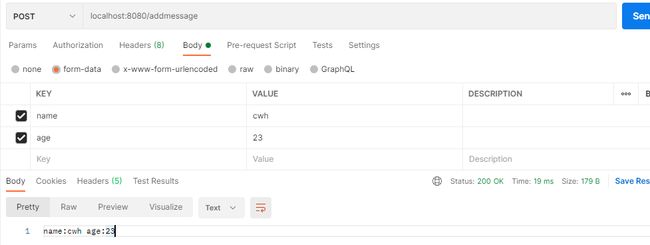
@RequestParam匹配url中传入的参数,上面addmessage()具体匹配url:/addmessage?name=cwh&age=23
我们再来看看@PathVariable
@PostMapping("/addmessage/{name}")
    public String addmessage(@PathVariable("name")String name) {
        return "name:" + name;
    }
返回结果:
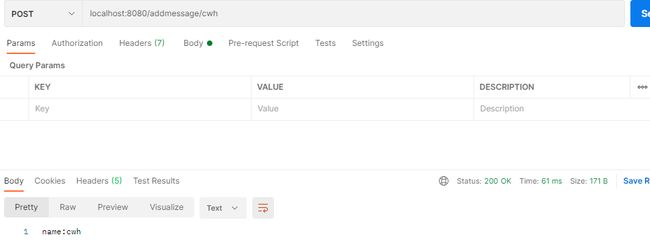
@PathVariable标明该请求参数以url:/addmessage/cwh的形式传入。
所以这两个注解作用没什么区别,只是对于不同参数传递方式使用不同方式获取参数。
DAO
DAO全称Data Access Object,即数据连接层。简单来说,就是实现数据库表中数据与实体类一一对应的功能层。例如我们使用springboot-data-jpa或者mybatis/mybatis-plus连接数据库,完成数据库数据与实体类映射的repository和mapper。jpa和mybatis的具体使用后续会详细介绍。
我个人倾向于把entity实体类也放在dao下,有利于逻辑理解。
@Mapper
@Repository
public interface StudentMapper {
    /**
     * 通过id查询学生
     * @param id
     * @return
     */
    Student queryById(@Param("id")Integer id);

    /**
     * 返回学生列表
     * @return
     */
    List<Student> queryAll();

    /**
     * 返回列表数量
     * @return
     */
    int getNum();

    /**
     * 插入学生信息
     * @return
     */
//    int insert(@Param("id")Integer id,@Param("name")String name,@Param("sex")String sex);

    int insert(@Param("student")Student student);
    /**
     * 更新学生信息
     * @return
     */
    int updateById(@Param("id")Integer id,@Param("name")String name,@Param("sex")String sex);

    int deleteById(@Param("id")Integer id);
}
这是mybatis的mapper接口,接口对应相应的mapper.xml文件,mapper.xml中实现实体类与表中数据的映射以及接口方法的各种数据库实现。
Service
Service层是Springboot主要的逻辑处理层。
我们一般是在service中注入Dao层中与数据库连接的接口,即可以理解为获取数据库信息,以形参实现该服务接口所需要的逻辑过程。最后controller层注入service,以请求中的参数完成最终的功能。
但是我们对于·层一般都是定义一堆接口,然后分别创建接口的实现,毕竟这样以后可以一个接口有多个实现,虽然我更倾向于一个service接口实现一个具体功能。
StudentService.java
=============================================
    public interface StudentService {

    public Student getStudentById(Integer id);

    public List<Student> getAll();

    public int getNum();

    public ResultVO insert(Student student);
}
----------------------------------------------
StudentServiceImpl.java
==============================================
@Service
public class StudentServiceImpl implements StudentService {
    @Autowired
    private StudentDao studentDao;

    @Override
    public Student getStudentById(Integer id) {
        return studentDao.queryById(id);
    }

    @Override
    public List<Student> getAll(){
        return studentDao.queryAll();
    }

    @Override
    public int getNum() {
        return studentDao.getNum();
    }

    @Override
    public ResultVO insert(Student student) {
        studentDao.insert(student);
        ResultVO resultVO = new ResultVO();
        resultVO.setCode(1);
        resultVO.setMsg("insert success");
        return resultVO;
    }
}
@Slf4j
@RestController
public class StudentController {

    @Autowired
    private StudentServiceImpl studentService;

    @GetMapping("/query")
    public Student getStudentById(@RequestParam("id")Integer id){
        Student student = studentService.getStudentById(id);
        log.info(student.getStuName());
        return student;
    }
	.......
    .......
    @GetMapping("/queryall")
    public List<Student> getAll(){
        return studentService.getAll();
    }

}
上面demo是一个对student表的简单CRUD功能的逻辑实现。
- 我们定义逻辑接口StudentService
- 定义StudentServiceImpl实现上述接口(使用@Service告诉Springboot这是一个service组件)
- 注入StudentDao,提供数据库相关功能
- Controller中注入StudentService(注入接口即可,Springboot会自动注入其实现类,但是一个接口多个实现类的时候需要标明设定的实现类ID)
VO
vo主要是返回视图层,即返回给前端的数据的具体格式。
@Data
@JsonInclude(JsonInclude.Include.NON_NULL)
public class ResultVO<T> {
    //返回代码
    private Integer code;
    //返回提示信息
    private String msg;
    //返回具体内容
    private T data;

    public ResultVO(){
    }
    public ResultVO(Integer code, String msg){
        this.code = code;
        this.msg = msg;
    }
}
这就是一个简单的返回视图类。
返回一个信息码,一个提示信息还有一个泛型T的data数据。
这里@JsonInclude(JsonInclude.Include.NON_NULL) 是标明null不参与序列化,即如果结果中有null,该属性不显示。
   @GetMapping("/addmessage")
    public ResultVO<String> getmessage(@RequestParam(value="name",required = true)String name ){
        ResultVO resultVO = new ResultVO();
        resultVO.setCode(1);
        resultVO.setMsg("success");
        resultVO.setData("name:"+name);
        return resultVO;
    }
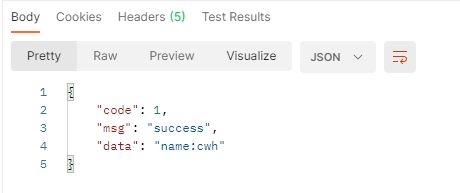
我们可以看到VO层主要是规范化返回信息,便于前端处理收到的信息。
例如前端和后端设计一个功能,后端只需要返回通用的ResultVO,这样前端只需要获取data.code或者data.data而不用频繁定义对象去接受不同的结果。这样也便于前后端分离开发。
config,annotation,exception…
其余的层数都是不必须的,当需要的时候进行适当编写即可。
config层主要是包括了一些配置函数。
例如之后要使用的spring security,我们便要定义自己的SecurityConfg
    @Override
    protected void configure(HttpSecurity http) throws Exception {
        // 关闭csrf和frameOptions,如果不关闭会影响前端请求接口(这里不展开细讲了,感兴趣的自行搜索,不难)
        http.csrf().disable();
        http.headers().frameOptions().disable();
        // 开启跨域以便前端调用接口
        http.cors();
        // 这是配置的关键,决定哪些接口开启防护,哪些接口绕过防护
        http.authorizeRequests()
                // 注意这里,是允许前端跨域联调的一个必要配置
                .requestMatchers(CorsUtils::isPreFlightRequest).permitAll()
                // 指定某些接口不需要通过验证即可访问。像登陆、注册接口肯定是不需要认证的
                .antMatchers("/API/login", "/API/register").permitAll()
                // 这里意思是其它所有接口需要认证才能访问
                .antMatchers("/API/**").authenticated()
                // 指定认证错误处理器
                .and().exceptionHandling().authenticationEntryPoint(new MyEntryPoint()).accessDeniedHandler(new MyDeniedHandler());

        // 禁用session
        http.sessionManagement().sessionCreationPolicy(SessionCreationPolicy.STATELESS);
        // 将我们自定义的认证过滤器替换掉默认的认证过滤器
        http.addFilterBefore(loginFilter, UsernamePasswordAuthenticationFilter.class);
        http.addFilterBefore(authFilter, FilterSecurityInterceptor.class);
    }
关于spring security相关配置我们后续再具体介绍,这里只需看看即可。
annotation 层主要包含了一些我们自己定义的注解。
例如我们之后要学习的AOP的知识,其中一种方式就是通过注解实现AOP,实现例如日志记录,权限校验等功能。
Exception层主要包含了我们自定义的一些异常。
在Springboot中我们可以通过@ControllerAdvice+@ExceptionHandler进行统一异常管理
统一异常管理不仅仅是简化代码其实也是为了规范返回数据格式。
还有很多层,例如
Aspect定义我们AOP的切面逻辑,utils工具层等等。这些都不是定死的,你也可以都写在一个包里面,我们这么做只是为了逻辑更加鲜明,便于工程管理。