初识Spring Security OAuth2
文章目录
- SpringSecurityOAuth来开发认证服务器和资源服务器
-
- SpringSecurityOAuth其实已经帮我们默认实现了以下一些东西:
-
- 授权码模式:
- 项目准备
-
- 1. 添加依赖
- 2. 配置认证服务器
-
- 登录并授权
- 获取token
- 3. 配置资源服务器
-
- 带着token去访问资源
- spring security oauth2 登录核心源码
-
- TokenEndpoint
-
- ClientDetails
- TokenRequest
- CompositeTokenGranter#grant
-
- 不同的授权模式,对应的实现方式不同
- tokenGranters
- AbstractTokenGranter#grant
- AbstractTokenGranter#getAccessToken
- DefaultTokenServices#createAccessToken
- 重构用户名密码登录
-
- 1. ImoocAuthenticationSuccessHandler重写
- 1.2ImoocResourceServerConfig
- 1.3演示
- 重构短信登录
- 重构社交登录
-
- 授权码模式:
- 简化模式:
- 1.定义OpenIdAuthenticationToken
- 2.OpenIdAuthenticationFilter
- 3. 验证Token的Provider
- 4.配置OpenIdAuthenticationSecurityConfig
- 5.配置资源服务器
- 6.演示
-
- 6.1获取Token
- 6.2根据Token访问
- 参考资料
SpringSecurityOAuth来开发认证服务器和资源服务器
SpringSecurityOAuth其实已经帮我们默认实现了以下一些东西:
-
认证服务器
- oauth2的认证方式有四种授权模式:授权码,简单,账户密码,客户端,具体请自行百度不做过多的阐述。 本文基于授权码方式实现
- Token的生成存储
-
资源服务器
- OAuthAuthenticationProcessingFilter(拦截用户请求中的token并从认证服务器中寻找对应的用户信息)
如下图所示:

授权码模式:

项目准备
1. 添加依赖
		<dependency>
             <groupId>org.springframework.boot</groupId>
             <artifactId>spring-boot-starter-security</artifactId>
         </dependency>
         <dependency>
             <groupId>org.springframework.boot</groupId>
             <artifactId>spring-boot-starter-web</artifactId>
         </dependency>
         <dependency>
             <groupId>org.springframework.security.oauth</groupId>
             <artifactId>spring-security-oauth2</artifactId>
         </dependency>
         <dependency>
             <groupId>org.springframework.boot</groupId>
             <artifactId>spring-boot-starter-test</artifactId>
         </dependency>
2. 配置认证服务器
@Configuration
 @EnableAuthorizationServer//是的,没做,就这么一个注解
 public class MerryyouAuthorizationServerConfig {

 }
有了这个注解表示我们的认证服务器已经默认实现了。启动一下我们会看到如下信息:

/oauth/authorize表示引导用户跳转去授权的路径,/oauth/token表示通过授权码获取token的路径。按照OAuth2的协议规范,我们去跳转授权的时候需要用这样的路径去访问:http://localhost:8060/oauth/authorize?response_type=code&client_id=imooc&redirect_uri=http://www.jianshu.com&scope=all
这些参数什么意思呢?其实理解他们并不难,这里不建议大家去死记硬背,而是要把自己想象一下授权的时候需要什么东西?
1.首先我们要知道哪一个应用再授权?比如我们要知道是简书需要授权还是慕课需要授权?client_id就是服务提供商给每个应用分配的id,所以请求的时候需要这个参数。这个clientId可以在应用启动的时候看到如下图所示:

2.第三方应用在请求我的哪一个用户授权?所以我们必须要得到用户名。但是请求参数中没有用户名啊?这不是在忽悠吗~~如下图所示:
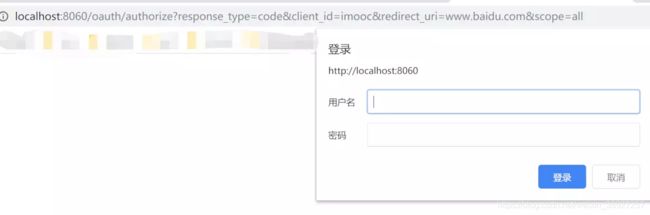
我们访问的/oauth/authorize的弹出框就需要我们填写这个东东
3.给你哪些授权?scope=all表示全部权限拿到。这个参数带的值是由服务提供商定义的,所以不要乱填写~
登录并授权

我们发现这样我们就获取到了code~~
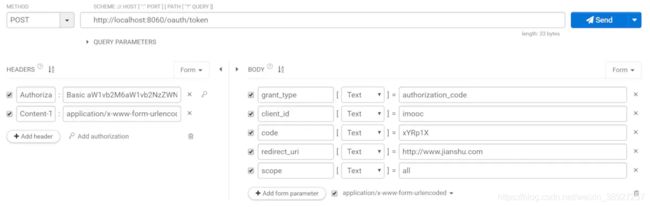
获取token
这里我们必须要发起post请求
我们要在请求头里面包含我们配置的clientId和clientSecret,然后在按照OAuth协议填写好请求参数:
springsecurity basic 认证

得到的access_token如下:

3. 配置资源服务器
 @Configuration
 @EnableResourceServer//咦,没错还是一个注解
 public class MerryyouResourceServerConfig {
 }
- 配置
application.yml客户端信息(不配置的话,控制台会默认打印clientid和clietSecret)
 security:
   oauth2:
     client:
       client-id: merryyou
       client-secret: merryyou
- 定义
MyUserDetailsService
 @Component
 public class MyUserDetailsService implements UserDetailsService {

     @Override
     public UserDetails loadUserByUsername(String username) throws UsernameNotFoundException {
         return new User(username, "123456", AuthorityUtils.commaSeparatedStringToAuthorityList("ROLE_USER"));
     }
 }
如果不配置ROLE_USER,即使我们输入了正确的用户名和密码也会403拒绝。
- 添加测试类
SecurityOauth2Test(用户名密码模式)
 @RunWith(SpringRunner.class)
 @SpringBootTest
 @Slf4j
 public class SecurityOauth2Test {
     //端口
     final static long PORT = 9090;
     //clientId
     final static String CLIENT_ID = "merryyou";
     //clientSecret
     final static String CLIENT_SECRET = "merryyou";
     //用户名
     final static String USERNAME = "admin";
     //密码
     final static String PASSWORD = "123456";
     //获取accessToken得URI
     final static String TOKEN_REQUEST_URI = "http://localhost:"+PORT+"/oauth/token?grant_type=password&username=" + USERNAME + "&password=" + PASSWORD+"&scope=all";
     //获取用户信息得URL
     final static String USER_INFO_URI = "http://localhost:"+PORT+"/user";

     @Test
     public void getUserInfo() throws Exception{
         RestTemplate rest = new RestTemplate();
         HttpHeaders headers = new HttpHeaders();
         headers.add( "authorization", "Bearer " + getAccessToken() );
         HttpEntity<String> entity = new HttpEntity<String>(null, headers);
         // pay attention, if using get with headers, should use exchange instead of getForEntity / getForObject
         ResponseEntity<String> result = rest.exchange( USER_INFO_URI, HttpMethod.GET, entity, String.class, new Object[]{ null } );
         log.info("用户信息返回的结果={}",JsonUtil.toJson(result));
     }

     /**
      * 获取accessToken
      * @return
      */
     private String getAccessToken(){
         RestTemplate rest = new RestTemplate();
         HttpHeaders headers = new HttpHeaders();
         headers.setContentType( MediaType.TEXT_PLAIN );
         headers.add("authorization", getBasicAuthHeader());
         HttpEntity<String> entity = new HttpEntity<String>(null, headers);
         ResponseEntity<OAuth2AccessToken> resp = rest.postForEntity( TOKEN_REQUEST_URI, entity, OAuth2AccessToken.class);
         if( !resp.getStatusCode().equals( HttpStatus.OK )){
             throw new RuntimeException( resp.toString() );
         }
         OAuth2AccessToken t = resp.getBody();
         log.info("accessToken={}",JsonUtil.toJson(t));
         log.info("the response, access_token: " + t.getValue() +"; token_type: " + t.getTokenType() +"; "
                 + "refresh_token: " + t.getRefreshToken() +"; expiration: " + t.getExpiresIn() +", expired when:" + t.getExpiration() );
         return t.getValue();

     }

     /**
      * 构建header
      * @return
      */
     private String getBasicAuthHeader(){
         String auth = CLIENT_ID + ":" + CLIENT_SECRET;
         byte[] encodedAuth = Base64.encodeBase64(auth.getBytes());
         String authHeader = "Basic " + new String(encodedAuth);
         return authHeader;
     }
 }
带着token去访问资源

这里我们一个简单的默认模式就跑完了,但是还是有很多优化的地方~
授权码模式效果如下:
测试类打印accessToken信息
2018-01-20 18:16:49.900  INFO 16136 --- [           main] cn.merryyou.security.SecurityOauth2Test  : accessToken={
  "value": "8e5ea72c-d153-48f5-8ee7-9b5616fc43dc",
  "expiration": "Jan 21, 2018 6:10:25 AM",
  "tokenType": "bearer",
  "refreshToken": {
    "value": "7adfefec-c80c-4ff4-913c-4f161c47fbf1"
  },
  "scope": [
    "all"
  ],
  "additionalInformation": {}
}
spring security oauth2 登录核心源码
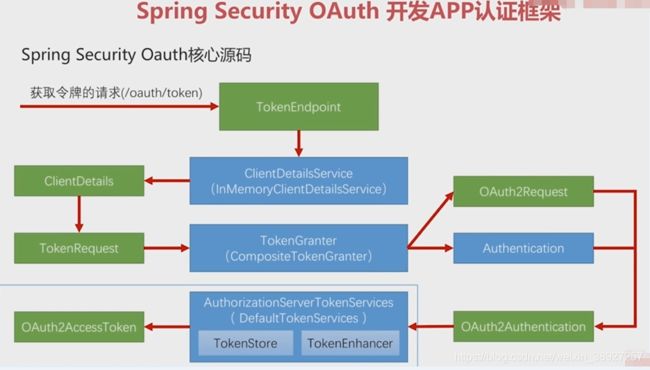
绿色:实体的类
蓝色:接口
TokenEndpoint:整个流程的入口点,可以理解成一个controller,处理获取令牌的请求,因为获取Token的请求地址都是:/oauth/token,只不过根据携带的参数来区别密码模式还是授权码模式
ClientDetailsService: TokenEndpoint调用clientDetailsService,读取第三方应用信息,因为之前发请求的时候,都会带上clientid和clientsecret,这样才知道哪个应用调用
ClientDetails:根据这两个参数来读取Client的配置信息也就是ClientDetails
TokenRequest:封装了请求中其他参数的信息,比如:grant_type、username、password、scope等等,同时把ClientDetails也放进TokenRequest里边,因为第三方应用信息也是令牌请求的一部分
TokenGranter:这个接口里边封装了四种授权模式的不同实现,去选一个实现方法来实现令牌的生成,在生成的过程中都会产生两个东西:OAuth2Request、Authentication
OAuth2Request:实际上是把ClientDetails和TokenRequest这两个对象的信息整合起来了
Authentication:封装了当前用户的一些授权信息
OAuth2Authentication:你现在是哪个第三方应用,在请求哪个用户给你授权,你用的授权模式是什么,授权其中一些参数是什么,最终这些信息都会被封装到这个OAuth2Authentication对象里边
AuthorizationServerTokenServices:(认证服务器的令牌服务)
TokenStore:处理令牌的存取
TokenEnhancer:令牌增强器,当令牌生成出来后可以去改造这个令牌,可以加一些东西进去
OAuth2AccessToken:
TokenEndpoint
TokenEndpoint:整个流程的入口点,可以理解成一个controller,处理获取令牌的请求,因为获取Token的请求地址都是:/oauth/token,只不过根据携带的参数来区别密码模式还是授权码模式
//#1.处理/oauth/token请求
@RequestMapping(value = "/oauth/token", method=RequestMethod.POST)
	public ResponseEntity<OAuth2AccessToken> postAccessToken(Principal principal, @RequestParam
	Map<String, String> parameters) throws HttpRequestMethodNotSupportedException {

		if (!(principal instanceof Authentication)) {
			throw new InsufficientAuthenticationException(
					"There is no client authentication. Try adding an appropriate authentication filter.");
		}
		//获取clientId
		String clientId = getClientId(principal);
		//获取第三方应用的详细配置信息
		ClientDetails authenticatedClient = getClientDetailsService().loadClientByClientId(clientId);
		//使用第三方应用信息创建TokenRequest
		TokenRequest tokenRequest = getOAuth2RequestFactory().createTokenRequest(parameters, authenticatedClient);
		//有没有传clientId
		if (clientId != null && !clientId.equals("")) {
			// Only validate the client details if a client authenticated during this
			// request.
			//与配置里面的是否匹配
			if (!clientId.equals(tokenRequest.getClientId())) {
				// double check to make sure that the client ID in the token request is the same as that in the
				// authenticated client
				throw new InvalidClientException("Given client ID does not match authenticated client");
			}
		}
		if (authenticatedClient != null) {
			//检查scope
			oAuth2RequestValidator.validateScope(tokenRequest, authenticatedClient);
		}
		//grant_type是否存在值,对应四种授权模式和刷新token
		if (!StringUtils.hasText(tokenRequest.getGrantType())) {
			throw new InvalidRequestException("Missing grant type");
		}
		//是否简化模式
		if (tokenRequest.getGrantType().equals("implicit")) {
			throw new InvalidGrantException("Implicit grant type not supported from token endpoint");
		}
		//是否是授权码模式
		if (isAuthCodeRequest(parameters)) {
			// The scope was requested or determined during the authorization step
			if (!tokenRequest.getScope().isEmpty()) {
				logger.debug("Clearing scope of incoming token request");
				//如果是授权码模式scope设置为空,根据获取code时的scope设置
				tokenRequest.setScope(Collections.<String> emptySet());
			}
		}
		//是否刷新令牌
		if (isRefreshTokenRequest(parameters)) {
			// A refresh token has its own default scopes, so we should ignore any added by the factory here.
			//设置scope
			tokenRequest.setScope(OAuth2Utils.parseParameterList(parameters.get(OAuth2Utils.SCOPE)));
		}
		//获取OAuth2AccessToken
		OAuth2AccessToken token = getTokenGranter().grant(tokenRequest.getGrantType(), tokenRequest);
		if (token == null) {
			throw new UnsupportedGrantTypeException("Unsupported grant type: " + tokenRequest.getGrantType());
		}

		return getResponse(token);

	}
ClientDetails
ClientDetailsService: TokenEndpoint调用clientDetailsService,读取第三方应用信息,因为之前发请求的时候,都会带上clientid和clientsecret,这样才知道哪个应用调用
ClientDetails:根据这两个参数来读取Client的配置信息也就是ClientDetails

TokenRequest
TokenRequest:封装了请求中其他参数的信息,比如:grant_type、username、password、scope等等,同时把ClientDetails也放进TokenRequest里边,因为第三方应用信息也是令牌请求的一部分
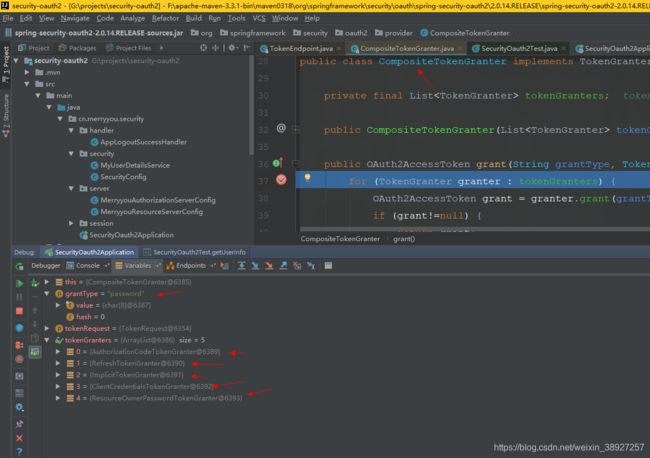
CompositeTokenGranter#grant
tokenGranters这个集合里边size是五,里边有五种对应之前的四种授权模式,再加上一种reflusToken,这五种情况都会产生令牌
这里就会去循环这个list集合,授权时指定了grantType,这里会根据grantType会去这五个实现里边挑一个,然后生成最终的accessToken,最后返回回去
	//四种授权模式+刷新令牌的模式根据grant_type判断
	public OAuth2AccessToken grant(String grantType, TokenRequest tokenRequest) {
		for (TokenGranter granter : tokenGranters) {
			OAuth2AccessToken grant = granter.grant(grantType, tokenRequest);
			if (grant!=null) {
				return grant;
			}
		}
		return null;
	}
密码模式:用请求中带上来的用户名和密码,来获取当前用户的信息
授权码模式:通过第一步发出去的授权码,服务提供商会记下发出去的授权码,通过这个授权码去找到用户信息,第三方应用带着授权码来获取令牌的时候,就通过授权码对应的用户信息返回回去
不同的授权模式,对应的实现方式不同


判断之前是否发过accessToken,是否过期,如果过期了就把之前发的accessToken删了,如果没过期就把令牌重新存起来,因为可能第一次请求是授权码模式,第二次请求是密码模式,这时存的信息是不一样的

如果是第一次请求Token就会新建一个refreshToken
然后根据authentication和refreshToken去创建一个Token

tokenGranters
TokenGranter:这个接口里边封装了四种授权模式的不同实现,去选一个实现方法来实现令牌的生成,在生成的过程中都会产生两个东西:OAuth2Request、Authentication

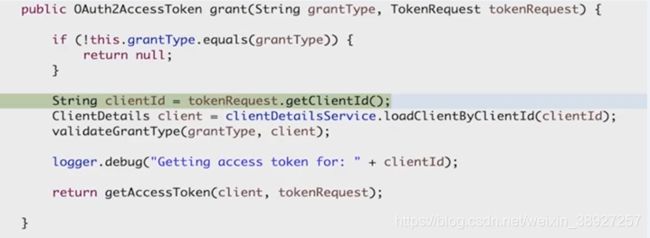
AbstractTokenGranter#grant
public OAuth2AccessToken grant(String grantType, TokenRequest tokenRequest) {
		//判断当前的授权类型和传入的是否匹配
		if (!this.grantType.equals(grantType)) {
			return null;
		}
		//获取clientId
		String clientId = tokenRequest.getClientId();
		ClientDetails client = clientDetailsService.loadClientByClientId(clientId);
		//校验
		validateGrantType(grantType, client);

		logger.debug("Getting access token for: " + clientId);
		//产生令牌
		return getAccessToken(client, tokenRequest);

	}
AbstractTokenGranter#getAccessToken
protected OAuth2AccessToken getAccessToken(ClientDetails client, TokenRequest tokenRequest) {
		return tokenServices.createAccessToken(getOAuth2Authentication(client, tokenRequest));
	}
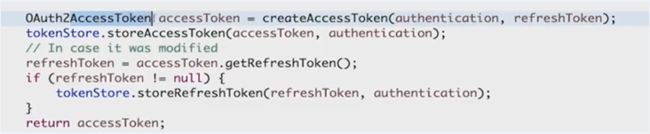
DefaultTokenServices#createAccessToken
public OAuth2AccessToken createAccessToken(OAuth2Authentication authentication) throws AuthenticationException {
		//从tokenStore获取OAuth2AccessToken (如果令牌存在,不同的授权模式下将返回同一个令牌)
		OAuth2AccessToken existingAccessToken = tokenStore.getAccessToken(authentication);
		OAuth2RefreshToken refreshToken = null;
		//判断是否过期
		if (existingAccessToken != null) {
			if (existingAccessToken.isExpired()) {
				if (existingAccessToken.getRefreshToken() != null) {
					//删除过期的令牌
					refreshToken = existingAccessToken.getRefreshToken();
					// The token store could remove the refresh token when the
					// access token is removed, but we want to
					// be sure...

					tokenStore.removeRefreshToken(refreshToken);
				}
				tokenStore.removeAccessToken(existingAccessToken);
			}
			else {
				//如果令牌存在则从新存储一下
				// Re-store the access token in case the authentication has changed
				tokenStore.storeAccessToken(existingAccessToken, authentication);
				//存储完直接返回
				return existingAccessToken;
			}
		}

		// Only create a new refresh token if there wasn't an existing one
		// associated with an expired access token.
		// Clients might be holding existing refresh tokens, so we re-use it in
		// the case that the old access token
		// expired.
		//判断刷新令牌不存在
		if (refreshToken == null) {
			//创建刷新令牌
			refreshToken = createRefreshToken(authentication);
		}
		// But the refresh token itself might need to be re-issued if it has
		// expired.
		else if (refreshToken instanceof ExpiringOAuth2RefreshToken) {
			//过期
			ExpiringOAuth2RefreshToken expiring = (ExpiringOAuth2RefreshToken) refreshToken;
			if (System.currentTimeMillis() > expiring.getExpiration().getTime()) {
				refreshToken = createRefreshToken(authentication);
			}
		}
		//根据刷新令牌创建OAuth2AccessToken
		OAuth2AccessToken accessToken = createAccessToken(authentication, refreshToken);
		tokenStore.storeAccessToken(accessToken, authentication);
		// In case it was modified
		refreshToken = accessToken.getRefreshToken();
		if (refreshToken != null) {
			tokenStore.storeRefreshToken(refreshToken, authentication);
		}
		//返回OAuth2AccessToken
		return accessToken;

	}
重构用户名密码登录
1. ImoocAuthenticationSuccessHandler重写
@Component("imoocAuthenticationSuccessHandler")
public class ImoocAuthenticationSuccessHandler extends SavedRequestAwareAuthenticationSuccessHandler {

    private Logger logger = LoggerFactory.getLogger(getClass());

    @Autowired
    private ObjectMapper objectMapper;

    @Autowired
    private SecurityProperties securityProperties;

    @Autowired
    private ClientDetailsService clientDetailsService;

    @Autowired
    private AuthorizationServerTokenServices authorizationServerTokenServices;

    /*
     * (non-Javadoc)
     *
     * @see org.springframework.security.web.authentication.
     * AuthenticationSuccessHandler#onAuthenticationSuccess(javax.servlet.http.
     * HttpServletRequest, javax.servlet.http.HttpServletResponse,
     * org.springframework.security.core.Authentication)
     */
    @SuppressWarnings("unchecked")
    @Override
    public void onAuthenticationSuccess(HttpServletRequest request, HttpServletResponse response,
            Authentication authentication) throws IOException, ServletException {

        logger.info("登录成功");

        String header = request.getHeader("Authorization");

        if (header == null || !header.startsWith("Basic ")) {
            throw new UnapprovedClientAuthenticationException("请求头中无client信息");
        }

        String[] tokens = extractAndDecodeHeader(header, request);
        assert tokens.length == 2;

        String clientId = tokens[0];
        String clientSecret = tokens[1];

        ClientDetails clientDetails = clientDetailsService.loadClientByClientId(clientId);

        if (clientDetails == null) {
            throw new UnapprovedClientAuthenticationException("clientId对应的配置信息不存在:" + clientId);
        } else if (!StringUtils.equals(clientDetails.getClientSecret(), clientSecret)) {
            throw new UnapprovedClientAuthenticationException("clientSecret不匹配:" + clientId);
        }

        TokenRequest tokenRequest = new TokenRequest(MapUtils.EMPTY_MAP, clientId, clientDetails.getScope(), "custom");

        OAuth2Request oAuth2Request = tokenRequest.createOAuth2Request(clientDetails);

        OAuth2Authentication oAuth2Authentication = new OAuth2Authentication(oAuth2Request, authentication);

        OAuth2AccessToken token = authorizationServerTokenServices.createAccessToken(oAuth2Authentication);

        response.setContentType("application/json;charset=UTF-8");
        response.getWriter().write(objectMapper.writeValueAsString(token));

    }

    private String[] extractAndDecodeHeader(String header, HttpServletRequest request) throws IOException {

        byte[] base64Token = header.substring(6).getBytes("UTF-8");
        byte[] decoded;
        try {
            decoded = Base64.decode(base64Token);
        } catch (IllegalArgumentException e) {
            throw new BadCredentialsException("Failed to decode basic authentication token");
        }

        String token = new String(decoded, "UTF-8");

        int delim = token.indexOf(":");

        if (delim == -1) {
            throw new BadCredentialsException("Invalid basic authentication token");
        }
        return new String[] { token.substring(0, delim), token.substring(delim + 1) };
    }

}
这里我们通过获取请求头中的clientId和ClientSecret构建相应的信息,和源码的实现基本类似,但是重点说一处不同的地方:
TokenRequest tokenRequest = new TokenRequest(MapUtils.EMPTY_MAP, clientId, clientDetails.getScope(), "custom");
这里的第一个参数本来应该是前台传递过来的相关参数,比如用户名密码之类的东西,但是我们现在自定义了,所以直接给了一个空的map不影响,第二个参数就是请求头过来的clientId,第三个参数是直接把用户所有的scope拿过来的,其实现实中我们可以实现的更细,比如说只拿用户的部分授权而不是全部授权,这里相当于是拿了全部的授权,最后一个参数源码中的实现应该是4中授权模式中的一种,但是这里我们是自定义的授权,所以传递了一个"custom"。
1.2ImoocResourceServerConfig
@Configuration
@EnableResourceServer
public class ImoocResourceServerConfig extends ResourceServerConfigurerAdapter {

    @Autowired
    protected AuthenticationSuccessHandler imoocAuthenticationSuccessHandler;

    @Autowired
    protected AuthenticationFailureHandler imoocAuthenticationFailureHandler;

    @Autowired
    private SmsCodeAuthenticationSecurityConfig smsCodeAuthenticationSecurityConfig;

    @Autowired
    private ValidateCodeSecurityConfig validateCodeSecurityConfig;

    @Autowired
    private SpringSocialConfigurer imoocSocialSecurityConfig;

    @Autowired
    private SecurityProperties securityProperties;

    @Override
    public void configure(HttpSecurity http) throws Exception {

        http.formLogin()
            .loginPage(SecurityConstants.DEFAULT_UNAUTHENTICATION_URL)
            .loginProcessingUrl(SecurityConstants.DEFAULT_LOGIN_PROCESSING_URL_FORM)
            .successHandler(imoocAuthenticationSuccessHandler)
            .failureHandler(imoocAuthenticationFailureHandler);

        http//.apply(validateCodeSecurityConfig)
            //  .and()
            .apply(smsCodeAuthenticationSecurityConfig)
                .and()
            .apply(imoocSocialSecurityConfig)
                .and()
            .authorizeRequests()
                .antMatchers(
                    SecurityConstants.DEFAULT_UNAUTHENTICATION_URL,
                    SecurityConstants.DEFAULT_LOGIN_PROCESSING_URL_MOBILE,
                    securityProperties.getBrowser().getLoginPage(),
                    SecurityConstants.DEFAULT_VALIDATE_CODE_URL_PREFIX+"/*",
                    securityProperties.getBrowser().getSignUpUrl(),
                    securityProperties.getBrowser().getSession().getSessionInvalidUrl(),
                    securityProperties.getBrowser().getSignOutUrl(),
                    "/user/regist")
                    .permitAll()
                .anyRequest()
                .authenticated()
                .and()
            .csrf().disable();
    }

}
1.3演示

我们模拟了用户名表单登录,这里成功得到了token,authentication/form这个路径是登录时的跳转路径。登录成功后,successHandler会返回token给客户。
重构短信登录
在之前的短信登录中,短信验证码是存储在session中的,像微信小程序是没法拿到cookie的,即使session中有验证码,也没有任何用处,所以我们需要改造一下:

这里改造很简单,我就不贴代码了,原理就是在header中我们传递一下设备Id,然后在把验证码存储在redis中而不是session中就可以了。
重构社交登录
之前我们获取token什么的都是用户直接和Client打交道,现在我们重构一下社交登录,用户只和App打交道,然后APP和我们后端的Client打交道。如下面2张图所示,一种授权码模式,一种简化模式:
授权码模式:

简化模式:

1.定义OpenIdAuthenticationToken
只有两个成员变量,一个opendId和一个providerId,这样我们就可以知道是哪个服务提供商提供的opendId。
public class OpenIdAuthenticationToken extends AbstractAuthenticationToken {

    private static final long serialVersionUID = SpringSecurityCoreVersion.SERIAL_VERSION_UID;

    // ~ Instance fields
    // ================================================================================================

    private final Object principal;
    private String providerId;

    // ~ Constructors
    // ===================================================================================================

    /**
     * This constructor can be safely used by any code that wishes to create a
     * UsernamePasswordAuthenticationToken, as the {@link #isAuthenticated()}
     * will return false.
     *
     */
    public OpenIdAuthenticationToken(String openId, String providerId) {
        super(null);
        this.principal = openId;
        this.providerId = providerId;
        setAuthenticated(false);
    }

    /**
     * This constructor should only be used by AuthenticationManager or
     * AuthenticationProvider implementations that are satisfied with
     * producing a trusted (i.e. {@link #isAuthenticated()} = true)
     * authentication token.
     *
     * @param principal
     * @param credentials
     * @param authorities
     */
    public OpenIdAuthenticationToken(Object principal,
            Collection<? extends GrantedAuthority> authorities) {
        super(authorities);
        this.principal = principal;
        super.setAuthenticated(true); // must use super, as we override
    }

    // ~ Methods
    // ========================================================================================================

    public Object getCredentials() {
        return null;
    }

    public Object getPrincipal() {
        return this.principal;
    }

    public String getProviderId() {
        return providerId;
    }

    public void setAuthenticated(boolean isAuthenticated) throws IllegalArgumentException {
        if (isAuthenticated) {
            throw new IllegalArgumentException(
                    "Cannot set this token to trusted - use constructor which takes a GrantedAuthority list instead");
        }

        super.setAuthenticated(false);
    }

    @Override
    public void eraseCredentials() {
        super.eraseCredentials();
    }
}
2.OpenIdAuthenticationFilter
定义好了token,我们需要一个Filter来拦截登录信息,然后把这些信息封装成一个我们自定义的Token(未认证),然后交给Manager,所以,我们这里自定义了一个OpenIdAuthenticationFilter。
public class OpenIdAuthenticationFilter extends AbstractAuthenticationProcessingFilter {
    // ~ Static fields/initializers
    // =====================================================================================

    private String openIdParameter = SecurityConstants.DEFAULT_PARAMETER_NAME_OPENID;
    private String providerIdParameter = SecurityConstants.DEFAULT_PARAMETER_NAME_PROVIDERID;
    private boolean postOnly = true;

    // ~ Constructors
    // ===================================================================================================

    public OpenIdAuthenticationFilter() {
        super(new AntPathRequestMatcher(SecurityConstants.DEFAULT_LOGIN_PROCESSING_URL_OPENID, "POST"));
    }

    // ~ Methods
    // ========================================================================================================

    public Authentication attemptAuthentication(HttpServletRequest request, HttpServletResponse response)
            throws AuthenticationException {
        if (postOnly && !request.getMethod().equals("POST")) {
            throw new AuthenticationServiceException("Authentication method not supported: " + request.getMethod());
        }

        String openid = obtainOpenId(request);
        String providerId = obtainProviderId(request);

        if (openid == null) {
            openid = "";
        }
        if (providerId == null) {
            providerId = "";
        }

        openid = openid.trim();
        providerId = providerId.trim();

        OpenIdAuthenticationToken authRequest = new OpenIdAuthenticationToken(openid, providerId);

        // Allow subclasses to set the "details" property
        setDetails(request, authRequest);

        return this.getAuthenticationManager().authenticate(authRequest);
    }


    /**
     * 获取openId
     */
    protected String obtainOpenId(HttpServletRequest request) {
        return request.getParameter(openIdParameter);
    }

    /**
     * 获取提供商id
     */
    protected String obtainProviderId(HttpServletRequest request) {
        return request.getParameter(providerIdParameter);
    }

    /**
     * Provided so that subclasses may configure what is put into the
     * authentication request's details property.
     *
     * @param request
     *            that an authentication request is being created for
     * @param authRequest
     *            the authentication request object that should have its details
     *            set
     */
    protected void setDetails(HttpServletRequest request, OpenIdAuthenticationToken authRequest) {
        authRequest.setDetails(authenticationDetailsSource.buildDetails(request));
    }

    /**
     * Sets the parameter name which will be used to obtain the username from
     * the login request.
     *
     * @param usernameParameter
     *            the parameter name. Defaults to "username".
     */
    public void setOpenIdParameter(String openIdParameter) {
        Assert.hasText(openIdParameter, "Username parameter must not be empty or null");
        this.openIdParameter = openIdParameter;
    }


    /**
     * Defines whether only HTTP POST requests will be allowed by this filter.
     * If set to true, and an authentication request is received which is not a
     * POST request, an exception will be raised immediately and authentication
     * will not be attempted. The unsuccessfulAuthentication() method
     * will be called as if handling a failed authentication.
     *
     * Defaults to true but may be overridden by subclasses.
     */
    public void setPostOnly(boolean postOnly) {
        this.postOnly = postOnly;
    }

    public final String getOpenIdParameter() {
        return openIdParameter;
    }

    public String getProviderIdParameter() {
        return providerIdParameter;
    }

    public void setProviderIdParameter(String providerIdParameter) {
        this.providerIdParameter = providerIdParameter;
    }

}
3. 验证Token的Provider
主要步骤是根据未认证的token,然后到usersConnectionRepository中去获取用户的userId,拿到这个userId之后,然后用userDetailService拿到用户信息,在封装成认证后的OpenIdAuthenticationToken。
public class OpenIdAuthenticationProvider implements AuthenticationProvider {

    private SocialUserDetailsService userDetailsService;

    private UsersConnectionRepository usersConnectionRepository;

    /*
     * (non-Javadoc)
     *
     * @see org.springframework.security.authentication.AuthenticationProvider#
     * authenticate(org.springframework.security.core.Authentication)
     */
    @Override
    public Authentication authenticate(Authentication authentication) throws AuthenticationException {

        OpenIdAuthenticationToken authenticationToken = (OpenIdAuthenticationToken) authentication;

        Set<String> providerUserIds = new HashSet<>();
        providerUserIds.add((String) authenticationToken.getPrincipal());
        Set<String> userIds = usersConnectionRepository.findUserIdsConnectedTo(authenticationToken.getProviderId(), providerUserIds);

        if(CollectionUtils.isEmpty(userIds) || userIds.size() != 1) {
            throw new InternalAuthenticationServiceException("无法获取用户信息");
        }

        String userId = userIds.iterator().next();

        UserDetails user = userDetailsService.loadUserByUserId(userId);

        if (user == null) {
            throw new InternalAuthenticationServiceException("无法获取用户信息");
        }

        OpenIdAuthenticationToken authenticationResult = new OpenIdAuthenticationToken(user, user.getAuthorities());

        authenticationResult.setDetails(authenticationToken.getDetails());

        return authenticationResult;
    }

    /*
     * (non-Javadoc)
     *
     * @see org.springframework.security.authentication.AuthenticationProvider#
     * supports(java.lang.Class)
     */
    @Override
    public boolean supports(Class<?> authentication) {
        return OpenIdAuthenticationToken.class.isAssignableFrom(authentication);
    }

    public SocialUserDetailsService getUserDetailsService() {
        return userDetailsService;
    }

    public void setUserDetailsService(SocialUserDetailsService userDetailsService) {
        this.userDetailsService = userDetailsService;
    }

    public UsersConnectionRepository getUsersConnectionRepository() {
        return usersConnectionRepository;
    }

    public void setUsersConnectionRepository(UsersConnectionRepository usersConnectionRepository) {
        this.usersConnectionRepository = usersConnectionRepository;
    }

}
4.配置OpenIdAuthenticationSecurityConfig
所有的过滤器还有provider都写好了,接下来就是要把他们配置起来,让他们生效
@Component
public class OpenIdAuthenticationSecurityConfig extends SecurityConfigurerAdapter<DefaultSecurityFilterChain, HttpSecurity> {

    @Autowired
    private AuthenticationSuccessHandler imoocAuthenticationSuccessHandler;

    @Autowired
    private AuthenticationFailureHandler imoocAuthenticationFailureHandler;

    @Autowired
    private SocialUserDetailsService userDetailsService;

    @Autowired
    private UsersConnectionRepository usersConnectionRepository;

    @Override
    public void configure(HttpSecurity http) throws Exception {

        OpenIdAuthenticationFilter OpenIdAuthenticationFilter = new OpenIdAuthenticationFilter();
        OpenIdAuthenticationFilter.setAuthenticationManager(http.getSharedObject(AuthenticationManager.class));
        OpenIdAuthenticationFilter.setAuthenticationSuccessHandler(imoocAuthenticationSuccessHandler);
        OpenIdAuthenticationFilter.setAuthenticationFailureHandler(imoocAuthenticationFailureHandler);

        OpenIdAuthenticationProvider OpenIdAuthenticationProvider = new OpenIdAuthenticationProvider();
        OpenIdAuthenticationProvider.setUserDetailsService(userDetailsService);
        OpenIdAuthenticationProvider.setUsersConnectionRepository(usersConnectionRepository);

        http.authenticationProvider(OpenIdAuthenticationProvider)
            .addFilterAfter(OpenIdAuthenticationFilter, UsernamePasswordAuthenticationFilter.class);

    }
}
5.配置资源服务器
其实就是把第四步中的配置放到资源服务器中去
@Configuration
@EnableResourceServer
public class ImoocResourceServerConfig extends ResourceServerConfigurerAdapter {

    @Autowired
    protected AuthenticationSuccessHandler imoocAuthenticationSuccessHandler;

    @Autowired
    protected AuthenticationFailureHandler imoocAuthenticationFailureHandler;

    @Autowired
    private SmsCodeAuthenticationSecurityConfig smsCodeAuthenticationSecurityConfig;

    @Autowired
    private OpenIdAuthenticationSecurityConfig openIdAuthenticationSecurityConfig;

    @Autowired
    private ValidateCodeSecurityConfig validateCodeSecurityConfig;

    @Autowired
    private SpringSocialConfigurer imoocSocialSecurityConfig;

    @Autowired
    private SecurityProperties securityProperties;

    @Override
    public void configure(HttpSecurity http) throws Exception {

        http.formLogin()
            .loginPage(SecurityConstants.DEFAULT_UNAUTHENTICATION_URL)
            .loginProcessingUrl(SecurityConstants.DEFAULT_LOGIN_PROCESSING_URL_FORM)
            .successHandler(imoocAuthenticationSuccessHandler)
            .failureHandler(imoocAuthenticationFailureHandler);

        http.apply(validateCodeSecurityConfig)
                .and()
            .apply(smsCodeAuthenticationSecurityConfig)
                .and()
            .apply(imoocSocialSecurityConfig)
                .and()
            .apply(openIdAuthenticationSecurityConfig)
                .and()
            .authorizeRequests()
                .antMatchers(
                    SecurityConstants.DEFAULT_UNAUTHENTICATION_URL,
                    SecurityConstants.DEFAULT_LOGIN_PROCESSING_URL_MOBILE,
                    SecurityConstants.DEFAULT_LOGIN_PROCESSING_URL_OPENID,
                    securityProperties.getBrowser().getLoginPage(),
                    SecurityConstants.DEFAULT_VALIDATE_CODE_URL_PREFIX+"/*",
                    securityProperties.getBrowser().getSignUpUrl(),
                    securityProperties.getBrowser().getSession().getSessionInvalidUrl(),
                    securityProperties.getBrowser().getSignOutUrl(),
                    "/user/regist")
                    .permitAll()
                .anyRequest()
                .authenticated()
                .and()
            .csrf().disable();
    }
}
6.演示
6.1获取Token

6.2根据Token访问

参考资料
SpringSecurityOAuth教程:https://www.jianshu.com/p/f6b73cd23114