【Linux 实操项目】基于iptables的SNAT、DNAT和Docker容器进行Nginx和MySQL服务的部署
本文目录
-
- 1.项目名称
- 2.项目环境
- 3.项目描述
- 4.项目步骤
-
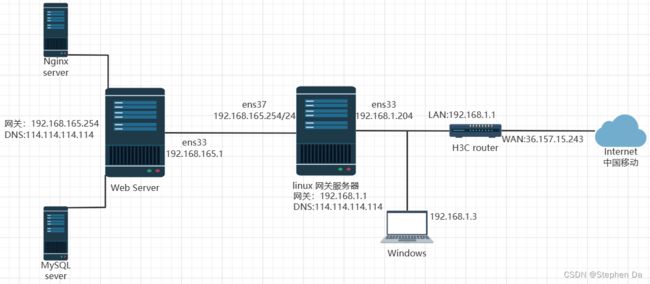
- 4.1规划整个项目的拓扑结构和IP地址
- 4.2安装好两台服务器系统,根据上面拓扑图的规划配置好相应的ip地址,安装好Docker软件
-
- 4.2.1 linux网关服务器的配置:
- 4.2.2 Web Server服务器的配置:
- 4.2.3 在Web Server服务器安装Docker容器
- 4.3在Web Server服务器启动Nginx和MySQL的Docker容器,测试容器是否能正常访问
-
- 4.3.1 启动Nginx
- 4.3.2 启动MySQL
- 4.3.3 测试容器是否能正常访问
- 4.4在网关服务器上配置好SNAT和DNAT策略,开启路由功能
- 4.5在Windows上测试发布的web服务和MySQL服务,使用Chrome和Navicat进行测试。
- 5.项目心得
1.项目名称
基于iptables的SNAT、DNAT和Docker容器进行Nginx和MySQL服务的部署
2.项目环境
CentOS 7.9,Docker 23.0.0,MySQL 5.7.35,Nginx 1.21.5,iptables 1.4.21
3.项目描述
采取Docker容器技术创建Web和MySQL服务,模拟企业发布内网的服务器,同时让内网的服务器能够上网。
4.项目步骤
4.1规划整个项目的拓扑结构和IP地址
4.2安装好两台服务器系统,根据上面拓扑图的规划配置好相应的ip地址,安装好Docker软件
4.2.1 linux网关服务器的配置:

4.2.2 Web Server服务器的配置:
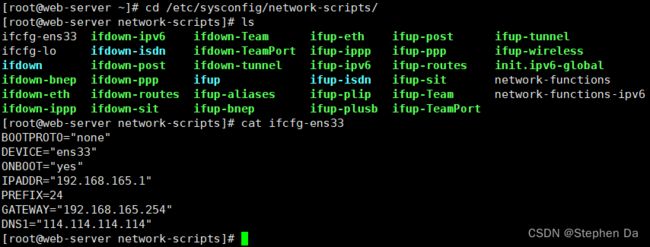
注意:三张网卡全部配置好之后,两台服务器分别输入此命令service network restart重启网络,方能生效!
4.2.3 在Web Server服务器安装Docker容器
Docker官方网站文档:https://docs.docker.com/engine/install/centos/
在尝试安装新版本之前,请卸载任何此类旧版本以及关联的依赖项:
yum remove docker \
                  docker-client \
                  docker-client-latest \
                  docker-common \
                  docker-latest \
                  docker-latest-logrotate \
                  docker-logrotate \
                  docker-engine
如果报告未安装这些包,则没关系,开始下一步开始安装。
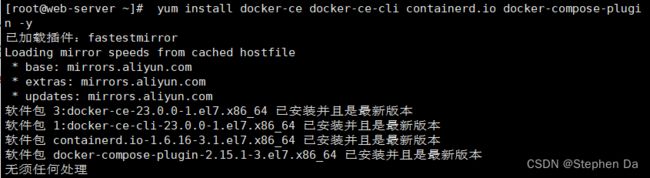
要安装最新版本,请运行:
yum install docker-ce docker-ce-cli containerd.io docker-compose-plugin
安装完成后可再次运行如下检测安装成功:
4.3在Web Server服务器启动Nginx和MySQL的Docker容器,测试容器是否能正常访问
4.3.1 启动Nginx
[root@web-server ~]# cd /etc/yum.repos.d
[root@web-server yum.repos.d]# ls
CentOS-Base.repo         CentOS-fasttrack.repo      docker-ce.repo
CentOS-Base.repo.backup  CentOS-Media.repo          epel.repo
CentOS-Base.repo.bak     CentOS-Sources.repo        epel.repo.rpmnew
CentOS-CR.repo           CentOS-Vault.repo          epel-testing.repo
CentOS-Debuginfo.repo    CentOS-x86_64-kernel.repo
[root@web-server yum.repos.d]# service docker start
[root@web-server yum.repos.d]# sudo mkdir -p /etc/docker
[root@web-server yum.repos.d]# sudo tee /etc/docker/daemon.json <<-'EOF'
> {
>   "registry-mirrors": ["https://yxzrazem.mirror.aliyuncs.com"]
> }
> EOF
{
  "registry-mirrors": ["https://yxzrazem.mirror.aliyuncs.com"]
}
[root@web-server yum.repos.d]# sudo systemctl daemon-reload
[root@web-server yum.repos.d]# sudo systemctl restart docker
[root@web-server yum.repos.d]# docker pull nginx
Using default tag: latest
latest: Pulling from library/nginx
a2abf6c4d29d: Pull complete
a9edb18cadd1: Pull complete
589b7251471a: Pull complete
186b1aaa4aa6: Pull complete
b4df32aa5a72: Pull complete
a0bcbecc962e: Pull complete
Digest: sha256:0d17b565c37bcbd895e9d92315a05c1c3c9a29f762b011a10c54a66cd53c9b31
Status: Downloaded newer image for nginx:latest
docker.io/library/nginx:latest
[root@web-server yum.repos.d]# docker images
REPOSITORY    TAG       IMAGE ID       CREATED         SIZE
nginx         latest    605c77e624dd   13 months ago   141MB
hello-world   latest    feb5d9fea6a5   16 months ago   13.3kB
[root@web-server yum.repos.d]# docker run --name sc-nginx-1 -d -p 80:80 nginx
c7e536aed317623af14d37de4e8adf8704717753c336ee963c8fd2e257905726
[root@web-server yum.repos.d]# docker ps
CONTAINER ID   IMAGE     COMMAND                   CREATED         STATUS         PORTS                               NAMES
c7e536aed317   nginx     "/docker-entrypoint.…"   6 seconds ago   Up 5 seconds   0.0.0.0:80->80/tcp, :::80->80/tcp   sc-nginx-1
[root@web-server yum.repos.d]# docker exec -it sc-nginx-1 /bin/bash
root@c7e536aed317:/# cd /usr/share/nginx/html/
root@c7e536aed317:/usr/share/nginx/html# ls
50x.html  index.html
root@c7e536aed317:/usr/share/nginx/html# echo "welcome to Jiangda web site" >index.html
注意:建议和我一样操作,记得更换成阿里云镜像,docker pull的速度更快,不然真的很慢很慢!
4.3.2 启动MySQL
[root@web-server yum.repos.d]# docker pull mysql:5.7.35
5.7.35: Pulling from library/mysql
b380bbd43752: Pull complete
f23cbf2ecc5d: Pull complete
30cfc6c29c0a: Pull complete
b38609286cbe: Pull complete
8211d9e66cd6: Pull complete
2313f9eeca4a: Pull complete
7eb487d00da0: Pull complete
bb9cc5c700e7: Pull complete
88676eb32344: Pull complete
8fea0b38a348: Pull complete
3dc585bfc693: Pull complete
Digest: sha256:b8814059bbd9c80b78fe4b2b0b70cd70fe3772b3c5d8ee1edfa46791db3224f9
Status: Downloaded newer image for mysql:5.7.35
docker.io/library/mysql:5.7.35
[root@web-server yum.repos.d]# docker run -d --name sc-mysql-2 -e MYSQL_ROOT_PASSWORD='sc123456' -p 3306:3306 mysql:5.7.35
8da872fedab0a3f0bebb5ad94ae3dad575fdc15f54861322f06bca5517b91adb
[root@web-server yum.repos.d]# docker ps
CONTAINER ID   IMAGE          COMMAND                   CREATED          STATUS          PORTS                                                  NAMES
8da872fedab0   mysql:5.7.35   "docker-entrypoint.s…"   37 seconds ago   Up 36 seconds   0.0.0.0:3306->3306/tcp, :::3306->3306/tcp, 33060/tcp   sc-mysql-2
c7e536aed317   nginx          "/docker-entrypoint.…"   14 minutes ago   Up 14 minutes   0.0.0.0:80->80/tcp, :::80->80/tcp                      sc-nginx-1
[root@web-server yum.repos.d]# ss -anplut|grep docker
tcp    LISTEN     0      128       *:3306                  *:*                   users:(("docker-proxy",pid=2785,fd=4))
tcp    LISTEN     0      128       *:80                    *:*                   users:(("docker-proxy",pid=2503,fd=4))
tcp    LISTEN     0      128    [::]:3306               [::]:*                   users:(("docker-proxy",pid=2789,fd=4))
tcp    LISTEN     0      128    [::]:80                 [::]:*                   users:(("docker-proxy",pid=2507,fd=4))
[root@web-server yum.repos.d]# mysql -uroot -psc123456 -h 192.168.165.1
Welcome to the MariaDB monitor.  Commands end with ; or \g.
Your MySQL connection id is 2
Server version: 5.7.35 MySQL Community Server (GPL)

Copyright (c) 2000, 2018, Oracle, MariaDB Corporation Ab and others.

Type 'help;' or '\h' for help. Type '\c' to clear the current input statement.

MySQL [(none)]> exit
Bye
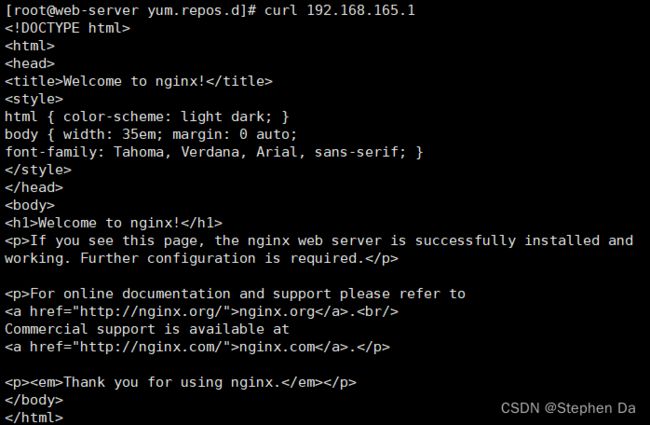
4.3.3 测试容器是否能正常访问
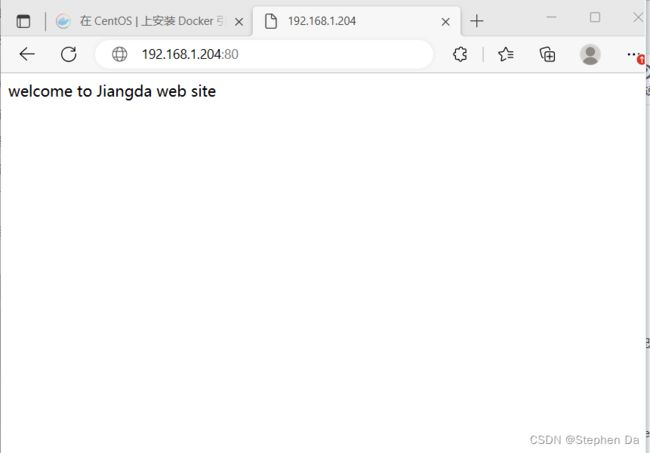
如下说明一切成功且顺利,即容器能正常访问。
访问Nginx成功:
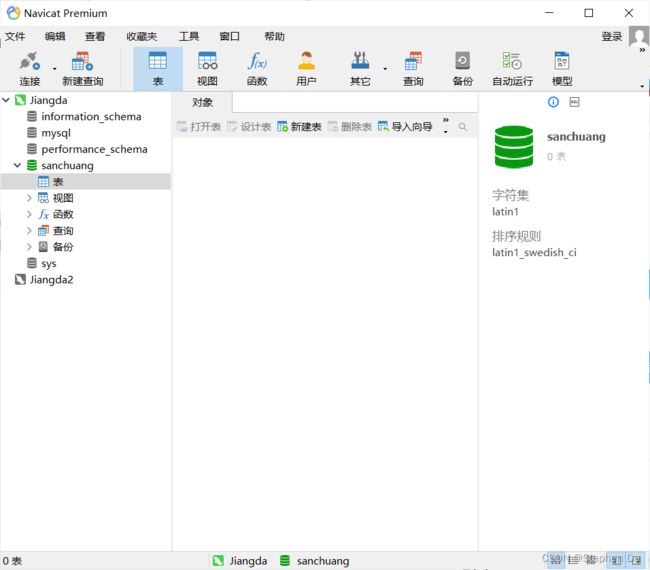
访问MySQL成功:

4.4在网关服务器上配置好SNAT和DNAT策略,开启路由功能
我们将配置命令和开启路由功能的命令集成在一个脚本中。运行脚本即可一次性配置好策略和打开路由功能,这样思路更清晰,防止忘记部分步骤。
vim snat_dnat.sh
进入vim编辑器,编写snat_dnat.sh:
#!/bin/bash
#stop firewalld
service firewalld stop

#open routing
setenforce 0

#clear iptables rules
echo 1 >/proc/sys/net/ipv4/ip_forward

#snat policy
iptables -F
iptables -t nat -F
iptables -P INPUT ACCEPT

#SNAT Policy
#iptables -t nat -A POSTROUTING -s 192.168.165.0/24 -o ens33 -j SNAT --to-source 192.168.1.204
iptables -t nat -A POSTROUTING -s 192.168.165.0/24 -o ens33 -j MASQUERADE

#DNAT Policy
#nginx
iptables -t nat -A PREROUTING -d 192.168.1.204 -p tcp --dport 80 -j DNAT --to-destination 192.168.165.1:80

#mysql
iptables -t nat -A PREROUTING -d 192.168.1.204 -p tcp --dport 3306 -j DNAT --to-destination 192.168.165.1:3306
保存退出后,执行脚本bash snat_dnat.sh。
4.5在Windows上测试发布的web服务和MySQL服务,使用Chrome和Navicat进行测试。
Chrome测试成功:
Navicat测试成功:
5.项目心得
- 感觉做一个项目规划非常重要,这样才能思路清晰,有条不紊的进行
- 加深了对iptables和Docker容器的理解
- 提升了网络Troubleshooting的能力
- 提升了文档的编写能力
- 对Linux的操作要求细心,对多台机器操作不混淆,尽量不出错