python爬虫之Scrapy介绍二——以爬取腾讯招聘为例
python爬虫之Scrapy介绍
- 1. logging模块
-
- 1.1 简介
- 1.2 错误级别
- 1.3 常用配置
- 1.4 logging模块在scrapy文件的配置
- 2. scrapy.Request—以腾讯招聘爬虫为例
- 3. item
1. logging模块
1.1 简介
定义:Python 中的 logging 模块可以让你跟踪代码运行时的事件,当程序崩溃时可以查看日志并且发现是什么引发了错误。
用途:1)控制信息层级,仅记录需要的信息。2)控制显示或者保存日志的时机。3)使用内置信息模板控制日志格式。4)知晓信息来自于哪个模块。
1.2 错误级别
级别:Log 信息有内置的层级——调试(debugging)、信息(informational)、警告(warnings)、错误(error)和严重错误(critical)。
DEBUG:详细信息,用于诊断问题。Value=10。
INFO:确认代码运行正常。Value=20。
WARNING:意想不到的事情发生了,或预示着某个问题。但软件仍按预期运行。Value=30。
ERROR:出现更严重的问题,软件无法执行某些功能。Value=40。
CRITICAL:严重错误,程序本身可能无法继续运行。Value=50。
内容参考自:Python Logging 模块完全解读
1.3 常用配置
import logging
'''
DEBUG:详细信息,用于诊断问题。Value=10。
INFO:确认代码运行正常。Value=20。
WARNING:意想不到的事情发生了,或预示着某个问题。但软件仍按预期运行。Value=30。
ERROR:出现更严重的问题,软件无法执行某些功能。Value=40。
CRITICAL:严重错误,程序本身可能无法继续运行。Value=50。
'''
logging.basicConfig(level=logging.ERROR,  # 设置日志记录水平为ERROR
                    format='%(asctime)s %(filename)s %(levelname)s %(message)s',
                    datefmt='%a %d %b %Y %H:%M:%S',  #  设置日志输出时间格式
                    filename='my.log',   # 设置日志文件名
                    filemode='w')

logging.debug('this is debug info')
logging.info('this is information')
logging.warn('this is warning message')
logging.error('this is error message')
logging.fatal('this is fatal message, it is same as logger.critical')
logging.critical('this is critical message')
更多logging知识可以阅读这两篇博客:
Python logging 模块之 logging.basicConfig 用法和参数详解
Python中的logging模块
1.4 logging模块在scrapy文件的配置
在爬虫和pipeline文件分别设置logging模块
如在爬虫文件中:
import scrapy
import logging  # 导入logging模块

logger = logging.getLogger(__name__)
class DbSpider(scrapy.Spider):  # 类名不改
    name = 'db'
    allowed_domains = ['douban.com']
    start_urls = ['http://douban.com/']
    def parse(self, response):   # 解析的方法,方法名不改
        # logging.warning('this is warning')
        # print(__name__)
        logger.warning('this is warning')  # 实现输出发出warning的文件名
        yield item
在pipeline文件中:
import logging
logger = logging.getLogger(__name__)
class MyspiderPipeline(object):
def process_item(self, item, spider):
logger.warning(item)
2. scrapy.Request—以腾讯招聘爬虫为例
scrapy.Request(url, callback=None, method='GET', headers=None, body=None,cookies=None, meta=None, encoding='utf-8', priority=0, dont_filter=False, errback=None, flags=None)
'''
常⽤参数为:
callback :指定传⼊的 URL 交给那个解析函数去处理
meta :实现不同的解析函数中传递数据, meta 默认会携带部分信息 , ⽐如下载延迟,请求深度
dont_filter: 让 scrapy 的去重不会过滤当前 URL , scrapy 默认有 URL 去重功能,对需要重复
请求的 URL 有重要⽤途
'''
以爬取腾讯招聘为实例,具体介绍
网址为:http://hr.tencent.com/position.php
(1)创建一个爬取腾讯招聘的项目
## 终端运行
cd  F:\教材\python学习\python练习\Scrapy框架
scrapy startproject TecentSpider
(2)定义一个爬虫文件
# 终端运行
cd TecentSpider
scrapy genspider Tecent "tecent.com"
(3)初始设置
1)在TencetSpider路径创建并定义start.py文件运行
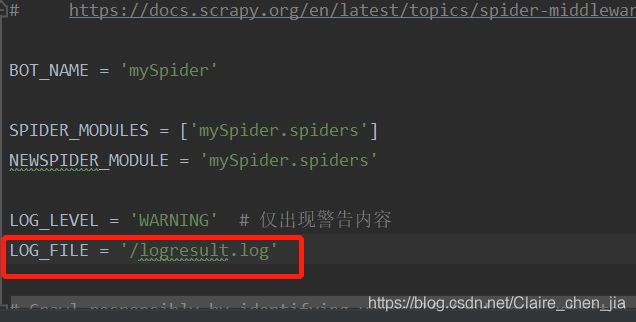
2)setting中打开管道文件、设置代理头,日志文件等
from scrapy import cmdline
cmdline.execute(['scrapy','crawl','Tecent'])
(4)分析目标url
分析首页:
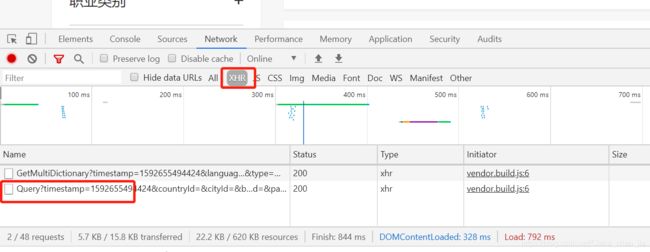
查看首页(http://hr.tencent.com/position.php)源代码,发现网页内容是被加密过,所以先进行解析

步骤如下:


分析具体岗位网页
查看具体岗位(https://careers.tencent.com/jobdesc.html?postId=1212639087324827648)的需求:
我们同样发现是被加密了,解密过程同首页解密过程。
并且我们可以发现:
Request URL: https://careers.tencent.com/tencentcareer/api/post/ByPostId?timestamp=1592655826569&postId=1212639087324827648&language=zh-cn
# 不同网页的Request URL 是根据首页的Postid决定的
(5)编写爬虫文件
import scrapy
import json


class TecentSpider(scrapy.Spider):
    name = 'Tecent'
    allowed_domains = ['tencent.com']   #  这里设置要注意 https://careers.tencent.com/
    # 腾讯招聘首页的目标URL  Index = {} 这里先format
    # https://careers.tencent.com/tencentcareer/api/post/Query?timestamp=1592655726234&countryId=&cityId=&bgIds=&productId=&categoryId=&parentCategoryId=&attrId=&keyword=&pageIndex={}&pageSize=10&language=zh-cn&area=cn
    one_url = 'https://careers.tencent.com/tencentcareer/api/post/Query?timestamp=1592655726234&countryId=&cityId=&bgIds=&productId=&categoryId=&parentCategoryId=&attrId=&keyword=&pageIndex={}&pageSize=10&language=zh-cn&area=cn'
    # 具体需求岗位的目标URL (postId={} 这里先format)
    # https://careers.tencent.com/tencentcareer/api/post/ByPostId?timestamp=1592655826569&postId=1212639087324827648&language=zh-cn
    two_url = 'https://careers.tencent.com/tencentcareer/api/post/ByPostId?timestamp=1592655826569&postId={}&language=zh-cn'
    start_urls = [one_url.format(1)]

    def parse(self, response):
        for page in range(1,11):
            # 向这10页来发起请求
            url = self.one_url.format(page)
            yield scrapy.Request(url=url,callback=self.parse_one)
            # callback 指定传⼊的 URL 交给那个解析函数去处理 --> 定义parse_one函数

    def parse_one(self,response):
        data = json.loads(response.text)   # 把网页响应的内容倒入到data里面
        for job in data['Data']['Posts']:
            # 定义一个字典保存数据
            item = {}
            item['position'] = job['RecruitPostName']  # 职位
            item['type'] = job['CategoryName'] # 职位类型
            post_id = job['PostId'] #  获得id,为了拼接网页
            # 拼接详情页的url
            detail_url = self.two_url.format(post_id)
            yield scrapy.Request(url=detail_url, meta={'item':item},callback=self.parse_two)
            # meta :实现不同的解析函数中传递数据, meta 默认会携带部分信息 , ⽐如下载延迟,请求深度
            # callback=self.parse_two : 定义parse_two 进一步定义解析具体岗位的函数

    def parse_two(self,response):
        # item = response.meta['item']   # 第一种从meta中取出item值
        item = response.meta.get('item')   # 第二种从meta中取出item值
        data = json.loads(response.text)  # # 把网页响应的内容倒入到data里面
        item['require'] = data['Data']['Requirement'] # 岗位要求
        item['content'] = data['Data']['Responsibility'] # 岗位描述
        yield item
(6)编写管道文件
class TecentspiderPipeline:
    def process_item(self, item, spider):
        print(item)
如果要存储文件,也可以在管道文件中进行存储代码的编写,这里只是打印出来而已
3. item
在item.py文件中定义在爬虫文件中的项目,如
## items.py
import scrapy
class TencentItem(scrapy.Item):
# define the fields for your item here like:
	title = scrapy.Field()
	position = scrapy.Field()
	date = scrapy.Field()

