SpringBoot常用注解
SpringBoot常用注解
1.常用注解介绍
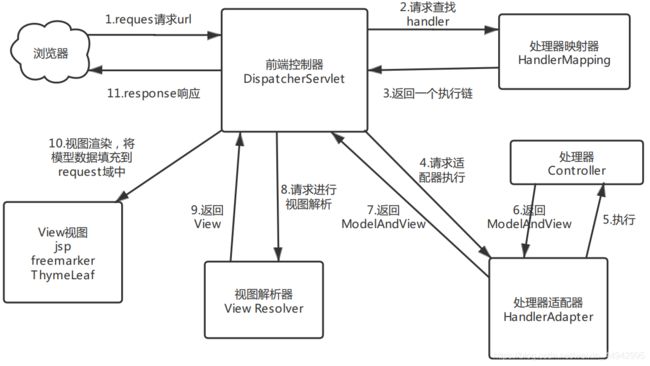
1.1 SpringMvc的实现原理
1.2 常用的注解介绍
常用注解分类有如下:
1.项目配置注解
-
@SpringBootApplication -
@ServletComponentScan -
@MapperScan
2.Controller的表现层注解:
-
@controller -
@Autowired -
@CrossOrigin -
@PathVariable -
@RequestParam -
@EnablCaching -
@RestController -
@RequestMapping -
@ResponseBody -
@GetMapping -
@PutMapping -
@PostMapping -
@DeleteMapping
3.servcie业务层注解
-
@Service -
@Resource
4.持久层注解
@Repository@Component@Transactional
5.其他相关注解
@ControllerAdvice@Configuration@Bean@Value
1.3 前言介绍
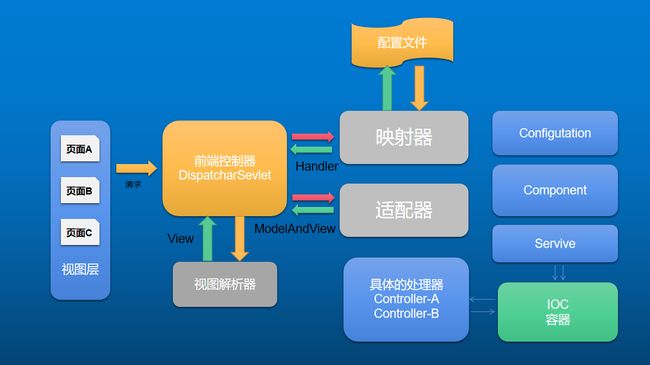
在spring boot中,摒弃了spring以往项目中大量繁琐的配置,遵循约定大于配置的原则,通过自身默认配置,极大的降低了项目搭建的复杂度。同样在spring boot中,大量注解的使用,使得代码看起来更加简洁,提高开发的效率。这些注解不光包括spring boot自有,也有一些是继承自spring的。
2.配置文件相关注解
2.2 @SpringBootApplication
@SpringBootApplication是一个复合注解,包含了@SpringBootConfiguration,@EnableAutoConfiguration,@ComponentScan这三个注解这三个注解的作用分别为:
@SpringBootConfiguration:标注当前类是配置类,这个注解继承自@Configuration。并会将当前类内声明的一个或多个以@Bean注解标记的方法的实例纳入到srping容器中,并且实例名就是方法名。@EnableAutoConfiguration:是自动配置的注解,这个注解会根据我们添加的组件jar来完成一些默认配置,我们做微服时会添加spring-boot-starter-web这个组件jar的pom依赖,这样配置会默认配置springmvc 和tomcat。@ComponentScan:扫描当前包及其子包下被@Component,@Controller,@Service,@Repository注解标记的类并纳入到spring容器中进行管理。等价于context:component-scan的xml配置文件中的配置项
@SpringBootApplication
public class Springboot2Application {

    public static void main(String[] args) {
        SpringApplication.run(Springboot2Application.class, args);
    }
}
2.3 @ServletComponentScan
Servlet、Filter、Listener 可以直接通过 @WebServlet、@WebFilter、@WebListener 注解自动注册,这样通过注解servlet ,拦截器,监听器的功能而无需其他配置,所以这次相中使用到了filter的实现,用到了这个注解
2.4 @MapperScan
spring-boot支持mybatis组件的一个注解,通过此注解指定mybatis接口类的路径,即可完成对mybatis接口的扫描。
@MapperScan("com.example.mapper")
@SpringBootApplication
public class Springboot2Application {

    public static void main(String[] args) {
        SpringApplication.run(Springboot2Application.class, args);
    }

}
3.Controller层相关注解
3.1 @controller
表明这个类是一个控制器类,和@RequestMapping来配合使用拦截请求
@Controller
public class UserController {
    @RequestMapping("/view")
    public String view(){

        return "view";
    }
}
3.2 @Autowired
是spring的自动装配,这个个注解可以用到构造器,变量域,方法,注解类型上。当我们需要从bean 工厂中获取一个bean时,Spring会自动为我们装配该bean中标记为@Autowired的元素
public class UserController {

    @Autowired
    private UserService userService;

    @RequestMapping("/view")
    public String view(){
        userService.save();
        return "view";
    }
}
3.3 @CrossOrigin
@CrossOrigin(origins = “”, maxAge = 1000) 这个注解主要是为了解决跨域访问的问题。这个注解可以为整个controller配置启用跨域,也可以在方法级别启用
3.4 @PathVariable
路径变量注解,@RequestMapping中用{}来定义url部分的变量名
	private static final String  PAGE = "param";

	// @PathVariable的用法
	// 这里是@PathVariable注解的单个值路径使用方法
     @RequestMapping("/path/{id}")
     public ModelAndView pathTest1(@PathVariable(value = "id",required = false)int id){
         ModelAndView modelAndView = new ModelAndView();
         modelAndView.setViewName(PAGE);
         return modelAndView;
     }

    // 这里是@PathVariable注解的多个值路径使用方法
    @RequestMapping("/path/{id}/{username}/{password}")
    public ModelAndView pathTest2(@PathVariable(value = "id",required = false)int id,
                                 @PathVariable(value = "username",required = false)String username,
                                 @PathVariable(value = "password",required = false)String password){
        ModelAndView modelAndView = new ModelAndView();
        modelAndView.setViewName(PAGE);
        return modelAndView;
    }
3.5 @RequestParam
用于将指定的请求参数赋值给方法中的形参。
有三个属性:
value:请求参数名(必须配置)required:是否必需,默认为 true,即 请求中必须包含该参数,如果没有包含,将会抛出异常(可选配置)defaultValue:默认值,如果设置了该值,required 将自动设为 false,无论你是否配置了required,配置了什么值,都是 false(可选配置)
	private static final String  PAGE = "param";

    // @RequestParam 的多参数方式使用
    @RequestMapping("/param")
    public ModelAndView paramTest(@RequestParam(value = "id",required = false,defaultValue = "0")int id,
                                  @RequestParam(value = "username",required = false,defaultValue = "zhangsan")String username,
                                  @RequestParam(value = "password",required = false,defaultValue = "123456")String password){
        ModelAndView modelAndView = new ModelAndView();
        modelAndView.addObject("id",id);
        modelAndView.addObject("username",username);
        modelAndView.addObject("password",password);
        modelAndView.setViewName(PAGE);
        return modelAndView;

        // 访问的时候使用 http://localhost:8080/param?id=1&username=zhangsan&password=123456
    }
3.6 @EnablCaching
@EnableCaching: 这个注解是spring framework中的注解驱动的缓存管理功能。自spring版本3.1起加入了该注解。其作用相当于spring配置文件中的cache manager标签。
3.7 @RestController
@RestController 是@Controller 和@ResponseBody的结合,以json数据格式返回数据,一个类被加上@RestController 注解,数据接口中就不再需要添加@ResponseBody。更加简洁。
@RestController    // @Controller + @ResponseBody
@RequestMapping("/request")
public class RestUserController {

    @GetMapping("/get")
    public User restTest(){
        User user = new User(1,"zhangsan",20,"男");
        return user;
    }
3.8 @RequestMapping
第一种使用
1.用来拦截请求,默认拦截get和post请求
@RequestMapping("/adminDetele/{id}")
或
@RequestMapping(value="/adminDetele/{id}", method= RequestMethod.GET )
2.详细使用方法:
@RestController    // @Controller + @ResponseBody
@RequestMapping("/request")
public class RestUserController {

    @RequestMapper("/data1")
    public String save(){
        return "Hello Word"
    }
}
第二种使用
1.导入Freemarker的坐标
		<dependency>
            <groupId>org.springframework.bootgroupId>
            <artifactId>spring-boot-starter-freemarkerartifactId>
        dependency>
2.配置application.yml的配置文件
# 配置视图解析器
spring:
  mvc:
    view:
      prefix: /
      suffix: .html
  # 配置freemarker插件  后缀
  freemarker:
    suffix: .html
    template-loader-path: classpath:/static/
3.使用@GetMapping注解配合视图解析器
@RestController
public class UserController {

    @RequestMapping("/view")
    public String view(){
        return "view";
    }
}
3.9 @ResponseBody
后端如果要返回json数据的话,需要配合@ResponseBody注解来完成
3.10 @GetMapping
用于将HTTP GET请求映射到特定处理程序方法的注释。具体来说,@GetMapping是一个作为快捷方式的组合注释
@RequestMapping(method = RequestMethod.GET)。
@RestController
@RequestMapping("/request")
public class RestUserController {

    @GetMapping("/get")
    public User restTest(){
        User user = new User(1,"zhangsan",20,"男");
        return user;
    }
}
3.11 @PostMapping
用于将HTTP POST请求映射到特定处理程序方法的注释。具体来说,@PostMapping是一个作为快捷方式的组合注释@RequestMapping(method = RequestMethod.POST)。
@RestController
@RequestMapping("/request")
public class RestUserController {

	@PostMapping("/addUser")
    public User addUser(@RequestBody User user){
        System.out.println(user);
        return user;
    }
}
类似的组合注解还有
@PutMapping、@DeleteMapping、@PatchMapping
4.业务层相关注解
4.1@Service
这个注解用来标记业务层的组件,我们会将业务逻辑处理的类都会加上这个注解交给spring容器管理,在需要使用的地方可使用@Autowired自动装配
@Service
public class ArticleServiceImpl implements ArticleService {}

@Controller
public class ArticleController {
    @Autowired
    ArticleService articleService;
}
4.2 @Resource
@Resource和@Autowired一样都可以用来装配bean,都可以标注字段上,或者方法上。 @resource注解不是spring提供的,是属J2EE规范的注解。两个之前的区别就是匹配方式上有点不同,@Resource默认按照名称方式进行bean匹配,@Autowired默认按照类型方式进行bean匹配
@Service("userService")
public class UserServiceImpl implements UserService {}

@RestController
public class UserController {

    @Autowired
    @Qualifier("userService")
    @Resource(name = "userService")
    private UserService userService;
}
5. 持久层注解
5.1 @Repository
作为DAO对象,管理操作数据库的对象。@Component, @Service, @Controller, @Repository是spring注解,注解后可以被spring框架所扫描并注入到spring容器来进行管理
@Repository
public interface UserDao {}
5.2 @Component
通用注解,其他三个注解是这个注解的拓展,并且具有了特定的功能。通过这些注解的分层管理,就能将请求处理,义务逻辑处理,数据库操作处理分离出来,为代码解耦,也方便了以后项目的维护和开发
@Component
public class RedisUtils {

    @Autowired
    RedisTemplate<String, String> redisTemplate;

    public Object get(String key) {
        return redisTemplate.opsForValue().get(key);
    }
}
5.3 @Transactional
声明事务,可以添加在类上或者方法上。在spring boot中 不用再单独配置事务管理,一般情况是我们会在servcie层添加了事务注解,即可开启事务。要注意的是,事务的开启只能在public 方法上
//尽量放在业务层上
@Transactional
@RequestMapping("/test")
public String test(Upload upload){}
6. 其他相关注解
6.1 ControllerAdvice
@ControllerAdvice 和 @ExceptionHandler 配合完成统一异常拦截处理
@RestControllerAdvice 是 @ControllerAdvice 和 @ResponseBody的合集,可以将异常以json的格式返回数据。
@ControllerAdvice
public class GlobalExceptionHandler {
    @Autowired
    RedisUtils redisUtils;

    @ExceptionHandler(value = Exception.class)
    public ModelAndView defaultErrorHandler(HttpServletRequest req, Exception e) throws Exception {
        ModelAndView mav = new ModelAndView();
        mav.addObject("exception", e);
        mav.addObject("url", req.getRequestURL());
//        mav.addObject("admin", redisUtils.get(Constant.USER));
        mav.setViewName("error");
        return mav;
    }

}
6.2 @Configuration
声明当前类为配置类,配合@Bean注解一起使用,可以作为导入插件。
@Configuration
public class MybatiPlusConfig{
    @Bean
    public MybatisPlusInterceptor mybatisPlusInterceptor() {
        MybatisPlusInterceptor interceptor = new MybatisPlusInterceptor();
        interceptor.addInnerInterceptor(new OptimisticLockerInnerInterceptor());
        return interceptor;
    }
}