KVM环境的搭建配置
KVM环境的搭建配置
参考资料:
https://access.redhat.com/documentation/en-us/red_hat_enterprise_linux/7/html/virtualization_deployment_and_administration_guide/index
实验环境:1.线下x86的RHEL7,RHEL8, CentOS7, CentOS8 服务器环境
2.因为VMware Workstation拥有嵌套虚拟化功能,故可以用来做测试
需要看实验的小伙伴可直接跳入2.2,然后直接跳到3.2正式开始
1.KVM虚拟化技术介绍
概述
KVM是基于内核的虚拟化技术(Kernel-based Virtual Machine),于2007年的Linux 2.6.20被合并进Linux内核。KVM要求CPU支持硬件虚拟化技术,即Intel的VT-x或AMD的AMD-V。
KVM相对裸机有2%以内的性能损耗,XEN相对裸机有2.5%的性能损耗。由于XEN需要修改Linux内核,而KVM是集成到每个Linux内核的、KVM相对XEN更加易用等原因,KVM已经成为大多数Linux系统的推荐默认虚拟化机制。
KVM只能完成CPU的虚拟化,而完整的硬件环境还需要网络、硬盘、键盘、鼠标等IO环境,这些硬件环境的模拟是通过QEMU-KVM完成的。

1).KVM是开源软件,全称是kernel-based virtual machine(基于内核的虚拟机)。
2).是x86架构且硬件支持虚拟化技术(如 intel VT 或 AMD-V)的Linux全虚拟化解决方案。
3).它包含一个为处理器提供底层虚拟化 可加载的核心模块kvm.ko(kvm-intel.ko或kvm-AMD.ko)。
4).KVM还需要一个经过修改的QEMU软件(qemu-kvm),作为虚拟机上层控制和界面。
5).KVM能在不改变linux或windows镜像的情况下同时运行多个虚拟机,(它的意思是多个虚拟机使用同一镜像)并为每一个虚拟机配置个性化硬件环境(网卡、磁盘、图形适配器……)。
6).在主流的Linux内核,如2.6.20以上的内核均已包含了KVM核心
2.环境准备
2.1 Host System Requirements
Minimum host system requirements
• 6 GB free disk space.
• 2 GB RAM.
Recommended system requirements
• One core or thread for each virtualized CPU and one for the host.
• 2 GB of RAM, plus additional RAM for virtual machines.
• 6 GB disk space for the host, plus the required disk space for the virtual machine(s).
Most guest operating systems require at least 6 GB of disk space. Additional storage space for each guest depends on their workload.
Swap space
Swap space in Linux is used when the amount of physical memory (RAM) is full. If the system needs more memory resources and the RAM is full, inactive pages in memory are moved to the swap space. While swap space can help machines with a small amount of RAM, it should not be considered a replacement for more RAM. Swap space is located on hard drives, which have a slower access time than physical memory. The size of your swap partition can be calculated from the physical RAM of the host. The Red Hat Customer Portal contains an article on safely and efficiently determining the size of the swap partition: https://access.redhat.com/site/solutions/15244.
o When using raw image files, the total disk space required is equal to or greater than the sum of the space required by the image files, the 6 GB of space required by the host operating system, and the swap space for the guest.
Equation 1.1. Calculating required space for guest virtual machines using raw images
total for raw format = images + hostspace + swap
For qcow images, you must also calculate the expected maximum storage requirements of the guest (total for qcow format), as qcow and qcow2 images are able to grow as required. To allow for this expansion, first multiply the expected maximum storage requirements of the guest (expected maximum guest storage) by 1.01, and add to this the space required by the host (host), and the necessary swap space (swap).
Equation 1.2. Calculating required space for guest virtual machines using qcow images
total for qcow format = (expected maximum guest storage * 1.01) + host + swap
Guest virtual machine requirements are further outlined in Chapter 7, Overcommitting with KVM.
2.2. KVM Hypervisor Requirements
CPU模块必须要有虚拟化功能才可以进行KVM的安装
The KVM hypervisor requires:
• an Intel processor with the Intel VT-x and Intel 64 virtualization extensions for x86-based systems; or
• an AMD processor with the AMD-V and the AMD64 virtualization extensions.
Virtualization extensions (Intel VT-x or AMD-V) are required for full virtualization. Enter the following commands to determine whether your system has the hardware virtualization extensions, and that they are enabled.
Procedure 1.1. Verifying virtualization extensions
1. Verify the CPU virtualization extensions are available
enter the following command to verify the CPU virtualization extensions are available:
$ grep -E 'svm|vmx' /proc/cpuinfo

2.Analyze the output
• The following example output contains a vmx entry, indicating an Intel processor with the Intel VT-x extension:

The following example output contains an svm entry, indicating an AMD processor with the AMD-V extensions:

If the grep -E ‘svm|vmx’ /proc/cpuinfo command returns any output, the processor contains the hardware virtualization extensions. In some circumstances, manufacturers disable the virtualization extensions in the BIOS. If the extensions do not appear, or full virtualization does not work, see Procedure A.3, “Enabling virtualization extensions in BIOS” for instructions on enabling the extensions in your BIOS configuration utility.
3.Ensure the KVM kernel modules are loaded
As an additional check, verify that the kvm modules are loaded in the kernel with the following command:
# lsmod | grep kvm

If the output includes kvm_intel or kvm_amd, the kvm hardware virtualization modules are loaded.
Note
The virsh utility (provided by the libvirt-client package) can output a full list of your system’s virtualization capabilities with the following command:
# virsh capabilities
2.3. KVM Guest Virtual Machine Compatibility
Red Hat Enterprise Linux 7 servers have certain support limits.
The following URLs explain the processor and memory amount limitations for Red Hat Enterprise Linux:
• For host systems: https://access.redhat.com/articles/rhel-limits
• For the KVM hypervisor: https://access.redhat.com/articles/rhel-kvm-limits
The following URL lists guest operating systems certified to run on a Red Hat Enterprise Linux KVM host:
• https://access.redhat.com/articles/973133
2.4. Supported Guest CPU Models
Every hypervisor has its own policy for which CPU features the guest will see by default. The set of CPU features presented to the guest by the hypervisor depends on the CPU model chosen in the guest virtual machine configuration.
2.4.1. Listing the Guest CPU Models
To view a full list of the CPU models supported for an architecture type, run the virsh cpu-models architecture command. For example:
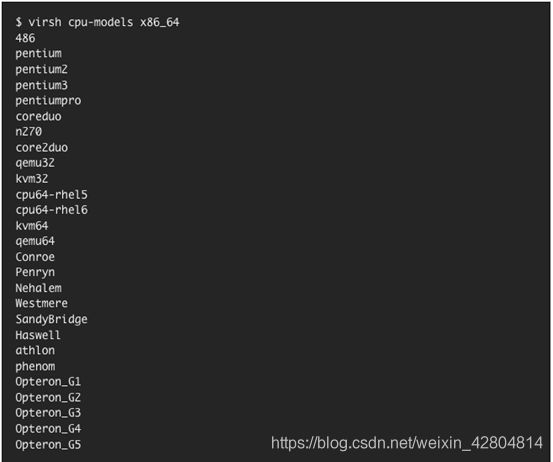

The full list of supported CPU models and features is contained in the cpu_map.xml file, located in /usr/share/libvirt/:
![]()
A guest’s CPU model and features can be changed in the section of the domain XML file. See Section 23.12, “CPU Models and Topology” for more information.
The host model can be configured to use a specified feature set as needed. For more information, see Section 23.12.1, “Changing the Feature Set for a Specified CPU”.
3.安装KVM虚拟化包
To use virtualization, Red Hat virtualization packages must be installed on your computer. Virtualization packages can be installed when installing Red Hat Enterprise Linux or after installation using the yum command and the Subscription Manager application.
The KVM hypervisor uses the default Red Hat Enterprise Linux kernel with the kvm kernel module.
3.1 安装系统时安装虚拟化包
This section provides information about installing virtualization packages while installing Red Hat Enterprise Linux
Procedure . Installing virtualization packages
-
Select software
Follow the installation procedure until the Installation Summary screen.
In the Installation Summary screen, click Software Selection. The Software Selection screen opens. -
Select the server type and package groups
You can install Red Hat Enterprise Linux 7 with only the basic virtualization packages or with packages that allow management of guests through a graphical user interface. Do one of the following:
Install a minimal virtualization host
Select the Virtualization Host radio button in the Base Environment pane and the Virtualization Platform check box in the Add-Ons for Selected Environment pane. This installs a basic virtualization environment which can be run with virsh or remotely over the network.

Install a virtualization host with a graphical user interface
Select the Server with GUI radio button in the Base Environment pane and the Virtualization Client, Virtualization Hypervisor, and Virtualization Tools check boxes in the Add-Ons for Selected Environment pane. This installs a virtualization environment along with graphical tools for installing and managing guest virtual machines.

3.Finalize installation
Click Done and continue with the installation.
3.1.1. Installing KVM Packages with Kickstart Files
To use a Kickstart file to install Red Hat Enterprise Linux with the virtualization packages, append the following package groups in the %packages section of your Kickstart file
@virtualization-hypervisor
@virtualization-client
@virtualization-platform
@virtualization-tools
For more information about installing with Kickstart files, see the Red Hat Enterprise Linux 7 Installation Guide.
3.2. 在Linux上安装KVM虚拟化包
3.2.1. Installing Virtualization Packages Manually(安装虚拟化软件及相关组件)
本节核心命令:
# yum install qemu-kvm libvirt
[root@localhost repo] yum install virt-install libvirt-python virt-manager virt-install libvirt-clien
To use virtualization on Red Hat Enterprise Linux, at minimum, you need to install the following packages:
• qemu-kvm: This package provides the user-level KVM emulator and facilitates communication between hosts and guest virtual machines.
• qemu-img: This package provides disk management for guest virtual machines.
Note
The qemu-img package is installed as a dependency of the qemu-kvm package.
• libvirt: This package provides the server and host-side libraries for interacting with hypervisors and host systems, and the libvirtd daemon that handles the library calls, manages virtual machines, and controls the hypervisor.
To install these packages, enter the following command:
# yum install qemu-kvm libvirt

Several additional virtualization management packages are also available and are recommended when using virtualization:
• virt-install: This package provides the virt-install command for creating virtual machines from the command line.
• libvirt-python: This package contains a module that permits applications written in the Python programming language to use the interface supplied by the libvirt API.
• virt-manager: This package provides the virt-manager tool, also known as Virtual Machine Manager. This is a graphical tool for administering virtual machines. It uses the libvirt-client library as the management API.
• libvirt-client: This package provides the client-side APIs and libraries for accessing libvirt servers. The libvirt-client package includes the virsh command-line tool to manage and control virtual machines and hypervisors from the command line or a special virtualization shell.
You can install all of these recommended virtualization packages with the following command:
[root@localhost repo] yum install virt-install libvirt-python virt-manager virt-install libvirt-client

yum install qemu qemu-img qemu-kvm libvirt libvirt-python libguestfs-tools virt-install
图形化工具
yum install virt-manager virt-viewer
开启 libvirtd 服务:(默认自启动)
systemctl enable libvirtd && systemctl start libvirtd
如果你的系统是最小化安装的,那你应该安装以下所需软件
yum groupinstall "GNOME 桌面" -y //安装GNOME桌面环境
yum install qemu-kvm -y /KVM核心模块
yum install qemu-kvm-tools -y //KVM调试工具,可以选择性安装
yum install qemu-img -y //创建、转换和修改镜像,能处理被qemu支持的所有镜像格式
yum install libvirt -y //管理虚拟机的工具包
yum install virt-install -y //virt-install是一个使用
libvirt库构建新虚拟机的命令行工具
yum install virt-manager -y //图形界面管理虚拟机
yum install bridge-utils -y //配置linux以太网桥
2.2.2. Installing Virtualization Package Groups
本小节核心命令:
yum groupinstall hidden
yum groupinstall “Virtualization Tools”
yum install virt-manager
yum grouplist |grep Virtualization
The virtualization packages can also be installed from package groups. The following table describes the virtualization package groups and what they provide.
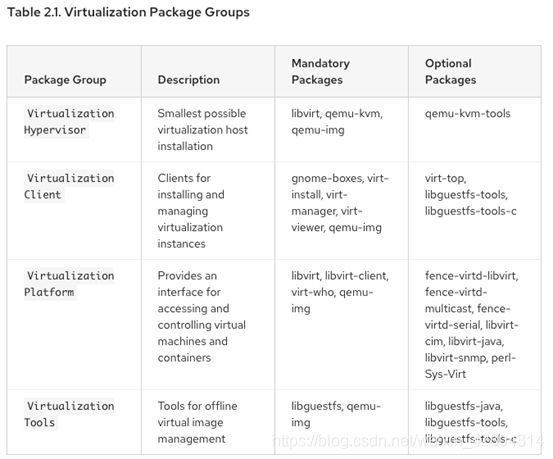
To install a package group, run the yum groupinstall package_group command. Use the --optional option to install the optional packages in the package group. For example, to install the Virtualization Tools package group with all of its optional packages, run:
可以使用此方法一次性安装:
[root@kvm kvm]# yum groupinstall virt*
3.3 检查KVM模块是否安装
[root@kvm network-scripts]# systemctl status libvirtd

4. Creating a Virtual Machine
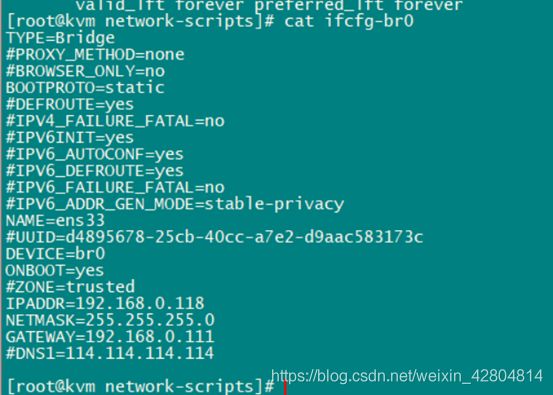
4.1 为KVM虚拟机新建网卡(这一步仿佛不是必须的)
添加一块桥接网卡,在/etc/sysconfig/network-scripts/ifcfg-??找到新建的网卡,修改网卡属性
重启网卡
[root@kvm network-scripts]# systemctl restart network
查看桥接设备:

4.2 创建虚拟磁盘
root@kvm kvm]# mkdir -p /kvm/data

[root@kvm kvm]# qemu-img create -f qcow2 /kvm/data/kvm-linux-78.qcow2 100G
(qcow2格式,改格式支持快照,100G)
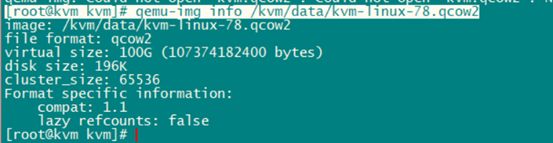
#查看磁盘信息:
[root@kvm kvm]# qemu-img info /kvm/data/kvm-linux-78.qcow2
4.3. Creating Guests with virt-instal(使用virt-install命令安装guest虚拟机)

4.3.1.使用IOS镜像安装
The following example installs a virtual machine from an ISO image:
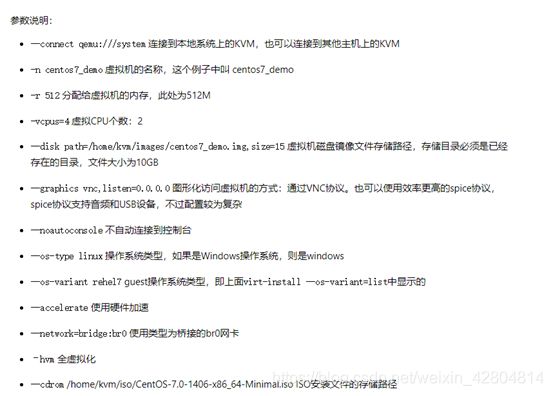
virt-install --virt-type kvm --name guest1-rhel7 --memory 2048 --vcpus 2 --disk size=8 --cdrom=/kvm/CentOS-7.8.iso --os-variant rhel7 --network bridge=br0 --graphics vnc,listen=0.0.0.0 --os-type=linux --disk path=/kvm/data/kvm-linux-78.qcow2,device=disk,bus=virtio,format=qcow2
使用VNC客户端连接宿主机,安装KVM
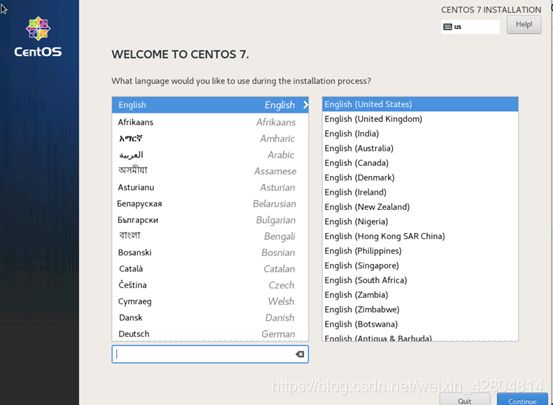
后面是linux的安装,自己百度
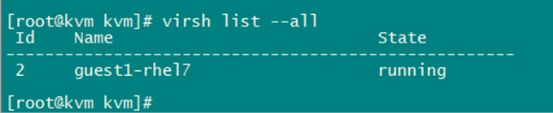
安装成功后可使用以下命令查看:
virsh list --all查看已经安装的虚拟机
virsh start kvm-demo启动虚拟机

virsh 命令提供了操作虚拟机的一系列命令:
virsh list —all 获取虚拟机列表
virsh dominfo {servername} 获取虚拟机信息
virsh shutdown {servername} 关闭虚拟机
virsh reboot {servername} 重启虚拟机
virsh start {servername} 启动虚拟机
virsh undefine {servername} 删除虚拟机定义文件,即删除/etc/libvirt/qemu目录下相应的xml文件,注意_这个命令并不会删除磁盘img文件,磁盘img文件需要手动删除
virsh edit {servername} 编辑虚拟机配置文件,即修改虚拟机的内存、CPU以及VNC连接端口等配置
virt-clone -o {old_servername} -n {new_servername} -f /path/to/img/file.img 复制虚拟机,复制完成后需要登录进虚拟机更改IP地址、hostname
4.4 CREATING GUESTS WITH VIRT-MANAGER(使用virt-manager软件安装guest虚拟机)
最简化安装的linux在用yum groupinstall安装GNOME后无法startx及解决办法:
这个还蛮恶心的,我百度了半天
ln -sf /lib/systemd/system/graphical.taget /etc/systemd/system/default.target
使用virt-manager展开图形化软件:

创建存储池
双击“QEMU/KVM”,然后选择“存储”选项卡,然后单击“+”按钮新建存储池,命名为“kvm02”,单击“前进”,然后输入上面创建的lvm挂载目录,单击完成


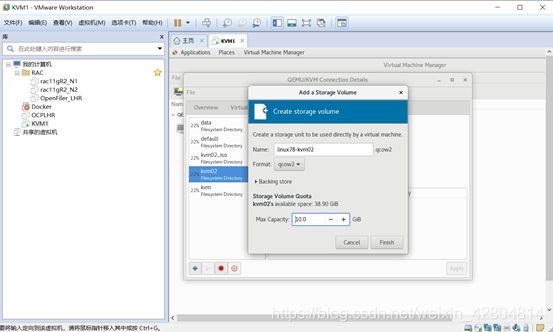
创建存储卷,其实就是KVM虚拟机的硬盘文件,选择刚建的“kvm02”存
储卷,点击新建卷,设置名字和大小。

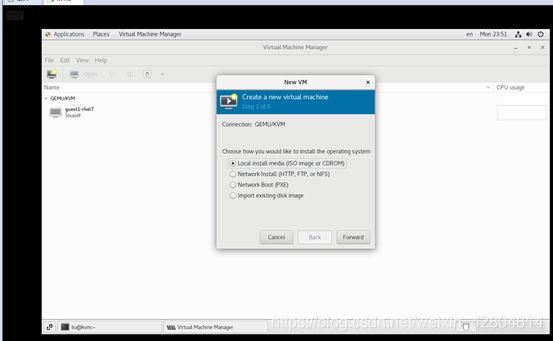
在虚拟系统管理器中选择“新建虚拟机”,选择“本地安装介质”,“前进

设置内存和CPU
选择虚拟机存储硬盘,选择刚刚创建的硬盘文件。


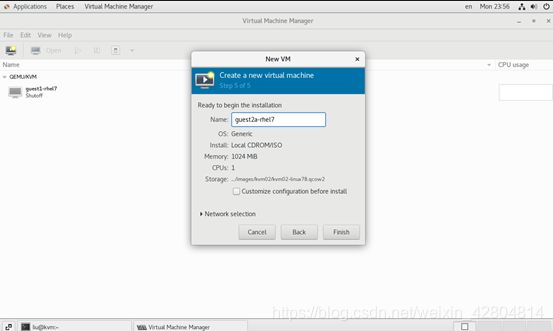

网络默认即可
最后安装即可

虚拟机的所有配置是放置在一个xml文件中,位置在/etc/libvirt/qemu/目录中

4.5 用XML配置文件创建虚拟机
配置文件 /etc/libvirt/qemu/
虚拟磁盘文件 /var/lib/libvirt/imgvirsh dumpxml 配置文件名 查看配置文件
virsh edit 配置文件名 修改配置文件
virsh dumpxml 配置文件名 >> /tmp/XX.xml 备份配置文件
复制一份XML配置文件

修改XML文件内的name,删除UUID,修改虚拟磁盘镜像文件位置以及删除虚拟网卡

[root@kvm testxml]# virsh start guest3-rhel7

此时需要重新define新建的XML文件
[root@kvm testxml]# virsh define guest3-rhel7.xml

[root@kvm testxml]# virsh start guest3-rhel7

此时因为新虚拟磁盘不存在导致报错,手动重建虚拟磁盘
[root@kvm storage]# qemu-img create -f qcow2 /var/lib/libvirt/images/guest3-rhel7-1.qcow2 20G
![]()

然后就可以通过virsh start 启动新建的虚拟机了

这之后需要经过对虚拟机和磁盘XML文件的复杂修改,虚拟机才能使用。所以此种建虚拟机的方式不推荐,但通过这种方式可以进行clone虚拟机,详见第5小节
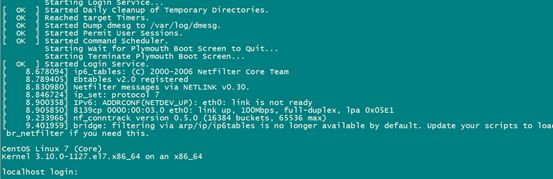
补充说明:
跳转进入新建的虚拟机guest3-rhel7,其中数字为ID
[root@kvm storage]# virsh console 1

通过virsh console 链接到KVM虚拟机出现上图所示的这种情况,一直卡在这个界面无法做任何操作。 解决办法:
1.修改grub.conf 文件通过为内核传递参数console=ttyS0,来让内核把输出定向至ttyS0。 [root@test01-kvm-jz /root] # vim /etc/grub.conf
2.修改/etc/inittab文件通过在inittab 里加一个ttyS0 ,来使得系统启动时能够生成一个ttyS0 来接收来自内核的数据。
> [root@test01-kvm-jz /root] # echo "S0:12345:respawn:/sbin/agetty ttyS0 115200" >> /etc/inittab
3.修改/etc/securetty 文件,由于/etc/securetty 文件允许你规定root 用户可以从哪个TTY 设备登录,因此我们需要添加ttyS0 的安全许可,即将ttyS0 添加至该文件,来允许我们的root 用户登录。
> [root@test01-kvm-jz /root] # echo "ttyS0" >>/etc/securetty
4.重启KVM 虚拟机 [root@test01-kvm-jz /root] # reboot
5 KVM克隆
继续沿用4.5的XML文件做实验
1.复制一份XML配置文件
virsh dumpxml 配置文件名 >> /tmp/XX.xml
2.修改XML文件内的name,删除UUID,修改虚拟磁盘镜像文件位置以及删除虚拟网卡
3.复制磁盘镜像文件(要复制所有的虚拟磁盘文件)
[root@kvm ~]# cd /var/lib/libvirt/images/
[root@kvm images]# cp guest1-rhel7-1.qcow2 /kvm/guest1-rhel7-1-clone.qcow2
4.重新修改guest3-rhel7.xml的虚拟磁盘路径


5.重新define guest3-rhel7.xml

6.重新启动

7.此时就可以使用了