容器-Docker《一》介绍和安装
容器-Docker
Docker资源
Docker官方英文资源:
docker官网:http://www.docker.com
Docker windows入门:https://docs.docker.com/windows/
Docker Linux 入门:https://docs.docker.com/linux/
Docker mac 入门:https://docs.docker.com/mac/
Docker 用户指引:https://docs.docker.com/engine/userguide/
Docker 官方博客:http://blog.docker.com/
Docker Hub: https://hub.docker.com/
Docker开源: https://www.docker.com/open-source
Docker中文资源:
Docker中文网站:http://www.docker.org.cn
Docker入门教程: http://www.docker.org.cn/book/docker.html
Docker安装手册:http://www.docker.org.cn/book/install.html
一小时Docker教程 :https://blog.csphere.cn/archives/22
Docker纸质书:http://www.docker.org.cn/dockershuji.html
DockerPPT:http://www.docker.org.cn/dockerppt.html
1 容器-Docker概述
1.1 Docker概述
container容器是指用以容纳物料并以壳体为主的基本装置,例如集装箱。Docker就是一种容器技术。
Docker 是 PaaS 提供商 dotCloud 开源的一个基于 LXC 的高级容器引擎,后来Docker 改为自己研发并开源的 runc 技术运行容器,彻底抛弃了LXC。源代码托管在 Github 上, 基于go语言并遵从Apache2.0协议开源,Sandbox机制。
Docker 采用客户端/服务端架构,使用远程API来管理和创建容器,

Docker是一种轻量级虚拟化技术,基于 Linux 内核实现,简单理解就是带着精简环境安装软件,Docker主要有三部分组成–镜像、容器、仓库。
镜像是带着环境安装的模板,软件系统和它运行的操作系统、环境配置和相关工具等全部封装成一个模板,镜像不能直接使用,它只是一个文件;
容器是根据镜像生成,带着环境安装好的软件系统,当有了镜像这个模板,Docker就可以根据这个模板创建一个容器,根据简单命令就可以直接运行容器,就类似于一个物理机上的软件跑起来了这样的状态复制一份;使用软件不需要考虑运行环境和兼容性。
仓库就是网上存放镜像的位置,仓库有很多封装好的镜像。如https://hub.docker.com/

docker 官网: http://www.docker.com
帮助文档链接: https://docs.docker.com/
docker 镜像: https://hub.docker.com/
docker 中文网站: http://www.docker.org.cn/
容器规范
容器技术除了的docker之外,还有coreOS的rkt,还有阿里的Pouch,为了保证容器生态的标准性和健康可持续发展,包括Linux 基金会、Docker、微软、红帽谷歌和IBM等公司在2015年6月共同成立了一个叫Open Container Initiative(OCI)的组织,其目的就是制定开放的标准的容器规范,目前OCI一共发布了两个规范,分别是runtime spec和 image format spec,有了这两个规范,不同的容器公司开发的容器只要兼容这两个规范,就可以保证容器的可移植性和相互可操作性。
OCI 官网:https://opencontainers.org/
1.2 Docker和虚拟机、物理机

容器内的应用直接运行在宿主机的内核之上,容器并没有自己的内核,也不需要虚拟硬件,相当轻量化;每个容器间是互相隔离,每个容器内都有一个属于自己的独立文件系统,独立的进程空间,网络空间,用户空间等,所以在同一个宿主机上的多个容器之间彼此不会相互影响。
一个软件运行大致需要如下这些kernel+lib+主程序+配置文件+数据文件,那么除了kernel就是属于一个容器里面的。
1.3 Docker的组成
Docker的基本组成 镜像(image) 容器(container) 仓库(repository)。
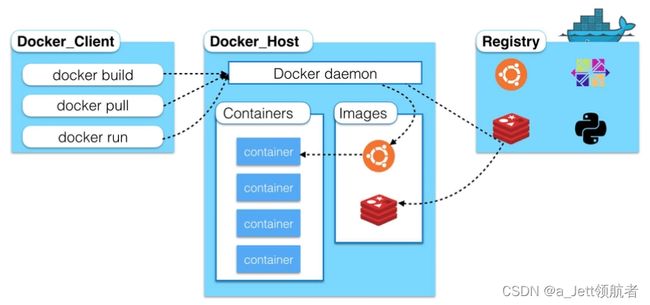
Docker 主机(Host): 一个物理机或虚拟机,用于运行Docker服务进程和容器,也称为宿主机,node节点
Docker 服务端(Server): Docker守护进程,运行docker容器
Docker 客户端(Client): 客户端使用 docker 命令或其他工具调用docker API
Docker 镜像(Images): 镜像可以理解为创建实例使用的模板,本质上就是一些程序文件的集合
Docker 仓库(Registry): 保存镜像的仓库,官方仓库: https://hub.docker.com/,可以搭建私有仓库harbor。Docker 公司选择阿里云平台作为其DockerHub 在中国运营的基础服务。
Docker 容器(Container): 容器是从镜像生成对外提供服务的一个或一组服务,其本质就是将镜像中的程序启动后生成的进程。
原理
Docker核心解决的问题是利用LXC来实现类似VM的功能,从而利用更加节省的硬件资源提供给用户更多的计算资源,LXC是一个操作系统级虚拟化方法。
1.4 Linux Namespace
满足用户虚拟化需求要解决的问题之一是“”隔离性 - 每个用户实例之间相互隔离, 互不影响“”。 硬件虚拟化方法给出的方法是VM, LXC给出的方法是container,更细一点是kernel namespace。
LXC所实现的隔离性主要是来自kernel的namespace, 其中pid, net, ipc, mnt, uts 等namespace将container的进程, 网络, 消息, 文件系统和hostname 隔离开。
pid namespace
之前提到用户的进程是lxc-start进程的子进程, 不同用户的进程就是通过pidnamespace隔离开的,且不同 namespace 中可以有相同PID。具有以下特征:
每个namespace中的pid是有自己的pid=1的进程(类似/sbin/init进程)
每个namespace中的进程只能影响自己的同一个namespace或子namespace中的进程
因为/proc包含正在运行的进程,因此在container中的pseudo-filesystem的/proc目录只能看到自己namespace中的进程
因为namespace允许嵌套,父namespace可以影响子namespace的进程,所以子namespace的进程可以在父namespace中看到,但是具有不同的pid
正是因为以上的特征,所有的LXC进程在docker中的父进程为docker进程,每个lxc进程具有不同的namespace。同时由于允许嵌套,因此可以很方便的实现 LXC in LXC
net namespace
有了 pid namespace, 每个namespace中的pid能够相互隔离,但是网络端口还是共享host的端口。网络隔离是通过netnamespace实现的,每个net namespace有独立的 network devices, IP addresses, IP routing tables, /proc/net 目录。这样每个container的网络就能隔离开来。
LXC在此基础上有5种网络类型,docker默认采用veth的方式将container中的虚拟网卡同host上的一个docker bridge连接在一起。
ipc namespace
container中进程交互还是采用linux常见的进程间交互方法(interprocess communication - IPC), 包括常见的信号量、消息队列和共享内存。然而同VM不同,container 的进程间交互实际上还是host上具有相同pid namespace中的进程间交互,因此需要在IPC资源申请时加入namespace信息 - 每个IPC资源有一个的 32bit ID。
mnt namespace
类似chroot,将一个进程放到一个特定的目录执行。mnt namespace允许不同namespace的进程看到的文件结构不同,这样每个 namespace 中的进程所看到的文件目录就被隔离开了。同chroot不同,每个namespace中的container在/proc/mounts的信息只包含所在namespace的mount point。
uts namespace
UTS(“UNIX Time-sharing System”) namespace允许每个container拥有独立的hostname和domain name,
使其在网络上可以被视作一个独立的节点而非Host上的一个进程。
user namespace
每个container可以有不同的 user 和 group id, 也就是说可以以container内部的用户在container内部执行程序而非Host上的用户。
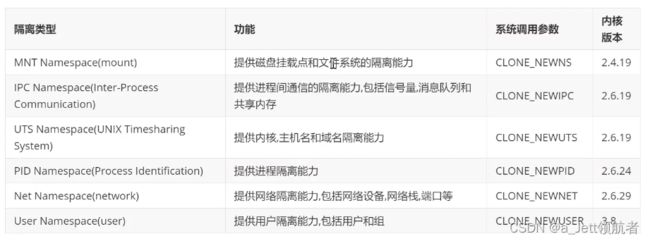
有了以上6种namespace从进程、网络、IPC、文件系统、UTS和用户角度的隔离,一个container就可以对外展现出一个独立计算机的能力,并且不同container从OS层面实现了隔离。

lsns命令namespace的管理工具
[root@Rocky8 ~]# lsns --help
Usage:
lsns [options] [<namespace>]
List system namespaces.
Options:
-J, --json use JSON output format
-l, --list use list format output
-n, --noheadings don't print headings
-o, --output define which output columns to use
-p, --task print process namespaces
-r, --raw use the raw output format
-u, --notruncate don'
t truncate text in columns
-W, --nowrap don't use multi-line representation
-t, --type <name> namespace type (mnt, net, ipc, user, pid, uts, cgroup)
-h, --help display this help
-V, --version display version
Available output columns:
NS namespace identifier (inode number)
TYPE kind of namespace
PATH path to the namespace
NPROCS number of processes in the namespace
PID lowest PID in the namespace
PPID PPID of the PID
COMMAND command line of the PID
UID UID of the PID
USER username of the PID
NETNSID namespace ID as used by network subsystem
NSFS nsfs mountpoint (usually used network subsystem)
For more details see lsns(8).
[root@Rocky8 ~]#
nsenter命令
[root@Rocky8 ~]# nsenter --help

Usage:
 nsenter [options] [<program> [<argument>...]]

Run a program with namespaces of other processes.

Options:
 -a, --all              enter all namespaces
 -t, --target <pid>     target process to get namespaces from
 -m, --mount[=<file>]   enter mount namespace
 -u, --uts[=<file>]     enter UTS namespace (hostname etc)
 -i, --ipc[=<file>]     enter System V IPC namespace
 -n, --net[=<file>]     enter network namespace
 -p, --pid[=<file>]     enter pid namespace
 -C, --cgroup[=<file>]  enter cgroup namespace
 -U, --user[=<file>]    enter user namespace
 -S, --setuid <uid>     set uid in entered namespace
 -G, --setgid <gid>     set gid in entered namespace
     --preserve-credentials do not touch uids or gids
 -r, --root[=<dir>]     set the root directory
 -w, --wd[=<dir>]       set the working directory
 -F, --no-fork          do not fork before exec'ing <program>
 -Z, --follow-context   set SELinux context according to --target PID

 -h, --help             display this help
 -V, --version          display version

For more details see nsenter(1).
[root@Rocky8 ~]#
1.4 cgroup(Control groups)
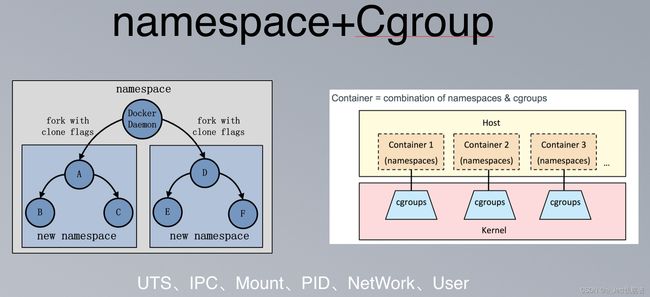
然而不同namespace之间资源还是相互竞争的,仍然需要类似ulimit来管理每个container所能使用的资源 - LXC 采用的是cgroup。
cgroups 实现了对资源的配额和度量。 cgroups 的使用非常简单,提供类似文件的接口,在 /cgroup目录下新建一个文件夹即可新建一个group,在此文件夹中新建task文件,并将pid写入该文件,即可实现对该进程的资源控制。具体的资源配置选项可以在该文件夹中新建子 subsystem ,{子系统前缀}.{资源项} 是典型的配置方法,
如memory.usage_in_bytes 就定义了该group 在subsystem memory中的一个内存限制选项。
另外,cgroups中的 subsystem可以随意组合,一个subsystem可以在不同的group中,也可以一个group包含多个subsystem - 也就是说一个 subsystem。
cpu : 在cgroup中,并不能像硬件虚拟化方案一样能够定义CPU能力,但是能够定义CPU轮转的优先级,因此具有较高CPU优先级的进程会更可能得到CPU运算。
通过将参数写入cpu.shares,即可定义改cgroup的CPU优先级 - 这里是一个相对权重,而非绝对值。当然在cpu这个subsystem中还有其他可配置项,手册中有详细说明。
cpusets : cpusets 定义了有几个CPU可以被这个group使用,或者哪几个CPU可以供这个group使用。在某些场景下,单CPU绑定可以防止多核间缓存切换,从而提高效率
memory : 内存相关的限制
blkio : block IO相关的统计和限制,byte/operation统计和限制(IOPS等),读写速度限制等,但是这里主要统计的都是同步IO
net_cls, cpuacct , devices , freezer 等其他可管理项。
[root@Rocky8 ~]# grep CGROUP /boot/config-4.18.0-425.3.1.el8.x86_64
CONFIG_CGROUPS=y
CONFIG_BLK_CGROUP=y
CONFIG_CGROUP_WRITEBACK=y
CONFIG_CGROUP_SCHED=y
CONFIG_CGROUP_PIDS=y
CONFIG_CGROUP_RDMA=y
CONFIG_CGROUP_FREEZER=y
CONFIG_CGROUP_HUGETLB=y
CONFIG_CGROUP_DEVICE=y
CONFIG_CGROUP_CPUACCT=y
CONFIG_CGROUP_PERF=y
CONFIG_CGROUP_BPF=y
# CONFIG_CGROUP_MISC is not set
# CONFIG_CGROUP_DEBUG is not set
CONFIG_SOCK_CGROUP_DATA=y
CONFIG_BLK_CGROUP_RWSTAT=y
CONFIG_BLK_CGROUP_IOLATENCY=y
CONFIG_BLK_CGROUP_FC_APPID=y
# CONFIG_BLK_CGROUP_IOCOST is not set
# CONFIG_BLK_CGROUP_IOPRIO is not set
# CONFIG_BFQ_CGROUP_DEBUG is not set
CONFIG_NETFILTER_XT_MATCH_CGROUP=m
CONFIG_NET_CLS_CGROUP=y
CONFIG_CGROUP_NET_PRIO=y
CONFIG_CGROUP_NET_CLASSID=y
[root@Rocky8 ~]#
为了防止通过系统资源耗尽的DDoS攻击,可以使用特定的命令行参数被来进行一些资源限制。
CPU使用率:
docker run -it --rm --cpuset=0,1 -c 2 …
内存使用:
docker run -it --rm -m 128m …
存储使用:
docker -d --storage-opt dm.basesize=5G
磁盘I/O:
不支持Docker。BlockIO*属性可以通过systemd暴露,并且在支持操作系统中被用来控制磁盘的使用配额。
1.5 runtime
容器运行时,runtime是真正运行容器的地方,因此为了运行不同的容器runtime需要和操作系统内核紧密合作相互在支持,以便为容器提供相应的运行环境。分为高级运行时和低级运行时,低级运行时主要和操作系统打交道,如runc,高级运行时主要和用户打交道,如docker命令。
runtime 类型:
Lxc: linux上早期的runtime,在 2013 年 Docker 刚发布的时候,就是采用lxc作为runtime, Docker把 LXC 复杂的容器创建与使用方式简化为 Docker 自己的一套命令体系。随着Docker的发展,原有的LXC不能满足Docker的需求,比如跨平台功能
Libcontainer: 随着 Docker 的不断发展,重新定义容器的实现标准,将底层实现都抽象化到Libcontainer 的接口。这就意味着,底层容器的实现方式变成了一种可变的方案,无论是使用namespace、cgroups 技术抑或是使用 systemd 等其他方案,只要实现了 Libcontainer 定义的一组接口,Docker 都可以运行。这也为 Docker 实现全面的跨平台带来了可能。
runc: 早期libcontainer是Docker公司控制的一个开源项目,OCI的成立后,Docker把libcontainer项目移交给了OCI组织,runC就是在libcontainer的基础上进化而来,目前Docker默认的runtime,runc遵守OCI规范
rkt: 是CoreOS开发的容器runtime,也符合OCI规范,所以使用rktruntime也可以运行Docker容器
root@ubuntu2204:~# docker info
Client:
 Context:    default
 Debug Mode: false

Server:
 Containers: 6
  Running: 0
  Paused: 0
  Stopped: 6
 Images: 2
 Server Version: 20.10.12
 Storage Driver: overlay2
  Backing Filesystem: extfs
  Supports d_type: true
  Native Overlay Diff: true
  userxattr: false
 Logging Driver: json-file
 Cgroup Driver: systemd
 Cgroup Version: 2
 Plugins:
  Volume: local
  Network: bridge host ipvlan macvlan null overlay
  Log: awslogs fluentd gcplogs gelf journald json-file local logentries splunk syslog
 Swarm: inactive
 Runtimes: io.containerd.runc.v2 io.containerd.runtime.v1.linux runc
 Default Runtime: runc                   #默认运行时类型
 Init Binary: docker-init
 containerd version:
 runc version:
 init version:
 Security Options:
  apparmor
  seccomp
   Profile: default
  cgroupns
 Kernel Version: 5.15.0-56-generic
 Operating System: Ubuntu 22.04.1 LTS
 OSType: linux
 Architecture: x86_64
 CPUs: 4
 Total Memory: 3.799GiB
 Name: ubuntu2204
 ID: PTBQ:OPQB:IGWX:5ATH:2BT3:55SW:AIQL:HG5X:I2YX:WLNE:AKJ3:4YXO
 Docker Root Dir: /var/lib/docker
 Debug Mode: false
 Registry: https://index.docker.io/v1/
 Labels:
 Experimental: false
 Insecure Registries:
  127.0.0.0/8
 Live Restore Enabled: false

root@ubuntu2204:~#
1.6 LXC(Linux Container)
Linux 容器【LXC(Linux Container)】
借助于namespace的隔离机制和cgroup限额功能,LXC提供了一套统一的API和工具来建立和管理container,如lxc-create,lxc-start,lxc-attach等。作为管理容器工具角度目前已经淘汰
LXC利用了如下 kernel 的features: [8]
Kernel namespaces (ipc, uts, mount, pid, network and user)
Apparmor and SELinux profiles
Seccomp policies
Chroots (using pivot_root)
Kernel capabilities
Control groups (cgroups)
LXC 向用户屏蔽了以上 kernel 接口的细节, 提供了如下的组件大大简化了用户的开发和使用工作:
The liblxc library
Several language bindings (python3, lua and Go)
A set of standard tools to control the containers
Container templates
LXC 旨在提供一个共享kernel的 OS 级虚拟化方法,在执行时不用重复加载Kernel, 且container的kernel与host共享,因此可以大大加快container的 启动过程,并显著减少内存消耗。在实际测试中,基于LXC的虚拟化方法的IO和CPU性能几乎接近 baremetal 的性能 , 大多数数据有相比 Xen具有优势。当然对于KVM这种也是通过Kernel进行隔离的方式, 性能优势或许不是那么明显, 主要还是内存消耗和启动时间上的差异。利用iozone进行 Disk IO吞吐量测试KVM反而比LXC要快,而且笔者在device mapping driver下重现同样case的实验中也确实能得到如此结论。参考文献从网络虚拟化中虚拟路由的场景(网络IO和CPU角度)比较了KVM和LXC, 得到结论是KVM在性能和隔离性的平衡上比LXC更优秀 - KVM在吞吐量上略差于LXC, 但CPU的隔离可管理项比LXC更明确。
[root@ubuntu1804 ~]#lxc-start alpine1 #启动lxc容器
[root@ubuntu1804 ~]#lxc-attach alpine1 #进入lxc容器
~ # ifconfig
eth0 Link encap:Ethernet HWaddr 00:16:3E:DF:9E:45
inet addr:10.0.1.51 Bcast:10.0.1.255 Mask:255.255.255.0
inet6 addr: fe80::216:3eff:fedf:9e45/64 Scope:Link
UP BROADCAST RUNNING MULTICAST MTU:1500 Metric:1
RX packets:23 errors:0 dropped:0 overruns:0 frame:0
TX packets:12 errors:0 dropped:0 overruns:0 carrier:0
collisions:0 txqueuelen:1000
RX bytes:2484 (2.4 KiB) TX bytes:1726 (1.6 KiB)
lo Link encap:Local Loopback
inet addr:127.0.0.1 Mask:255.0.0.0
inet6 addr: ::1/128 Scope:Host
UP LOOPBACK RUNNING MTU:65536 Metric:1
RX packets:0 errors:0 dropped:0 overruns:0 frame:0
TX packets:0 errors:0 dropped:0 overruns:0 carrier:0
collisions:0 txqueuelen:1000
RX bytes:0 (0.0 B) TX bytes:0 (0.0 B)
1.7 Docker前端管理工具docker
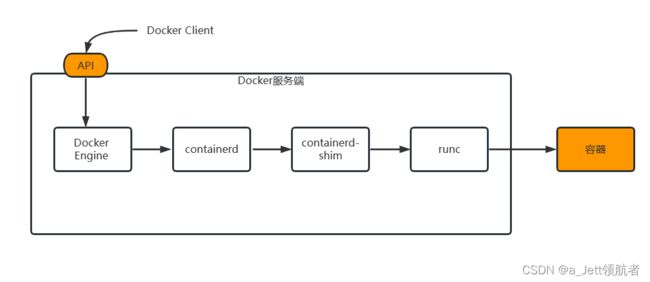
通过Docker的API向Docker引擎发送请求,Docker引擎将请求交给containerd,containerd会运行containerd-shim(垫片),containerd-shim去连接runc,runc创建或运行一个新的容器。
通过安装docker可以看出这些组件,但是对于服务端是Docker做好的,从使用者角度不需要过多关心,只需要很好运用docker命令就可以了。
root@ubuntu2204:~# apt update
Hit:1 https://mirrors.tuna.tsinghua.edu.cn/ubuntu jammy InRelease
Hit:2 https://mirrors.tuna.tsinghua.edu.cn/ubuntu jammy-updates InRelease
Hit:3 https://mirrors.tuna.tsinghua.edu.cn/ubuntu jammy-backports InRelease
Hit:4 https://mirrors.tuna.tsinghua.edu.cn/ubuntu jammy-security InRelease
Reading package lists... Done
Building dependency tree... Done
Reading state information... Done
55 packages can be upgraded. Run 'apt list --upgradable' to see them.
root@ubuntu2204:~# apt  install docker.io
Reading package lists... Done
Building dependency tree... Done
Reading state information... Done
The following additional packages will be installed:
  bridge-utils containerd dns-root-data dnsmasq-base pigz runc ubuntu-fan
Suggested packages:
  ifupdown aufs-tools cgroupfs-mount | cgroup-lite debootstrap docker-doc rinse
  zfs-fuse | zfsutils
The following NEW packages will be installed:
  bridge-utils containerd dns-root-data dnsmasq-base docker.io pigz runc
  ubuntu-fan
0 upgraded, 8 newly installed, 0 to remove and 55 not upgraded.
Need to get 66.8 MB of archives.
After this operation, 287 MB of additional disk space will be used.
Do you want to continue? [Y/n]
Docker内部是通过runc来进行容器的管理的,实际上runc是一个二进制程序。
#which runc
#ll /usr/sbin/runc
#file /usr/sbin/runc
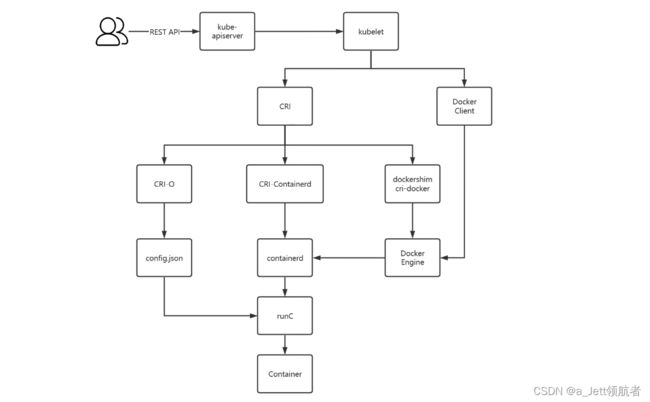
K8S管理Docker
2 Docker安装
Docker版本号之前一直是0.X版本或1.X版本,从2013年3月13日发布第一个版本0.1.1-1开始一直到2017年02月08日发布1.13.1版;从2017年3月1号开始改为每个季度发布一次稳定版,其版本号规则也统一变更为YY.MM.xx,第一个版本为17.03.0, 例如17.09表示是2017年9月份发布的。Docker之前没有区分版本,但是2017年推出(将docker更名为)新的项目Moby,也分为 CE(Docker Community Edition,社区版本)和 EE(DockerEnterprise Edition,企业收费版)。
github地址: https://github.com/moby/moby

Docker 目前已经支持多种操作系统的安装运行,比如Ubuntu、CentOS、Redhat、Debian、Fedora,甚至是还支持了Mac和Windows,在linux系统上需要内核版本在3.10或以上
root@ubuntu2204:~# uname -r
5.15.0-43-generic
root@ubuntu2204:~#
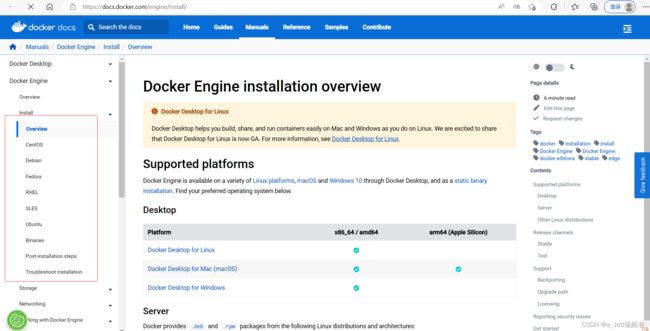
官方文档 : https://docs.docker.com/engine/install/
阿里云文档: https://developer.aliyun.com/mirror/docker-ce?spm=a2c6h.13651102.0.0.3e221b11guHCWE
2.1 Ubuntu安装Docker
官方文档: https://docs.docker.com/install/linux/docker-ce/ubuntu/
内置仓库安装docker
root@ubuntu2204:~# uname -r
5.15.0-43-generic
root@ubuntu2204:~# cat /etc/os-release
PRETTY_NAME="Ubuntu 22.04.1 LTS"
NAME="Ubuntu"
VERSION_ID="22.04"
VERSION="22.04.1 LTS (Jammy Jellyfish)"
VERSION_CODENAME=jammy
ID=ubuntu
ID_LIKE=debian
HOME_URL="https://www.ubuntu.com/"
SUPPORT_URL="https://help.ubuntu.com/"
BUG_REPORT_URL="https://bugs.launchpad.net/ubuntu/"
PRIVACY_POLICY_URL="https://www.ubuntu.com/legal/terms-and-policies/privacy-policy"
UBUNTU_CODENAME=jammy
root@ubuntu2204:~# apt update
root@ubuntu2204:~# apt -y install docker.io

root@ubuntu2204:~# docker info
Client:
 Context:    default
 Debug Mode: false

Server:
 Containers: 0
  Running: 0
  Paused: 0
  Stopped: 0
 Images: 0
 Server Version: 20.10.12
 Storage Driver: overlay2
  Backing Filesystem: extfs
  Supports d_type: true
  Native Overlay Diff: true
  userxattr: false
 Logging Driver: json-file
 Cgroup Driver: systemd
 Cgroup Version: 2
 Plugins:
  Volume: local
  Network: bridge host ipvlan macvlan null overlay
  Log: awslogs fluentd gcplogs gelf journald json-file local logentries splunk syslog
 Swarm: inactive
 Runtimes: runc io.containerd.runc.v2 io.containerd.runtime.v1.linux
 Default Runtime: runc
 Init Binary: docker-init
 containerd version:
 runc version:
 init version:
 Security Options:
  apparmor
  seccomp
   Profile: default
  cgroupns
 Kernel Version: 5.15.0-43-generic
 Operating System: Ubuntu 22.04.1 LTS
 OSType: linux
 Architecture: x86_64
 CPUs: 2
 Total Memory: 3.8GiB
 Name: ubuntu2204
 ID: 7KC4:55NP:37SK:R6YK:KAI7:RRKW:BMKY:P4YA:QFIX:GE54:KLWE:5XUZ
 Docker Root Dir: /var/lib/docker
 Debug Mode: false
 Registry: https://index.docker.io/v1/
 Labels:
 Experimental: false
 Insecure Registries:
  127.0.0.0/8
 Live Restore Enabled: false

root@ubuntu2204:~# apt-cache madison docker.io
 docker.io | 20.10.12-0ubuntu4 | https://mirrors.tuna.tsinghua.edu.cn/ubuntu jammy/universe amd64 Packages
root@ubuntu2204:~# systemctl status docker.service
● docker.service - Docker Application Container Engine
     Loaded: loaded (/lib/systemd/system/docker.service; enabled; vendor preset: enabled)
     Active: active (running) since Sat 2022-12-31 05:45:38 UTC; 38s ago
TriggeredBy: ● docker.socket
       Docs: https://docs.docker.com
   Main PID: 4752 (dockerd)
      Tasks: 8
     Memory: 29.9M
        CPU: 422ms
     CGroup: /system.slice/docker.service
             └─4752 /usr/bin/dockerd -H fd:// --containerd=/run/containerd/containerd.sock

Dec 31 05:45:38 ubuntu2204 dockerd[4752]: time="2022-12-31T05:45:38.116720918Z" level=info msg="scheme \"unix\" not registered, fallback to default scheme" >
Dec 31 05:45:38 ubuntu2204 dockerd[4752]: time="2022-12-31T05:45:38.116735706Z" level=info msg="ccResolverWrapper: sending update to cc: {[{unix:///run/cont>
Dec 31 05:45:38 ubuntu2204 dockerd[4752]: time="2022-12-31T05:45:38.116744133Z" level=info msg="ClientConn switching balancer to \"pick_first\"" module=grpc
Dec 31 05:45:38 ubuntu2204 dockerd[4752]: time="2022-12-31T05:45:38.177174869Z" level=info msg="Loading containers: start."
Dec 31 05:45:38 ubuntu2204 dockerd[4752]: time="2022-12-31T05:45:38.359342683Z" level=info msg="Default bridge (docker0) is assigned with an IP address 172.>
Dec 31 05:45:38 ubuntu2204 dockerd[4752]: time="2022-12-31T05:45:38.458540239Z" level=info msg="Loading containers: done."
Dec 31 05:45:38 ubuntu2204 dockerd[4752]: time="2022-12-31T05:45:38.480814480Z" level=info msg="Docker daemon" commit=20.10.12-0ubuntu4 graphdriver(s)=overl>
Dec 31 05:45:38 ubuntu2204 dockerd[4752]: time="2022-12-31T05:45:38.480973741Z" level=info msg="Daemon has completed initialization"
Dec 31 05:45:38 ubuntu2204 systemd[1]: Started Docker Application Container Engine.
Dec 31 05:45:38 ubuntu2204 dockerd[4752]: time="2022-12-31T05:45:38.518767530Z" level=info msg="API listen on /run/docker.sock"
lines 1-22/22 (END)

在docker安装启动之后,默认会生成一个名称为docker0的网卡并且默认IP地址为172.17.0.1的网卡
root@ubuntu2204:~# ip a
1: lo: <LOOPBACK,UP,LOWER_UP> mtu 65536 qdisc noqueue state UNKNOWN group default qlen 1000
    link/loopback 00:00:00:00:00:00 brd 00:00:00:00:00:00
    inet 127.0.0.1/8 scope host lo
       valid_lft forever preferred_lft forever
    inet6 ::1/128 scope host
       valid_lft forever preferred_lft forever
2: ens33: <BROADCAST,MULTICAST,UP,LOWER_UP> mtu 1500 qdisc fq_codel state UP group default qlen 1000
    link/ether 00:0c:29:2a:fe:f9 brd ff:ff:ff:ff:ff:ff
    altname enp2s1
    inet 10.0.0.223/24 brd 10.0.0.255 scope global ens33
       valid_lft forever preferred_lft forever
    inet6 fe80::20c:29ff:fe2a:fef9/64 scope link
       valid_lft forever preferred_lft forever
3: docker0: <NO-CARRIER,BROADCAST,MULTICAST,UP> mtu 1500 qdisc noqueue state DOWN group default
    link/ether 02:42:8e:11:dd:ed brd ff:ff:ff:ff:ff:ff
    inet 172.17.0.1/16 brd 172.17.255.255 scope global docker0
       valid_lft forever preferred_lft forever
root@ubuntu2204:~#

root@ubuntu2204:~# apt install bridge-utils
Reading package lists... Done
Building dependency tree... Done
Reading state information... Done
bridge-utils is already the newest version (1.7-1ubuntu3).
bridge-utils set to manually installed.
0 upgraded, 0 newly installed, 0 to remove and 109 not upgraded.
root@ubuntu2204:~# brctl show
bridge name	bridge id		STP enabled	interfaces
docker0		8000.02428e11dded	no
root@ubuntu2204:~# ss  -ntula   #当启动一个容器之后就能看到网桥
root@ubuntu2204:~# route -n
root@ubuntu2204:~# apt update

# 安装必要的一些系统工具
root@ubuntu2204:~# sudo apt-get update
root@ubuntu2204:~# sudo apt-get -y install apt-transport-https ca-certificates curl software-properties-common

# 安装GPG证书
root@ubuntu2204:~# curl -fsSL https://mirrors.aliyun.com/docker-ce/linux/ubuntu/gpg | sudo apt-key add -
Warning: apt-key is deprecated. Manage keyring files in trusted.gpg.d instead (see apt-key(8)).
OK

# 写入软件信息
root@ubuntu2204:~# sudo add-apt-repository "deb [arch=amd64] https://mirrors.aliyun.com/docker-ce/linux/ubuntu $(lsb_release -cs) stable"
Repository: 'deb [arch=amd64] https://mirrors.aliyun.com/docker-ce/linux/ubuntu jammy stable'
Description:
Archive for codename: jammy components: stable
More info: https://mirrors.aliyun.com/docker-ce/linux/ubuntu
Adding repository.
Press [ENTER] to continue or Ctrl-c to cancel.
Adding deb entry to /etc/apt/sources.list.d/archive_uri-https_mirrors_aliyun_com_docker-ce_linux_ubuntu-jammy.list
Adding disabled deb-src entry to /etc/apt/sources.list.d/archive_uri-https_mirrors_aliyun_com_docker-ce_linux_ubuntu-jammy.list
Hit:1 https://mirrors.tuna.tsinghua.edu.cn/ubuntu jammy InRelease
Hit:2 https://mirrors.tuna.tsinghua.edu.cn/ubuntu jammy-updates InRelease
Get:3 https://mirrors.aliyun.com/docker-ce/linux/ubuntu jammy InRelease [48.9 kB]
Hit:4 https://mirrors.tuna.tsinghua.edu.cn/ubuntu jammy-backports InRelease
Hit:5 https://mirrors.tuna.tsinghua.edu.cn/ubuntu jammy-security InRelease
Get:6 https://mirrors.aliyun.com/docker-ce/linux/ubuntu jammy/stable amd64 Packages [11.1 kB]
Fetched 59.9 kB in 1s (87.6 kB/s)
Reading package lists... Done
W: https://mirrors.aliyun.com/docker-ce/linux/ubuntu/dists/jammy/InRelease: Key is stored in legacy trusted.gpg keyring (/etc/apt/trusted.gpg), see the DEPRECATION section in apt-key(8) for details.

#更新并安装Docker-CE
root@ubuntu2204:~# sudo apt-get -y update
Hit:1 https://mirrors.aliyun.com/docker-ce/linux/ubuntu jammy InRelease
Hit:2 https://mirrors.tuna.tsinghua.edu.cn/ubuntu jammy InRelease
Hit:3 https://mirrors.tuna.tsinghua.edu.cn/ubuntu jammy-updates InRelease
Hit:4 https://mirrors.tuna.tsinghua.edu.cn/ubuntu jammy-backports InRelease
Hit:5 https://mirrors.tuna.tsinghua.edu.cn/ubuntu jammy-security InRelease
Reading package lists... Done
W: https://mirrors.aliyun.com/docker-ce/linux/ubuntu/dists/jammy/InRelease: Key is stored in legacy trusted.gpg keyring (/etc/apt/trusted.gpg), see the DEPRECATION section in apt-key(8) for details.


# 安装指定版本的Docker-CE:
#1:查找Docker-CE的版本:
root@ubuntu2204:~# apt-cache madison docker-ce
 docker-ce | 5:20.10.22~3-0~ubuntu-jammy | https://mirrors.aliyun.com/docker-ce/linux/ubuntu jammy/stable amd64 Packages
 docker-ce | 5:20.10.21~3-0~ubuntu-jammy | https://mirrors.aliyun.com/docker-ce/linux/ubuntu jammy/stable amd64 Packages
 docker-ce | 5:20.10.20~3-0~ubuntu-jammy | https://mirrors.aliyun.com/docker-ce/linux/ubuntu jammy/stable amd64 Packages
 docker-ce | 5:20.10.19~3-0~ubuntu-jammy | https://mirrors.aliyun.com/docker-ce/linux/ubuntu jammy/stable amd64 Packages
 docker-ce | 5:20.10.18~3-0~ubuntu-jammy | https://mirrors.aliyun.com/docker-ce/linux/ubuntu jammy/stable amd64 Packages
 docker-ce | 5:20.10.17~3-0~ubuntu-jammy | https://mirrors.aliyun.com/docker-ce/linux/ubuntu jammy/stable amd64 Packages
 docker-ce | 5:20.10.16~3-0~ubuntu-jammy | https://mirrors.aliyun.com/docker-ce/linux/ubuntu jammy/stable amd64 Packages
 docker-ce | 5:20.10.15~3-0~ubuntu-jammy | https://mirrors.aliyun.com/docker-ce/linux/ubuntu jammy/stable amd64 Packages
 docker-ce | 5:20.10.14~3-0~ubuntu-jammy | https://mirrors.aliyun.com/docker-ce/linux/ubuntu jammy/stable amd64 Packages
 docker-ce | 5:20.10.13~3-0~ubuntu-jammy | https://mirrors.aliyun.com/docker-ce/linux/ubuntu jammy/stable amd64 Packages

#2: 安装指定版本的Docker-CE,因为docker是C/S模式,最好客户端与服务端版本一直,以免冲突
root@ubuntu2204:~# apt install docker-ce=5:20.10.18~3-0~ubuntu-jammy  docker-ce-cli=5:20.10.18~3-0~ubuntu-jammy
Reading package lists... Done
Building dependency tree... Done
Reading state information... Done
The following additional packages will be installed:
  containerd.io docker-ce-rootless-extras docker-scan-plugin libltdl7 libslirp0 pigz slirp4netns
Suggested packages:
  aufs-tools cgroupfs-mount | cgroup-lite
The following NEW packages will be installed:
  containerd.io docker-ce docker-ce-cli docker-ce-rootless-extras docker-scan-plugin libltdl7 libslirp0 pigz slirp4netns
0 upgraded, 9 newly installed, 0 to remove and 109 not upgraded.
Need to get 102 MB of archives.
After this operation, 383 MB of additional disk space will be used.
Do you want to continue? [Y/n]

root@ubuntu2204:~# docker info
Client:
 Context:    default
 Debug Mode: false
 Plugins:
  app: Docker App (Docker Inc., v0.9.1-beta3)
  buildx: Docker Buildx (Docker Inc., v0.9.1-docker)
  scan: Docker Scan (Docker Inc., v0.23.0)

Server:
 Containers: 0
  Running: 0
  Paused: 0
  Stopped: 0
 Images: 0
 Server Version: 20.10.18
 Storage Driver: overlay2
  Backing Filesystem: extfs
  Supports d_type: true
  Native Overlay Diff: true
  userxattr: false
 Logging Driver: json-file
 Cgroup Driver: systemd
 Cgroup Version: 2
 Plugins:
  Volume: local
  Network: bridge host ipvlan macvlan null overlay
  Log: awslogs fluentd gcplogs gelf journald json-file local logentries splunk syslog
 Swarm: inactive
 Runtimes: io.containerd.runc.v2 io.containerd.runtime.v1.linux runc
 Default Runtime: runc
 Init Binary: docker-init
 containerd version: 9ba4b250366a5ddde94bb7c9d1def331423aa323
 runc version: v1.1.4-0-g5fd4c4d
 init version: de40ad0
 Security Options:
  apparmor
  seccomp
   Profile: default
  cgroupns
 Kernel Version: 5.15.0-43-generic
 Operating System: Ubuntu 22.04.1 LTS
 OSType: linux
 Architecture: x86_64
 CPUs: 2
 Total Memory: 3.8GiB
 Name: ubuntu2204
 ID: 6W65:HBBG:JIMM:V3BX:ZNXT:54PM:4BG7:O2XI:6YXM:Y6QG:XS7K:X55R
 Docker Root Dir: /var/lib/docker
 Debug Mode: false
 Registry: https://index.docker.io/v1/
 Labels:
 Experimental: false
 Insecure Registries:
  127.0.0.0/8
 Live Restore Enabled: false
root@ubuntu2204:~# docker version
删除 docker
root@ubuntu2204:~# apt purge docker-ce
Reading package lists... Done
Building dependency tree... Done
Reading state information... Done
The following packages were automatically installed and are no longer required:
  containerd.io docker-ce-rootless-extras libltdl7 libslirp0 pigz slirp4netns
Use 'sudo apt autoremove' to remove them.
The following packages will be REMOVED:
  docker-ce*
0 upgraded, 0 newly installed, 1 to remove and 110 not upgraded.
After this operation, 88.1 MB disk space will be freed.
Do you want to continue? [Y/n] y
(Reading database ... 73672 files and directories currently installed.)
Removing docker-ce (5:20.10.18~3-0~ubuntu-jammy) ...
Warning: Stopping docker.service, but it can still be activated by:
  docker.socket
(Reading database ... 73664 files and directories currently installed.)
Purging configuration files for docker-ce (5:20.10.18~3-0~ubuntu-jammy) ...
root@ubuntu2204:~# docker version
Client: Docker Engine - Community
 Version:           20.10.18
 API version:       1.41
 Go version:        go1.18.6
 Git commit:        b40c2f6
 Built:             Thu Sep  8 23:11:43 2022
 OS/Arch:           linux/amd64
 Context:           default
 Experimental:      true
Cannot connect to the Docker daemon at unix:///var/run/docker.sock. Is the docker daemon running?
root@ubuntu2204:~# docker info
Client:
 Context:    default
 Debug Mode: false
 Plugins:
  app: Docker App (Docker Inc., v0.9.1-beta3)
  buildx: Docker Buildx (Docker Inc., v0.9.1-docker)
  scan: Docker Scan (Docker Inc., v0.23.0)

Server:
ERROR: Cannot connect to the Docker daemon at unix:///var/run/docker.sock. Is the docker daemon running?
errors pretty printing info
root@ubuntu2204:~# rm -rf /var/lib/docker
基于CentOS 7的一键安装docker 脚本
#!/bin/bash
#
COLOR="echo -e \\033[1;31m"
END="\033[m"
VERSION="19.03.5-3.el7"
wget -P /etc/yum.repos.d/ https://mirrors.aliyun.com/docker-ce/linux/centos/docker-ce.repo  || { ${COLOR}"互联网连接失败,请检查网络配置!"${END};exit; }
yum clean all
yum -y install docker-ce-$VERSION docker-ce-cli-$VERSION || { ${COLOR}"Base,Extras的yum源失败,请检查yum源配置"${END};exit; }
mkdir -p /etc/docker
cat > /etc/docker/daemon.json <<EOF
{
 "registry-mirrors": ["https://si7y70hh.mirror.aliyuncs.com"]
 }
EOF

systemctl restart docker
docker version && ${COLOR}"Docker安装成功"${END} || ${COLOR}"Docker安装失败"${END}
2.2 Centos安装Docker
官方文档: https://docs.docker.com/install/linux/docker-ce/centos/
包安装
如果您无法使用 Docker 的存储库来安装 Docker,您可以下载您的版本文件并手动安装。您需要下载 每次要升级 Docker 引擎时,一个新文件。.rpm
1,转到 https://download.docker.com/linux/centos/ 并选择您的 CentOS 版本。然后浏览并下载要安装的 Docker 版本的文件。x86_64/stable/Packages/.rpm
2,安装 Docker 引擎,将下面的路径更改为下载的路径 Docker 包。
sudo yum install /path/to/package.rpm
Docker 已安装,但尚未启动。组已创建,但没有 用户将添加到组中。docker
3,启动 Docker。
sudo systemctl start docker
4,通过运行映像验证是否正确安装了 Docker 引擎。hello-world
sudo docker run hello-world
此命令下载测试映像并在容器中运行它。当 容器运行,它会打印一条消息并退出。
这将安装并运行 Docker 引擎。用于运行 Docker 命令。 继续执行 Linux 的安装后步骤以允许 运行 Docker 命令和其他可选配置的非特权用户 步骤。sudo
示例CentOS 7.6 安装 docker
[root@centos7 ~]#cat /etc/redhat-release
CentOS Linux release 7.6.1810 (Core)
[root@centos7 ~]#ls /etc/yum.repos.d/
backup  base.repo
[root@centos7 ~]#wget -P /etc/yum.repos.d/ https://mirrors.aliyun.com/docker-ce/linux/centos/docker-ce.repo

[root@centos7 ~]#ls /etc/yum.repos.d/
backup  base.repo  docker-ce.repo
[root@centos7 ~]#yum clean all
Loaded plugins: fastestmirror
Cleaning repos: base docker-ce-stable epel extras
Cleaning up list of fastest mirrors
[root@centos7 ~]#yum repolist

[root@centos7 ~]#yum list docker-ce* --showduplicates | sort -r

[root@centos7 ~]#yum -y install docker-ce-18.09.9-3.el7 docker-ce-cli-18.09.9-3.el7
[root@centos7 ~]#docker version

[root@centos7 ~]#systemctl restart docker
[root@centos7 ~]#docker version
升级Docker引擎
要升级 Docker 引擎,请下载较新的软件包文件并重复安装过程,而不是 ,然后指向新文件。yum -y upgradeyum -y install
删除 docker
[root@centos7 ~]#yum remove docker-ce
#删除docker资源存放的相关文件
[root@centos7 ~]#rm -rf /var/lib/docker
在CentOS8安装docker
[root@centos8 ~]#tee /etc/yum.repos.d/docker.repo <
[docker]
name=docker
gpgcheck=0
baseurl=https://mirrors.aliyun.com/docker-ce/linux/centos/8/x86_64/stable/
EOF
[root@centos8 ~]#dnf -y install docker-ce
CentOS 6 因内核太旧,即使支持安装docker,但会有各种问题,不建议安装
CentOS 8 有新技术 podman 代替 docker
CentOS 7 的 extras 源虽然可以安装docker,但包比较旧,建议从官方源或镜像源站点下载安装docker,因此建议在CentOS 7 上安装 docker。
Docker CE镜像安装
简介
Docker CE是免费的Docker产品的新名称,Docker CE包含了完整的Docker平台,非常适合开发人员和运维团队构建容器APP。
下载地址:https://mirrors.aliyun.com/docker-ce/
配置方法
Ubuntu (使用 apt-get 进行安装)
# step 1: 安装必要的一些系统工具
sudo apt-get update
sudo apt-get -y install apt-transport-https ca-certificates curl software-properties-common
# step 2: 安装GPG证书
curl -fsSL https://mirrors.aliyun.com/docker-ce/linux/ubuntu/gpg | sudo apt-key add -
# Step 3: 写入软件源信息
sudo add-apt-repository "deb [arch=amd64] https://mirrors.aliyun.com/docker-ce/linux/ubuntu $(lsb_release -cs) stable"
# Step 4: 更新并安装Docker-CE
sudo apt-get -y update
sudo apt-get -y install docker-ce

# 安装指定版本的Docker-CE:
# Step 1: 查找Docker-CE的版本:
# apt-cache madison docker-ce
#   docker-ce | 17.03.1~ce-0~ubuntu-xenial | https://mirrors.aliyun.com/docker-ce/linux/ubuntu xenial/stable amd64 Packages
#   docker-ce | 17.03.0~ce-0~ubuntu-xenial | https://mirrors.aliyun.com/docker-ce/linux/ubuntu xenial/stable amd64 Packages
# Step 2: 安装指定版本的Docker-CE: (VERSION例如上面的17.03.1~ce-0~ubuntu-xenial)
# sudo apt-get -y install docker-ce=[VERSION]
CentOS 7(使用 yum 进行安装)
# step 1: 安装必要的一些系统工具
sudo yum install -y yum-utils device-mapper-persistent-data lvm2
# Step 2: 添加软件源信息
sudo yum-config-manager --add-repo https://mirrors.aliyun.com/docker-ce/linux/centos/docker-ce.repo
# Step 3
sudo sed -i 's+download.docker.com+mirrors.aliyun.com/docker-ce+' /etc/yum.repos.d/docker-ce.repo
# Step 4: 更新并安装Docker-CE
sudo yum makecache fast
sudo yum -y install docker-ce
# Step 4: 开启Docker服务
sudo service docker start

# 注意:
# 官方软件源默认启用了最新的软件,您可以通过编辑软件源的方式获取各个版本的软件包。例如官方并没有将测试版本的软件源置为可用,您可以通过以下方式开启。同理可以开启各种测试版本等。
# vim /etc/yum.repos.d/docker-ce.repo
#   将[docker-ce-test]下方的enabled=0修改为enabled=1
#
# 安装指定版本的Docker-CE:
# Step 1: 查找Docker-CE的版本:
# yum list docker-ce.x86_64 --showduplicates | sort -r
#   Loading mirror speeds from cached hostfile
#   Loaded plugins: branch, fastestmirror, langpacks
#   docker-ce.x86_64            17.03.1.ce-1.el7.centos            docker-ce-stable
#   docker-ce.x86_64            17.03.1.ce-1.el7.centos            @docker-ce-stable
#   docker-ce.x86_64            17.03.0.ce-1.el7.centos            docker-ce-stable
#   Available Packages
# Step2: 安装指定版本的Docker-CE: (VERSION例如上面的17.03.0.ce.1-1.el7.centos)
# sudo yum -y install docker-ce-[VERSION]
安装校验
root@iZbp12adskpuoxodbkqzjfZ:$ docker version
Client:
 Version:      17.03.0-ce
 API version:  1.26
 Go version:   go1.7.5
 Git commit:   3a232c8
 Built:        Tue Feb 28 07:52:04 2017
 OS/Arch:      linux/amd64

Server:
 Version:      17.03.0-ce
 API version:  1.26 (minimum version 1.12)
 Go version:   go1.7.5
 Git commit:   3a232c8
 Built:        Tue Feb 28 07:52:04 2017
 OS/Arch:      linux/amd64
 Experimental: false
通用脚本
官方通用脚本
从Docker官方下载通用安装脚本
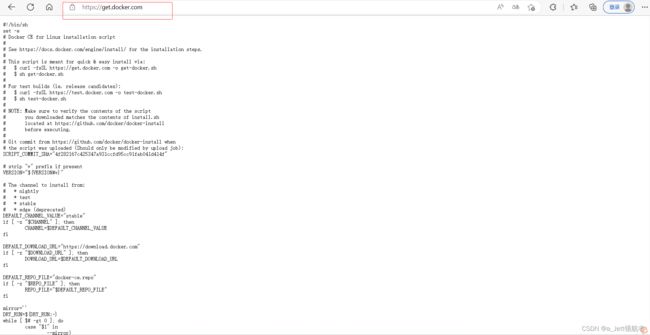
[root@ubuntu1804 ~]#curl -fsSL get.docker.com -o get-docker.sh
[root@ubuntu1804 ~]#sh get-docker.sh --mirror Aliyun
[root@Rocky8 ~]# cat /etc/os
cat: /etc/os: No such file or directory
[root@Rocky8 ~]# cat /etc/os-release
NAME="Rocky Linux"
VERSION="8.7 (Green Obsidian)"
ID="rocky"
ID_LIKE="rhel centos fedora"
VERSION_ID="8.7"
PLATFORM_ID="platform:el8"
PRETTY_NAME="Rocky Linux 8.7 (Green Obsidian)"
ANSI_COLOR="0;32"
LOGO="fedora-logo-icon"
CPE_NAME="cpe:/o:rocky:rocky:8:GA"
HOME_URL="https://rockylinux.org/"
BUG_REPORT_URL="https://bugs.rockylinux.org/"
ROCKY_SUPPORT_PRODUCT="Rocky-Linux-8"
ROCKY_SUPPORT_PRODUCT_VERSION="8.7"
REDHAT_SUPPORT_PRODUCT="Rocky Linux"
REDHAT_SUPPORT_PRODUCT_VERSION="8.7"
[root@Rocky8 ~]# curl -fsSL https://get.docker.com -o get-docker.sh
[root@Rocky8 ~]# ls
anaconda-ks.cfg  fstab  get-docker.sh  spug.tar  test.bin  test.bin.gz
[root**@Rocky8 ~]# bash get-docker.sh
# Executing docker install script, commit: 4f282167c425347a931ccfd95cc91fab041d414f
ERROR: Unsupported distribution 'rocky'
[root@Rocky8 ~]#
自定义通用脚本
支持Ubuntu、Centos、Rocky版本操作系统
#!/bin/bash
#
DOCKER_VERSION="20.10.10"
DOCKER_URL="http://mirrors.ustc.edu.cn"
#DOCKER_URL="https://mirrors.aliyun.com"
#DOCKER_URL="https://mirrors.tuna.tsinghua.edu.cn"


COLOR_SUCCESS="echo -e \\033[1;32m"
COLOR_FAILURE="echo -e \\033[1;31m"
END="\033[m"

. /etc/os-release
UBUNTU_DOCKER_VERSION="5:${DOCKER_VERSION}~3-0~${ID}-${UBUNTU_CODENAME}"
#UBUNTU_DOCKER_VERSION="5:20.10.9~3-0~`lsb_release -si`-`lsb_release -cs`"
#UBUNTU_DOCKER_VERSION="5:19.03.14~3-0~lsb_release -si-`lsb_release -cs`"


color () {
    RES_COL=60
    MOVE_TO_COL="echo -en \\033[${RES_COL}G"
    SETCOLOR_SUCCESS="echo -en \\033[1;32m"
    SETCOLOR_FAILURE="echo -en \\033[1;31m"
    SETCOLOR_WARNING="echo -en \\033[1;33m"
    SETCOLOR_NORMAL="echo -en \E[0m"
    echo -n "$1" && $MOVE_TO_COL
    echo -n "["
    if [ $2 = "success" -o $2 = "0" ] ;then
        ${SETCOLOR_SUCCESS}
        echo -n $"  OK  "
    elif [ $2 = "failure" -o $2 = "1"  ] ;then
        ${SETCOLOR_FAILURE}
        echo -n $"FAILED"
    else
        ${SETCOLOR_WARNING}
        echo -n $"WARNING"
    fi
    ${SETCOLOR_NORMAL}
    echo -n "]"
    echo
}


install_docker(){
    if [ $ID = "centos" -o $ID = "rocky" ];then
        if [ $VERSION_ID = "7" ];then
            cat >  /etc/yum.repos.d/docker.repo  <<EOF
[docker]
name=docker
gpgcheck=0
#baseurl=https://mirrors.aliyun.com/docker-ce/linux/centos/7/x86_64/stable/
baseurl=${DOCKER_URL}/docker-ce/linux/centos/7/x86_64/stable/
EOF
        else
            cat >  /etc/yum.repos.d/docker.repo  <<EOF
[docker]
name=docker
gpgcheck=0
#baseurl=https://mirrors.aliyun.com/docker-ce/linux/centos/8/x86_64/stable/
baseurl=${DOCKER_URL}/docker-ce/linux/centos/8/x86_64/stable/
EOF
        fi
	    yum clean all
        ${COLOR_FAILURE} "Docker有以下版本"${END}
        yum list docker-ce --showduplicates
        ${COLOR_FAILURE}"5秒后即将安装: docker-"${DOCKER_VERSION}" 版本....."${END}
        ${COLOR_FAILURE}"如果想安装其它Docker版本,请按ctrl+c键退出,修改版本再执行"${END}
        sleep 5
        yum -y install docker-ce-$DOCKER_VERSION docker-ce-cli-$DOCKER_VERSION  \
            || { color "Base,Extras的yum源失败,请检查yum源配置" 1;exit; }
    else
	    dpkg -s docker-ce &> /dev/null && $COLOR"Docker已安装,退出" 1 && exit
        apt update || { color "更新包索引失败" 1 ; exit 1; }
        apt  -y install apt-transport-https ca-certificates curl software-properties-common || \
            { color "安装相关包失败" 1 ; exit 2;  }
        curl -fsSL ${DOCKER_URL}/docker-ce/linux/ubuntu/gpg | sudo apt-key add -
        add-apt-repository "deb [arch=amd64] ${DOCKER_URL}/docker-ce/linux/ubuntu $(lsb_release -cs) stable"
        apt update
        ${COLOR_FAILURE} "Docker有以下版本"${END}
        apt-cache madison docker-ce
        ${COLOR_FAILURE}"5秒后即将安装: docker-"${UBUNTU_DOCKER_VERSION}" 版本....."${END}
        ${COLOR_FAILURE}"如果想安装其它Docker版本,请按ctrl+c键退出,修改版本再执行"${END}
        sleep 5
        apt -y  install docker-ce=${UBUNTU_DOCKER_VERSION} docker-ce-cli=${UBUNTU_DOCKER_VERSION}
    fi
    if [ $? -eq 0 ];then
        color "安装软件包成功"  0
    else
        color "安装软件包失败,请检查网络配置" 1
        exit
    fi

}

config_docker (){
    mkdir -p /etc/docker
    tee /etc/docker/daemon.json <<-'EOF'
{
	  "registry-mirrors": ["https://si7y70hh.mirror.aliyuncs.com","https://docker.mirrors.ustc.edu.cn","https://hub-mirror.c.163.com","https://reg-mirror.qiniu.com"],
	  "insecure-registries": ["harbor.wang.org"],
      "live-restore": true
}
EOF
    systemctl daemon-reload
    systemctl enable docker
    systemctl restart docker
    docker version && color "Docker 安装成功" 0 ||  color "Docker 安装失败" 1
}


set_alias (){
	echo 'alias rmi="docker images -qa|xargs docker rmi -f"' >> ~/.bashrc
	echo 'alias rmc="docker ps -qa|xargs docker rm -f"' >> ~/.bashrc
}


install_docker

config_docker

set_alias
[root@Rocky8 ~]#
在这里插入代码片
2.3 Linux 二进制安装
本方法适用于无法上网或无法通过包安装方式安装的主机上安装docker
安装文档: https://docs.docker.com/install/linux/docker-ce/binaries/
二进制安装下载路径
https://download.docker.com/linux/
https://mirrors.aliyun.com/docker-ce/linux/static/stable/x86_64/
CentOS 8.1 基于二进制安装docker
[root@centos8 ~]#wget https://download.docker.com/linux/static/stable/x86_64/docker-19.03.5.tgz
[root@centos8 ~]#tar xvf docker-19.03.5.tgz
[root@centos8 ~]#cp docker/* /usr/bin/
[root@centos8 ~]#groupadd -r docker

#将Ubuntu1804或CentOS7基于包方式安装的相关文件复制到相应目录下
[root@ubuntu1804 ~]#scp /lib/systemd/system/docker.* /lib/systemd/system/containerd.service  10.0.0.8:/lib/systemd/system/

[root@centos8 ~]#systemctl daemon-reload
[root@centos8 ~]#systemctl enable --now docker
[root@centos8 ~]#docker version
[root@centos8 ~]#docker run hello-world
[root@centos8 ~]#pstree -p

