基础11-WebMVC自动化配置原理
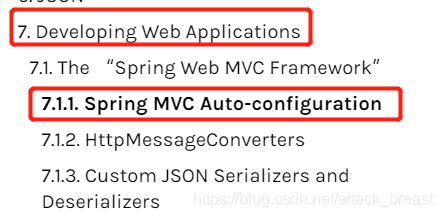
打开Spring Boot官网,按照图片找到如下信息:
这里的关键就在于Spring MVC Auto-configuration
Spring MVC Auto-configuration
稍微翻译下图中信息:
Spring Boot为大多数应用提供了自动化配置的Spring MVC。自动化配置添加了如下内容:
①包含ContentNegotiatingViewResolver、BeanNameViewResolver;
②支持静态资源,包括对webjars的支持;
③自动注册Converter、GenericConverter、Formatter;
④支持HttpMessageConverters;
⑤自动注册MessageCodesResolver;
⑥静态index.html的支持;
⑦对favicon图标的支持;
⑧自动使用ConfigurableWebBindingInitializer;
如果你想保留Spring Boot MVC功能,并且想要添加自定义的MVC配置(拦截器,格式化器,视图控制器和其他功能),则可以在自己实现的WebMvcConfigurer接口子类添加@Configuration注解,但不可以添加@EnableWebMvc注解。如果你想用自定义类来取代RequestMappingHandlerMapping,RequestMappingHandlerAdapter或ExceptionHandlerExceptionResolver,则开发者就必须声明一个WebMvcRegistrationsAdapter实例来作为被取代的组件。
如果想完全控制Spring MVC,则可以添加自己的@EnableWebMvc注解的@Configuration。
ContentNegotiatingViewResolver
这2个类的作用就是:根据方法返回值,找到对应的View对象,然后进行解析,根据View内容来决定是展示,还是转发,重定向等操作;
打开WebMvcAutoConfiguration.viewResolver方法:
| @Bean @ConditionalOnBean({ViewResolver.class}) |
这里是new ContentNegotiatingViewResolver();打开ContentNegotiatingViewResolver.resolveViewName方法,该方法是负责解析的核心方法:
| @Nullable public View resolveViewName(String viewName, Locale locale) throws Exception { RequestAttributes attrs = RequestContextHolder.getRequestAttributes(); Assert.state(attrs instanceof ServletRequestAttributes, "No current ServletRequestAttributes"); List this.getMediaTypes(((ServletRequestAttributes)attrs).getRequest()); if (requestedMediaTypes != null) { List this.getCandidateViews(viewName, locale, requestedMediaTypes); View bestView = this.getBestView(candidateViews, requestedMediaTypes, attrs); if (bestView != null) { return bestView; } }
String mediaTypeInfo = this.logger.isDebugEnabled() && requestedMediaTypes != null ? " given " + requestedMediaTypes.toString() : ""; if (this.useNotAcceptableStatusCode) { if (this.logger.isDebugEnabled()) { this.logger.debug("Using 406 NOT_ACCEPTABLE" + mediaTypeInfo); }
return NOT_ACCEPTABLE_VIEW; } else { this.logger.debug("View remains unresolved" + mediaTypeInfo); return null; } } |
这里的核心方法就是:getCandidateViews、getBestView方法;下面是getCandidateViews方法源码:
| private List |
这里关键的代码是Iterator var5 = this.viewResolvers.iterator();这里看一下this.viewResolvers的初始化过程,这就需要看initServletContext方法:
| protected void initServletContext(ServletContext servletContext) { |
BeanFactoryUtils.beansOfTypeIncludingAncestors方法遍历整个Spring容器,来获取ViewResolver列表,然后赋值给viewResolvers;
因此,用户可以自定义一个ViewResolver接口的实现类并添加到容器中,最后Spring Boot会统一由ContentNegotiatingViewResolver添加到ViewResolver列表viewResolvers中,而用户只需提供实现类即可,不需要其他额外的配置;
Formatter
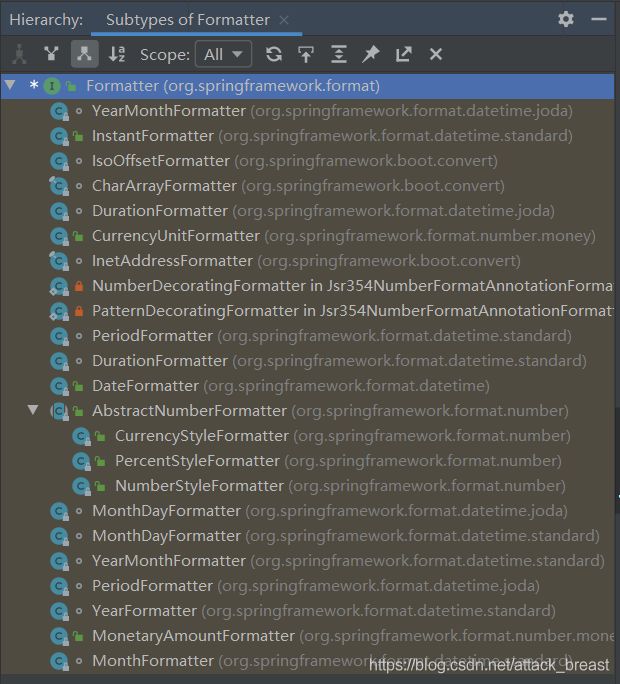
Formatter格式化器,是一个接口,下面是该接口的实现类:
在WebMvcAutoConfiguration.addFormatters、WebMvcAutoConfiguration.mvcConversionService等其他方法里面能看到添加格式化器的代码,下面是日期格式化器的源码:
| @Bean |
这里重点是this.mvcProperties.getDateFormat(),返回值String类型,然后我们跟踪WebMvcProperties的dateformat属性,其日期格式化是通过spring.mvc.date-format来定义的;
这里是addFormatters方法源码:
| public void addFormatters(FormatterRegistry registry) { ApplicationConversionService.addBeans(registry, this.beanFactory); } public static void addBeans(FormatterRegistry registry, ListableBeanFactory beanFactory) { Set beans.addAll(beanFactory.getBeansOfType(GenericConverter.class).values()); beans.addAll(beanFactory.getBeansOfType(Converter.class).values()); beans.addAll(beanFactory.getBeansOfType(Printer.class).values()); beans.addAll(beanFactory.getBeansOfType(Parser.class).values()); Iterator var3 = beans.iterator(); while(var3.hasNext()) { Object bean = var3.next(); if (bean instanceof GenericConverter) { registry.addConverter((GenericConverter)bean); } else if (bean instanceof Converter) { registry.addConverter((Converter)bean); } else if (bean instanceof Formatter) { registry.addFormatter((Formatter)bean); } else if (bean instanceof Printer) { registry.addPrinter((Printer)bean); } else if (bean instanceof Parser) { registry.addParser((Parser)bean); } } } |
Formatter接口继承自Printer接口,只要你实现了Formatter接口并添加到容器中,到了else if (bean instanceof Formatter) 这里,自然而然就会把你自定义的Formatter注册到容器中;用户只需提供实现类即可,不需要其他额外的配置;
HttpMessageConverters
| public class HttpMessageConverters implements Iterable
public interface HttpMessageConverter
|
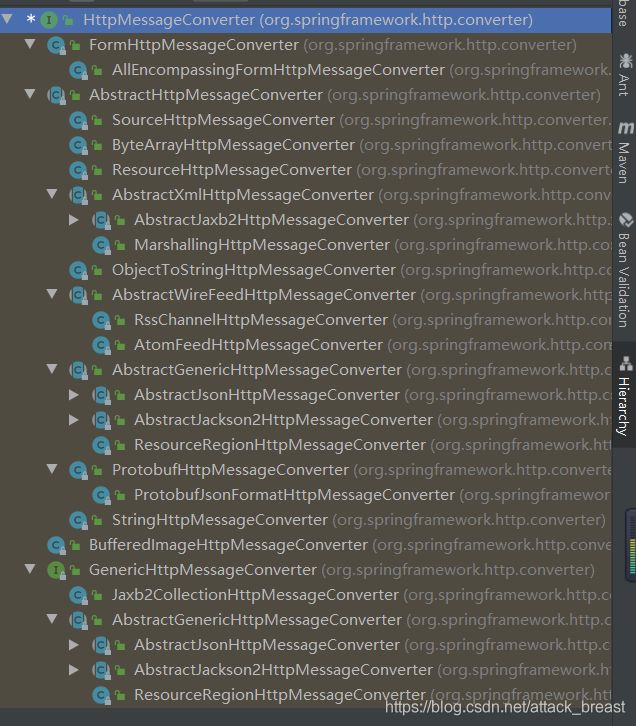
下面是HttpMessageConverter接口的实现类:
HttpMessageConverter负责对Http进行各种转换,例如:StringHttpMessageConverter把请求内容换换成String、GsonHttpMessageConverter负责按照JSON格式进行转换Http请求,下面是源码:
| 这是StringHttpMessageConverter的: protected String readInternal(Class clazz, HttpInputMessage inputMessage) throws IOException { Charset charset = this.getContentTypeCharset(inputMessage.getHeaders().getContentType()); return StreamUtils.copyToString(inputMessage.getBody(), charset); } 这是GsonHttpMessageConverter的: protected Object readInternal(Type resolvedType, Reader reader) throws Exception { return this.getGson().fromJson(reader, resolvedType); } |
HttpMessageConverters则是作为HttpMessageConverter容器,来持有HttpMessageConverter众多的实例;
下面是WebMvcAutoConfiguration初始化HttpMessageConverters的代码:
| public WebMvcAutoConfigurationAdapter(ResourceProperties resourceProperties, WebMvcProperties mvcProperties, ListableBeanFactory beanFactory, ObjectProvider this.resourceProperties = resourceProperties; this.mvcProperties = mvcProperties; this.beanFactory = beanFactory; this.messageConvertersProvider = messageConvertersProvider; this.resourceHandlerRegistrationCustomizer = (WebMvcAutoConfiguration.ResourceHandlerRegistrationCustomizer)resourceHandlerRegistrationCustomizerProvider.getIfAvailable(); }
|
也就是说,由外部初始化后,直接调用调用WebMvcAutoConfigurationAdapter方法来完成一部分注册;
只要你实现了HttpMessageConverter接口并添加到容器中,Spring Boot自然就会完成对你实现类的注册;用户只需提供实现类即可,不需要其他额外的配置;
MessageCodesResolver
定义错误代码的生成规则;
WebMvcAutoConfiguration中调用源码:
| public MessageCodesResolver getMessageCodesResolver() { if (this.mvcProperties.getMessageCodesResolverFormat() != null) { DefaultMessageCodesResolver resolver = new DefaultMessageCodesResolver(); resolver.setMessageCodeFormatter(this.mvcProperties.getMessageCodesResolverFormat()); return resolver; } else { return null; } } |
这里指向了WebMvcProperties的messageCodesResolverFormat,即spring.mvc.message-codes-resolver-format属性;
这个,个人只能定义格式,无法自定义实例了;
ConfigurableWebBindingInitializer
初始化WebBindingInitializer;
| protected ConfigurableWebBindingInitializer getConfigurableWebBindingInitializer(FormattingConversionService mvcConversionService, Validator mvcValidator) { try { return (ConfigurableWebBindingInitializer)this.beanFactory.getBean(ConfigurableWebBindingInitializer.class); } catch (NoSuchBeanDefinitionException var4) { return super.getConfigurableWebBindingInitializer(mvcConversionService, mvcValidator); } } |
@EnableWebMvc注解
首先看看@EnableWebMvc注解源代码:
| @Retention(RetentionPolicy.RUNTIME) @Target({ElementType.TYPE}) @Documented @Import({DelegatingWebMvcConfiguration.class}) public @interface EnableWebMvc { } |
这里通过Import导入了DelegatingWebMvcConfiguration类,下面看看这个类的类声明:
| @Configuration( proxyBeanMethods = false ) public class DelegatingWebMvcConfiguration extends WebMvcConfigurationSupport { } |
这里说明该类是WebMvcConfigurationSupport子类,下面我们再去看看WebMvcAutoConfiguration类声明:
| @Configuration( proxyBeanMethods = false ) @ConditionalOnWebApplication( type = Type.SERVLET ) @ConditionalOnClass({Servlet.class, DispatcherServlet.class, WebMvcConfigurer.class}) @ConditionalOnMissingBean({WebMvcConfigurationSupport.class}) @AutoConfigureOrder(-2147483638) @AutoConfigureAfter({DispatcherServletAutoConfiguration.class, TaskExecutionAutoConfiguration.class, ValidationAutoConfiguration.class}) public class WebMvcAutoConfiguration { } |
当我们使用@EnableWebMvc的时候,通过@Import注解创建WebMvcConfigurationSupport实例(该实例对象被注入到Spring容器),鉴于WebMvcAutoConfiguration的@ConditionalOnMissingBean注解的作用从而导致了WebMvcAutoConfiguration实例无法创建,所以,此时,由开发者完全控制了Spring MVC;
WebMvcConfigurerComposite把所有WebMvcConfigurer实现类都放到List
WebMvcConfigurer接口
WebMvcAutoConfiguration.WebMvcAutoConfigurationAdaptern内部类实现了WebMvcConfigurer接口,下面是内部类的类声明:
| @Configuration( proxyBeanMethods = false ) @Import({WebMvcAutoConfiguration.EnableWebMvcConfiguration.class}) @EnableConfigurationProperties({WebMvcProperties.class, ResourceProperties.class}) @Order(0) public static class WebMvcAutoConfigurationAdapter implements WebMvcConfigurer {
} |
这里Import了WebMvcAutoConfiguration.EnableWebMvcConfiguration类,下面看一下该类的类声明:
| @Configuration( proxyBeanMethods = false ) public static class EnableWebMvcConfiguration extends DelegatingWebMvcConfiguration implements ResourceLoaderAware { } |
该类继承了DelegatingWebMvcConfiguration类,而父类恰恰又是DelegatingWebMvcConfiguration,这里又跟@EnableWebMvc注解类似了,但与@EnableWebMvc注解有本质区别:
@EnableWebMvc注解通过@Import注解把DelegatingWebMvcConfiguration实例注入到Spring容器中,进而导致WebMvcAutoConfiguration找到该实例后,无法被创建;
而EnableWebMvcConfiguration 也是把DelegatingWebMvcConfiguration创建(该类没有声明@Bean/Component),但是该实例是存在于JVM中的,并没有在Spring容器中进行注册,所以,WebMvcAutoConfiguration无法检测到该实例的存在;
总结:如何修改Spring Boot的默认配置
Spring Boot加载模式:
①Spring Boot在自动配置许多组件的时候,先看容器中有没有用户自己配置的组件(@Bean/@Component),如果有则就用用户配置,否则自动配置;
如果组件可以有多个,则将用户配置的、系统默认配置组合在一起,例如:ViewResolver;
②在Spring Boot中,会有很多的XXXConfigurer来帮助我们进行扩展配置;


