Cloud+seata+feign 使用及踩坑(部分内容是我踩坑的时候百度到的内容)
一、seata 安装(用的是seata-server 1.4.2 。PS:截至2022.3.4之前为最新版)
官网链接:https://github.com/seata/seata/releases
使用的是seata的AT模式,什么是AT模式,请参考官方文档(https://seata.io/zh-cn/docs/overview/what-is-seata.html)
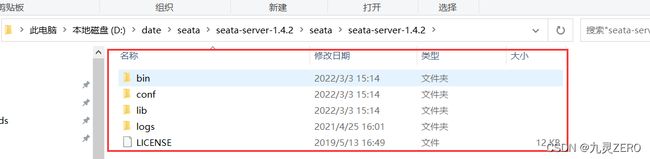
1.下载官方1.4.2的zip压缩包,然后解压.内容如下图。如果不对就是下错了
**前言:**先创建数据库:seata及业务表
DROP TABLE IF EXISTS `storage_tbl`;
CREATE TABLE `storage_tbl` (
  `id` int(11) NOT NULL AUTO_INCREMENT,
  `commodity_code` varchar(255) DEFAULT NULL,
  `count` int(11) DEFAULT 0,
  PRIMARY KEY (`id`),
  UNIQUE KEY (`commodity_code`)
) ENGINE=InnoDB DEFAULT CHARSET=utf8;


DROP TABLE IF EXISTS `order_tbl`;
CREATE TABLE `order_tbl` (
  `id` int(11) NOT NULL AUTO_INCREMENT,
  `user_id` varchar(255) DEFAULT NULL,
  `commodity_code` varchar(255) DEFAULT NULL,
  `count` int(11) DEFAULT 0,
  `money` int(11) DEFAULT 0,
  PRIMARY KEY (`id`)
) ENGINE=InnoDB DEFAULT CHARSET=utf8;


DROP TABLE IF EXISTS `account_tbl`;
CREATE TABLE `account_tbl` (
  `id` int(11) NOT NULL AUTO_INCREMENT,
  `user_id` varchar(255) DEFAULT NULL,
  `money` int(11) DEFAULT 0,
  PRIMARY KEY (`id`)
) ENGINE=InnoDB DEFAULT CHARSET=utf8;

2.第二步,进入conf目录下。打开file.conf。将 mode类型改为db。并在下面找到相应的db配置修改数据库连接url、user、password等,然后保存!
## transaction log store, only used in seata-server
store {
  ## store mode: file、db、redis
  ## 修改它⬇
  mode = "db"
  ## 修改它⬆
  ## rsa decryption public key
  publicKey = ""
  ## file store property
  file {
    ## store location dir
    dir = "sessionStore"
    # branch session size , if exceeded first try compress lockkey, still exceeded throws exceptions
    maxBranchSessionSize = 16384
    # globe session size , if exceeded throws exceptions
    maxGlobalSessionSize = 512
    # file buffer size , if exceeded allocate new buffer
    fileWriteBufferCacheSize = 16384
    # when recover batch read size
    sessionReloadReadSize = 100
    # async, sync
    flushDiskMode = async
  }

  ## database store property 在这里⬇
  db {
    ## the implement of javax.sql.DataSource, such as DruidDataSource(druid)/BasicDataSource(dbcp)/HikariDataSource(hikari) etc.
    datasource = "druid"
    ## mysql/oracle/postgresql/h2/oceanbase etc.
    dbType = "mysql"
    driverClassName = "com.mysql.jdbc.Driver"
    ## if using mysql to store the data, recommend add rewriteBatchedStatements=true in jdbc connection param
    ## 这个数据库是你上面创建的seata的数据库
    url = "jdbc:mysql://127.0.0.1:3306/seata?rewriteBatchedStatements=true"
    user = "mysql"
    password = "mysql"
    minConn = 5
    maxConn = 100
    globalTable = "global_table"
    branchTable = "branch_table"
    lockTable = "lock_table"
    queryLimit = 100
    maxWait = 5000
  }

  ## redis store property
  redis {
    ## redis mode: single、sentinel
    mode = "single"
    ## single mode property
    single {
      host = "127.0.0.1"
      port = "6379"
    }
    ## sentinel mode property
    sentinel {
      masterName = ""
      ## such as "10.28.235.65:26379,10.28.235.65:26380,10.28.235.65:26381"
      sentinelHosts = ""
    }
    password = ""
    database = "0"
    minConn = 1
    maxConn = 10
    maxTotal = 100
    queryLimit = 100
  }
}
- [ 第三步,打开’registry.conf’ ,这里配置的是注册中心信息]
修改type为你当前项目使用的注册中心名称,使用eureka就改成eureka。
我使用的是consul,所以我改成consul。在下面找到consul的配置信息
cluster:项目注册到注册中心以后显示的服务名
serverAddr:注册中心(consul)的IP+端口
registry {
  # file 、nacos 、eureka、redis、zk、consul、etcd3、sofa
  type = "consul"

  nacos {
    application = "seata-server"
    serverAddr = "127.0.0.1:8848"
    group = "SEATA_GROUP"
    namespace = ""
    cluster = "default"
    username = ""
    password = ""
  }
  eureka {
    serviceUrl = "http://localhost:8761/eureka"
    application = "default"
    weight = "1"
  }
  redis {
    serverAddr = "localhost:6379"
    db = 0
    password = ""
    cluster = "default"
    timeout = 0
  }
  zk {
    cluster = "default"
    serverAddr = "127.0.0.1:2181"
    sessionTimeout = 6000
    connectTimeout = 2000
    username = ""
    password = ""
  }
  consul {
    cluster = "default"
    serverAddr = "127.0.0.1:8500"
    aclToken = ""
  }
  etcd3 {
    cluster = "default"
    serverAddr = "http://localhost:2379"
  }
  sofa {
    serverAddr = "127.0.0.1:9603"
    application = "default"
    region = "DEFAULT_ZONE"
    datacenter = "DefaultDataCenter"
    cluster = "default"
    group = "SEATA_GROUP"
    addressWaitTime = "3000"
  }
  file {
    name = "file.conf"
  }
}

config {
  # file、nacos 、apollo、zk、consul、etcd3
  type = "file"

  nacos {
    serverAddr = "127.0.0.1:8848"
    namespace = ""
    group = "SEATA_GROUP"
    username = ""
    password = ""
    dataId = "seataServer.properties"
  }
  consul {
    serverAddr = "127.0.0.1:8500"
    aclToken = ""
  }
  apollo {
    appId = "seata-server"
    ## apolloConfigService will cover apolloMeta
    apolloMeta = "http://192.168.1.204:8801"
    apolloConfigService = "http://192.168.1.204:8080"
    namespace = "application"
    apolloAccesskeySecret = ""
    cluster = "seata"
  }
  zk {
    serverAddr = "127.0.0.1:2181"
    sessionTimeout = 6000
    connectTimeout = 2000
    username = ""
    password = ""
    nodePath = "/seata/seata.properties"
  }
  etcd3 {
    serverAddr = "http://localhost:2379"
  }
  file {
    name = "file.conf"
  }
}
- [ 启动项目:cmd进入bin目录下,启动命令 ]
jhcloud-seata.sh -h 127.0.0.1 -p 8091 -m db -n 1(MAC启动方式)
.\jhcloud-seata.bat -h 127.0.0.1 -p 8091 -m db -n 1 (wind启动方式)
参数说明:
-h: 注册到注册中心的ip (要和注册中心的IP相同,才能注册到注册中心上去,本地就是127.0.0.1了)
-p: seata-server的端口号
-m: 全局事务会话信息存储模式,file、db,优先读取启动参数
-n: Server node,多个Server时,需区分各自节点,用于生成不同区间的transactionId,以免冲突
-
[启动完成之后在A、B服务中引入依赖。谁用谁引,或者引入全局 ]
-
io.seata seata-spring-boot-starter 1.2.0 -
前言给所有服务使用的数据库添加:SEATA AT 模式需要的 UNDO_LOG 表
-- 注意此处0.3.0+ 增加唯一索引 ux_undo_log
CREATE TABLE `undo_log` (
  `id` bigint(20) NOT NULL AUTO_INCREMENT,
  `branch_id` bigint(20) NOT NULL,
  `xid` varchar(100) NOT NULL,
  `context` varchar(128) NOT NULL,
  `rollback_info` longblob NOT NULL,
  `log_status` int(11) NOT NULL,
  `log_created` datetime NOT NULL,
  `log_modified` datetime NOT NULL,
  `ext` varchar(100) DEFAULT NULL,
  PRIMARY KEY (`id`),
  UNIQUE KEY `ux_undo_log` (`xid`,`branch_id`)
) ENGINE=InnoDB AUTO_INCREMENT=1 DEFAULT CHARSET=utf8;
- [ 修改A、B服务的yml配置文件。用的配置是一样的]
#开发配置
server:
  port: 8084

spring:
  profiles:
    active: dev
  application:
    name: jhcloud-portal

  #mysql数据库链接
  datasource:
    driver-class-name: com.mysql.cj.jdbc.Driver
    url: jdbc:mysql://localhost:3306/cloud_portal?useUnicode=true&characterEncoding=UTF-8&autoReconnect=true&serverTimezone=Asia/Shanghai&allowMultiQueries=true&rewriteBatchedStatements=true
    username: root
    password: root
    type: com.zaxxer.hikari.HikariDataSource
    hikari:
      minimum-idle: 5
      maximum-pool-size: 15
      auto-commit: true
      idle-timeout: 30000
      pool-name: MenuHikariCP
      max-lifetime: 1800000
      connection-timeout: 30000
      connection-test-query: SELECT 1

  #consul注册中心
  cloud:
    consul:
      port: 8500
      host: localhost #consul地址
      #      host: 192.168.2.98
      discovery:
        prefer-ip-address: true
        instance-id: ${spring.application.name}:${server.port}
        register: true
        health-check-interval: 60s
        catalog-services-watch-delay: 30
        catalog-services-watch-timeout: 10
        service-name: ${spring.application.name}


  #redis
  redis:
    database: 0
    host: localhost
    port: 6379
    password:
    timeout: 18000
    jedis:
      pool:
        max-active: 4
        max-idle: 20
        min-idle: 1

#mybatis
mybatis:
  configuration:
    map-underscore-to-camel-case: true
    call-setters-on-nulls: true
    variables:
      portal: cloud_portal
      train: cloud_train

  type-aliases-package: cn.jhcloud_common.model
  mapper-locations: classpath*:mapper/**/*Mapper.xml

#监控
management:
  endpoints:
    web:
      exposure:
        include: health #可用性检查


# feign调用超时时间配置
feign:
# 一定要把熔断关掉
  hystrix:
    enabled: false
  client:
    config:
      default:
        connectTimeout: 10000
        readTimeout: 600000
seata:
  enabled: true
  # 事务群组,(可以每个应用独立取名,也可以使用相同的名字)
  tx-service-group: jh_group_seata
  enable-auto-data-source-proxy: true
  client:
    rm-report-success-enable: true
    # 异步提交缓存队列长度(默认10000)
    rm-async-commit-buffer-limit: 1000
    # 一阶段全局提交结果上报TC重试次数(默认1次,建议大于1)
    tm-commit-retry-count:   3
    # 一阶段全局回滚结果上报TC重试次数(默认1次,建议大于1)
    tm-rollback-retry-count: 3
    support:
      # 数据源自动代理开关(默认false关闭)
      spring-datasource-autoproxy: true
  service:
    vgroup-mapping:
    #jh_group_seata对应的是你上面tx-service-group中的名称
    #jhcloud-seata对应的是你registry.conf中定义的名字
      jh_group_seata: jhcloud-seata
    grouplist:
    #这个IP加端口是你seata的IP+端口
      jhcloud-seata: 127.0.0.1:8091
-
[接口调用 ]
-
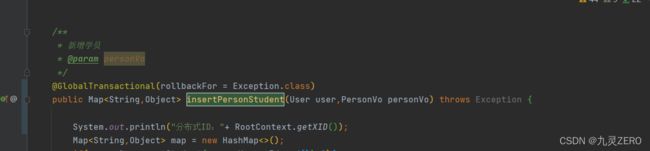
A服务调用B服务,需要在A服务的方法上加一个@GlobalTransactional注解即可。不需要@Transactional注解。
-
-
总结一下遇到的坑
如果你是使用feign跨服务调用接口。注解无效不会滚。检查三步
- 先检查异常是否被try catch捕获或者有无熔断降级
异常被catch后或熔断降级后,全局事务便不感知抛出的异常。建议catch异常后返回异常码给事务发起方(TM),然后事务发起方 ™ 。通过API的方式回滚全局事务。 - debug以下方法:
ExecuteTemplate#execute(List, StatementProxy, StatementCallback
如果没进入这个方法,说明数据源没有代理。
3.如果没进入
if (CollectionUtils.isEmpty(sqlRecognizers)) {
sqlRecognizers = SQLVisitorFactory.get(statementProxy.getTargetSQL(),dbType);
}
没进去说明xid没有传递
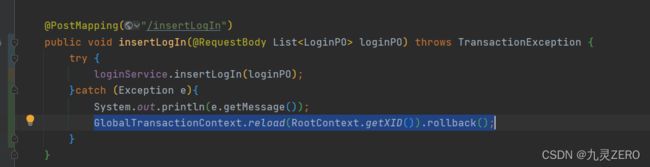
第一种解决方法:使用以下方法手动回滚
GlobalTransactionContext.reload(RootContext.getXID()).rollback();
第二方法解决:使用下面的方法配置代理数据源。
并且在启动类上加:(不适用于多数据源)
@Import(DataSourceConfig.class) //DataSourceConfig是上面配置文件的
@SpringBootApplication(exclude = {DataSourceAutoConfiguration.class})
package cn.jhcloud_common.config;

import com.alibaba.druid.pool.DruidDataSource;
import io.seata.rm.datasource.DataSourceProxy;
import org.springframework.beans.factory.annotation.Autowired;
import org.springframework.context.annotation.Bean;
import org.springframework.context.annotation.Configuration;
import org.springframework.context.annotation.Primary;
import org.springframework.core.env.Environment;

import javax.annotation.Resource;
import javax.sql.DataSource;

@Configuration
public class DataSourceConfig {

    @Resource
    private Environment env;

    @Bean
    public DataSource getDataSource() {
        DruidDataSource dataSource = new DruidDataSource();
        dataSource.setUrl(env.getProperty("spring.datasource.url"));
        dataSource.setUsername(env.getProperty("spring.datasource.username"));
        dataSource.setPassword(env.getProperty("spring.datasource.password"));
        dataSource.setDriverClassName(env.getProperty("spring.datasource.driver-class-name"));
        //这上面是获取配置文件中的信息,url,username,password,driverclassname等
        return dataSource;
    }

    @Primary
    @Bean("dataSource")
    public DataSourceProxy dataSource(DataSource druidDataSource) {
        return new DataSourceProxy(druidDataSource);
    }

}
第三种解决方法,XID没有传递。再FeignConfig中配置:requestTemplate.header(RootContext.KEY_XID, RootContext.getXID());
package cn.jhcloud_common.config;

import javax.servlet.http.HttpServletRequest;
import io.seata.core.context.RootContext;
import org.springframework.context.annotation.Configuration;
import org.springframework.http.HttpHeaders;
import org.springframework.web.context.request.RequestContextHolder;
import org.springframework.web.context.request.ServletRequestAttributes;
import feign.RequestInterceptor;
import feign.RequestTemplate;
@Configuration
public class FeignConfig implements RequestInterceptor {

    @Override
    public void apply(RequestTemplate requestTemplate) {
        ServletRequestAttributes attributes = (ServletRequestAttributes)RequestContextHolder.getRequestAttributes();
        HttpServletRequest request = attributes.getRequest();
        requestTemplate.header(HttpHeaders.AUTHORIZATION, request.getHeader(HttpHeaders.AUTHORIZATION));
        //seata分布式事务
          requestTemplate.header(RootContext.KEY_XID, RootContext.getXID());
    }

}
***4: 补充报错异常一:io.seata.common.exception.NotSupportYetException: xxx contains multi PK, but current not support。
这个问题的意思是说一张数据库表不能有两个或者两个以上的主键。
解决办法:把多余主键清除,只保留一个主键。如果是中间表这种,有复合主键的,只能改为唯一主键。好像暂时没别的办法!
- [ 补充问题2:]
A服务使用feign跨服务调用B服务接口,A、B服务 都需要加@GlobalTransactional 分布式事务注解,并且@GlobalTransactional之前 不能有@Transactional 本地事务注解。不然可能会出现回滚不了或者报错!(也就是A调B整个流程不能出现@Transactional)
还有一个方法上加了@GlobalTransactional就不要再加@Transactional。只要一个分布式事务注解就可以了。
不然可能会报找不到全局事务的异常,嗯,反正我是报了。也可能是是我个人问题,反正是早着记录一下


20220929:遇到的新问题补充。
如果你项目yml使用的是:com.mysql.cj.jdbc.Driver

seata也是用的是:com.mysql.cj.jdbc.Driver
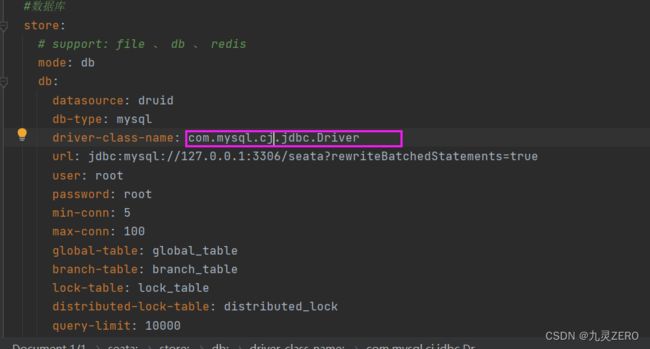
这个时候你网上找的办法都失败了,可以试试把seata项目里面的cj去掉,
使用:com.mysql.jdbc.Driver
PS:(时间紧,任务重)所以没有时间去找原因。见谅
多数据源(MyBatis-Plus)情况下如何Client端yml配置seata
(20221009–补充)
#开发配置
server:
  port: 8086
  tomcat:
    uri-encoding: UTF-8
    max-threads: 1000
    min-spare-threads: 500

spring:
  profiles:
    active: dev
  application:
    name: @artifactId@

  #mysql数据库链接
  datasource:
    dynamic:
      primary: train #设置默认的数据源或者数据源组,train
      strict: true #严格匹配数据源,默认false. true未匹配到指定数据源时抛异常,false使用默认数据源
      # 主要是下面那两句
      # 开启seata代理,开启后默认每个数据源都代理,如果某个不需要代理可单独关闭
      seata: true
      #支持XA及AT模式,默认AT
      seata-mode: AT
      druid:
        initialSize: 1
        minIdle: 3
        maxActive: 20
        # 配置获取连接等待超时的时间
        maxWait: 60000
        # 配置间隔多久才进行一次检测,检测需要关闭的空闲连接,单位是毫秒
        timeBetweenEvictionRunsMillis: 60000
        # 配置一个连接在池中最小生存的时间,单位是毫秒
        minEvictableIdleTimeMillis: 30000
        validationQuery: select 'x'
        testWhileIdle: true
        testOnBorrow: false
        testOnReturn: false
        # 打开PSCache,并且指定每个连接上PSCache的大小
        poolPreparedStatements: true
        maxPoolPreparedStatementPerConnectionSize: 20
        # 配置监控统计拦截的filters,去掉后监控界面sql无法统计,'wall'用于防火墙
        filters: config,stat,slf4j
        # 通过connectProperties属性来打开mergeSql功能;慢SQL记录
        connectionProperties: druid.stat.mergeSql=true;druid.stat.slowSqlMillis=5000;
        # 合并多个DruidDataSource的监控数据
        useGlobalDataSourceStat: true
      datasource:
        train:
          driver-class-name: com.mysql.cj.jdbc.Driver
          url: jdbc:mysql://127.0.0.1:3306/cloud_train?useUnicode=true&characterEncoding=UTF-8&autoReconnect=true&serverTimezone=Asia/Shanghai&allowMultiQueries=true&rewriteBatchedStatements=true
          username: root
          password: root
          type: com.zaxxer.hikari.HikariDataSource
          hikari:
            minimum-idle: 100
            maximum-pool-size: 1000
            auto-commit: true
            idle-timeout: 30000
            pool-name: MenuHikariCP
            max-lifetime: 1800000
            connection-timeout: 30000
            # 配置多久进行一次检测,检测需要关闭的空闲连接 单位毫秒
            timeBetweenEvictionRunsMillis: 30000
            validationQuery: SELECT 1 FROM dual
            max-threads: 100

        question:
          url: jdbc:mysql://127.0.0.1:3306/cloud_doctor_question?useUnicode=true&characterEncoding=UTF-8&autoReconnect=true&serverTimezone=Asia/Shanghai&allowMultiQueries=true&rewriteBatchedStatements=true
          username: root
          password: root
          driver-class-name: com.mysql.cj.jdbc.Driver
          type: com.zaxxer.hikari.HikariDataSource
          hikari:
            minimum-idle: 100
            maximum-pool-size: 1000
            auto-commit: true
            idle-timeout: 30000
            pool-name: MenuHikariCP
            max-lifetime: 1800000
            connection-timeout: 30000
            # 配置多久进行一次检测,检测需要关闭的空闲连接 单位毫秒
            timeBetweenEvictionRunsMillis: 30000
            validationQuery: SELECT 1 FROM dual
            max-threads: 100

  #consul注册中心
  cloud:
    consul:
      port: 8500
      host: localhost
      #      host: 127.0.0.1
      discovery:
        prefer-ip-address: true
        instance-id: ${spring.application.name}:${server.port}:${spring.cloud.client.ip-address}
        register: true
        health-check-path: /health/check
        health-check-interval: 2s
        health-check-timeout: 10s
        catalog-services-watch-delay: 30
        catalog-services-watch-timeout: 10
        service-name: ${spring.application.name}
#        ip-address: 39.104.26.32 # 当有多个IP时,手动指定IP


  #redis
  redis:
    database: 0
    host: localhost
    port: 6379
    password:
    timeout: 18000
    jedis:
      pool:
        max-active: 4
        max-idle: 20
        min-idle: 1

  #强制开启utf8编码
  http:
    encoding:
      force: true
      charset: UTF-8
      enabled: true

#mybatis
mybatis:
  configuration:
    map-underscore-to-camel-case: true
  type-aliases-package: cn.jhcloud_common.model
  mapper-locations: classpath*:mapper/**/*Mapper.xml
#监控
management:
  endpoints:
    web:
      exposure:
        include: '*' # Endpoint IDs that should be included or '*' for all.

#日志
logging:
  level:
    root: trace

#密码加密所用
password:
  key: jh

#禁用httpclient而使用okhttp
feign:
  httpclient:
    enabled: false
  okhttp:
    enabled: true
    #连接、时间
  client:
    config:
      default:
        connectTimeout: 60000
        readTimeout: 60000
#
security:
  oauth2:
    resource:
      user-info-uri: http://jhcloud-portal/auth/currentUser  #校验token,并且返回user信息
      loadBalanced: true

mybatis-plus:
  global-config:
    db-config:
      id-type: 0
      table-prefix:
      table-underline: false
  configuration:
    log-impl: org.apache.ibatis.logging.stdout.StdOutImpl
    map-underscore-to-camel-case: false
    call-setters-on-nulls: true

seata:
  enabled: true
  # 事务群组(可以每个应用独立取名,也可以使用相同的名字)
  tx-service-group: jh_group_seata
  # 一定要是false
  enable-auto-data-source-proxy: false
  client:
    # 修复分布式事务1分钟超时问题,默认为一分钟现在为20分钟。单位毫秒
    tm:
      defaultGlobalTransactionTimeout: 1200000
      # 降级开关(默认:false)。业务侧根据连续错误数自动降级不走seata事务
      degradeCheck: true
    rm-report-success-enable: true
    # 异步提交缓存队列长度(默认10000)
    rm-async-commit-buffer-limit: 10000
    # 一阶段全局提交结果上报TC重试次数(默认1次,建议大于1)
    tm-commit-retry-count:   10
    # 一阶段全局回滚结果上报TC重试次数(默认1次,建议大于1)
    tm-rollback-retry-count: 10
    support:
      # 数据源自动代理开关(默认false关闭)
      spring-datasource-autoproxy: false
  service:
    vgroup-mapping:
      jh_group_seata: jhcloud-seata
    grouplist:
      jhcloud-seata: 127.0.0.1:8091